2007 PONTIAC TORRENT AUX
[x] Cancel search: AUXPage 250 of 490

Using the DVD Player
The DVD player is controlled by the buttons on
the remote control, by the RSA system, or by the
buttons on the radio faceplate. See “Remote
Control”, underRear Seat Entertainment System
on page 274for more information.
The DVD player is only compatible with DVDs of
the appropriate region code that is printed on
the jacket of most DVDs.
The DVD slot of the radio is compatible with most
audio CDs, CD-R, CD-RW, DVD-Video,
DVD-Audio, DVD-R/RW, DVD+R/RW media along
with MP3 and WMA formats.
If an error message appears on the video screen
or the radio, see “DVD Display Error Messages”
under,Rear Seat Entertainment System on
page 274and “DVD Radio Error Messages” in this
section for more information.
Playing a DVD
DVD/CD AUX (Auxiliary):Press this button to
cycle through DVD, CD, or Auxiliary when listening
to the radio. The DVD/CD text label and a message
showing track or chapter number appears on the
display when a disc is in either slot. Press this
button again and the system automatically
searches for an auxiliary input device, such as a
portable audio player. If a portable audio player is
not connected, “No Aux Input Device” appears on
the display. If a disc is in both the DVD slot and the
CD slot the DVD/CD AUX button cycles between
the two sources and does not indicate “No Aux
Input Device”. If a front auxiliary device is
connected, the DVD/CD AUX button cycles through
all available options, such as: DVD slot, CD slot,
Front AUX, and Rear AUX (if available). See “Using
the Auxiliary Input Jack(s)” later in this section, or
Rear Seat Entertainment System on page 274,
“Audio/Video (A/V) Jacks” for more information.
250
Page 255 of 490
Stopping and Resuming Playback
To stop playing a DVD without turning off the
system, press the stop button on the remote
control, or press the pushbutton located under the
stop or the play/pause symbol tags displayed
on the radio. If the radio head is sourced to
something other than DVD-V, press the DVD/CD
AUX button to make DVD-V the active source.
To resume DVD playback, press the play/pause
button on the remote control, or press the
pushbutton located under the play/pause symbol
tag displayed on the radio. The DVD should resume
play from where it last stopped if the disc has not
been ejected and the stop button has not been
pressed twice on the remote control. If the disc has
been ejected or the stop button has been pressed
twice on the remote control, the disc resumes
playing at the beginning of the disc.
Ejecting a Disc
Press the eject button on the radio to eject the
disc. If a disc is ejected from the radio, but
not removed, the radio reloads the disc after a
short period of time. The disc is stored in the radio.
The radio does not resume play of the disc
automatically. If the RSA system is sourced to the
DVD, the movie when reloaded into the DVD
player begins to play again. In case loading and
reading of a DVD or CD cannot be completed
(unknown format, etc.), and the disc fails to eject,
press and hold the DVD Eject button more
than 5 seconds to force the disc to eject.
DVD Radio Error Messages
Player Error:This message is displayed when
there are disc load or eject problems.
Disc Format Error:This message appears on
the display, if the disc is inserted with the disc label
wrong side up, or if the disc is damaged.
Disc Region Error:This message appears on
the display, if the disc is not from a correct region.
No Disc Inserted:This message appears on the
display, if no disc is present when the EJECT or
DVD/CD AUX button is pressed on the radio.
255
Page 256 of 490
Using the Auxiliary Input Jack(s)
Your radio system has an auxiliary input jack
located on the lower right side of the faceplate.
This is not an audio output; do not plug the
headphone set into the front auxiliary input jack.
You can however, connect an external audio
device such as an iPod, laptop computer,
MP3 player, CD player, or cassette tape player,
etc. to the auxiliary input jack for use as another
source for audio listening.
Drivers are encouraged to set up any auxiliary
device while the vehicle is in park (P). See
Defensive Driving on page 290for more
information on driver distraction.
To use a portable audio player, connect a 3.5 mm
(1/8 inch) cable to the radio’s front auxiliary
input jack. When a device is connected, the radio
automatically begins playing audio from the
device over the vehicle speakers.To listen to a device through the rear auxiliary
input over the speakers, cycle the DVD/CD Aux
button on the radio faceplate until “Rear Aux Input”
displays on the radio. The RSA or DVD Screen
must be on in order for the radio to source to rear
auxiliary.
O(Power/Volume):Turn this knob clockwise or
counterclockwise to increase or decrease the
volume of the portable player. You may need to
do additional volume adjustments from the portable
device.
BAND:Press this button to listen to the radio
when a portable audio device is playing. The
portable audio device continues playing, so you
may want to stop it or power it off.
256
Page 257 of 490
DVD/CD AUX (CD/Auxiliary):Press this button to
cycle through DVD, CD, or Auxiliary when
listening to the radio. The DVD/CD text label and
a message showing track or chapter number
appears on display when a disc is in either slot.
Press this button again and the system
automatically searches for an auxiliary input
device, such as a portable audio player. If a
portable audio player is not connected, “No Aux
Input Device” appears on the display. If a disc is in
both the DVD slot and the CD slot the DVD/CD
AUX button cycles between the two sources
and does not indicate “No Aux Input Device”. If a
front auxiliary device is connected, the
DVD/CD AUX button cycles through all available
options, such as: DVD slot, CD slot, Front
AUX, and Rear AUX (if available). See “Using the
Auxiliary Input Jack(s)” later in this section, or
Rear Seat Entertainment System on page 274,
“Audio/Video (A/V) Jacks” for more information.Using an MP3 (Radio with CD or
Six-Disc CD Player)
MP3/WMA CD-R or CD-RW Disc
The radio plays MP3 and WMA �les that were
recorded on a CD-R or CD-RW disc. The �les can
be recorded with the following �xed bit rates:
32 kbps, 40 kbps, 56 kbps, 64 kbps, 80 kbps,
96 kbps, 112 kbps, 128 kbps, 160 kbps, 192 kbps,
224 kbps, 256 kbps, and 320 kbps or a variable
bit rate. Song title, artist name, and album
are displayed by the radio when recorded using
ID3 tags version 1 and 2.
Compressed Audio
The radio also plays discs that contain both
uncompressed CD audio (.CDA �les) and
MP3/WMA �les. By default the radio reads only
the uncompressed audio and ignores the
MP3/WMA �les. Pressing the CAT (category)
button toggles between compressed and
uncompressed audio format.
257
Page 263 of 490
To change from playback by artist to playback by
album, press the pushbutton located below the
Sort By label. From the sort screen, push one of
the buttons below the album button. Press the
pushbutton below the back label to return to the
main music navigator screen. Now the album
name is displayed on the second line between the
arrows and songs from the current album begins
to play. Once all songs from that album are played,
the player moves to the next album in alphabetical
order on the CD-R and begin playing MP3 �les
from that album.
To exit music navigator mode, press the
pushbutton below the Back label to return to
normal MP3 playback.BAND:Press this button to listen to the radio
when a CD is playing. The CD remains safely
inside the radio for future listening.
CD/AUX (CD/Auxiliary):Press this button to play
a CD when listening to the radio. The CD icon
and a message showing disc and/or track number
appears on the display when a CD is in the
player. Press this button again and the system
automatically searches for an auxiliary input device
such as a portable audio player. If a portable
audio player is not connected, “No Input Device
Found” appears on the display.
263
Page 271 of 490
To change from playback by artist to playback by
album, press the pushbutton located below the Sort
By label. From the sort screen, push one of the
buttons below the album button. Press the
pushbutton below the back label to return to the
main music navigator screen. The album name
displays on the second line between the arrows and
songs from the current album begins to play. Once
all songs from that album are played, the player
moves to the next album in alphabetical order on
the CD-R and begins playing MP3 �les from that
album.
To exit music navigator mode, press the
pushbutton below the Back label to return to normal
MP3 playback.
BAND:Press this button to listen to the radio
when a CD or a DVD is playing. The CD or DVD
remains safely inside the radio for future
listening or viewing entertainment.
DVD/CD AUX (Auxiliary):Press this button to
cycle through DVD, CD, or Auxiliary when listening
to the radio. The DVD/CD text label and a
message showing track or chapter number
appears on display when a disc is in either slot.Press this button again and the system
automatically searches for an auxiliary input
device, such as a portable audio player. If a
portable audio player is not connected, “No Aux
Input Device” appears on the display. If a disc is in
both the DVD slot and the CD slot the DVD/CD
AUX button cycles between the two sources
and does not indicate “No Aux Input Device”. If a
front auxiliary device is connected, the
DVD/CD AUX button cycles through all available
options, such as: DVD slot, CD slot, Front
AUX, and Rear AUX (if available). See “Using the
Auxiliary Input Jack(s)” later in this section, or
Rear Seat Entertainment System on page 274
Rear Seat Entertainment System, “Audio/Video
(A/V) Jacks” for more information.
If a MP3 is inserted into top DVD slot, the rear
seat operator can turn on the video screen
and use the remote control to navigate the CD
(tracks only) through the remote control.
271
Page 275 of 490
To enable Parental Control press and hold the
radio power button for more than 2 seconds. If on,
the radio and video screen will turn off. If a
DVD and/or CD is playing, it will be stopped.
A “padlock” icon or a text message may be
displayed on the radio display depending on which
radio you have, while Parental Control is on.
The radio can be turned back on with a single
press of the power button and used normally, but
the RSE system will remain in Parental Control.
To turn off Parental Control, press and hold
the radio power button for more than 2 seconds.
The video screen will return to the state they were
in before Parental Control was turned on. The
“padlock” icon will disappear from the radio
display.
Parental Control can also be turned off by inserting
or ejecting any disc, an ignition cycle, or pressing
the “play” icon on the radio DVD display menu.Headphones
The RSE includes two sets of wireless
headphones that are only dedicated to this
system. These headphones are used to listen to
the DVD radio or an auxiliary device connected to
the RCA jacks. The wireless headphones have
an ON/OFF switch and a volume control.
To use the headphones, turn the switch to ON.
An indicator light located on the headphones
will illuminate. If the light does not illuminate, the
batteries may need to be replaced. See “Battery
Replacement” later in this section for more
information. Switch the headphones to OFF when
not in use.
The infrared transmitters are located in the display
below the video screen. The headphones will
shut off automatically to save the battery power if
the RSE system and RSA are shut off or if the
headphones are out of range of the transmitters for
more than three minutes. If you move too far
forward or step out of the vehicle, the headphones
will lose the audio signal.
To adjust the volume on the headphones, use the
volume control located on the right side.
275
Page 277 of 490
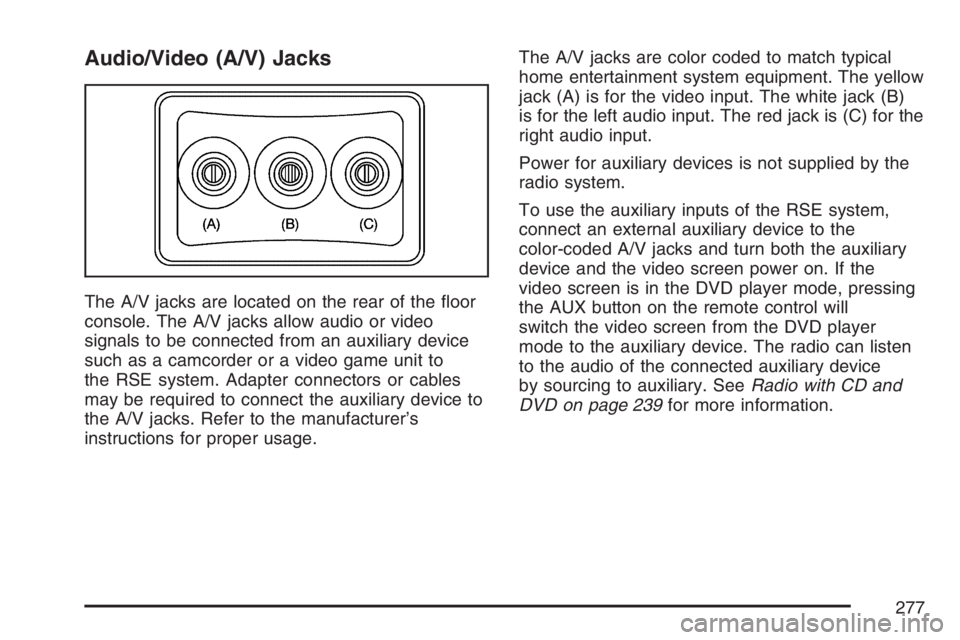
Audio/Video (A/V) Jacks
The A/V jacks are located on the rear of the �oor
console. The A/V jacks allow audio or video
signals to be connected from an auxiliary device
such as a camcorder or a video game unit to
the RSE system. Adapter connectors or cables
may be required to connect the auxiliary device to
the A/V jacks. Refer to the manufacturer’s
instructions for proper usage.The A/V jacks are color coded to match typical
home entertainment system equipment. The yellow
jack (A) is for the video input. The white jack (B)
is for the left audio input. The red jack is (C) for the
right audio input.
Power for auxiliary devices is not supplied by the
radio system.
To use the auxiliary inputs of the RSE system,
connect an external auxiliary device to the
color-coded A/V jacks and turn both the auxiliary
device and the video screen power on. If the
video screen is in the DVD player mode, pressing
the AUX button on the remote control will
switch the video screen from the DVD player
mode to the auxiliary device. The radio can listen
to the audio of the connected auxiliary device
by sourcing to auxiliary. SeeRadio with CD and
DVD on page 239for more information.
277