2007 NISSAN VERSA ECO mode
[x] Cancel search: ECO modePage 10 of 304

HATCHBACK MODEL
1. Rear hatch opener switch (P. 3-24)
2. Rear window defroster switch (P. 2-18)
3. Antenna (P. 4-27)
4. Child safety locks (P. 3-6)
5. Fuel-filler door (P. 3-28)
6. Fuel-filler cap, fuel recommendation
(P. 3-28, P. 9-3)
7. Replacing bulbs (P. 8-26)
8. Interior hatch release (P. 3-25)
9. Rear window washer (P. 2-18)
See the page number indicated in paren-
theses for operating details.
WII0093
EXTERIOR REAR
0-4Illustrated table of contents
ZREVIEW COPYÐ2007 Versa(vrs)
Owners ManualÐUSA_English(nna)
10/05/06Ðdebbie
X
Page 11 of 304

SEDAN MODEL
1. Interior trunk lid release (P.3-27 )
2. Rear window defroster switch (P. 2-18)
3. Antenna (P. 4-27)
4. Child safety locks (P. 3-6)
5. Fuel-filler door (P. 3-28)
6. Fuel-filler cap, fuel recommendation
(P. 3-28, P. 9-3)
7. Replacing bulbs (P. 8-26)
8. Trunk opener switch/Intelligent Key
request switch (P. 3-26 / 3-13)
See the page number indicated in paren-
theses for operating details.
WII0102
Illustrated table of contents0-5
ZREVIEW COPYÐ2007 Versa(vrs)
Owners ManualÐUSA_English(nna)
10/05/06Ðdebbie
X
Page 20 of 304
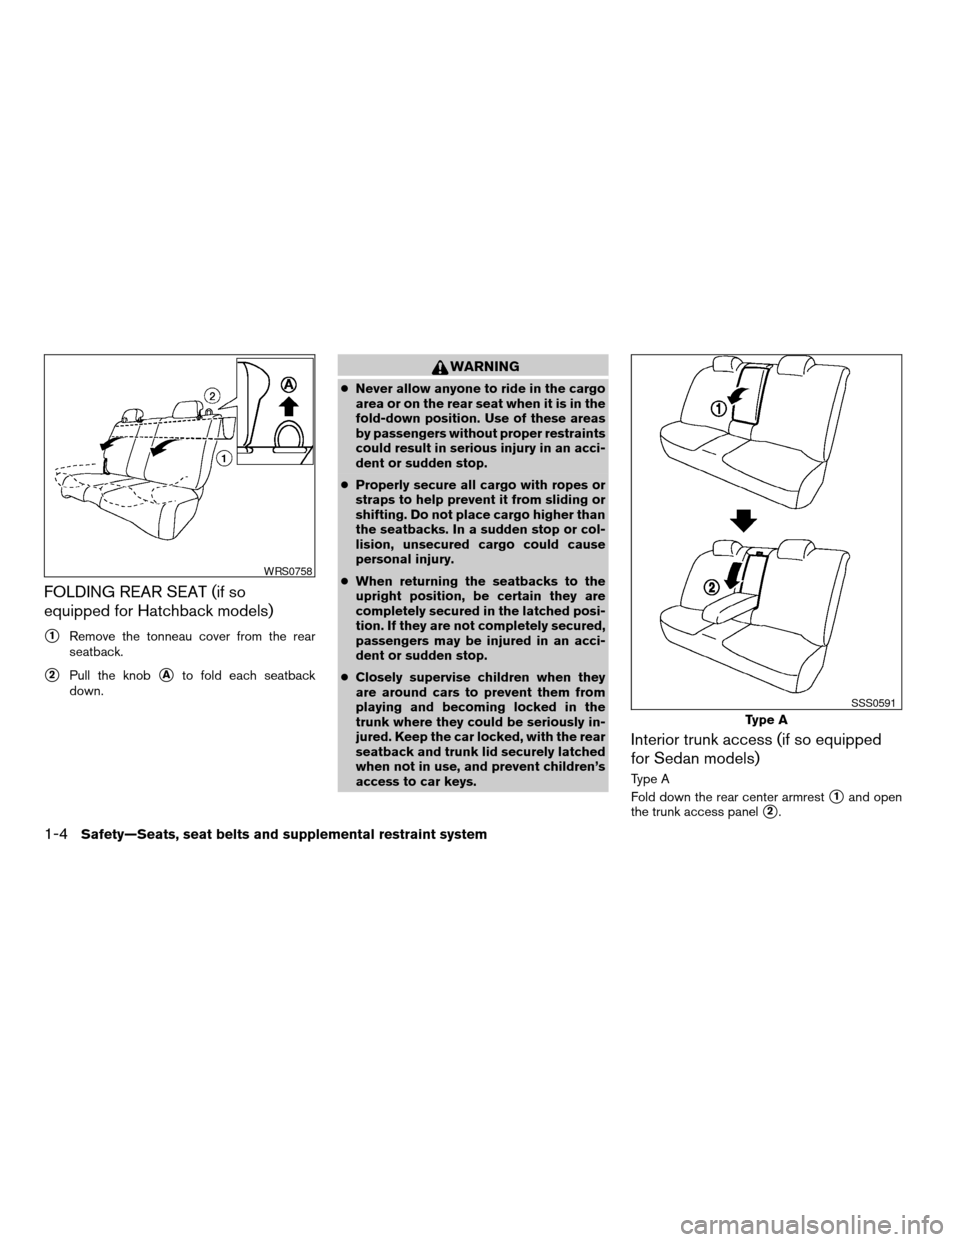
FOLDING REAR SEAT (if so
equipped for Hatchback models)
s1Remove the tonneau cover from the rear
seatback.
s2Pull the knobsAto fold each seatback
down.
WARNING
cNever allow anyone to ride in the cargo
area or on the rear seat when it is in the
fold-down position. Use of these areas
by passengers without proper restraints
could result in serious injury in an acci-
dent or sudden stop.
cProperly secure all cargo with ropes or
straps to help prevent it from sliding or
shifting. Do not place cargo higher than
the seatbacks. In a sudden stop or col-
lision, unsecured cargo could cause
personal injury.
cWhen returning the seatbacks to the
upright position, be certain they are
completely secured in the latched posi-
tion. If they are not completely secured,
passengers may be injured in an acci-
dent or sudden stop.
cClosely supervise children when they
are around cars to prevent them from
playing and becoming locked in the
trunk where they could be seriously in-
jured. Keep the car locked, with the rear
seatback and trunk lid securely latched
when not in use, and prevent children’s
access to car keys.
Interior trunk access (if so equipped
for Sedan models)
Type A
Fold down the rear center armrest
s1and open
the trunk access panel
s2.
WRS0758
Type A
SSS0591
1-4Safety—Seats, seat belts and supplemental restraint system
ZREVIEW COPYÐ2007 Versa(vrs)
Owners ManualÐUSA_English(nna)
10/05/06Ðdebbie
X
Page 39 of 304
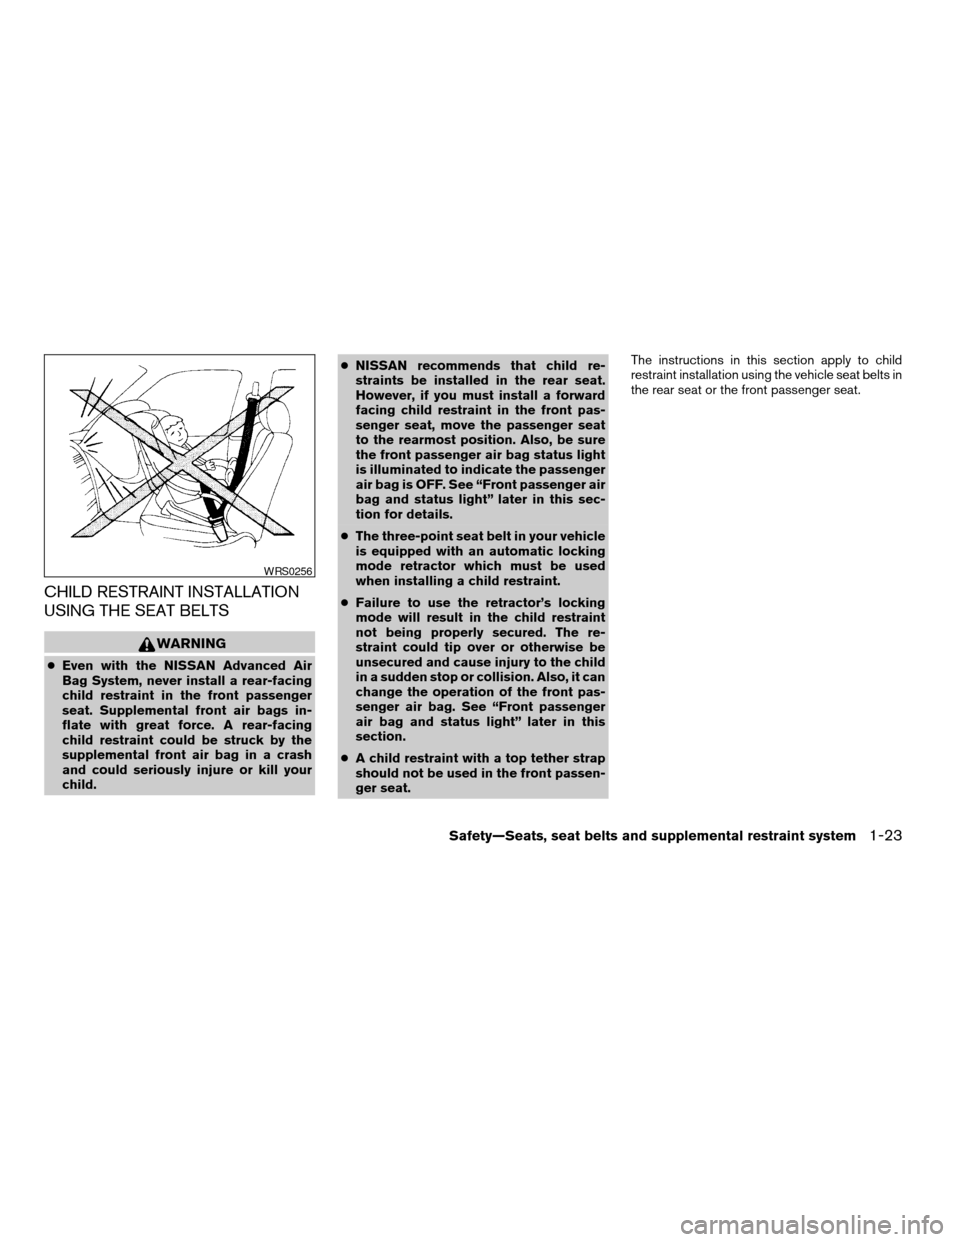
CHILD RESTRAINT INSTALLATION
USING THE SEAT BELTS
WARNING
cEven with the NISSAN Advanced Air
Bag System, never install a rear-facing
child restraint in the front passenger
seat. Supplemental front air bags in-
flate with great force. A rear-facing
child restraint could be struck by the
supplemental front air bag in a crash
and could seriously injure or kill your
child.cNISSAN recommends that child re-
straints be installed in the rear seat.
However, if you must install a forward
facing child restraint in the front pas-
senger seat, move the passenger seat
to the rearmost position. Also, be sure
the front passenger air bag status light
is illuminated to indicate the passenger
air bag is OFF. See “Front passenger air
bag and status light” later in this sec-
tion for details.
cThe three-point seat belt in your vehicle
is equipped with an automatic locking
mode retractor which must be used
when installing a child restraint.
cFailure to use the retractor’s locking
mode will result in the child restraint
not being properly secured. The re-
straint could tip over or otherwise be
unsecured and cause injury to the child
in a sudden stop or collision. Also, it can
change the operation of the front pas-
senger air bag. See “Front passenger
air bag and status light” later in this
section.
cA child restraint with a top tether strap
should not be used in the front passen-
ger seat.The instructions in this section apply to child
restraint installation using the vehicle seat belts in
the rear seat or the front passenger seat.
WRS0256
Safety—Seats, seat belts and supplemental restraint system1-23
ZREVIEW COPYÐ2007 Versa(vrs)
Owners ManualÐUSA_English(nna)
10/05/06Ðdebbie
X
Page 45 of 304
7. Check that the retractor is in the automatic
locking mode by trying to pull more seat belt
out of the retractor. If you cannot pull any
more seat belt webbing out of the retractor,
the retractor is in the automatic locking
mode
8. Check to make sure that the child restraint is
properly secured prior to each use. If the belt
is not locked, repeat steps 3 through 7.
After the child restraint is removed and the seat
belt fully retracted, the automatic locking mode
(child restraint mode) is canceled.
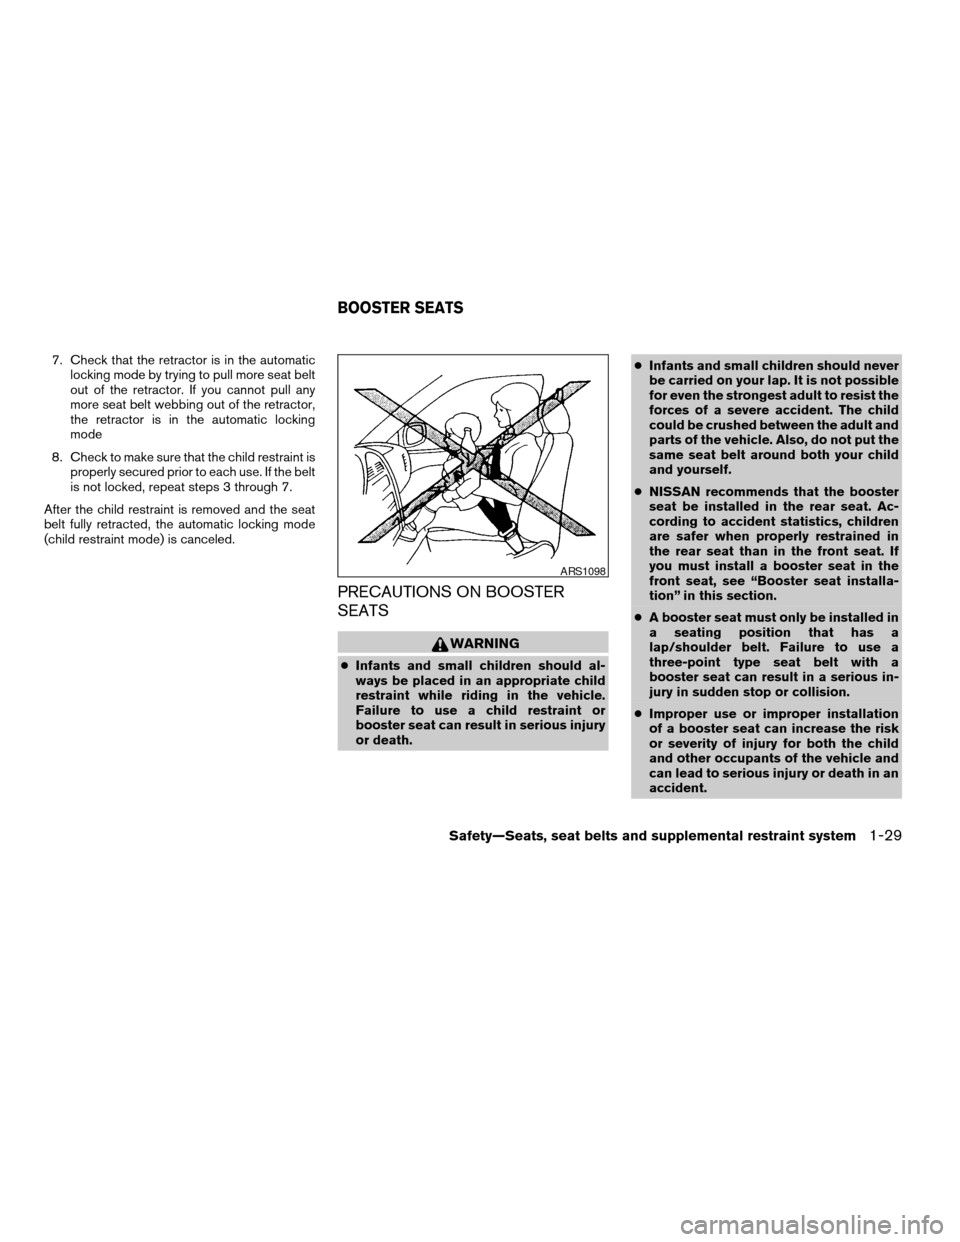
PRECAUTIONS ON BOOSTER
SEATS
WARNING
cInfants and small children should al-
ways be placed in an appropriate child
restraint while riding in the vehicle.
Failure to use a child restraint or
booster seat can result in serious injury
or death.cInfants and small children should never
be carried on your lap. It is not possible
for even the strongest adult to resist the
forces of a severe accident. The child
could be crushed between the adult and
parts of the vehicle. Also, do not put the
same seat belt around both your child
and yourself.
cNISSAN recommends that the booster
seat be installed in the rear seat. Ac-
cording to accident statistics, children
are safer when properly restrained in
the rear seat than in the front seat. If
you must install a booster seat in the
front seat, see “Booster seat installa-
tion” in this section.
cA booster seat must only be installed in
a seating position that has a
lap/shoulder belt. Failure to use a
three-point type seat belt with a
booster seat can result in a serious in-
jury in sudden stop or collision.
cImproper use or improper installation
of a booster seat can increase the risk
or severity of injury for both the child
and other occupants of the vehicle and
can lead to serious injury or death in an
accident.
ARS1098
BOOSTER SEATS
Safety—Seats, seat belts and supplemental restraint system1-29
ZREVIEW COPYÐ2007 Versa(vrs)
Owners ManualÐUSA_English(nna)
10/05/06Ðdebbie
X
Page 47 of 304
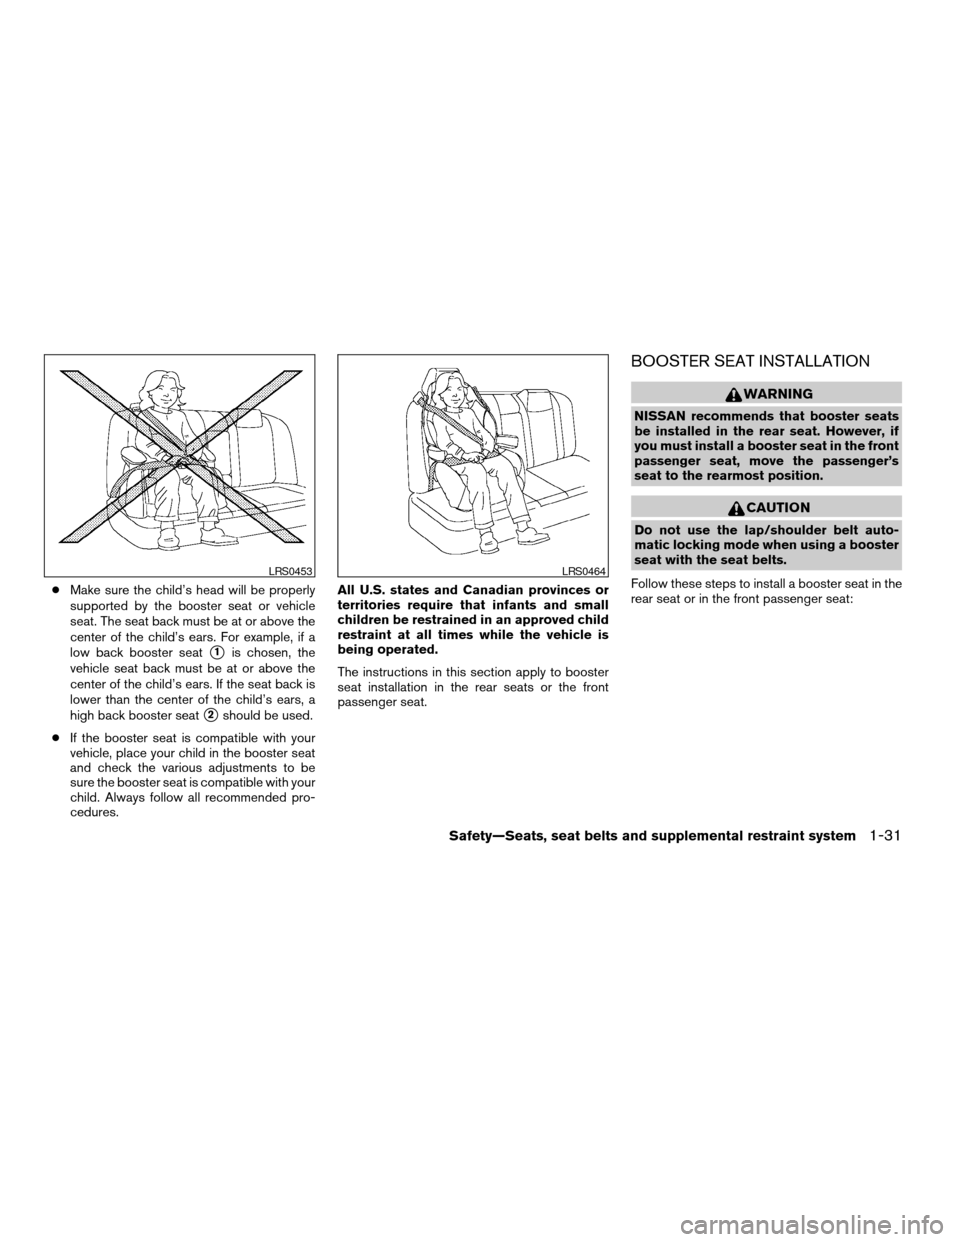
cMake sure the child’s head will be properly
supported by the booster seat or vehicle
seat. The seat back must be at or above the
center of the child’s ears. For example, if a
low back booster seat
s1is chosen, the
vehicle seat back must be at or above the
center of the child’s ears. If the seat back is
lower than the center of the child’s ears, a
high back booster seat
s2should be used.
cIf the booster seat is compatible with your
vehicle, place your child in the booster seat
and check the various adjustments to be
sure the booster seat is compatible with your
child. Always follow all recommended pro-
cedures.All U.S. states and Canadian provinces or
territories require that infants and small
children be restrained in an approved child
restraint at all times while the vehicle is
being operated.
The instructions in this section apply to booster
seat installation in the rear seats or the front
passenger seat.
BOOSTER SEAT INSTALLATION
WARNING
NISSAN recommends that booster seats
be installed in the rear seat. However, if
you must install a booster seat in the front
passenger seat, move the passenger’s
seat to the rearmost position.
CAUTION
Do not use the lap/shoulder belt auto-
matic locking mode when using a booster
seat with the seat belts.
Follow these steps to install a booster seat in the
rear seat or in the front passenger seat:
LRS0453LRS0464
Safety—Seats, seat belts and supplemental restraint system1-31
ZREVIEW COPYÐ2007 Versa(vrs)
Owners ManualÐUSA_English(nna)
10/05/06Ðdebbie
X
Page 59 of 304

Status light
The front passenger air bag status light
is
located near the climate controls. The light oper-
ates as follows:
cUnoccupied passenger’s seat: The
is
OFF and the front passenger air bag is OFF
and will not inflate in a crash.
cPassenger’s seat occupied by a small adult,
child or child restraint as outlined in this
section: The
illuminates to indicate
that the front passenger air bag is OFF and
will not inflate in a crash.
cOccupied passenger seat and the passen-
ger meet the conditions outlined in this sec-
tion: The light
is OFF to indicate that
the front passenger air bag is operational.
Front passenger air bag
The front passenger air bag is designed to auto-
matically turn OFF when the vehicle is operated
under some conditions as described below in
accordance with U.S. regulations. If the front
passenger air bag is OFF, it will not inflate in a
crash. The driver air bag and other air bags in your
vehicle are not part of this system.
The purpose of the regulation is to help reduce
the risk of injury or death from an inflating air bag
to certain front passenger seat occupants, suchas children, by requiring the air bag to be auto-
matically turned OFF. Certain sensors are used
to meet the requirements.
One sensor used is the occupant classification
sensor (pressure sensor) . It is in the bottom of the
front passenger seat cushion and is designed to
detect an occupant and objects on the seat by
weight. It works together with seat belt sensors
described later. For example, if a child is in the
front passenger seat, the advanced air bag sys-
tem is designed to turn the passenger air bag
OFF in accordance with the regulations. Also, if a
child restraint of the type specified in the regula-
tions is on the seat, its weight and the child’s
weight can be detected and cause the air bag to
turn OFF. Occupant classification sensor opera-
tion can vary depending on the front passenger
seat belt sensors.
The front passenger seat belt sensors are de-
signed to detect if the seat belt is buckled and the
amount of tension on the seat belt, such as when
it is in the automatic locking mode (child restraint
mode) . Based on the weight on the seat detected
by the occupant classification sensor and the belt
tension detected on the seat belt, the advanced
air bag system determines whether the front pas-
senger air bag should be automatically turned
OFF as required by the regulations.Front passenger seat adult occupants who are
properly seated and using the seat belt as out-
lined in this manual should not cause the passen-
ger air bag to be automatically turned OFF. For
small adults it may be turned OFF, however if the
occupant takes his/her weight off the seat cush-
ion (for example, by not sitting upright, by sitting
on an edge of the seat, or by otherwise being out
of position) , this could cause the sensor to turn
the air bag OFF. In addition, if the occupant
improperly uses the seat belt in the automatic
locking mode (child restraint mode) , this could
cause the air bag to be turned OFF. Always be
sure to be seated and wearing the seat belt
properly for the most effective protection by the
seat belt and supplemental air bag.
NISSAN recommends that pre-teens and chil-
dren be properly restrained in a rear seat.
NISSAN also recommends that appropriate child
restraints and booster seats be properly installed
in a rear seat. If this is not possible, the occupant
classification sensor and seat belt sensors are
designed to operate as described above to turn
the front passenger air bag OFF for specified
child restraints as required by the regulations.
Failing to properly secure child restraints and to
use the automatic locking mode (child restraint
mode) may allow the restraint to tip or move in an
accident or sudden stop. This can also result in
the passenger air bag inflating in a crash instead
Safety—Seats, seat belts and supplemental restraint system1-43
ZREVIEW COPYÐ2007 Versa(vrs)
Owners ManualÐUSA_English(nna)
10/05/06Ðdebbie
X
Page 75 of 304
CAUTION
If the high temperature warning light illu-
minates while the engine is running, it
may indicate the engine temperature is
extremely high. Stop the vehicle safely as
soon as possible. If the vehicle is over-
heated, continuing vehicle operation may
seriously damage the engine. See “If your
vehicle overheats” in the “In case of emer-
gency” section.
Intelligent Key lock warning
light (M/T models) (if so
equipped)
When the ignition switch is left in the OFF posi-
tion instead of completely turning it to the LOCK
position, the Intelligent Key lock warning light
blinks red and the Intelligent Key room buzzer will
sound. The light will keep blinking until the igni-
tion switch is returned to the LOCK or ACC
position.
If the Intelligent Key lock warning light blinks and
the buzzer sounds, press the PUSH release but-
ton next to ignition knob, then turn the ignition
knob to either the LOCK or ACC position.
Intelligent Key system warning
light (if so equipped)
The Intelligent Key system warning light illumi-
nates green when the ignition switch can be
turned. The Intelligent Key system warning light
illuminates red when the ignition switch cannot
be turned.
The Intelligent Key system warning light blinks
red if the Intelligent Key is taken outside of the
vehicle while the ignition switch is in the ACC or
ON position.
cIf the Intelligent Key system warning light
blinks, make sure of the location of the Intel-
ligent Key as soon as possible. The Intelli-
gent Key should be carried by the driver
while operating the vehicle.
cThe Intelligent Key system warning light
turns off about 10 seconds after the Intelli-
gent Key is brought inside the vehicle.
The Intelligent Key system warning light blinks
green indicating that the Intelligent Key battery is
almost discharged.
See “Intelligent Key system” in the “Pre-driving
checks and adjustments” section.
Low fuel warning light
This light comes on when the fuel level in the fuel
tank is getting low. Refuel as soon as it is conve-
nient, preferably before the fuel gauge reaches E
(Empty) .There will be a small reserve of fuel
in the tank when the fuel gauge needle
reaches E (Empty) .
Low tire pressure warning
light (if so equipped)
Your vehicle is equipped with a Tire Pressure
Monitoring System (TPMS) that monitors the tire
pressure of all tires except the spare.
The low tire pressure warning light warns of low
tire pressure or indicates that the TPMS is not
functioning properly.
After the ignition switch is turned ON, this light
illuminates for about 1 second and turns off.
Low tire pressure warning:
If the vehicle is being driven with low tire pres-
sure, the warning light will illuminate.
When the low tire pressure warning light illumi-
nates, you should stop and adjust the tire pres-
sure to the recommended COLD tire pressure
shown on the Tire and Loading Information label.
The low tire pressure warning light does not
automatically turn off when the tire pressure is
Instruments and controls2-9
ZREVIEW COPYÐ2007 Versa(vrs)
Owners ManualÐUSA_English(nna)
10/05/06Ðdebbie
X