2007 NISSAN VERSA check engine light
[x] Cancel search: check engine lightPage 194 of 304
Each time the engine is started, or when the
selector lever is shifted to any position other than
D (Drive) , the Overdrive off mode will be auto-
matically turned off.
Accelerator downshift
— in D position —
For passing or hill climbing, depress the accel-
erator pedal to the floor. This shifts the transmis-
sion down into a lower gear, depending on the
vehicle speed.
Fail-safe
When the fail-safe operation occurs, the CVT will
not be shifted into the selected driving position.
If the vehicle is driven under extreme con-
ditions, such as excessive wheel spinning
and subsequent hard braking, the fail-safe
system may be activated. The MIL may
come on to indicate the fail-safe mode is
activated, see “Malfunction indicator light
(MIL)” in the “Instrument and controls” sec-
tion. This will occur even if all electrical
circuits are functioning properly. In this
case, turn the ignition switch to the OFF
position and wait for 10 seconds. Then turn
the switch back to the ON position. The
vehicle should return to its normal operat-
ing condition. If it does not return to itsnormal operating condition, have a
NISSAN dealer check the transmission and
repair if necessary.
WARNING
When the high fluid temperature protec-
tion mode or fail-safe operation occurs,
vehicle speed may be gradually reduced.
The reduced speed may be lower than
other traffic, which could increase the
chance of a collision. Be especially care-
ful when driving. If necessary, pull to the
side of the road at a safe place and allow
the transmission to return to normal op-
eration, or have it repaired if necessary.
MANUAL TRANSMISSION (if so
equipped)
WARNING
cDo not downshift abruptly on slippery
roads. This may cause a loss of control.
cDo not over-rev the engine when shift-
ing to a lower gear. This may cause a
loss of control or engine damage.
CAUTION
cDo not rest your foot on the clutch pedal
while driving. This may cause clutch
damage.
cFully depress the clutch pedal before
shifting to help prevent transmission
damage.
cStop your vehicle completely before
shifting into R (Reverse) .
cWhen the vehicle is stopped with the
engine running (for example, at a stop
light) , shift to N (Neutral) and release
the clutch pedal with the foot brake
applied.
5-20Starting and driving
ZREVIEW COPYÐ2007 Versa(vrs)
Owners ManualÐUSA_English(nna)
10/05/06Ðdebbie
X
Page 197 of 304
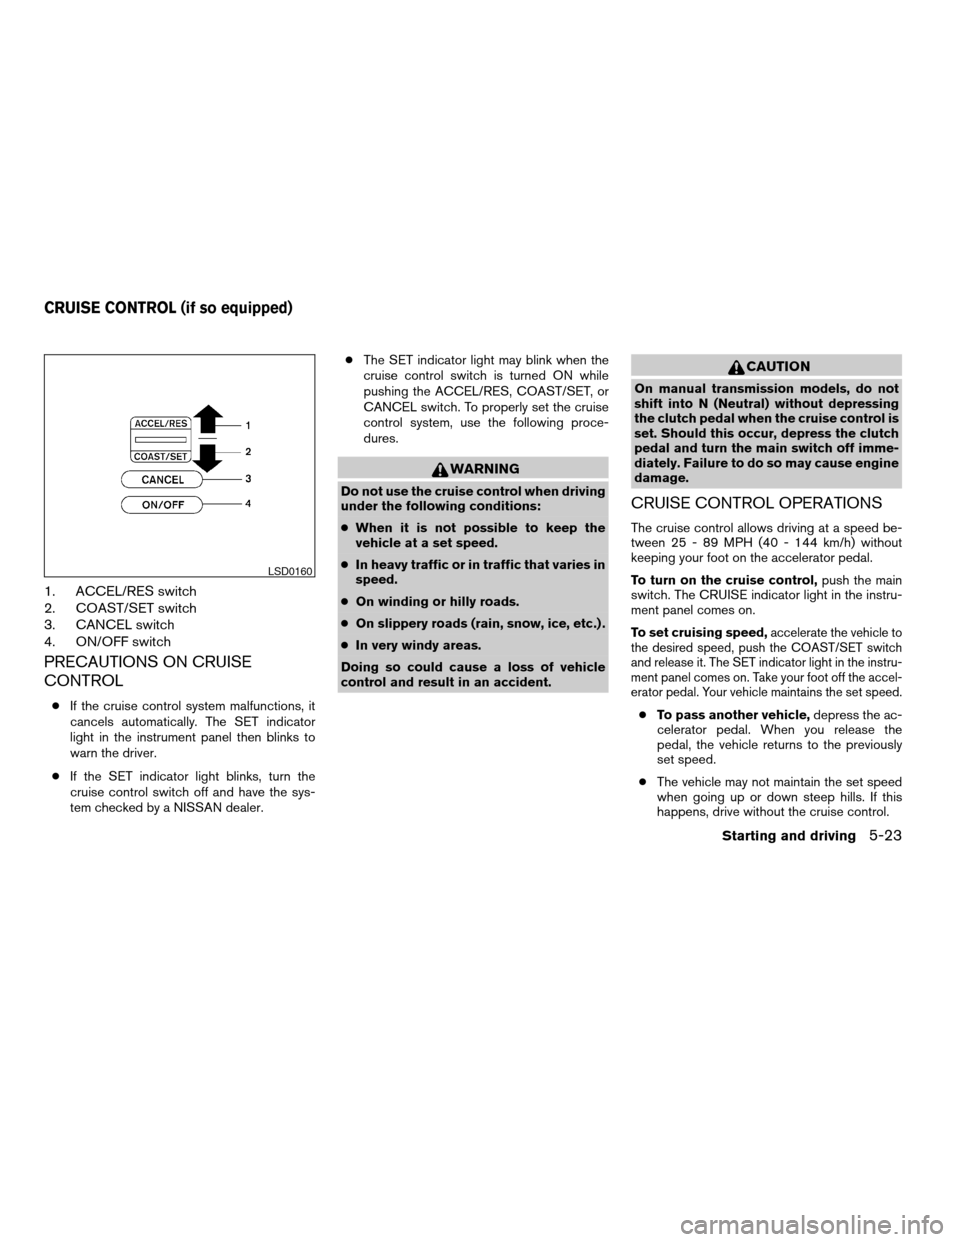
1. ACCEL/RES switch
2. COAST/SET switch
3. CANCEL switch
4. ON/OFF switch
PRECAUTIONS ON CRUISE
CONTROL
cIf the cruise control system malfunctions, it
cancels automatically. The SET indicator
light in the instrument panel then blinks to
warn the driver.
cIf the SET indicator light blinks, turn the
cruise control switch off and have the sys-
tem checked by a NISSAN dealer.cThe SET indicator light may blink when the
cruise control switch is turned ON while
pushing the ACCEL/RES, COAST/SET, or
CANCEL switch. To properly set the cruise
control system, use the following proce-
dures.
WARNING
Do not use the cruise control when driving
under the following conditions:
cWhen it is not possible to keep the
vehicle at a set speed.
cIn heavy traffic or in traffic that varies in
speed.
cOn winding or hilly roads.
cOn slippery roads (rain, snow, ice, etc.) .
cIn very windy areas.
Doing so could cause a loss of vehicle
control and result in an accident.
CAUTION
On manual transmission models, do not
shift into N (Neutral) without depressing
the clutch pedal when the cruise control is
set. Should this occur, depress the clutch
pedal and turn the main switch off imme-
diately. Failure to do so may cause engine
damage.
CRUISE CONTROL OPERATIONS
The cruise control allows driving at a speed be-
tween 25 - 89 MPH (40 - 144 km/h) without
keeping your foot on the accelerator pedal.
To turn on the cruise control,push the main
switch. The CRUISE indicator light in the instru-
ment panel comes on.
To set cruising speed,
accelerate the vehicle to
the desired speed, push the COAST/SET switch
and release it. The SET indicator light in the instru-
ment panel comes on. Take your foot off the accel-
erator pedal. Your vehicle maintains the set speed.
cTo pass another vehicle,depress the ac-
celerator pedal. When you release the
pedal, the vehicle returns to the previously
set speed.
cThe vehicle may not maintain the set speed
when going up or down steep hills. If this
happens, drive without the cruise control.
LSD0160
CRUISE CONTROL (if so equipped)
Starting and driving5-23
ZREVIEW COPYÐ2007 Versa(vrs)
Owners ManualÐUSA_English(nna)
10/05/06Ðdebbie
X
Page 201 of 304
WARNING
cIf the engine is not running or is turned
off while driving, the power assist for
the steering will not work. Steering will
be harder to operate.
cWhen the power steering warning light
illuminates with the engine running,
there will be no power assist for the
steering. You will still have control of
the vehicle but the steering will be
harder to operate. Have the power
steering system checked by a NISSAN
dealer.
The power steering system is designed to pro-
vide power assist while driving to operate the
steering wheel with light force.
When the steering wheel is operated repeatedly
or continuously while parking or driving at a very
low speed, the power assist for the steering
wheel will be reduced. This is to prevent over-
heating of the power steering system and protect
it from getting damaged. While the power assist
is reduced, steering wheel operation will become
heavy. When the temperature of the power steer-
ing system goes down, the power assist level will
return to normal. Avoid repeating such steering
wheel operations that could cause the power
steering system to overheat.You may hear a sound when the steering wheel is
operated quickly. However, this is not a malfunc-
tion.
If the power steering warning lightPSilluminates
while the engine is running, it may indicate the
power steering system is not functioning properly
and may need servicing. Have the power steering
system checked by a NISSAN dealer.
When the power steering warning light illumi-
nates with the engine running, there will be no
power assist for the steering but you will still have
control of the vehicle. At this time, greater steer-
ing effort is required to operate the steering
wheel, especially in sharp turns and at low
speeds.
For additional information see “Power steering
warning light” in the “Instruments and controls”
section.The brake system has two separate hydraulic
circuits. If one circuit malfunctions, you will still
have braking at two wheels.
BRAKE PRECAUTIONS
Vacuum assisted brakes
The brake booster aids braking by using engine
vacuum. If the engine stops, you can stop the
vehicle by depressing the brake pedal. However,
greater foot pressure on the brake pedal will be
required to stop the vehicle and stopping dis-
tance will be longer.
Using the brakes
Avoid resting your foot on the brake pedal while
driving. This will overheat the brakes, wear out the
brakes and pads faster, and reduce gas mileage.
To help reduce brake wear and to prevent the
brakes from overheating, reduce speed and
downshift to a lower gear before going down a
slope or long grade. Overheated brakes may
reduce braking performance and could result in
loss of vehicle control.
POWER STEERING BRAKE SYSTEM
Starting and driving5-27
ZREVIEW COPYÐ2007 Versa(vrs)
Owners ManualÐUSA_English(nna)
10/05/06Ðdebbie
X
Page 203 of 304

WARNING
Do not pump the brake pedal. Doing so
may result in increased stopping
distances.
Self-test feature
The ABS includes electronic sensors, electric
pumps, hydraulic solenoids and a computer. The
computer has a built-in diagnostic feature that
tests the system each time you start the engine
and move the vehicle at a low speed in forward or
reverse. When the self-test occurs, you may hear
a “clunk” noise and/or feel a pulsation in the brake
pedal. This is normal and does not indicate a
malfunction. If the computer senses a malfunc-
tion, it switches the ABS off and illuminates the
ABS warning light on the instrument panel. The
brake system then operates normally, but without
anti-lock assistance.
If the ABS warning light illuminates during the
self-test or while driving, have the vehicle
checked by a NISSAN dealer.
Normal operation
The ABS operates at speeds above3-6MPH(5
- 10 km/h) .When the ABS senses that one or more wheels
are close to locking up, the actuator rapidly ap-
plies and releases hydraulic pressure.
This action is similar to pumping the brakes very
quickly. You may feel a pulsation in the brake
pedal and hear a noise from under the hood or
feel a vibration from the actuator when it is oper-
ating. This is normal and indicates that the ABS is
operating properly. However, the pulsation may
indicate that road conditions are hazardous and
extra care is required while driving.
FREEING A FROZEN DOOR LOCK
To prevent a door lock from freezing, apply de-
icer through the key hole. If the lock becomes
frozen, heat the key before inserting it into the key
hole or use the remote keyless entry keyfob (if so
equipped) .
ANTI-FREEZE
In the winter when it is anticipated that the tem-
perature will drop below 32°F (0°C) , check the
anti-freeze to assure proper winter protection.
For details, see “Engine cooling system” in the
“Maintenance and do-it-yourself” section of this
manual.
BATTERY
If the battery is not fully charged during extremely
cold weather conditions, the battery fluid may
freeze and damage the battery. To maintain maxi-
mum efficiency, the battery should be checked
regularly. For details, see “Battery” in the “Main-
tenance and do-it-yourself” section of this
manual.
COLD WEATHER DRIVING
Starting and driving5-29
ZREVIEW COPYÐ2007 Versa(vrs)
Owners ManualÐUSA_English(nna)
10/05/06Ðdebbie
X
Page 208 of 304
TIRE PRESSURE MONITORING
SYSTEM (TPMS) (if so equipped)
This vehicle is equipped with the tire pressure
monitoring system (TPMS) . It monitors tire pres-
sure of all tires except the spare. When the low
tire pressure warning light is lit, one or more of
your tires is significantly under-inflated. If the
vehicle is being driven with low tire pressure, the
TPMS will activate and warn you of it by the low
tire pressure warning light. This system will acti-
vate only when the vehicle is driven at speeds
above 16 MPH (25 km/h) . For more details, refer
to “Warning/indicator lights and audible remind-
ers” in the “Instruments and controls” section,
and “Tire pressure monitoring system (TPMS)” in
the “Starting and driving” section.
WARNING
cIf the low tire pressure warning light
illuminates while driving, avoid sudden
steering maneuvers or abrupt braking,
reduce vehicle speed, pull off the road
to a safe location and stop the vehicle
as soon as possible. Serious vehicle
damage could occur and may lead to an
accident and could result in serious
personal injury. Check the tire pressure
for all four tires. Adjust the tire pressure
to the recommended COLD tire pres-
sure shown on the Tire and Loading
Information label to turn the low tire
pressure warning light OFF. If you have
a flat tire, replace it with a spare tire as
soon as possible.
cWhen a spare tire is mounted or a wheel
is replaced, the TPMS will not function
and the low tire pressure warning light
will flash for approximately 1 minute.
The light will remain on after 1 minute.
Contact your NISSAN dealer as soon as
possible for tire replacement and/or
system resetting.
cReplacing tires with those not originally
specified by NISSAN could affect the
proper operation of the TPMS.cDo not inject any tire liquid or aerosol
tire sealant into the tires, as this may
cause a malfunction of the tire pressure
sensors.
CHANGING A FLAT TIRE
If you have a flat tire, follow the instructions be-
low.
Stopping the vehicle
1. Safely move the vehicle off the road and
away from traffic.
2. Turn on the hazard warning flashers.
3. Park on a level surface and apply the parking
brake. Shift the transmission into P (Park) or
the manual transmission into R (Reverse) .
4. Turn off the engine.
5. Raise the hood to warn other traffic and to
signal professional road assistance person-
nel that you need assistance.
6. Have all passengers get out of the vehicle
and stand in a safe place, away from traffic
and clear of the vehicle.
FLAT TIRE
6-2In case of emergency
ZREVIEW COPYÐ2007 Versa(vrs)
Owners ManualÐUSA_English(nna)
10/05/06Ðdebbie
X
Page 216 of 304
If your vehicle is overheating (indicated by a red
high temperature warning light) , or if you
feel a lack of engine power, detect abnormal
noise, etc. take the following steps.
WARNING
cDo not continue to drive if your vehicle
overheats. Doing so could cause engine
damage or a vehicle fire.
cTo avoid the danger of being scalded,
never remove the radiator cap while the
engine is still hot. When the radiator
cap is removed, pressurized hot water
will spurt out, possibly causing serious
injury.
cDo not open the hood if steam is com-
ing out.
1. Move the vehicle safely off the road, apply
the parking brake and move the shift lever to
N (Neutral) (manual transmission) or to P
(Park) (AT or CVT) .
Do not stop the engine.
2. Turn off the air conditioner (if so equipped) .
Open all the windows, move the heater or air
conditioner temperature control to maximum
hot and fan control to high speed.3. Get out of the vehicle. Look and listen for
steam or coolant escaping from the radiator
before opening the hood. (If steam or cool-
ant is escaping, turn off the engine.) Do not
open the hood further until no steam or
coolant can be seen.
4. Open the engine hood.
WARNING
If steam or water is coming from the en-
gine, stand clear to prevent getting
burned.
5. Visually check drive belts for damage or
looseness. Also check if the cooling fan is
running. The radiator hoses and radiator
should not leak water. If coolant is leaking,
the water pump belt is missing or loose, or
the cooling fan does not run, stop the en-
gine.
WARNING
Be careful not to allow your hands, hair,
jewelry or clothing to come into contact
with, or get caught in, engine belts or the
engine cooling fan. The engine cooling
fan can start at any time when the coolant
temperature is high.6. After the engine cools down, check the cool-
ant level in the engine coolant reservoir tank
with the engine running. Add coolant to the
engine coolant reservoir tank if necessary.
Have your vehicle repaired at a NISSAN
dealer.
IF YOUR VEHICLE OVERHEATS
6-10In case of emergency
ZREVIEW COPYÐ2007 Versa(vrs)
Owners ManualÐUSA_English(nna)
10/05/06Ðdebbie
X
Page 227 of 304

8 Maintenance and do-it-yourself
Maintenance requirements..........................8-2
General maintenance..............................8-2
Explanation of general maintenance items.........8-2
Maintenance precautions...........................8-5
Engine compartment check locations................8-6
Engine cooling system.............................8-7
Checking engine coolant level...................8-7
Changing engine coolant........................8-8
Engine oil.........................................8-8
Checking engine oil level........................8-8
Changing engine oil............................8-9
Changing engine oil filter.......................8-10
4-speed automatic transmission fluid...............8-11
Temperature conditions for checking.............8-11
Continuously Variable Transmission (CVT) fluid......8-12
Brake and clutch fluid.............................8-13
Brake fluid....................................8-13
Clutch fluid...................................8-13
Window washer fluid.............................8-14
Window washer fluid reservoir..................8-14
Battery..........................................8-14
Jump starting.................................8-16
Drive belt........................................8-17Spark plugs......................................8-17
Replacing spark plugs.........................8-17
Air cleaner.......................................8-18
In-cabin microfilter (if so equipped)..............8-18
Windshield wiper blades..........................8-18
Cleaning.....................................8-18
Replacing....................................8-19
Brakes..........................................8-20
Fuses...........................................8-21
Engine compartment...........................8-21
Passenger compartment.......................8-23
Battery replacement..............................8-24
Keyfob.......................................8-24
Intelligent Key battery..........................8-25
Lights...........................................8-26
Headlights....................................8-26
Exterior and interior lights.......................8-27
Wheels and tires.................................8-31
Tire pressure..................................8-31
Tire labeling...................................8-34
Types of tires..................................8-36
Tire chains....................................8-37
Changing wheels and tires.....................8-38
ZREVIEW COPYÐ2007 Versa(vrs)
Owners ManualÐUSA_English(nna)
10/05/06Ðdebbie
X
Page 236 of 304

Drain plug tightening torque:
22 - 29 ft-lb (29 - 39 N·m)
7. Refill engine with recommended oil through
the oil filler opening, then install the oil filler
cap securely.
See “Capacities and recommended
fuel/lubricants” in the “Technical and con-
sumer information” section of this manual for
drain and refill capacity.
The drain and refill capacity depends on the
oil temperature and drain time. Use these
specifications for reference only. Always use
the dipstick to determine when the proper
amount of oil is in the engine.
8. Start the engine. Check for leakage around
the drain plug and oil filter. Correct as re-
quired.
9. Turn the engine off and wait more than 10
minutes. Check the oil level with the dipstick.
Add engine oil if necessary.
CHANGING ENGINE OIL FILTER
1. Park the vehicle on a level surface and apply
the parking brake.
2. Turn the engine off.
3. Place a large drain pan under the oil filter
sC.
4. Loosen the oil filter with an oil filter wrench
by turning it counterclockwise. Then remove
the oil filter by turning it by hand.
CAUTION
Be careful not to burn yourself. The engine
oil may be hot.
5. Wipe the engine oil filter sealing surface with
a clean rag.
Be sure to remove any old gasket material
remaining on the sealing surface of the en-
gine.
6. Coat the gasket on the new filter with clean
engine oil.
7. Screw on the oil filter until a slight resistance
is felt, then tighten an additional 2/3 turn.
8. Start the engine and check for leakage
around the oil filter. Correct as required.
9. Turn the engine off and wait more than 10
minutes. Check the oil level. Add engine oil if
necessary.
sAOil filler cap
sBOil drain plug
sCOil filter
WDI0521
8-10Maintenance and do-it-yourself
ZREVIEW COPYÐ2007 Versa(vrs)
Owners ManualÐUSA_English(nna)
10/05/06Ðdebbie
X