2007 NISSAN TIIDA roof
[x] Cancel search: roofPage 3712 of 5883
HEADLINING
INT-33
< ON-VEHICLE REPAIR >
C
D
E
F
G
H
I
K
L
MA
B
INT
N
O
P
Avoid headlining damage when installing by inserting rear clips first during assembly.
Removal and Installation - SedanINFOID:0000000001329057
REMOVAL
1. Remove the negative and positive battery cables.
2. Remove front seat assembly RH/LH. Refer to SE-14, "
Removal and Installation".
3. Remove rear seat cushion and rear seatback. Refer to SE-18, "
Removal and Installation".
4. Remove front seat belt shoulder anchor RH/LH. Refer to SB-6, "
Removal and Installation of Front Seat
Belt".
5. Remove center console body assembly. Refer to IP-11, "
Removal and Installation".
6. Remove front pillar garnish RH/LH. Refer to INT-20, "
Removal and Installation".
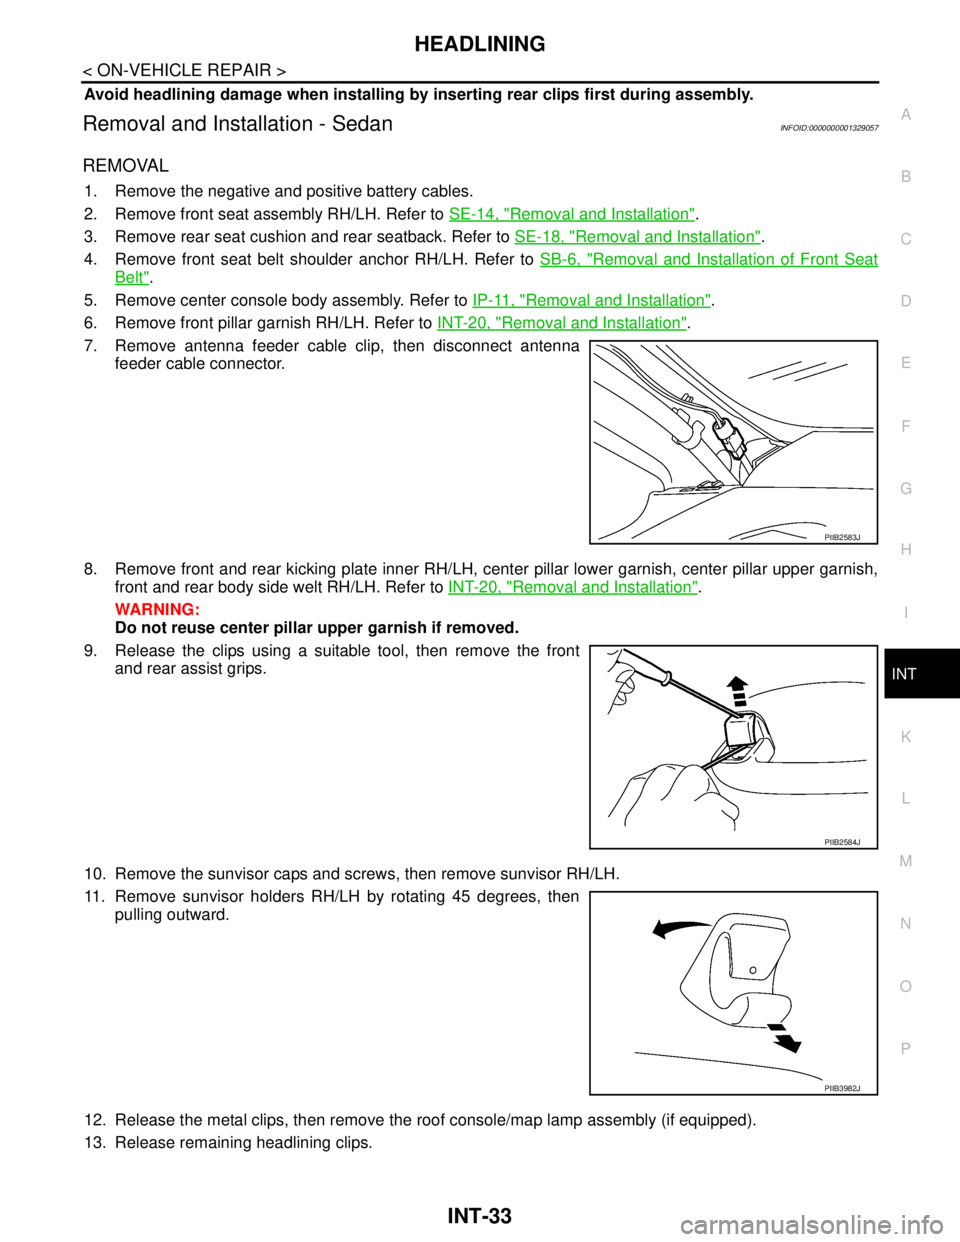
7. Remove antenna feeder cable clip, then disconnect antenna
feeder cable connector.
8. Remove front and rear kicking plate inner RH/LH, center pillar lower garnish, center pillar upper garnish,
front and rear body side welt RH/LH. Refer to INT-20, "
Removal and Installation".
WARNING:
Do not reuse center pillar upper garnish if removed.
9. Release the clips using a suitable tool, then remove the front
and rear assist grips.
10. Remove the sunvisor caps and screws, then remove sunvisor RH/LH.
11. Remove sunvisor holders RH/LH by rotating 45 degrees, then
pulling outward.
12. Release the metal clips, then remove the roof console/map lamp assembly (if equipped).
13. Release remaining headlining clips.
PIIB2583J
PIIB2584J
PIIB3982J
Page 3713 of 5883
INT-34
< ON-VEHICLE REPAIR >
HEADLINING
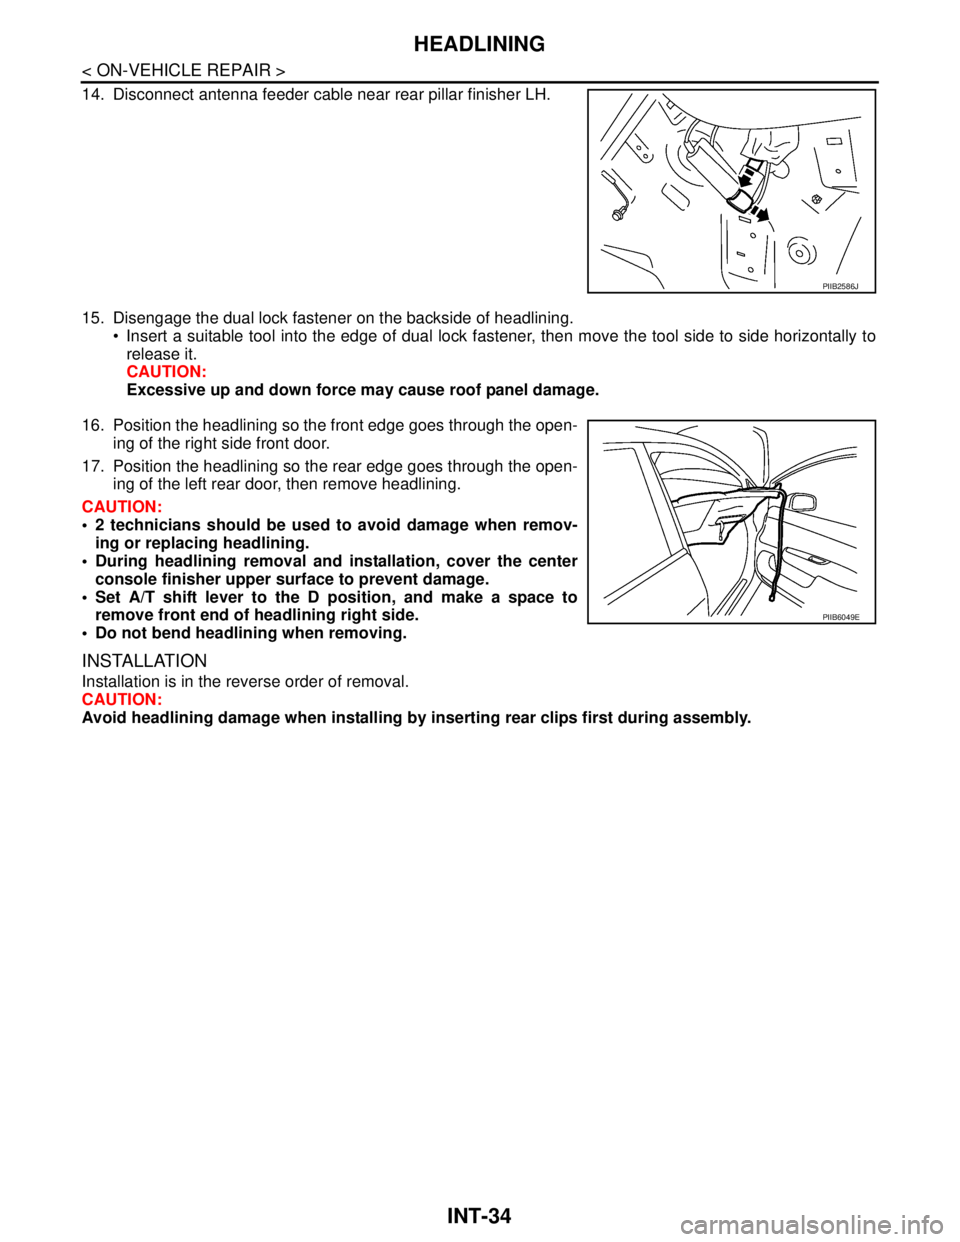
14. Disconnect antenna feeder cable near rear pillar finisher LH.
15. Disengage the dual lock fastener on the backside of headlining.
Insert a suitable tool into the edge of dual lock fastener, then move the tool side to side horizontally to
release it.
CAUTION:
Excessive up and down force may cause roof panel damage.
16. Position the headlining so the front edge goes through the open-
ing of the right side front door.
17. Position the headlining so the rear edge goes through the open-
ing of the left rear door, then remove headlining.
CAUTION:
2 technicians should be used to avoid damage when remov-
ing or replacing headlining.
During headlining removal and installation, cover the center
console finisher upper surface to prevent damage.
Set A/T shift lever to the D position, and make a space to
remove front end of headlining right side.
Do not bend headlining when removing.
INSTALLATION
Installation is in the reverse order of removal.
CAUTION:
Avoid headlining damage when installing by inserting rear clips first during assembly.
PIIB2586J
PIIB6049E
Page 3722 of 5883
SQUEAK AND RATTLE TROUBLE DIAGNOSES
IP-7
< SERVICE INFORMATION >
C
D
E
F
G
H
I
K
L
MA
B
IP
N
O
P
Most of these incidents can be repaired by adjusting, securing or insulating the item(s) or component(s) caus-
ing the noise.
SUNROOF/HEADLINING
Noises in the sunroof/headlining area can often be traced to one of the following:
1. Sunroof lid, rail, linkage or seals making a rattle or light knocking noise
2. Sun visor shaft shaking in the holder
3. Front or rear windshield touching headliner and squeaking
Again, pressing on the components to stop the noise while duplicating the conditions can isolate most of these
incidents. Repairs usually consist of insulating with felt cloth tape.
OVERHEAD CONSOLE (FRONT AND REAR)
Overhead console noises are often caused by the console panel clips not being engaged correctly. Most of
these incidents are repaired by pushing up on the console at the clip locations until the clips engage.
In addition look for:
1. Loose harness or harness connectors.
2. Front console map/reading lamp lens loose.
3. Loose screws at console attachment points.
SEATS
When isolating seat noise it's important to note the position the seat is in and the load placed on the seat when
the noise is present. These conditions should be duplicated when verifying and isolating the cause of the
noise.
Cause of seat noise include:
1. Headrest rods and holder
2. A squeak between the seat pad cushion and frame
3. The rear seatback lock and bracket
These noises can be isolated by moving or pressing on the suspected components while duplicating the con-
ditions under which the noise occurs. Most of these incidents can be repaired by repositioning the component
or applying urethane tape to the contact area.
UNDERHOOD
Some interior noise may be caused by components under the hood or on the engine wall. The noise is then
transmitted into the passenger compartment.
Causes of transmitted underhood noise include:
1. Any component mounted to the engine wall
2. Components that pass through the engine wall
3. Engine wall mounts and connectors
4. Loose radiator mounting pins
5. Hood bumpers out of adjustment
6. Hood striker out of adjustment
These noises can be difficult to isolate since they cannot be reached from the interior of the vehicle. The best
method is to secure, move or insulate one component at a time and test drive the vehicle. Also, engine RPM
or load can be changed to isolate the noise. Repairs can usually be made by moving, adjusting, securing, or
insulating the component causing the noise.
Page 4462 of 5883
PWC-1
BODY EXTERIOR, DOORS, ROOF & VEHICLE SECURITY
C
D
E
F
G
H
I
J
L
M
SECTION PWC
A
B
PWC
N
O
P
CONTENTS
POWER WINDOW CONTROL SYSTEM
BASIC INSPECTION ....................................3
DIAGNOSIS AND REPAIR WORKFLOW ..........3
Work Flow .................................................................3
INSPECTION AND ADJUSTMENT .....................4
ADDITIONAL SERVICE WHEN REMOVING BAT-
TERY NEGATIVE TERMINAL .....................................
4
ADDITIONAL SERVICE WHEN REMOVING
BATTERY NEGATIVE TERMINAL : Description ......
4
ADDITIONAL SERVICE WHEN REMOVING
BATTERY NEGATIVE TERMINAL : Special Re-
pair Requirement .......................................................
4
ADDITIONAL SERVICE WHEN REPLACING
CONTROL UNIT ..........................................................
4
ADDITIONAL SERVICE WHEN REPLACING
CONTROL UNIT : Description ..................................
4
ADDITIONAL SERVICE WHEN REPLACING
CONTROL UNIT : Special Repair Requirement .......
4
FUNCTION DIAGNOSIS ...............................6
POWER WINDOW SYSTEM ...............................6
System Diagram .......................................................6
System Description ...................................................6
Component Parts Location ......................................8
Component Description .............................................8
DIAGNOSIS SYSTEM (BCM) ............................10
COMMON ITEM .........................................................10
COMMON ITEM : CONSULT-III Function (BCM -
COMMON ITEM) .....................................................
10
RETAINED PWR .......................................................10
RETAINED PWR : CONSULT-III Function (BCM -
RETAINED PWR) ...................................................
10
COMPONENT DIAGNOSIS .........................11
POWER SUPPLY AND GROUND CIRCUIT ......11
POWER WINDOW MAIN SWITCH ............................11
POWER WINDOW MAIN SWITCH : Description ....11
POWER WINDOW MAIN SWITCH : Component
Function Check ........................................................
11
POWER WINDOW MAIN SWITCH : Diagnosis
Procedure ................................................................
11
POWER WINDOW MAIN SWITCH : Component
Inspection ................................................................
14
POWER WINDOW MAIN SWITCH : Special Re-
pair Requirement .....................................................
16
FRONT POWER WINDOW SWITCH .........................16
FRONT POWER WINDOW SWITCH : Descrip-
tion ...........................................................................
16
FRONT POWER WINDOW SWITCH : Compo-
nent Function Check ................................................
16
FRONT POWER WINDOW SWITCH : Diagnosis
Procedure ................................................................
17
REAR POWER WINDOW SWITCH ...........................19
REAR POWER WINDOW SWITCH : Description ....19
REAR POWER WINDOW SWITCH : Component
Function Check ........................................................
19
REAR POWER WINDOW SWITCH : Diagnosis
Procedure ................................................................
19
REAR POWER WINDOW SWITCH : Component
Inspection ................................................................
21
POWER WINDOW MOTOR ..............................22
DRIVER SIDE .............................................................22
DRIVER SIDE : Description .....................................22
DRIVER SIDE : Component Function Check ..........22
DRIVER SIDE : Diagnosis Procedure .....................22
DRIVER SIDE : Component Inspection ...................23
DRIVER SIDE : Special Repair Requirement ..........23
PASSENGER SIDE ....................................................24
PASSENGER SIDE : Description ............................24
PASSENGER SIDE : Component Function Check
....
24
PASSENGER SIDE : Diagnosis Procedure ............24
Page 4535 of 5883
RF-1
BODY EXTERIOR, DOORS, ROOF & VEHICLE SECURITY
C
D
E
F
G
H
I
J
L
M
SECTION RF
A
B
RF
N
O
P
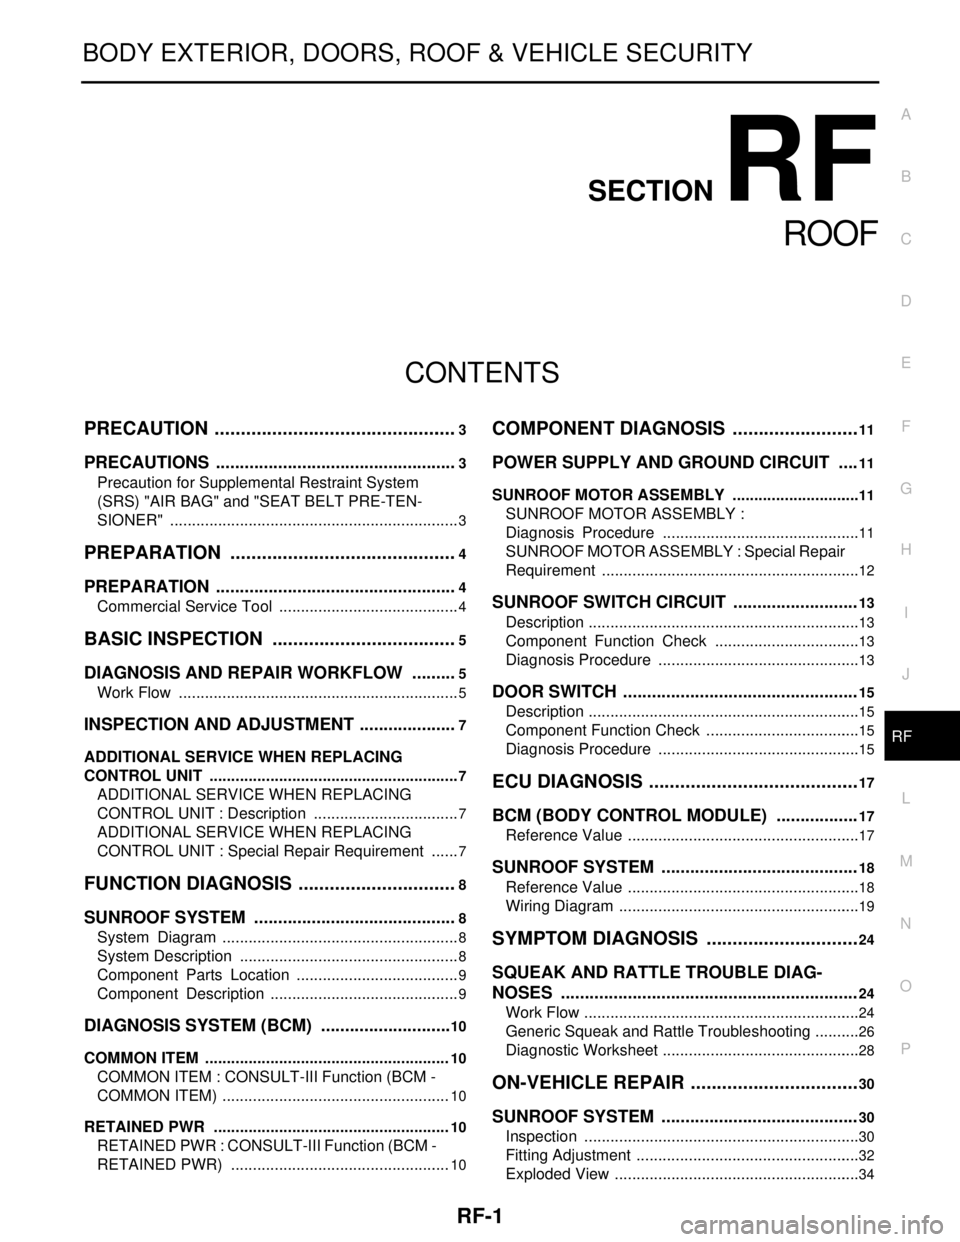
CONTENTS
ROOF
PRECAUTION ...............................................3
PRECAUTIONS ...................................................3
Precaution for Supplemental Restraint System
(SRS) "AIR BAG" and "SEAT BELT PRE-TEN-
SIONER" ...................................................................
3
PREPARATION ............................................4
PREPARATION ...................................................4
Commercial Service Tool ..........................................4
BASIC INSPECTION ....................................5
DIAGNOSIS AND REPAIR WORKFLOW ..........5
Work Flow .................................................................5
INSPECTION AND ADJUSTMENT .....................7
ADDITIONAL SERVICE WHEN REPLACING
CONTROL UNIT ..........................................................
7
ADDITIONAL SERVICE WHEN REPLACING
CONTROL UNIT : Description ..................................
7
ADDITIONAL SERVICE WHEN REPLACING
CONTROL UNIT : Special Repair Requirement .......
7
FUNCTION DIAGNOSIS ...............................8
SUNROOF SYSTEM ...........................................8
System Diagram .......................................................8
System Description ...................................................8
Component Parts Location ......................................9
Component Description ............................................9
DIAGNOSIS SYSTEM (BCM) ............................10
COMMON ITEM .........................................................10
COMMON ITEM : CONSULT-III Function (BCM -
COMMON ITEM) .....................................................
10
RETAINED PWR .......................................................10
RETAINED PWR : CONSULT-III Function (BCM -
RETAINED PWR) ...................................................
10
COMPONENT DIAGNOSIS .........................11
POWER SUPPLY AND GROUND CIRCUIT ....11
SUNROOF MOTOR ASSEMBLY ..............................11
SUNROOF MOTOR ASSEMBLY :
Diagnosis Procedure ..............................................
11
SUNROOF MOTOR ASSEMBLY : Special Repair
Requirement ............................................................
12
SUNROOF SWITCH CIRCUIT ..........................13
Description ...............................................................13
Component Function Check ..................................13
Diagnosis Procedure ...............................................13
DOOR SWITCH .................................................15
Description ...............................................................15
Component Function Check ....................................15
Diagnosis Procedure ...............................................15
ECU DIAGNOSIS .........................................17
BCM (BODY CONTROL MODULE) .................17
Reference Value ......................................................17
SUNROOF SYSTEM .........................................18
Reference Value ......................................................18
Wiring Diagram ........................................................19
SYMPTOM DIAGNOSIS ..............................24
SQUEAK AND RATTLE TROUBLE DIAG-
NOSES ..............................................................
24
Work Flow ................................................................24
Generic Squeak and Rattle Troubleshooting ...........26
Diagnostic Worksheet ..............................................28
ON-VEHICLE REPAIR .................................30
SUNROOF SYSTEM .........................................30
Inspection ................................................................30
Fitting Adjustment ....................................................32
Exploded View .........................................................34
Page 4541 of 5883
INSPECTION AND ADJUSTMENT
RF-7
< BASIC INSPECTION >
C
D
E
F
G
H
I
J
L
MA
B
RF
N
O
P
INSPECTION AND ADJUSTMENT
ADDITIONAL SERVICE WHEN REPLACING CONTROL UNIT
ADDITIONAL SERVICE WHEN REPLACING CONTROL UNIT : Description
INFOID:0000000001724556
MEMORY RESET PROCEDURE
1. Please observe the following instructions while confirming the sunroof operation.
NOTE:
Do not disconnect the battery power while the sunroof is operating or within 5 seconds after the sunroof
stops (to wipe-out the memory of lid position and operating friction).
2. Initialization of system should be conducted after the following conditions.
When the battery has been disconnected or discharged.
When the sunroof motor has been disconnected from power.
When the sunroof motor is changed.
When the sunroof does not operate normally (Incomplete initialization conditions).
ADDITIONAL SERVICE WHEN REPLACING CONTROL UNIT : Special Repair Re-
quirement
INFOID:0000000001724557
INITIALIZATION PROCEDURE
If the sunroof does not close or open automatically, use the following procedure to return sunroof operation to
normal.
1. Turn ignition switch ON.
2. Push and release the tilt up switch to start the tilt up operation.
3. Push and hold the tilt up switch until the sunroof pops up.
NOTE:
The sunroof will move toward the tilt up direction and will be stopped mechanically, at which time it will be
automatically fully closed. Keep pushing the switch during this operation. Release the switch when the
operation is complete.
4. Push and hold the tilt up switch within 10 seconds of step 3.
5. After 4 seconds, the sunroof will be automatically cycled in sequence of slide open-tilt up-tilt down.
NOTE:
Keep pushing the switch during this operation.
6. When the sunroof stops, release the switch 0.5 second later.
7. If the slide switch operates normally, the initialization is complete.
Page 4542 of 5883
RF-8
< FUNCTION DIAGNOSIS >
SUNROOF SYSTEM
FUNCTION DIAGNOSIS
SUNROOF SYSTEM
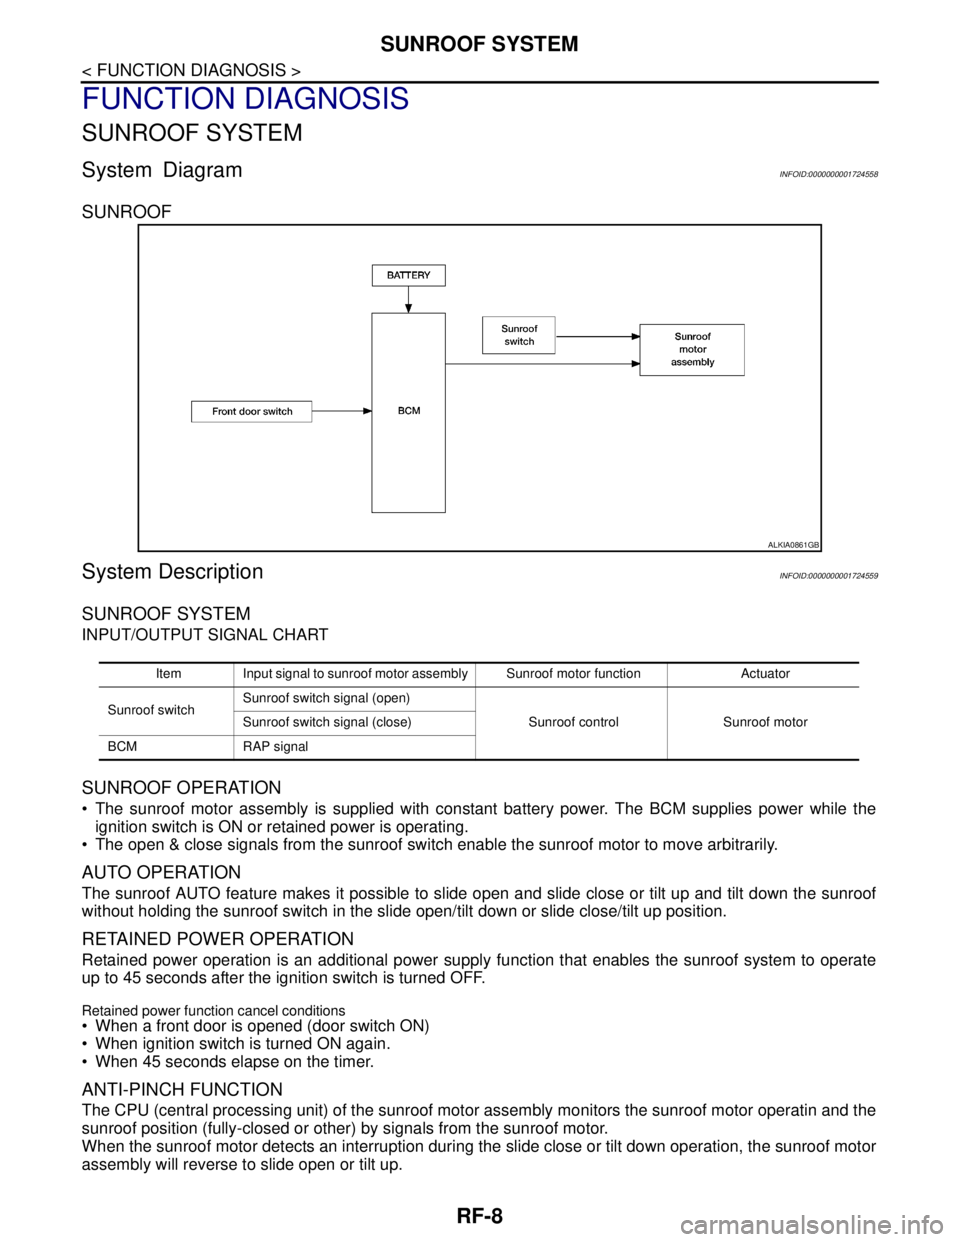
System DiagramINFOID:0000000001724558
SUNROOF
System DescriptionINFOID:0000000001724559
SUNROOF SYSTEM
INPUT/OUTPUT SIGNAL CHART
SUNROOF OPERATION
The sunroof motor assembly is supplied with constant battery power. The BCM supplies power while the
ignition switch is ON or retained power is operating.
The open & close signals from the sunroof switch enable the sunroof motor to move arbitrarily.
AUTO OPERATION
The sunroof AUTO feature makes it possible to slide open and slide close or tilt up and tilt down the sunroof
without holding the sunroof switch in the slide open/tilt down or slide close/tilt up position.
RETAINED POWER OPERATION
Retained power operation is an additional power supply function that enables the sunroof system to operate
up to 45 seconds after the ignition switch is turned OFF.
Retained power function cancel conditions
When a front door is opened (door switch ON)
When ignition switch is turned ON again.
When 45 seconds elapse on the timer.
ANTI-PINCH FUNCTION
The CPU (central processing unit) of the sunroof motor assembly monitors the sunroof motor operatin and the
sunroof position (fully-closed or other) by signals from the sunroof motor.
When the sunroof motor detects an interruption during the slide close or tilt down operation, the sunroof motor
assembly will reverse to slide open or tilt up.
ALKIA0861GB
Item Input signal to sunroof motor assembly Sunroof motor function Actuator
Sunroof switchSunroof switch signal (open)
Sunroof control Sunroof motor Sunroof switch signal (close)
BCM RAP signal
Page 4543 of 5883
SUNROOF SYSTEM
RF-9
< FUNCTION DIAGNOSIS >
C
D
E
F
G
H
I
J
L
MA
B
RF
N
O
P
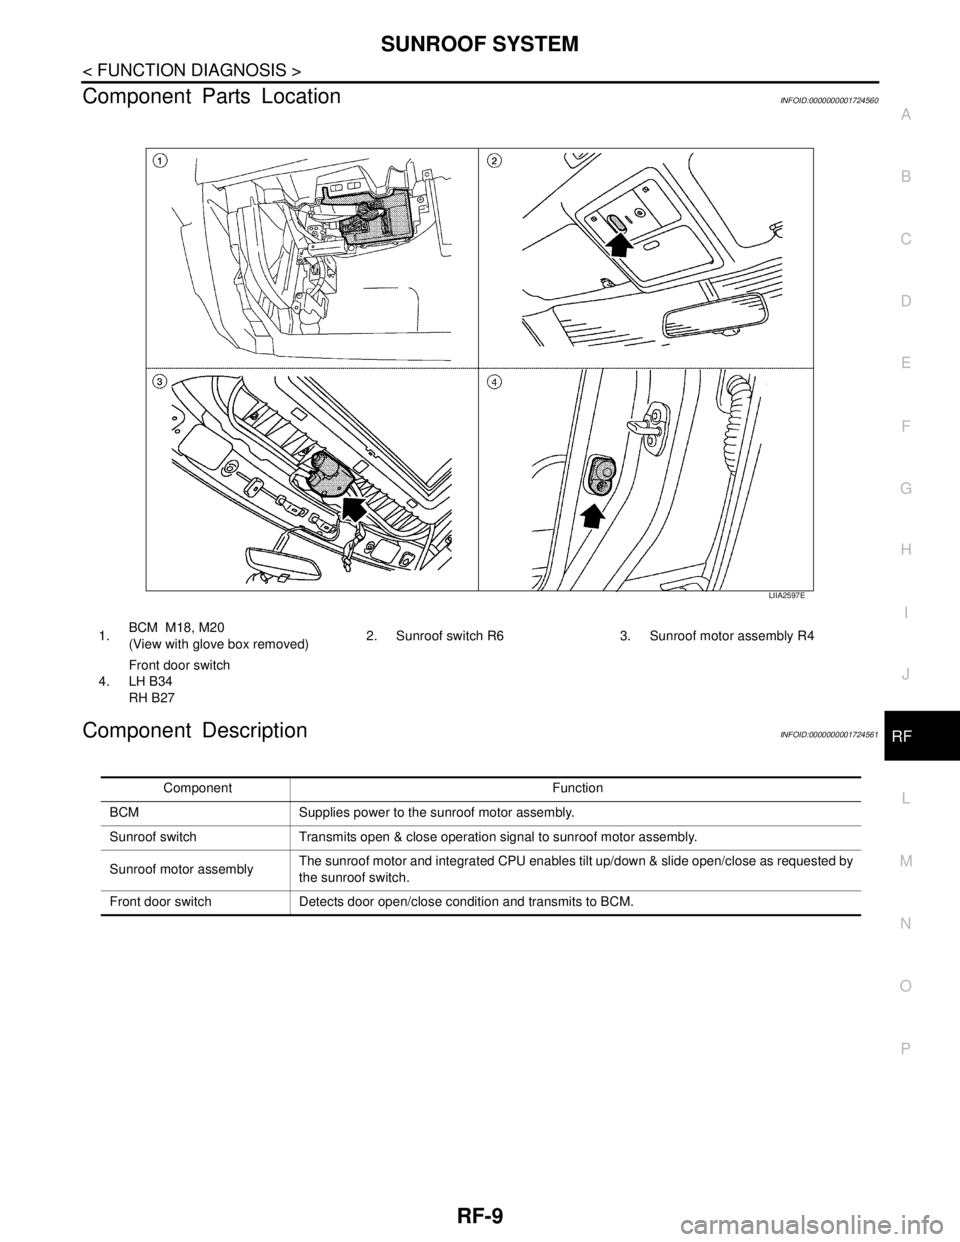
Component Parts LocationINFOID:0000000001724560
Component DescriptionINFOID:0000000001724561
LIIA2597E
1.BCM M18, M20
(View with glove box removed)2. Sunroof switch R6 3. Sunroof motor assembly R4
4.Front door switch
LH B34
RH B27
Component Function
BCM Supplies power to the sunroof motor assembly.
Sunroof switch Transmits open & close operation signal to sunroof motor assembly.
Sunroof motor assemblyThe sunroof motor and integrated CPU enables tilt up/down & slide open/close as requested by
the sunroof switch.
Front door switch Detects door open/close condition and transmits to BCM.