Page 9 of 12

xtronic continuously Varia Ble
trans Mission (c V t) (if so equipped)
The Xtronic CVT does not produce a gear change sensation like traditional automatic transmissions.
R (Reverse) speed for CVT vehicles is limited to 25 MPH (40 km/h).
STARTING THE ENGINE WITH CV T ( Intelligent Key models only)
Push the ignition knob in.
Confirm the Intelligent Key warning light is illuminated green.
Turn the ignition knob to start the engine.
TURNING THE ENGINE OFF WITH CV T ( Intelligent Key models only)
Shift the transmission into P (Park).
Turn the ignition knob to the LOCK position.
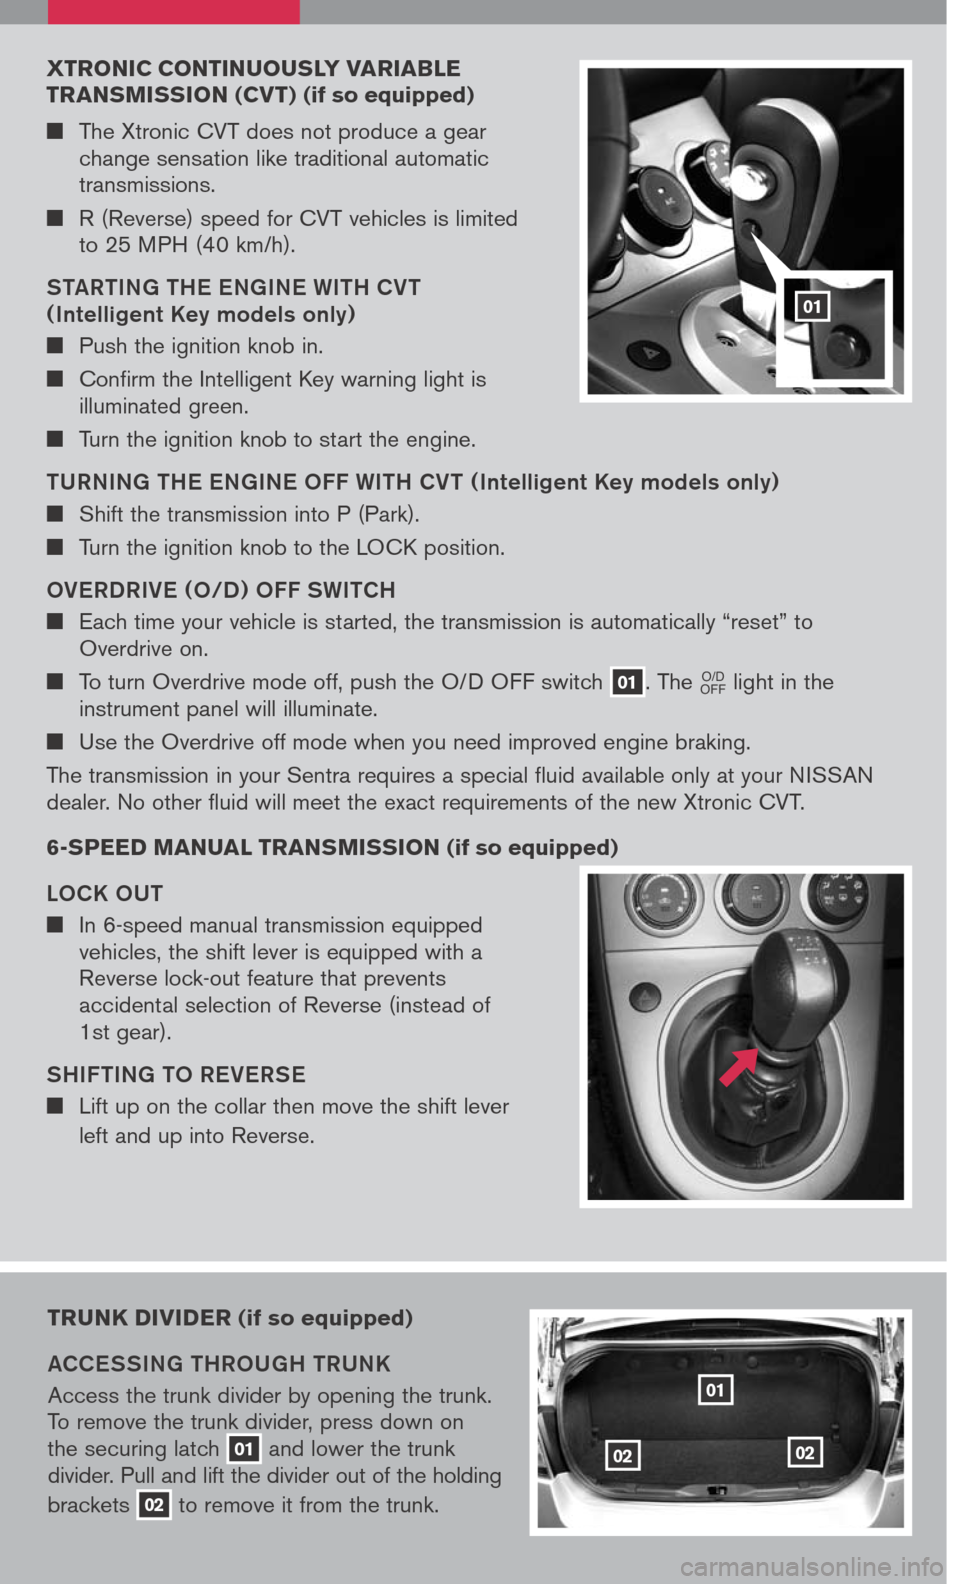
OVERDRIVE (O/D ) OFF SWITCH
Each time your vehicle is started, the transmission is automatically “reset” to Overdrive on.
To turn Overdrive mode off, push the O/D OFF switch 01. The
LCN0030
O/DOFF light in the instrument panel will illuminate.
Use the Overdrive off mode when you need improved engine braking.
The transmission in your Sentra requires a special fluid available only at your NISSAN dealer. No other fluid will meet the exact requirements of the new Xtronic CVT.
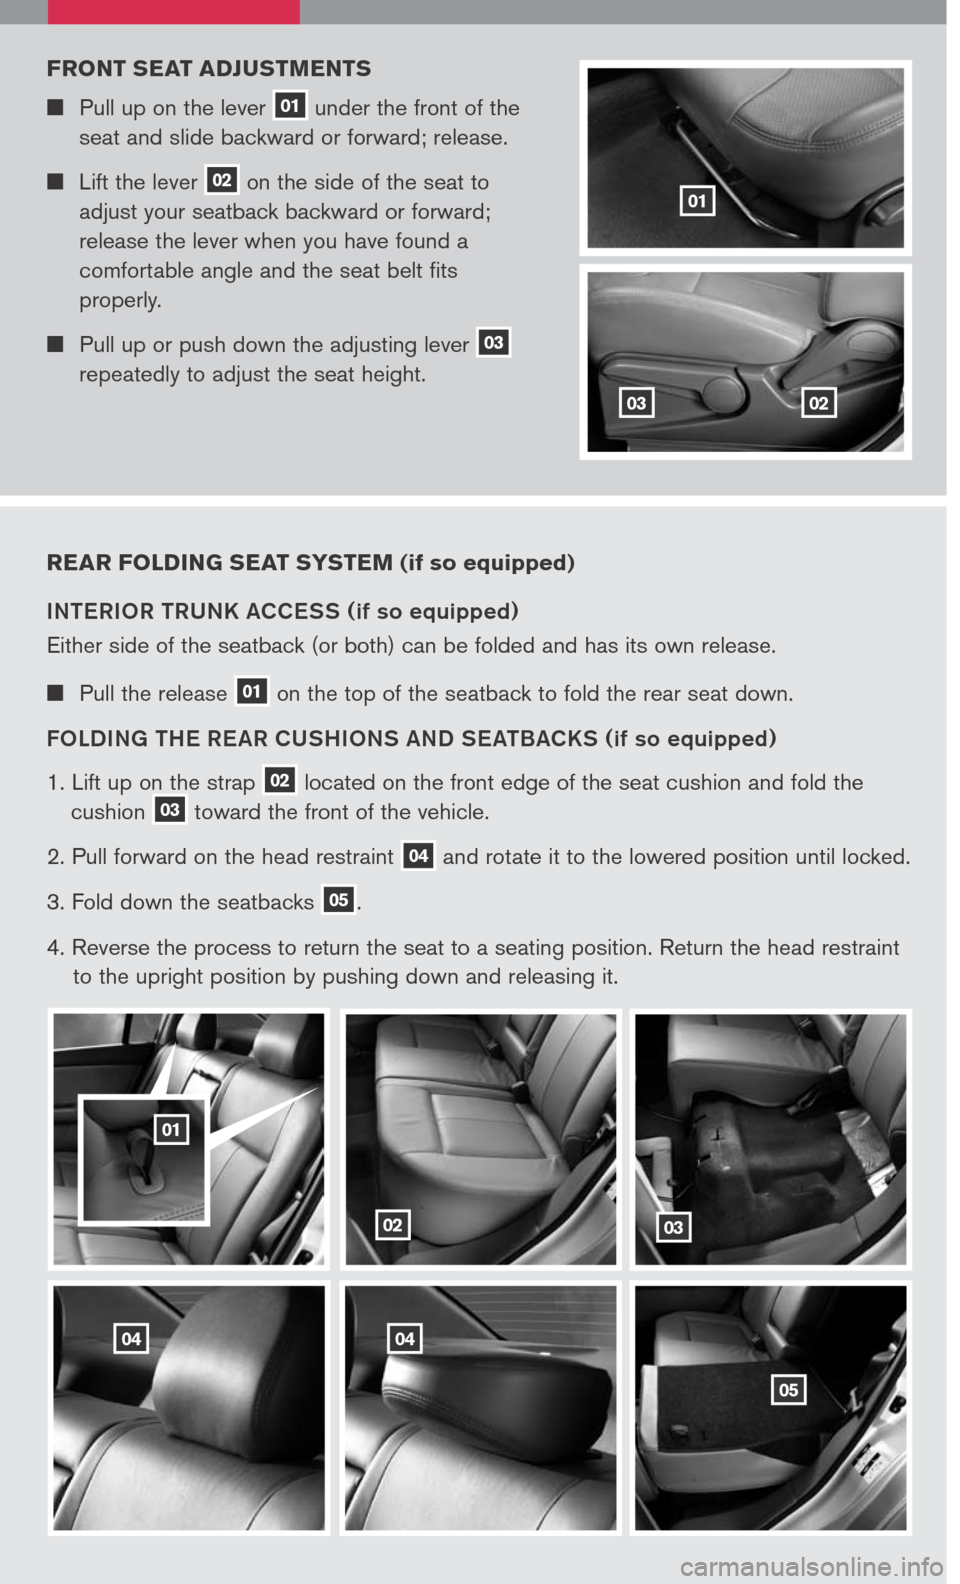
6- speed Manual trans Mission (if so equipped)
LOCK OUT
In 6-speed manual transmission equipped vehicles, the shift lever is equipped with a Reverse lock-out feature that prevents accidental selection of Reverse (instead of 1st gear).
SHIF TING TO REVERSE
Lift up on the collar then move the shift lever
left and up into Reverse.
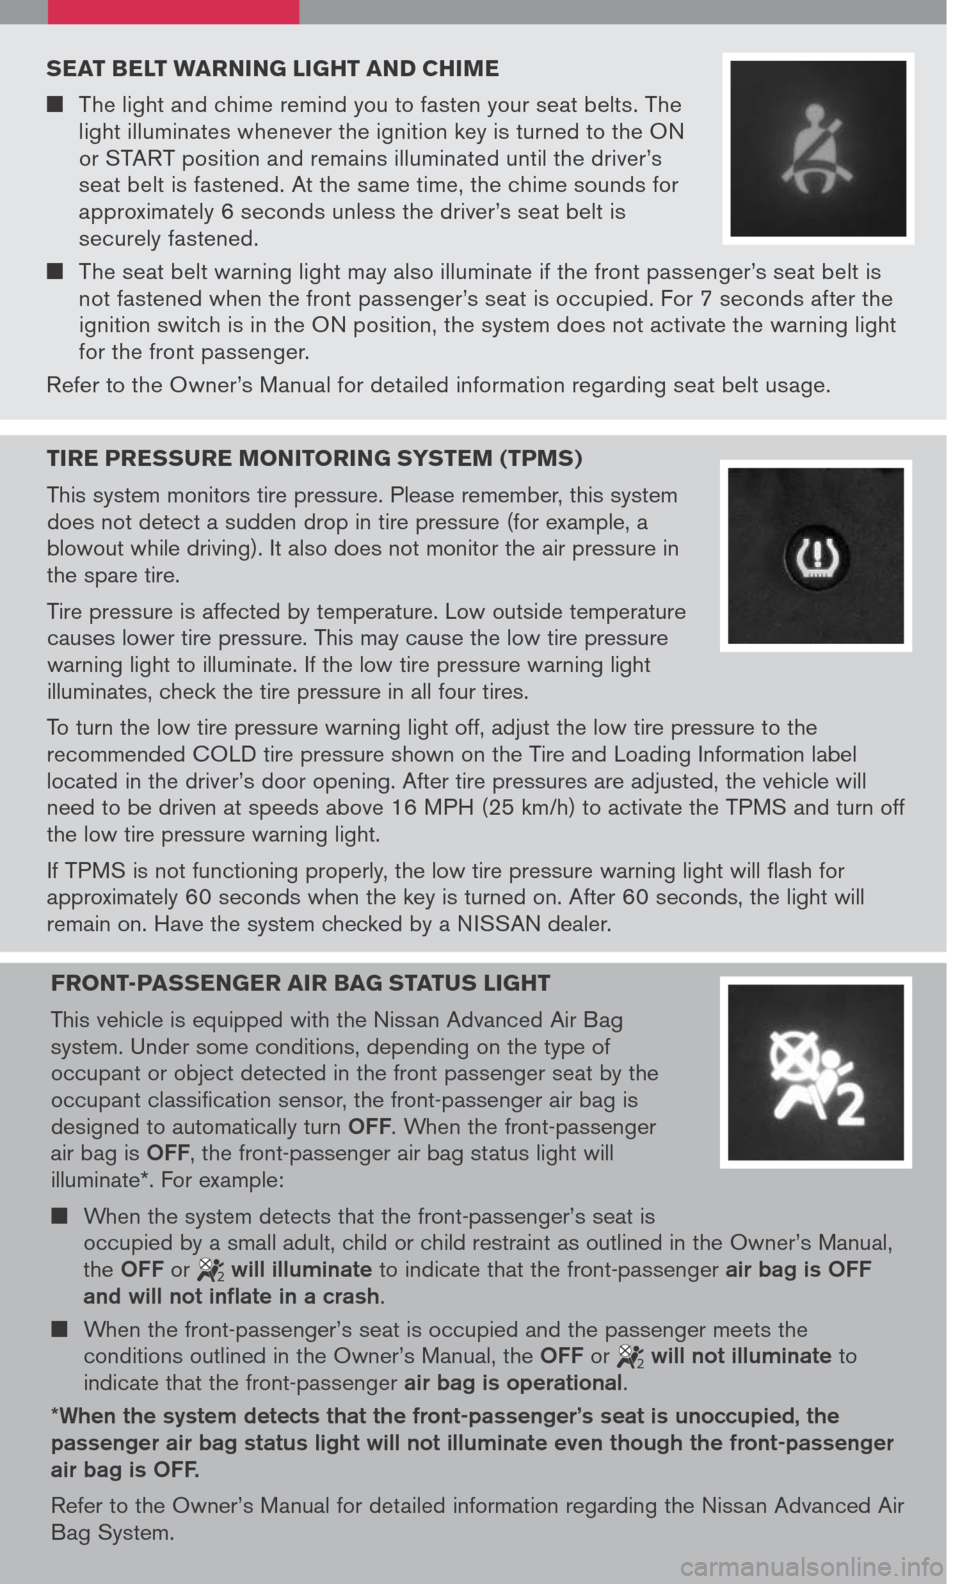
trunk diVider (if so equipped)
ACCESSING THROUGH TRUNK
Access the trunk divider by opening the trunk. To remove the trunk divider, press down on the securing latch 01 and lower the trunk divider. Pull and lift the divider out of the holding
brackets 02 to remove it from the trunk.
01
0202
01
Page 10 of 12

01
rear Folding seat syste M (if so equipped)
INTERIOR TRUNK ACCESS (if so equipped)
Either side of the seatback (or both) can be folded and has its own release.
Pull the release 01 on the top of the seatback to fold the rear seat down.
FOLDING THE RE AR CUSHIONS AND SE ATBACKS
(if so equipped)
1. Lift up on the strap 02 located on the front edge of the seat cushion and fold the
cushion 03 toward the front of the vehicle.
2. Pull forward on the head restraint 04 and rotate it to the lowered position until locked.
3. Fold down the seatbacks 05.
4. Reverse the process to return the seat to a seating position. Return the head restraint
to the upright position by pushing down and releasing it.
02
01
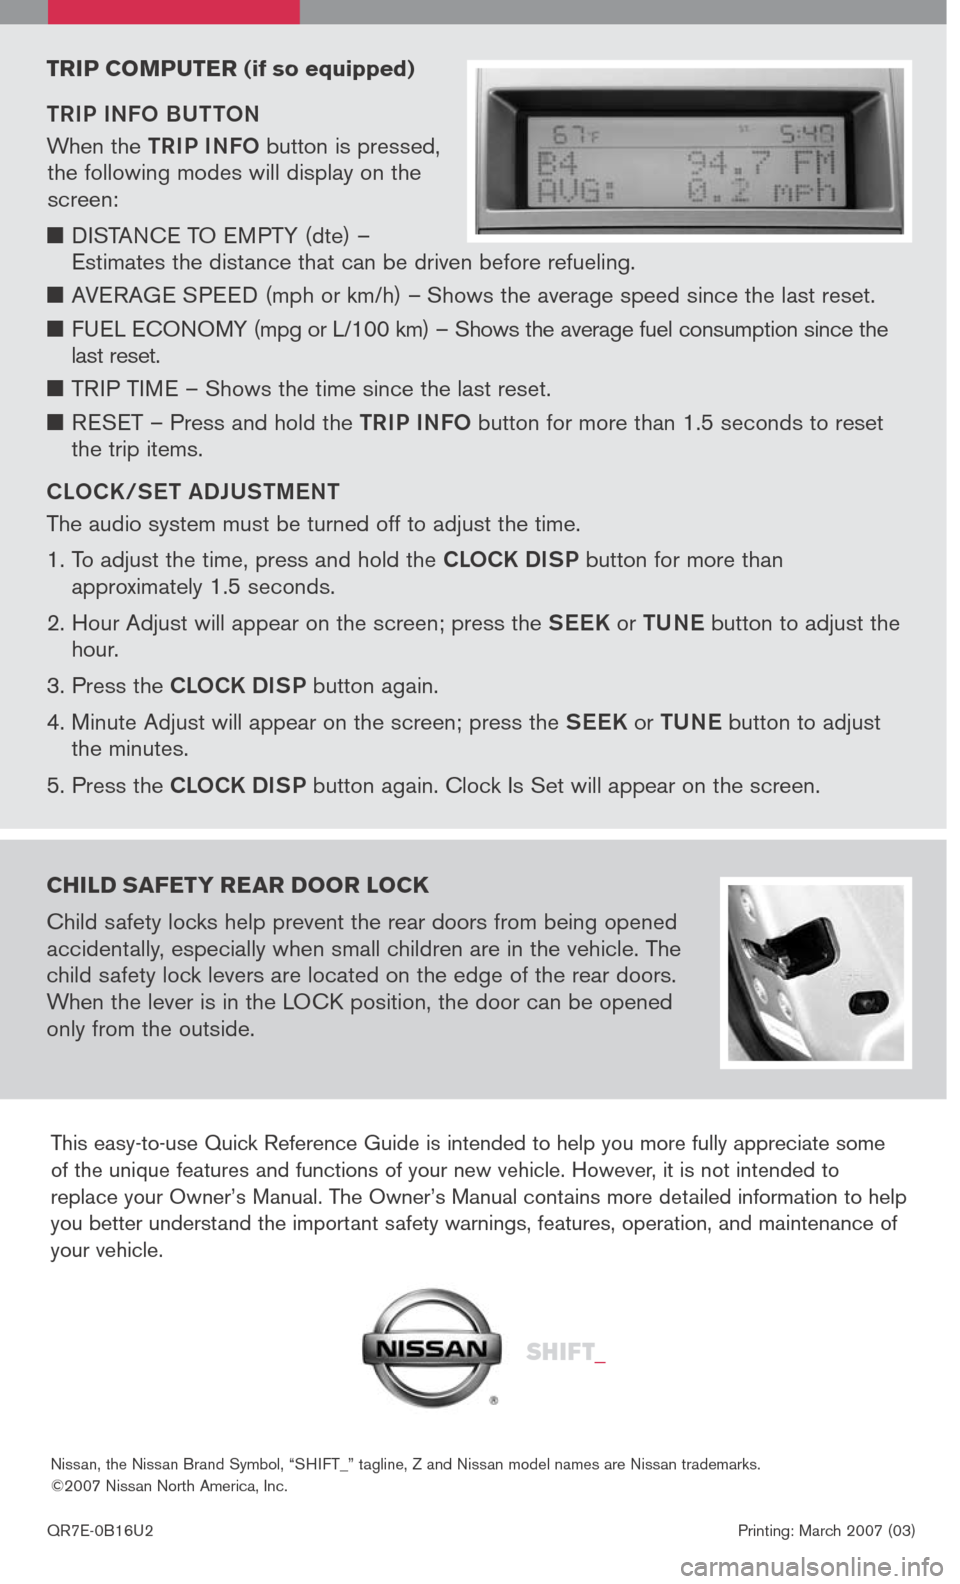
F ront seat adjust Ments
Pull up on the lever 01 under the front of the
seat and slide backward or forward; release.
Lift the lever 02 on the side of the seat to
adjust your seatback backward or forward;
release the lever when you have found a
comfortable angle and the seat belt fits
properly.
Pull up or push down the adjusting lever 03 repeatedly to adjust the seat height.
0203
0404
03
05
Page 11 of 12

seat Belt Warning light and chi Me
The light and chime remind you to fasten your seat belts. The light illuminates whenever the ignition key is turned to the ON or START position and remains illuminated until the driver’s seat belt is fastened. At the same time, the chime sounds for approximately 6 seconds unless the driver’s seat belt is securely fastened.
The seat belt warning light may also illuminate if the front passenger’s seat belt is not fastened when the front passenger’s seat is occupied. For 7 seconds after the ignition switch is in the ON position, the system does not activate the warning light for the front passenger.
Refer to the Owner’s Manual for detailed information regarding seat belt usage.
tire pressure Monitoring syste M (tpMs)
This system monitors tire pressure. Please remember, this system does not detect a sudden drop in tire pressure (for example, a blowout while driving). It also does not monitor the air pressure in the spare tire.
Tire pressure is affected by temperature. Low outside temperature causes lower tire pressure. This may cause the low tire pressure warning light to illuminate. If the low tire pressure warning light illuminates, check the tire pressure in all four tires.
To turn the low tire pressure warning light off, adjust the low tire pressure to the recommended COLD tire pressure shown on the Tire and Loading Information label located in the driver’s door opening. After tire pressures are adjusted, the vehicle will need to be driven at speeds above 16 MPH (25 km/h) to activate the TPMS and turn off the low tire pressure warning light.
If TPMS is not functioning properly, the low tire pressure warning light will flash for approximately 60 seconds when the key is turned on. After 60 seconds, the light will remain on. Have the system checked by a NISSAN dealer.
Front -passenger air Bag status light
This vehicle is equipped with the Nissan Advanced Air Bag system. Under some conditions, depending on the type of occupant or object detected in the front passenger seat by the occupant classification sensor, the front-passenger air bag is designed to automatically turn OFF. When the front-passenger air bag is OFF, the front-passenger air bag status light will illuminate*. For example:
When the system detects that the front-passenger’s seat is occupied by a small adult, child or child restraint as outlined in the Owner’s Manual, the OFF or 2 will illuminate to indicate that the front-passenger air bag is OFF and will not inflate in a crash.
When the front-passenger’s seat is occupied and the passenger meets the conditions outlined in the Owner’s Manual, the OFF or 2 will not illuminate to indicate that the front-passenger air bag is operational.
*When the system detects that the front-passenger’s seat is unoccupied, the passenger air bag status light will not illuminate even though the front-passenger air bag is OFF.
Refer to the Owner’s Manual for detailed information regarding the Nissan Advanced Air Bag System.
Page 12 of 12

This easy-to-use Quick Reference Guide is intended to help you more fully appreciate some of the unique features and functions of your new vehicle. However, it is not intended to replace your Owner’s Manual. The Owner’s Manual contains more detailed information to help you better understand the important safety warnings, features, operation, and maintenance of your vehicle.
QR7E-0B16U2 Printing: March 2007 (03)
Nissan, the Nissan Brand Symbol, “SHIFT_” tagline, Z and Nissan model names are Nissan trademarks. ©2007 Nissan North America, Inc.
Sh ift_
trip co Mputer (if so equipped)
TRIP INFO BUTTON
When the TRIP INFO button is pressed, the following modes will display on the screen:
DISTANCE TO EMPTY (dte) – Estimates the distance that can be driven before refueling.
AVERAGE SPEED (mph or km/h) – Shows the average speed since the last reset.
FUEL ECONOMY (mpg or L/100 km) – Shows the average fuel consumption since the last reset.
TRIP TIME – Shows the time since the last reset.
RESET – Press and hold the TRIP INFO button for more than 1.5 seconds to reset the trip items.
CLOCK /SET ADJUSTMENT
The audio system must be turned off to adjust the time.
1. To adjust the time, press and hold the CLOCK DISP button for more than approximately 1.5 seconds.
2. Hour Adjust will appear on the screen; press the SEEK or TUNE button to adjust the hour.
3. Press the CLOCK DISP button again.
4. Minute Adjust will appear on the screen; press the SEEK or TUNE button to adjust the minutes.
5. Press the CLOCK DISP button again. Clock Is Set will appear on the screen.
child sa Fety rear door lock
Child safety locks help prevent the rear doors from being opened accidentally, especially when small children are in the vehicle. The child safety lock levers are located on the edge of the rear doors. When the lever is in the LOCK position, the door can be opened only from the outside.