2007 NISSAN QUEST turn signal
[x] Cancel search: turn signalPage 254 of 384
cThe TPMS will activate only when the vehicle
is driven at speeds above 16 MPH (25
km/h) . Also, this system may not detect a
sudden drop in tire pressure (for example a
flat tire while driving) .
cTire pressure rises and falls depending on
the heat caused by the vehicle’s operation
and the outside temperature. Low outside
temperature can lower the temperature of
the air inside the tire which can cause a
lower tire inflation pressure. This may cause
the low tire pressure warning light to illumi-
nate. If the warning light illuminates in low
ambient temperature, check the tire pres-
sure for all four tires.
cYou can also check the pressure of all tires
(except the spare tire) on the display screen.
The order of the tire pressure figures dis-
played on the screen does not correspond
with the actual order of the tire position. See
“Tire pressure information” in the “Display
screen, heater, air conditioner and audio and
phone systems” section.
For additional information, see “Low tire pressure
warning light” in the “Instruments and controls”
section and “Tire Pressure Monitoring System
(TPMS)” in the “In case of emergency” section.WARNING
cIf the low tire pressure warning light
illuminates while driving, avoid sudden
steering maneuvers or abrupt braking,
reduce vehicle speed, pull off the road
to a safe location and stop the vehicle
as soon as possible. Serious vehicle
damage could occur and may lead to an
accident and could result in serious
personal injury. Check the tire pressure
for all four tires. Adjust the tire pressure
to the recommended COLD tire pres-
sure shown on the Tire and Loading
Information label to turn the low tire
pressure warning light OFF. If you have
a flat tire, replace it with a spare tire as
soon as possible. (See “Flat tire” in the
“In case of emergency” section for
changing a flat tire.)
cWhen a spare tire is mounted or a wheel
is replaced, tire pressure will not be
indicated, the TPMS will not function
and the low tire pressure warning light
will flash. Contact your NISSAN dealer
as soon as possible for tire replacement
and/or system resetting.
cReplacing tires with those not originally
specified by NISSAN could affect the
proper operation of the TPMS.cDo not inject any tire liquid or aerosol
tire sealant into the tires, as this may
cause a malfunction of the tire pressure
sensors.
CAUTION
Do not place metalized film or any metal
parts (antenna, etc.) on the windows. This
may cause poor reception of the signals
from the tire pressure sensors, and the
TPMS will not function properly.
FCC Notice:
Changes or modifications not expressly ap-
proved by the party responsible for compli-
ance could void the user’s authority to op-
erate the equipment.
This device complies with Part 15 of the
FCC Rules and RSS-210 of Industry
Canada.
Operation is subject to the following two
conditions: (1) This device may not cause
harmful interface, and (2) this device must
accept any interference received, including
interference that may cause undesired op-
eration of the device.
5-4Starting and driving
ZREVIEW COPYÐ2007 Quest(van)
Owners ManualÐUSA_English(nna)
02/27/06Ðdebbie
X
Page 278 of 384
For vehicles equipped with MichelinTPAXTtires,
the vehicle can be driven for a limited time on a
flat tire, see9Michelin PAX Tires9in the9Mainte-
nance and do-it-yourself9section.
TIRE PRESSURE MONITORING
SYSTEM (TPMS)
This vehicle is equipped with the Tire Pressure
Monitoring System (TPMS) . It monitors tire pres-
sure of all tires except the spare. When the low
tire pressure warning light is lit or flashing con-
tinuously, one or more of your tires is significantly
under-inflated. If equipped, the system also dis-
plays pressure of all tires (except the spare tire)
on the display screen by sending a signal from a
sensor that is installed in each wheel. If the ve-
hicle is being driven with low tire pressure, the
TPMS will activate and warn you of it by the low
tire pressure warning light. This system will acti-
vate only when the vehicle is driven at speeds
above 16 MPH (25 km/h) . For more details, refer
to “Warning/indicator lights and audible remind-
ers” in the “Instruments and controls” section,
“Tire pressure information” in the “Display screen,
heater, air conditioner and audio and phone sys-
tems” section and “Tire Pressure Monitoring Sys-
tem (TPMS)” in the “Starting and driving” section.
WARNING
cIf the low tire pressure warning light
illuminates while driving, avoid sudden
steering maneuvers or abrupt braking,
reduce vehicle speed, pull off the road
to a safe location and stop the vehicle
as soon as possible. Serious vehicle
damage could occur and may lead to an
accident and could result in serious
personal injury. Check the tire pressure
for all four tires. Adjust the tire pressure
to the recommended COLD tire pres-
sure shown on the Tire and Loading
Information label to turn the low tire
pressure warning light OFF. If you have
a flat tire, replace it with a spare tire as
soon as possible.
cAlthough you can continue driving with
a punctured MichelinTPAXTtire (if so
equipped) , remember that vehicle han-
dling stability is reduced, which could
lead to an accident and personal injury.
Also, driving a long distance at high
speeds may damage the tires.cDo not drive at speeds above 50 MPH
(80 km/h) and do not drive more than
125 miles (200 km) with a punctured
MichelinTPAXTtire (if so equipped) .
The actual distance the vehicle can be
driven on a flat tire depends on outside
temperature, vehicle load, road condi-
tions and other factors.
cDo not tow a trailer when a MichelinT
PAXT(if so equipped) tire is flat.
cWhen a spare tire is mounted or a wheel
is replaced, tire pressure will not be
indicated, the TPMS will not function
and the low tire pressure warning light
will flash. Contact your NISSAN dealer
as soon as possible for tire replacement
and/or system resetting.
cReplacing tires with those not originally
specified by NISSAN could affect the
proper operation of the TPMS.
cDo not inject any tire liquid or aerosol
tire sealant into the tires, as this may
cause a malfunction of the tire pressure
sensors.
FLAT TIRE
6-2In case of emergency
ZREVIEW COPYÐ2007 Quest(van)
Owners ManualÐUSA_English(nna)
02/27/06Ðdebbie
X
Page 279 of 384
CHANGING A FLAT TIRE
If you have a flat tire, follow the instructions be-
low.
Stopping the vehicle
1. Safely move the vehicle off the road and
away from traffic.
2. Turn on the hazard warning flashers.
3. Park on a level surface and apply the parking
brake. Shift the transmission into P (Park) .
4. Turn off the engine.
5. Raise the hood to warn other traffic and to
signal professional road assistance person-
nel that you need assistance.
6. Have all passengers get out of the vehicle
and stand in a safe place, away from traffic
and clear of the vehicle.
WARNING
cMake sure the parking brake is securely
applied and the automatic transmission
is shifted into P (Park) .
cNever change tires when the vehicle is
on a slope, ice or slippery areas. This is
hazardous.cNever change tires if oncoming traffic is
close to your vehicle. Wait for profes-
sional road assistance.
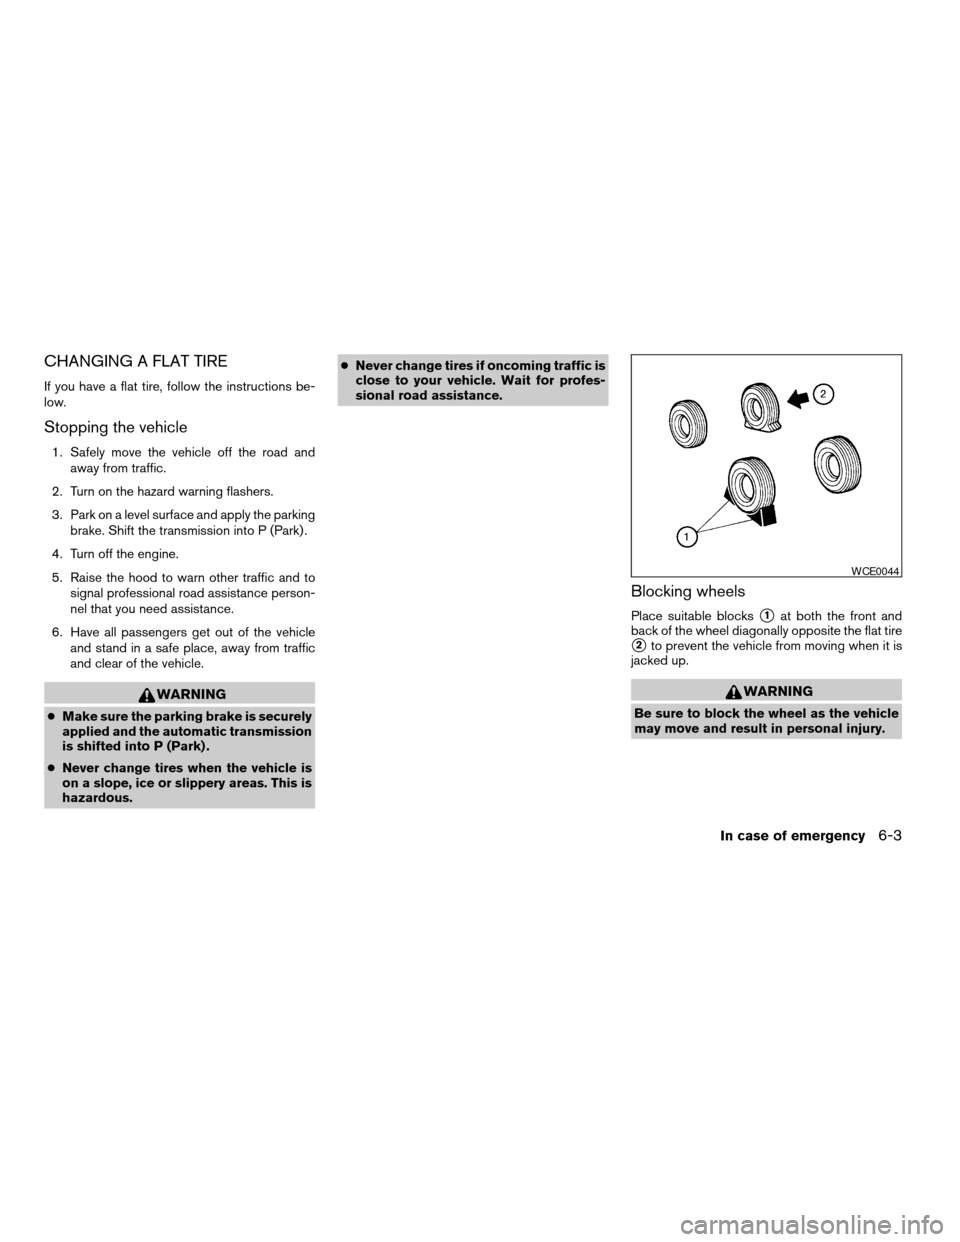
Blocking wheels
Place suitable blockss1at both the front and
back of the wheel diagonally opposite the flat tire
s2to prevent the vehicle from moving when it is
jacked up.
WARNING
Be sure to block the wheel as the vehicle
may move and result in personal injury.
WCE0044
In case of emergency6-3
ZREVIEW COPYÐ2007 Quest(van)
Owners ManualÐUSA_English(nna)
02/27/06Ðdebbie
X
Page 299 of 384

When driving in areas using road salt or other
corrosive materials, check lubrication frequently.
Lights*Clean the headlights on a regular basis.
Make sure that the headlights, stop lights, tail
lights, turn signal lights, and other lights are all
operating properly and installed securely. Also
check headlight aim.
Road wheel nuts*When checking the tires,
make sure no wheel nuts are missing, and check
for any loose wheel nuts. Tighten if necessary.
Tire rotation*Tires should be rotated every
7,500 miles (12,000 km) .
Tires*Check the pressure with a gauge often
and always prior to long distance trips. If neces-
sary, adjust the pressure in all tires, including the
spare, to the pressure specified. Check carefully
for damage, cuts or excessive wear.
Wheel alignment and balanceIf the vehicle
should pull to either side while driving on a
straight and level road, or if you detect uneven or
abnormal tire wear, there may be a need for wheel
alignment. If the steering wheel or seat vibrates at
normal highway speeds, wheel balancing may be
needed.
cFor additional information regarding tires,
refer to “Important Tire Safety Information”
(US) or “Tire Safety Information” (Canada) in
the Warranty Information Booklet .WindshieldClean the windshield on a regular
basis. Check the windshield at least every six
months for cracks or other damage. Have a dam-
aged windshield repaired by a qualified repair
facility.
Windshield wiper blades*Check for cracks or
wear if they do not wipe properly.
Inside the vehicle
The maintenance items listed here should be
checked on a regular basis, such as when per-
forming periodic maintenance, cleaning the ve-
hicle, etc.
Additional information on the following
items with an “*” is found later in this sec-
tion.
Accelerator pedalCheck the pedal for smooth
operation and make sure the pedal does not bind
or require uneven effort. Keep the floor mat away
from the pedal.
Automatic transmission P (Park) position
mechanismOn a fairly steep hill check that your
vehicle is held securely with the selector lever in
the P (Park) position without applying any brakes.
Brake pedal*Check the pedal for smooth op-
eration and keep the floor mat away from the
pedal.BrakesCheck that the brakes do not pull the
vehicle to one side when applied.
Parking brakeConfirm that your vehicle is held
securely on a fairly steep hill with only the parking
brake applied.
SeatsCheck seat position controls such as seat
adjusters, seatback recliner, etc. to ensure they
operate smoothly and all latches lock securely in
every position. Check that the head restraints
move up and down smoothly and the locks (if so
equipped) hold securely in all latched positions.
Seat beltsCheck that all parts of the seat belt
system (for example, buckles, anchors, adjusters
and retractors) operate properly and smoothly,
and are installed securely. Check the belt web-
bing for cuts, fraying, wear or damage.
Steering wheelCheck for changes in the steer-
ing system, such as excessive freeplay, hard
steering or strange noises.
Warning lights and chimesMake sure all
warning lights and chimes are operating properly.
Windshield wiper and washer*Check that
the wipers and washer operate properly and that
the wipers do not streak.
Maintenance and do-it-yourself8-3
ZREVIEW COPYÐ2007 Quest(van)
Owners ManualÐUSA_English(nna)
02/27/06Ðdebbie
X
Page 360 of 384
Tire pressures
cWhen towing a trailer, inflate the ve-
hicle tires to the recommended cold
tire pressure indicated on the Tire
and Loading Information label.
cTrailer tire condition, size, load rating
and proper inflation pressure should
be in accordance with the trailer and
tire manufacturer’s specifications.
Safety chains
Always use suitable safety chains between your
vehicle and the trailer. The safety chains should
be crossed and should be attached to the hitch,
not to the vehicle bumper or axle. Be sure to leave
enough slack in the chains to permit turning
corners.
Trailer lights
CAUTION
When splicing into the vehicle electrical
system, a commercially available power-
type module/converter must be used to
provide power for all trailer lighting. This
unit uses the vehicle battery as a direct
power source for all trailer lights while
using the vehicle tail light, stoplight and
turn signal circuits as a signal source. The
module/converter must draw no more
that 15 milliamps from the stop and tail
lamp circuits. Using a module/converter
that exceeds these power requirements
may damage the vehicle’s electrical sys-
tem. See a reputable trailer dealer to ob-
tain the proper equipment and to have it
installed.
Trailer lights should comply with federal and/or
local regulations. For assistance in hooking up
trailer lights, contact a NISSAN dealer or repu-
table trailer dealer. A genuine NISSAN trailer tow
harness is available from your NISSAN dealer.
Trailer brakes
If your trailer is equipped with a braking system,
make sure it conforms to federal and/or local
regulations and that it is properly installed.
WARNING
Never connect a trailer brake system di-
rectly to the vehicle brake system.
Pre-towing tips
cBe certain your vehicle maintains a level
position when a loaded and/or unloaded
trailer is hitched. Do not drive the vehicle if it
has an abnormal nose-up or nose-down
condition; check for improper tongue load,
overload, worn suspension or other possible
causes of either condition.
cAlways secure items in the trailer to prevent
load shift while driving.
cKeep the cargo load as low as possible in
the trailer to keep the trailer center of gravity
low.
cLoad the trailer so approximately 60% of the
trailer load is in the front half and 40% is in
the back half. Also make sure the load is
balanced side to side.
cCheck your hitch, trailer tire pressure, ve-
hicle tire pressure, trailer light operation, and
trailer wheel lug nuts every time you attach a
trailer to the vehicle.
9-20Technical and consumer information
ZREVIEW COPYÐ2007 Quest(van)
Owners ManualÐUSA_English(nna)
02/27/06Ðdebbie
X
Page 371 of 384

F
Flashers
(See hazard warning flasher switch)......2-24
Flat tire......................6-2
Floor mat positioning aid.............7-4
Fluid
Brake fluid..................8-12
Capacities and recommended
fuel/lubricants.................9-2
Engine coolant................8-7
Engine oil...................8-8
Power steering fluid.............8-11
Window washer fluid............8-12
F.M.V.S.S. certification label..........9-10
Fog light switch.................2-23
Front air bag system
(See supplemental restraint system).....1-58
Front seats....................1-2
Fuel
Capacities and recommended
fuel/lubricants.................9-2
Fuel economy................5-17
Fuel gauge..................2-5
Fuel octane rating..............9-4
Fuel recommendation............9-3
Fuel-filler door and cap...........3-19
Fuel-filler door lock opener lever......3-19
Fuel economy setting........4-4, 4-8, 4-19
Fuses......................8-20
Fusible links...................8-21G
Garage door opener, HomeLinkTUniversal
Transceiver...................2-46
Garment hook..................2-37
Gascap.....................3-19
Gauge
Engine coolant temperature gauge.....2-5
Fuel gauge..................2-5
Odometer...................2-4
Speedometer.................2-4
Tachometer..................2-4
Trip odometer.................2-4
General maintenance..............8-2
Glove box....................2-31
Glove box lock.................2-31
Grocery hooks.................2-32
H
Hazard warning flasher switch.........2-24
Head restraints..................1-8
Active head restraint.............1-7
Headlight and turn signal switch........2-19
Headlight control switch............2-19
Headlights....................8-24
Headphones
(See DVD entertainment system).......4-65
Headrest storage................2-37
Heated seats..................2-25
Heater
Heater and air conditioner
controls................4-31, 4-40
Heater operation...........4-33, 4-41Rear seat air conditioner..........4-42
HomeLinkTUniversal Transceiver.......2-46
Hood release..................3-14
Horn.......................2-25
I
Ignition switch..................5-8
Immobilizer system..........2-16, 3-2, 5-9
Important vehicle information label.......9-10
In-cabin microfilter...............8-16
Increasing fuel economy............5-17
Indicator lights and audible reminders
(See warning/indicator lights and audible
reminders).....................2-7
Inside automatic anti-glare mirror.......3-23
Inside mirror...................3-23
Instrument brightness control.........2-22
Instrument panel..............0-6, 2-2
Instrument panel dimmer switch........2-22
Interior lights
(see Lights on demand switch)........2-43
ISOFIX child restraints.............1-27
J
Jump starting...................6-8
K
Key ........................3-2
Keyfob battery replacement..........8-23
10-3
ZREVIEW COPYÐ2007 Quest(van)
Owners ManualÐUSA_English(nna)
02/27/06Ðdebbie
X
Page 372 of 384

Keyless entry system
(See remote keyless entry system).......3-9
L
Labels
Air conditioner specification label.....9-11
C.M.V.S.S. certification label........9-10
Emission control information label.....9-10
Engine serial number............9-10
F.M.V.S.S. certification label........9-10
Vehicle identification number (VIN) plate . .9-9
Warning labels (for SRS)..........1-65
Language setting..........4-6, 4-15, 4-26
LATCH
(Lower Anchors and Tethers for CHildren)
System......................1-27
License plate
Installing the license plate.........9-12
Lift gate.....................3-14
Lift gate release.................3-18
Light
Air bag warning light.........1-65, 2-11
Brake light (See stop light).........8-25
Bulb check/instrument panel........2-7
Bulb replacement..............8-25
Charge warning light.............2-8
Cornering light...............2-24
Fog light switch...............2-23
Headlight and turn signal switch......2-19
Headlight control switch..........2-19
Headlights..................8-24
Light bulbs..................8-24
Low tire pressure warning light.......2-9
Low washer fluid warning light.......2-11Passenger air bag and status light.....1-59
Personal lights...............2-44
Security indicator light...........2-13
Warning/indicator lights and audible
reminders...................2-7
Lights
Map lights..................2-45
Lights on demand switch............2-43
Lock
Child safety sliding door lock........3-9
Door locks..................3-3
Fuel-filler door lock opener lever......3-19
Glove box lock...............2-31
Lift gate release...............3-18
Power door locks...............3-5
Low fuel warning light..............2-9
Low tire pressure warning light.........2-9
Low washer fluid warning light.........2-11
Luggage (See vehicle loading information) . .9-12
M
Main ON/OFF switch
(for power doors).............3-6, 3-15
Maintenance
Changing the maintenance
interval.................4-9, 4-20
Displaying the maintenance notice
reminder...............4-10, 4-20
General maintenance............8-2
Inside the vehicle...............8-3
Maintenance precautions..........8-5
Outside the vehicle..............8-2
Resetting the maintenance
interval................4-10, 4-20Seat belt maintenance...........1-25
Setting.................4-9, 4-19
Under the hood and vehicle.........8-4
Malfunction indicator light...........2-12
Manual front seat adjustment..........1-2
Manual vent windows..............2-41
Map lights....................2-45
Map pocket...................2-31
Meters and gauges................2-3
Instrument brightness control.......2-22
Mirror
Automatic anti-glare inside mirror.....3-23
Inside mirror.................3-23
Vanity mirror.................3-22
N
NISSAN vehicle immobilizer
system................2-16, 3-2, 5-9
O
Octane rating (See fuel octane rating).....9-4
Odometer.....................2-4
Oil
Capacities and recommended
fuel/lubricants.................9-2
Changing engine oil.............8-9
Changing engine oil filter..........8-10
Checking engine oil level..........8-8
Engine oil...................8-8
Engine oil and oil filter recommendation . .9-5
Engine oil viscosity..............9-5
Overdrive switch................5-13
10-4
ZREVIEW COPYÐ2007 Quest(van)
Owners ManualÐUSA_English(nna)
02/27/06Ðdebbie
X
Page 374 of 384

Setting button...........4-5, 4-11, 4-22
Shift lock release................5-12
Shifting
Automatic transmission...........5-11
Shoulder belt height adjustment........1-24
Side air bag system (See supplemental side
air bag and curtain side-impact air
bag system)...................1-62
SkyView™ roof.................2-41
Sliding door
Manual sliding door.............3-5
Power sliding door..............3-6
Sliding door locks
Child safety sliding door locks........3-9
Spark plug replacement............8-15
Speedometer...................2-4
SRS warning label...............1-65
Starting
Before starting the engine..........5-9
Jump starting.................6-8
Precautions when starting and driving . . .5-2
Push starting................6-10
Starting the engine.............5-10
Startup screen.................4-18
Steering
Power steering fluid.............8-11
Power steering system...........5-19
Tilting steering wheel............3-21
Steering wheel audio control switch......4-59
Stop light....................8-25
Storage.....................2-28
Storage bin............2-33, 2-36, 2-37
Storage tray...................2-29
Sun visors....................3-22
Sunglasses case................2-28
Sunglasses holder...............2-28Sunroof.....................2-42
Supplemental air bag warning labels.....1-65
Supplemental air bag warning light . . .1-65, 2-11
Supplemental front impact air bag system . .1-58
Supplemental restraint system
Information and warning labels.......1-65
Precautions on supplemental restraint
system....................1-51
Supplemental restraint system
(Supplemental air bag system).........1-51
Supplemental side and curtain side-impact air
bag system...................1-62
Switch
Autolight switch...............2-20
Automatic power window switch.....2-40
Fog light switch...............2-23
Hazard warning flasher switch.......2-24
Headlight and turn signal switch......2-19
Headlight control switch..........2-19
Ignition switch................5-8
Lights on demand switch..........2-43
Main ON/OFF switch
(for power doors)...........3-6, 3-15
Overdrive switch..............5-13
Power door lock switch...........3-5
Rear sonar system off switch.......2-27
Rear window and outside mirror defroster
switch....................2-18
Rear window wiper and washer
switches...................2-18
Traction control system (TCS) off
switch....................2-26
Turn signal switch..............2-23
Vehicle dynamic control (VDC) off
switch....................2-26
Windshield wiper and washer switch . . .2-17T
Tachometer....................2-4
Temperature gauge
Engine coolant temperature gauge.....2-5
Theft (NISSAN vehicle immobilizer system) ,
engine start..............2-16, 3-2, 5-9
Third row bench seat adjustment.....1-7, 1-12
Three-way catalyst................5-2
Tilting steering wheel..............3-21
Tire
Flat tire....................6-2
Spare tire................6-4, 8-42
Tire chains..................8-39
Tire placard.................9-11
Tire pressure................8-29
Tire rotation.................8-40
Types of tires................8-37
Uniform tire quality grading.........9-23
Wheels and tires..............8-29
Wheel/tire size................9-8
Tire pressure
Low tire pressure warning light.......2-9
Tire pressure display........4-4, 4-11, 4-21
Tire pressure monitoring system......5-3, 5-5
Tire rotation maintenance reminder . . .4-4, 4-11,
4-21
Top tether strap child restraint.........1-30
Towing
Flat towing..................9-22
Tow truck towing..............6-11
Towing load/specification.........9-19
Trailer towing................9-16
Traction control system (TCS) off switch . . .2-26
10-6
ZREVIEW COPYÐ2007 Quest(van)
Owners ManualÐUSA_English(nna)
02/27/06Ðdebbie
X