2007 NISSAN QUEST service indicator
[x] Cancel search: service indicatorPage 92 of 384

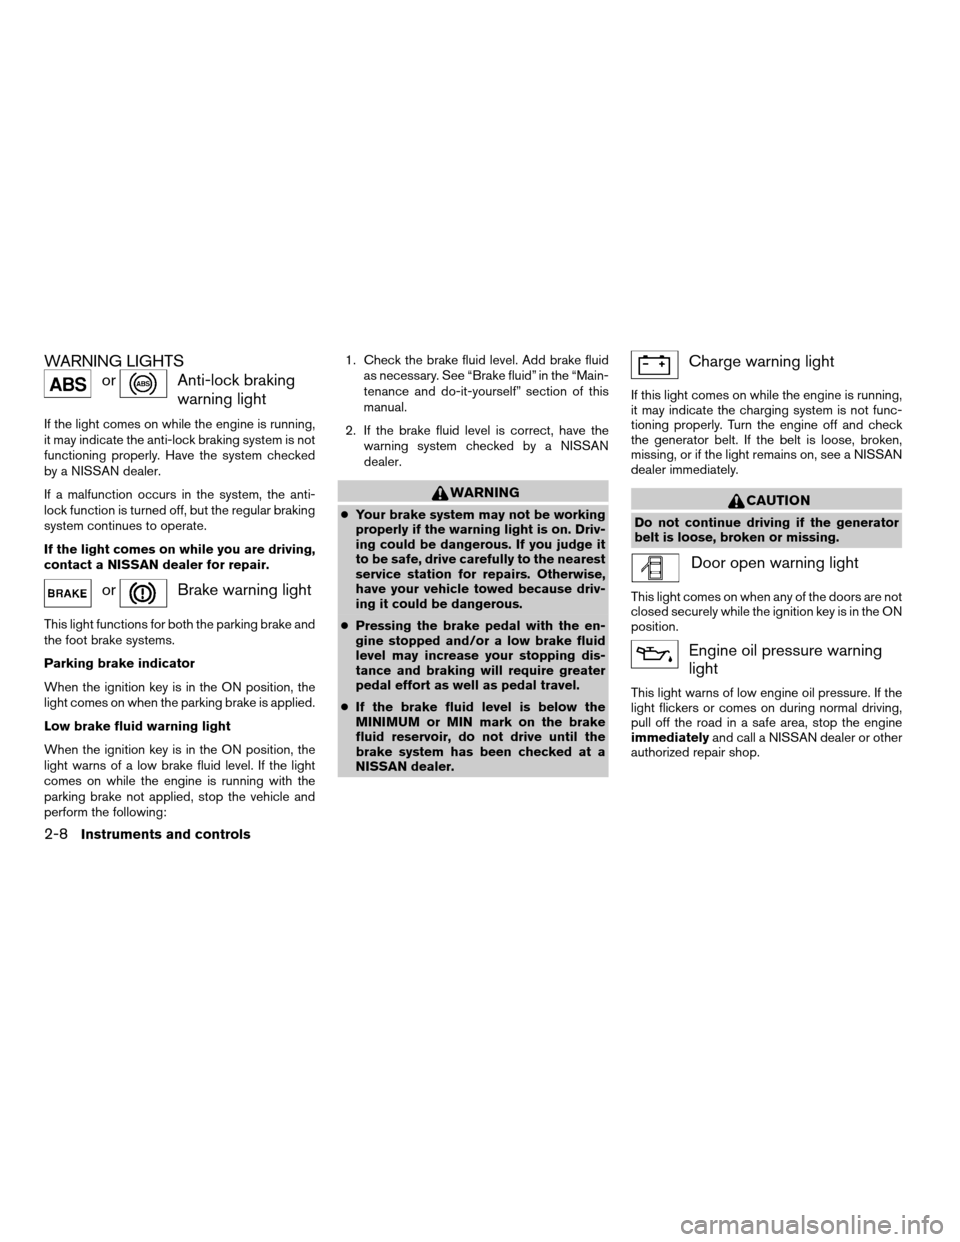
WARNING LIGHTS
orAnti-lock braking
warning light
If the light comes on while the engine is running,
it may indicate the anti-lock braking system is not
functioning properly. Have the system checked
by a NISSAN dealer.
If a malfunction occurs in the system, the anti-
lock function is turned off, but the regular braking
system continues to operate.
If the light comes on while you are driving,
contact a NISSAN dealer for repair.
orBrake warning light
This light functions for both the parking brake and
the foot brake systems.
Parking brake indicator
When the ignition key is in the ON position, the
light comes on when the parking brake is applied.
Low brake fluid warning light
When the ignition key is in the ON position, the
light warns of a low brake fluid level. If the light
comes on while the engine is running with the
parking brake not applied, stop the vehicle and
perform the following:1. Check the brake fluid level. Add brake fluid
as necessary. See “Brake fluid” in the “Main-
tenance and do-it-yourself” section of this
manual.
2. If the brake fluid level is correct, have the
warning system checked by a NISSAN
dealer.
WARNING
cYour brake system may not be working
properly if the warning light is on. Driv-
ing could be dangerous. If you judge it
to be safe, drive carefully to the nearest
service station for repairs. Otherwise,
have your vehicle towed because driv-
ing it could be dangerous.
cPressing the brake pedal with the en-
gine stopped and/or a low brake fluid
level may increase your stopping dis-
tance and braking will require greater
pedal effort as well as pedal travel.
cIf the brake fluid level is below the
MINIMUM or MIN mark on the brake
fluid reservoir, do not drive until the
brake system has been checked at a
NISSAN dealer.
Charge warning light
If this light comes on while the engine is running,
it may indicate the charging system is not func-
tioning properly. Turn the engine off and check
the generator belt. If the belt is loose, broken,
missing, or if the light remains on, see a NISSAN
dealer immediately.
CAUTION
Do not continue driving if the generator
belt is loose, broken or missing.
Door open warning light
This light comes on when any of the doors are not
closed securely while the ignition key is in the ON
position.
Engine oil pressure warning
light
This light warns of low engine oil pressure. If the
light flickers or comes on during normal driving,
pull off the road in a safe area, stop the engine
immediatelyand call a NISSAN dealer or other
authorized repair shop.
2-8Instruments and controls
ZREVIEW COPYÐ2007 Quest(van)
Owners ManualÐUSA_English(nna)
02/27/06Ðdebbie
X
Page 100 of 384

NISSAN VEHICLE IMMOBILIZER
SYSTEM
The NISSAN Vehicle Immobilizer System will not
allow the engine to start without the use of a
registered key.
If the engine fails to start using a registered key
(for example, when interference is caused by
another registered key, an automated toll road
device or automatic payment device on the key
ring) , restart the engine using the following pro-
cedures:
1. Leave the ignition switch in the ON position
for approximately 5 seconds.
2. Turn the ignition switch to the OFF or LOCK
position, and wait approximately 10 sec-
onds.
3. Repeat steps 1 and 2.
4. Restart the engine while holding the device
(which may have caused the interference)
separate from the registered key.
If the no start condition re-occurs, NISSAN rec-
ommends placing the registered key on a sepa-
rate key ring to avoid interference from other
devices.Statement related to Section 15 of FCC
Rules for NISSAN Vehicle Immobilizer Sys-
tem (CONT ASSY — IMMOBILIZER, ANT
ASSY — IMMOBILIZER)
This device complies with part 15 of the
FCC Rules and RSS-210 of Industry
Canada. Operation is subject to the follow-
ing two conditions;
(1) This device may not cause harmful in-
terference, and (2) this device must accept
any interference received, including inter-
ference that may cause undesired opera-
tion of the device.
CHANGES OR MODIFICATIONS NOT EX-
PRESSLY APPROVED BY THE PARTY RE-
SPONSIBLE FOR COMPLIANCE COULD
VOID THE USER’S AUTHORITY TO OPER-
ATE THE EQUIPMENT.
Security indicator light
The security indicator light blinks whenever the
ignition switch is in the LOCK, OFF or ACC
position. This function indicates the NISSAN Ve-
hicle Immobilizer System is operational.
If the NISSAN Vehicle Immobilizer System is mal-
functioning, the light will remain on while the
ignition key is in the ON position.
If the light still remains on and/or the en-
gine will not start, see a NISSAN dealer for
NISSAN Vehicle Immobilizer System ser-
vice as soon as possible. Please bring all
registered keys that you have when visiting
your NISSAN dealer for service.
LIC0474
2-16Instruments and controls
ZREVIEW COPYÐ2007 Quest(van)
Owners ManualÐUSA_English(nna)
02/27/06Ðdebbie
X
Page 218 of 384

The FM stereo indicator ST will glow during FM
stereo reception. When the stereo broadcast
signal is weak, the radio will automatically change
from stereo to monaural reception.
TUNE (Tuning Type A
only):
To manually tune the radio, press the TUNE
button
or.
To move quickly through the channels, hold either
the
orbutton down for more than
1.5 seconds.
TUNE (Tuning Type B
and C):
To manually tune the radio, press the TUNE
button
or.
To move quickly through the channels, hold either
the
orbutton down for more than
1.5 seconds.
SEEK tuning (Type A
only):
Press the SEEK/TRACK button
orfor less than 1.5 seconds to tune from high to low
or low to high frequencies and stop at the next
broadcasting station.
SEEK tuning (Type B and
C):
Press the SEEK/TRACK button
orfor less than 1.5 seconds to tune from high to low
or low to high frequencies and stop at the next
broadcasting station.
SCAN RPT tuning (Type A and B only):
Press the SCAN RPT button for more than 1.5
seconds to stop at each broadcasting station
(AM, FM or SAT if so equipped) for 5 seconds.
Pressing the button again during this 5 second
period will stop SCAN tuning and the radio will
remain tuned to that station. If the SCAN RPT
button is not pressed within 5 seconds, SCAN
tuning moves to the next station.
SCAN tuning (Type C only):
Press the SCAN button for more than 1.5 sec-
onds to stop at each broadcasting station for 5
seconds. Pressing the button again during this 5
second period will stop SCAN tuning and the
radio will remain tuned to that station. If the
SCAN button is not pressed within 5 seconds,
SCAN tuning moves to the next station.
Station memory operations:
18 stations can be set for the FM, AM and SAT
radio to the A, B and C preset button in any
combination of AM, FM or SAT* stations.1. Press the PRESET A·B·C button to change
between storage banks. The radio displays
the icon A, B or C to indicate which set of
presets are active.
2. Tune to the desired station using manual,
SEEK or SCAN tuning. Press and hold any
of the desired station memory buttons (1 –
6) until a beep sound is heard. (The radio
mutes when the select button is pressed) .
3. The channel indicator will then come on and
the sound will resume. Memorizing is now
complete.
4. Other buttons can be set in the same man-
ner.
* SAT presets are only available on SAT equipped
vehicles.
If the battery cable is disconnected, or if the fuse
opens, the radio memory will be canceled. In that
case, reset the desired stations.
Radio data system (RDS):
RDS stands for Radio Data System, and is a data
information service transmitted by some radio
stations on the FM band (not AM band) and/or
SAT radio encoded within a regular radio broad-
cast. Currently, most RDS stations are in large
cities, but many stations are now considering
broadcasting RDS data.
4-54Display screen, heater, air conditioner, audio and phone systems
ZREVIEW COPYÐ2007 Quest(van)
Owners ManualÐUSA_English(nna)
02/27/06Ðdebbie
X
Page 337 of 384

cThe original tires have built-in
tread wear indicators. When the
wear indicators are visible, the
tire(s) should be replaced.
cTires degrade with age and use.
Have tires, including the spare,
over 6 years old checked by a
qualified technician because
some tire damage may not be ob-
vious. Replace the tires as neces-
sary to prevent tire failure and
possible personal injury.
cImproper service of the spare tire
may result in serious personal in-
jury. If it is necessary to repair the
spare tire, contact a NISSAN
dealer.
cFor additional information re-
garding tires, refer to “Important
Tire Safety Information” (US) or
“Tire Safety Information”
(Canada) in the Warranty Infor-
mation Booklet.Replacing wheels and tires
When replacing a tire, use the same size, tread
design, speed rating and load carrying capacity
as originally equipped. Recommended types and
sizes are shown in “Wheels and tires” in the
“Technical and consumer information” section of
this manual.
WARNING
cThe use of tires other than those recom-
mended or the mixed use of tires of
different brands, construction (bias,
bias-belted or radial) , or tread patterns
can adversely affect the ride, braking,
handling, ground clearance, body-to-
tire clearance, tire chain clearance,
speedometer calibration, headlight aim
and bumper height. Some of these ef-
fects may lead to accidents and could
result in serious personal injury.
cIf the wheels are changed for any rea-
son, always replace with wheels which
have the same off-set dimension.
Wheels of a different off-set could
cause premature tire wear, degrade ve-
hicle handling characteristics and/or
interference with the brake
discs/drums. Such interference can
lead to decreased braking efficiencyand/or early brake pad/shoe wear. Re-
fer to “Wheels and tires” in the “Techni-
cal and consumer information” section
of this manual for wheel off-set
dimensions.
cWhen a spare tire is mounted or a wheel
is replaced, tire pressure will not be
indicated, the TPMS will not function
and the low tire pressure warning light
will flash. Contact your NISSAN dealer
as soon as possible for tire replacement
and/or system resetting.
cReplacing tires with those not originally
specified by NISSAN could affect the
proper operation of the TPMS.
cDo not install a deformed wheel or tire
even if it has been repaired. Such
wheels or tires could have structural
damage and could fail without warning.
cThe use of retread tires is not
recommended.
cFor additional information regarding
tires, refer to “Important Tire Safety In-
formation” (US) or “Tire Safety Informa-
tion” (Canada) in the Warranty Informa-
tion Booklet.
Maintenance and do-it-yourself8-41
ZREVIEW COPYÐ2007 Quest(van)
Owners ManualÐUSA_English(nna)
02/27/06Ðdebbie
X
Page 338 of 384

Wheel balance
Unbalanced wheels may affect vehicle handling
and tire life. Even with regular use, wheels can get
out of balance. Therefore, they should be bal-
anced as required.
Wheel balance service should be per-
formed with the wheels off the vehicle.
Spin balancing the wheels on the vehicle
could lead to mechanical damage.
cFor additional information regarding
tires, refer to “Important Tire Safety
Information” (US) or “Tire Safety Infor-
mation” (Canada) in the Warranty In-
formation Booklet .
Care of wheels
cWash the wheels when washing the vehicle
to maintain their appearance.
cClean the inner side of the wheels when the
wheel is changed or the underside of the
vehicle is washed.
cDo not use abrasive cleaners when washing
the wheels.
cInspect wheel rims regularly for dents or
corrosion. Such damage may cause loss of
pressure or poor seal at the tire bead.cNISSAN recommends waxing the road
wheels to protect against road salt in areas
where it is used during winter.
Spare tire (TEMPORARY USE ONLY
spare tire)
Observe the following precautions if the TEM-
PORARY USE ONLY spare tire must be used.
Otherwise, your vehicle could be damaged or
involved in an accident:
WARNING
cThe spare tire should be used for emer-
gency use only. It should be replaced
with the standard tire at the first oppor-
tunity to avoid possible tire or differen-
tial damage.
cDrive carefully while the TEMPORARY
USE ONLY spare tire is installed. Avoid
sharp turns and abrupt braking while
driving.
cPeriodically check spare tire inflation
pressure. Always keep the pressure of
the TEMPORARY USE ONLY spare tire
at 60 psi (420 kPa, 4.2 bar) .
cWith the TEMPORARY USE ONLY spare
tire installed do not drive the vehicle at
speeds faster than 50 MPH (80 km/h) .cWhen driving on roads covered with
snow or ice, the TEMPORARY USE
ONLY spare tire should be used on the
rear wheels and the original tire used
on the front wheels (drive wheels) . Use
tire chains only on the front (original)
tires.
cTire tread of the TEMPORARY USE
ONLY spare tire will wear at a faster rate
than the standard tire. Replace the
spare tire as soon as the tread wear
indicators appear.
cDo not use the spare tire on other
vehicles.
cDo not use more than one spare tire at
the same time.
cDo not tow a trailer when the TEMPO-
RARY USE ONLY spare tire is installed.
8-42Maintenance and do-it-yourself
ZREVIEW COPYÐ2007 Quest(van)
Owners ManualÐUSA_English(nna)
02/27/06Ðdebbie
X
Page 369 of 384

10 Index
A
Active head restraint...............1-7
Adjusting pedal position............3-21
Air bag (See supplemental restraint
system).....................1-51
Air bag system
Front (See supplemental front impact
air bag system)...............1-58
Side and curtain (See supplemental side
air bag and curtain side-impact air bag
system)...................1-62
Air bag warning labels.............1-65
Air bag warning light...........1-65, 2-11
Air cleaner housing filter............8-16
Air conditioner
Air conditioner operation..........4-34
Air conditioner service...........4-43
Air conditioner specification label.....9-11
Air conditioner system refrigerant and
oil recommendations.............9-6
Heater and air conditioner
controls................4-31, 4-40
Rear seat air conditioner..........4-42
Servicing air conditioner..........4-43
Air flow charts..................4-35
Alarm system
(See vehicle security system).........2-14
Anchor point locations.............1-30
Antenna.....................4-61
Anti-lock brake warning light..........2-8Anti-lock braking system (ABS)........5-20
Audible reminders................2-14
Audio system..................4-43
AM-FM-SAT radio with compact disc
(CD) changer................4-51
AM-FM-SAT radio with compact disc
(CD) player.................4-51
Compact Disc (CD) changer.......4-56
Compact disc (CD) player.........4-55
MP3 display..................4-6
Radio....................4-43
Rear audio controls.............4-60
Steering wheel audio control switch. . . .4-59
Autolight switch.................2-20
Automatic
Automatic drive positioner.........3-25
Automatic power window switch.....2-40
Automatic transmission position indicator
light.....................2-11
Driving with automatic transmission. . . .5-10
Transmission selector lever lock
release....................5-12
Automatic anti-glare inside mirror.......3-23
Average speed..................4-4
B
Back button................4-7, 4-18
Battery......................8-13
Charge warning light.............2-8
Before starting the engine............5-9Belts (See drive belts).............8-15
Bench seat adjustment (3rd row). . . .1-7, 1-12
BluetoothThands-free phone system.....4-72
Booster seats..................1-47
Brake
Anti-lock braking system (ABS)......5-20
Brake fluid..................8-12
Brake light (See stop light).........8-25
Brake system................5-19
Brake warning light..............2-8
Brake wear indicators........2-14, 8-20
Parking brake check............8-20
Parking brake operation..........5-14
Self-adjusting brakes............8-20
Brake pedal...................8-20
Break-in schedule................5-16
Brightness control
Instrument panel..............2-22
Brightness/contrast button. . . .4-6, 4-16, 4-28
Bulb check/instrument panel..........2-7
Bulb replacement................8-25
C
Capacities and recommended
fuel/lubricants...................9-2
Captain’s chair adjustment (2nd row)......1-6
Car phone or CB radio.............4-72
Cargo (See vehicle loading information) . . .9-12
CD care and cleaning.............4-58
CD changer (See audio system)........4-56
ZREVIEW COPYÐ2007 Quest(van)
Owners ManualÐUSA_English(nna)
02/27/06Ðdebbie
X
Page 373 of 384

Overheat
If your vehicle overheats..........6-10
Owner’s manual order form..........9-25
Owner’s manual/service manual order
information....................9-25
P
Parking
Parking brake check............8-20
Parking brake operation..........5-14
Parking/parking on hills...........5-18
Pedal position adjustment...........3-21
Personal lights.................2-44
Power
Front seat adjustment............1-4
Power door locks...............3-5
Power outlet.................2-27
Power steering fluid.............8-11
Power steering system...........5-19
Power vent windows............2-40
Power windows...............2-38
Precautions
Maintenance precautions..........8-5
Precautions on child restraints . . .1-25, 1-40,
1-47
Precautions on seat belt usage......1-15
Precautions on supplemental restraint
system....................1-51
Precautions when starting and driving . . .5-2
Pre-tensioner seat belt system.........1-64
Programmable features......4-5, 4-11, 4-22
Push starting..................6-10R
Radio
Car phone or CB radio...........4-72
Compact Disc (CD) changer.......4-56
Rear audio controls.............4-60
Steering wheel audio control switch. . . .4-59
Readiness for inspection maintenance (I/M)
test........................9-24
Rear audio controls...............4-60
Rear center seat belt..............1-21
Rear seat air conditioner............4-42
Rear sonar system off switch.........2-27
Rear view monitor................4-29
Rear window and outside mirror defroster
switch......................2-18
Rear window wiper and washer switches . . .2-18
Recorders
Event data..................9-25
Refrigerant recommendation..........9-6
Registering your vehicle in another country. . .9-9
Remote controller (See DVD entertainment
system).....................4-64
Remote keyless entry system..........3-9
Reporting safety defects (US only)......9-24
Resetting average speed............4-4
Resetting the fuel economy.....4-4, 4-9, 4-19
Resetting trip 1 and trip 2.........4-8, 4-18
S
Safety
Child safety sliding door lock........3-9
Child seat belts........1-25, 1-40, 1-47Reporting safety defects (US only). . . .9-24
Screen (See DVD entertainment system) . . .4-64
Seat adjustment
Front manual seat adjustment........1-2
Front power seat adjustment........1-4
Second row captain’s chair.........1-6
Third row bench seat.........1-7, 1-12
Seat belt
Child safety.................1-17
Infants and small children.........1-18
Injured Person................1-19
Larger children...............1-18
Precautions on seat belt usage......1-15
Pregnant women..............1-19
Pre-tensioner seat belt system.......1-64
Rear center seat belt............1-21
Seat belt extenders.............1-25
Seat belt maintenance...........1-25
Seat belts..................1-15
Shoulder belt height adjustment......1-24
Three-point type with retractor.......1-19
Seat belt warning light.............2-11
Seatback pockets................2-32
Seats
Adjustment..................1-2
Automatic drive positioner.........3-25
Front seats..................1-2
Heated seats................2-25
Manual front seat adjustment........1-2
Second row captain’s chair adjustment.....1-6
Security indicator light.............2-13
Security system (NISSAN vehicle immobilizer
system) , engine start.........2-16, 3-2, 5-9
Self-adjusting brakes..............8-20
Service manual order form...........9-25
Servicing air conditioner............4-43
10-5
ZREVIEW COPYÐ2007 Quest(van)
Owners ManualÐUSA_English(nna)
02/27/06Ðdebbie
X