2007 NISSAN QUEST child lock
[x] Cancel search: child lockPage 140 of 384

USING THE MAIN ON/OFF SWITCH
FOR THE POWER SLIDING DOOR
(if so equipped)
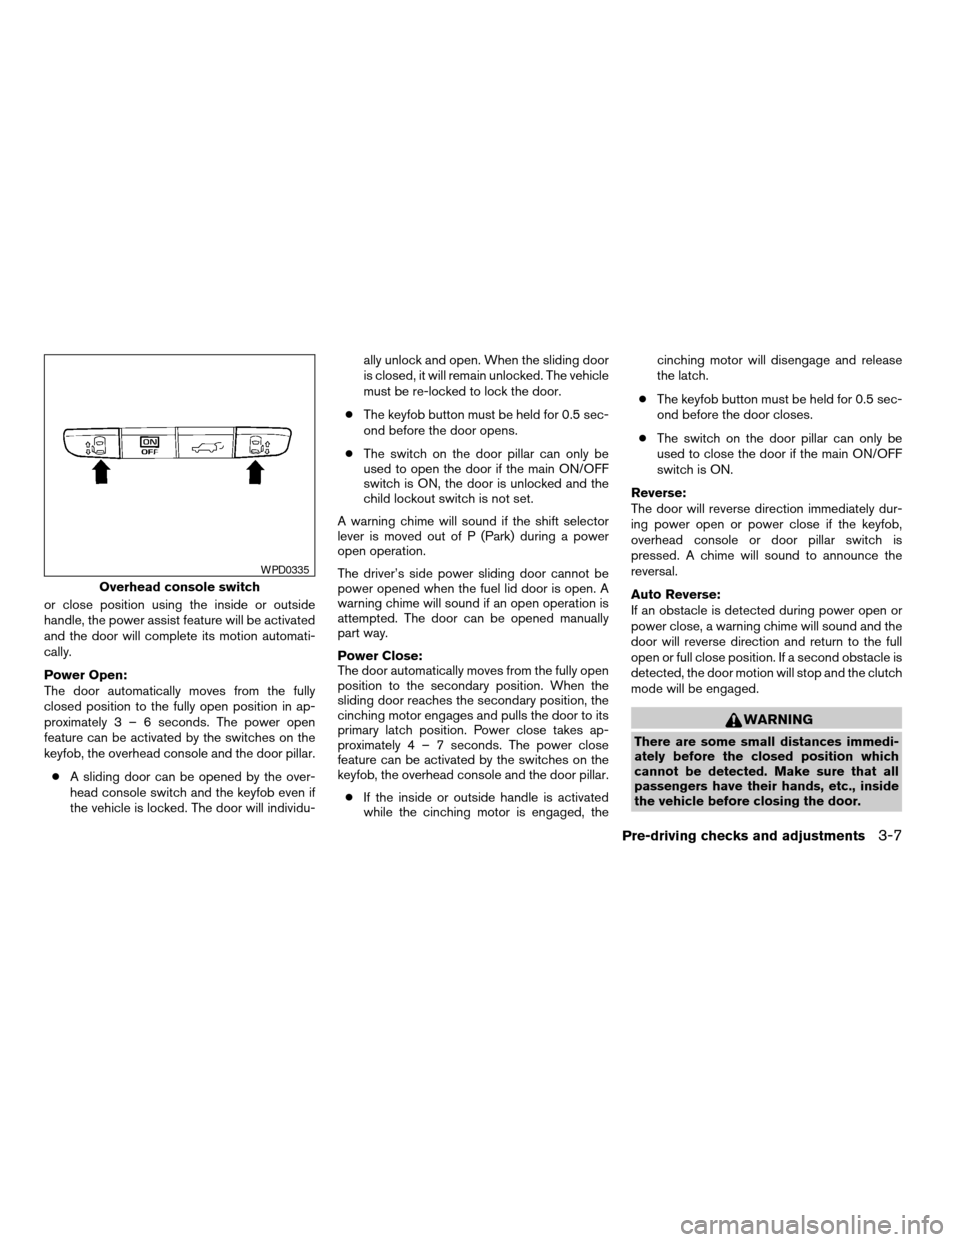
The main ON/OFF switch is located in the over-
head console.
Push the switch ON to enable the door pillar
switches and the power assist feature. An indica-
tor light will illuminate when the switch is in the
ON position.
Push the switch OFF to disable the door pillar
switches and the power assist feature. An indica-
tor light will illuminate when the switch is in the
OFF position.When the switch is in the OFF position, the
sliding door can still be opened with the keyfob or
overhead console switch. The sliding door can
also be opened manually with the inside or out-
side handle.
NOTE:
If the child safety lock is in the lock posi-
tion, the door pillar switch will not operate
the sliding door regardless of the main
ON/OFF switch position.
OPERATING THE POWER SLIDING
DOOR (if so equipped)
NOTE:
To open, close or reverse a power sliding
door, the ignition switch must be OFF, or, if
the ignition switch is ON, the shift selector
lever must be in P (Park) . Also, the power
sliding doors will not operate if battery
voltage is low.
Power Assist:
If the main on/off switch is ON and a sliding door
is unlocked and manually moved toward the open
WPD0334
Door pillar switch
LPD0225
3-6Pre-driving checks and adjustments
ZREVIEW COPYÐ2007 Quest(van)
Owners ManualÐUSA_English(nna)
02/27/06Ðdebbie
X
Page 141 of 384

or close position using the inside or outside
handle, the power assist feature will be activated
and the door will complete its motion automati-
cally.
Power Open:
The door automatically moves from the fully
closed position to the fully open position in ap-
proximately3–6seconds. The power open
feature can be activated by the switches on the
keyfob, the overhead console and the door pillar.
cA sliding door can be opened by the over-
head console switch and the keyfob even if
the vehicle is locked. The door will individu-ally unlock and open. When the sliding door
is closed, it will remain unlocked. The vehicle
must be re-locked to lock the door.
cThe keyfob button must be held for 0.5 sec-
ond before the door opens.
cThe switch on the door pillar can only be
used to open the door if the main ON/OFF
switch is ON, the door is unlocked and the
child lockout switch is not set.
A warning chime will sound if the shift selector
lever is moved out of P (Park) during a power
open operation.
The driver’s side power sliding door cannot be
power opened when the fuel lid door is open. A
warning chime will sound if an open operation is
attempted. The door can be opened manually
part way.
Power Close:
The door automatically moves from the fully open
position to the secondary position. When the
sliding door reaches the secondary position, the
cinching motor engages and pulls the door to its
primary latch position. Power close takes ap-
proximately4–7seconds. The power close
feature can be activated by the switches on the
keyfob, the overhead console and the door pillar.
cIf the inside or outside handle is activated
while the cinching motor is engaged, thecinching motor will disengage and release
the latch.
cThe keyfob button must be held for 0.5 sec-
ond before the door closes.
cThe switch on the door pillar can only be
used to close the door if the main ON/OFF
switch is ON.
Reverse:
The door will reverse direction immediately dur-
ing power open or power close if the keyfob,
overhead console or door pillar switch is
pressed. A chime will sound to announce the
reversal.
Auto Reverse:
If an obstacle is detected during power open or
power close, a warning chime will sound and the
door will reverse direction and return to the full
open or full close position. If a second obstacle is
detected, the door motion will stop and the clutch
mode will be engaged.
WARNING
There are some small distances immedi-
ately before the closed position which
cannot be detected. Make sure that all
passengers have their hands, etc., inside
the vehicle before closing the door.
Overhead console switch
WPD0335
Pre-driving checks and adjustments3-7
ZREVIEW COPYÐ2007 Quest(van)
Owners ManualÐUSA_English(nna)
02/27/06Ðdebbie
X
Page 143 of 384

CHILD SAFETY SLIDING DOOR
LOCK
The child safety lock helps prevent the sliding
door from being opened accidentally, especially
when small children are in the vehicle.The child safety lock levers are located on the
edge of the sliding doors.
When the lever is in the lock position, the
door can be opened only from the outside,
by the overhead console switch or using
the keyfob.It is possible to lock/unlock all doors, turn on the
interior lights and puddle lamps (if so equipped) ,
and activate the panic alarm by using the keyfob
from outside the vehicle.
Some settings for the keyfob, such as horn beep,
can be adjusted. For vehicles with monochrome
screen, refer to “Silencing the horn beep feature”
later in this section. For vehicles with color
screen, refer to “Vehicle electronic systems” in
the “Display screen, heater, air conditioner, audio
and phone systems” section later in this manual.
Be sure to remove the key from the vehicle
before locking the doors.
The keyfob can operate at a distance of approxi-
mately 33 ft (10 m) from the vehicle. The effective
distance depends upon the conditions around
the vehicle.
As many as 5 keyfobs can be used with one
vehicle. For information concerning the purchase
and use of additional keyfobs, contact a NISSAN
dealer.
The keyfob will not function when:
cthe battery is discharged
cthe distance between the vehicle and the
keyfob is over 33 ft (10 m)
The panic alarm will not activate when the
key is in the ignition switch.
LPD0231
REMOTE KEYLESS ENTRY SYSTEM
Pre-driving checks and adjustments3-9
ZREVIEW COPYÐ2007 Quest(van)
Owners ManualÐUSA_English(nna)
02/27/06Ðdebbie
X
Page 148 of 384

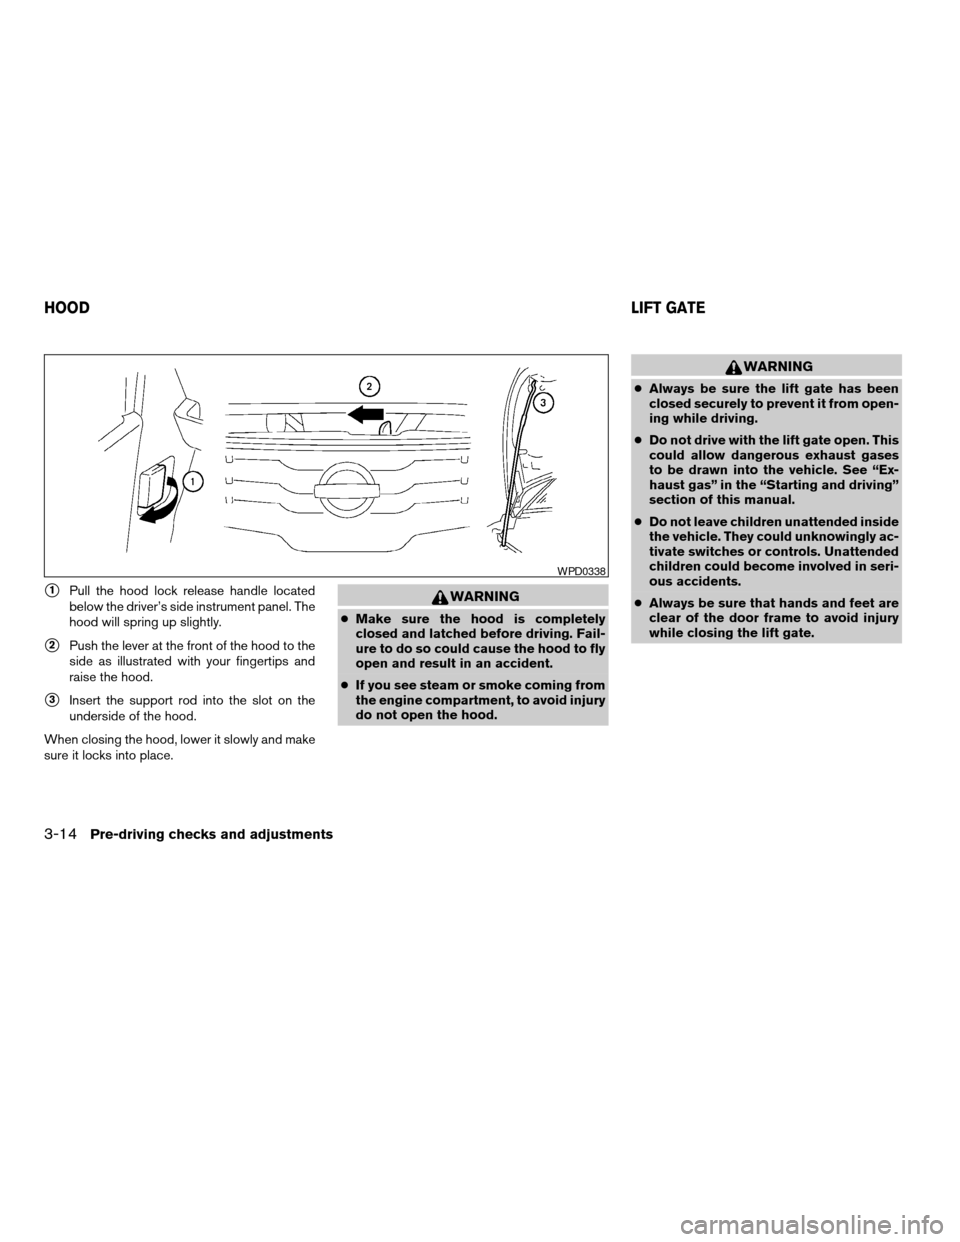
s1Pull the hood lock release handle located
below the driver’s side instrument panel. The
hood will spring up slightly.
s2Push the lever at the front of the hood to the
side as illustrated with your fingertips and
raise the hood.
s3Insert the support rod into the slot on the
underside of the hood.
When closing the hood, lower it slowly and make
sure it locks into place.
WARNING
cMake sure the hood is completely
closed and latched before driving. Fail-
ure to do so could cause the hood to fly
open and result in an accident.
cIf you see steam or smoke coming from
the engine compartment, to avoid injury
do not open the hood.
WARNING
cAlways be sure the lift gate has been
closed securely to prevent it from open-
ing while driving.
cDo not drive with the lift gate open. This
could allow dangerous exhaust gases
to be drawn into the vehicle. See “Ex-
haust gas” in the “Starting and driving”
section of this manual.
cDo not leave children unattended inside
the vehicle. They could unknowingly ac-
tivate switches or controls. Unattended
children could become involved in seri-
ous accidents.
cAlways be sure that hands and feet are
clear of the door frame to avoid injury
while closing the lift gate.
WPD0338
HOODLIFT GATE
3-14Pre-driving checks and adjustments
ZREVIEW COPYÐ2007 Quest(van)
Owners ManualÐUSA_English(nna)
02/27/06Ðdebbie
X
Page 268 of 384

WARNING
cDo not stop or park the vehicle over
flammable materials such as dry grass,
waste paper or rags. They may ignite
and cause a fire.
cSafe parking procedures require that
both the parking brake be set and the
transmission placed into P (Park) . Fail-
ure to do so could cause the vehicle to
move unexpectedly or roll away and re-
sult in an accident. Make sure the shift
lever has been pushed as far forward as
it can go and cannot be moved without
depressing the foot brake pedal.cNever leave the engine running while
the vehicle is unattended.
cDo not leave children unattended inside
the vehicle. They could unknowingly ac-
tivate switches or controls. Unattended
children could become involved in seri-
ous accidents.
1. Firmly apply the parking brake.
2. Move the shift selector lever to the P (Park)
position.
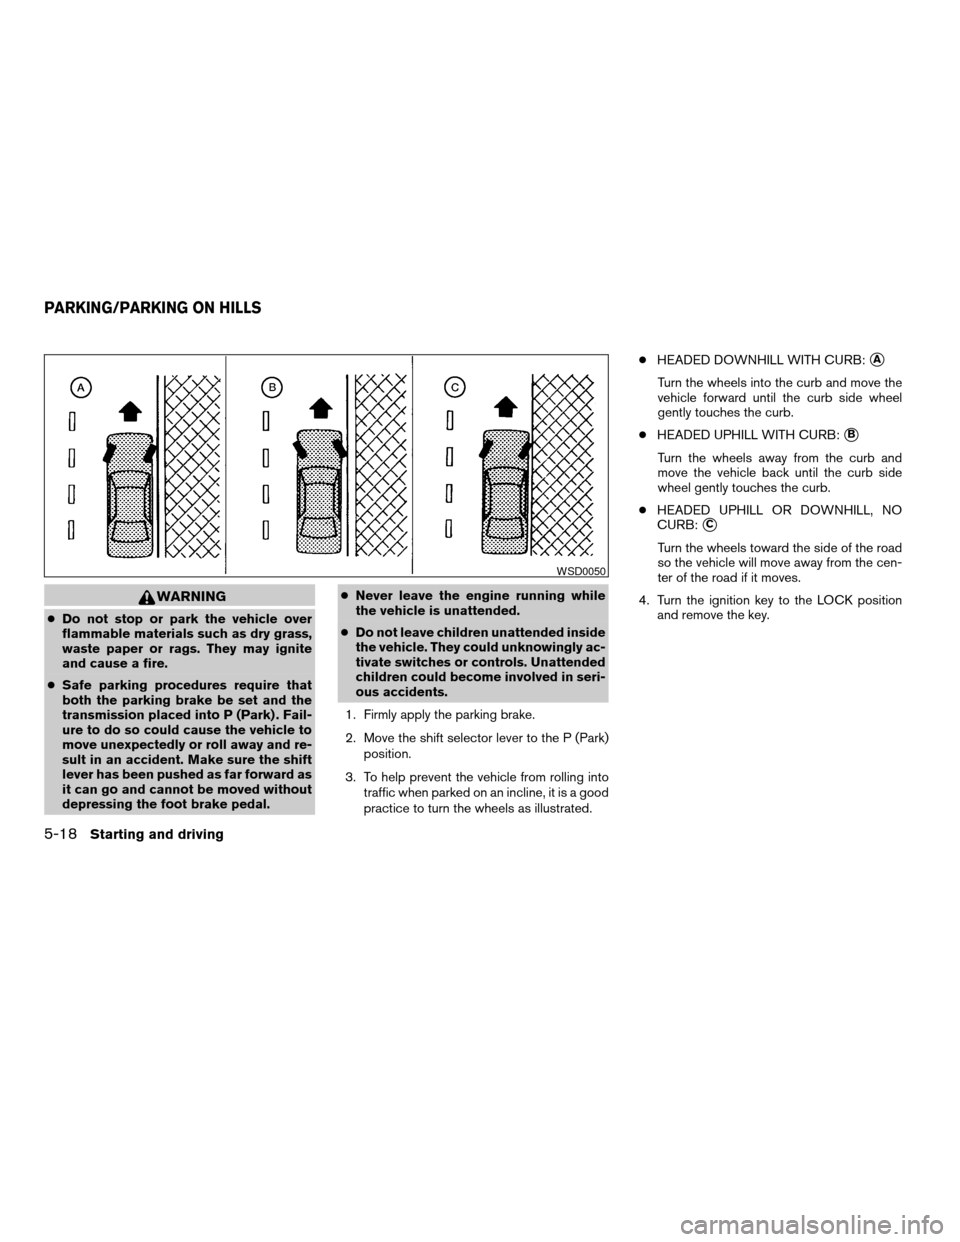
3. To help prevent the vehicle from rolling into
traffic when parked on an incline, it is a good
practice to turn the wheels as illustrated.cHEADED DOWNHILL WITH CURB:
sA
Turn the wheels into the curb and move the
vehicle forward until the curb side wheel
gently touches the curb.
cHEADED UPHILL WITH CURB:
sB
Turn the wheels away from the curb and
move the vehicle back until the curb side
wheel gently touches the curb.
cHEADED UPHILL OR DOWNHILL, NO
CURB:
sC
Turn the wheels toward the side of the road
so the vehicle will move away from the cen-
ter of the road if it moves.
4. Turn the ignition key to the LOCK position
and remove the key.
WSD0050
PARKING/PARKING ON HILLS
5-18Starting and driving
ZREVIEW COPYÐ2007 Quest(van)
Owners ManualÐUSA_English(nna)
02/27/06Ðdebbie
X
Page 305 of 384

CAUTION
Oil level should be checked regularly. Op-
erating the engine with an insufficient
amount of oil can damage the engine, and
such damage is not covered by warranty.
CHANGING ENGINE OIL
1. Park the vehicle on a level surface and apply
the parking brake.
2. Start the engine and let it idle until it reaches
operating temperature, then turn it off.
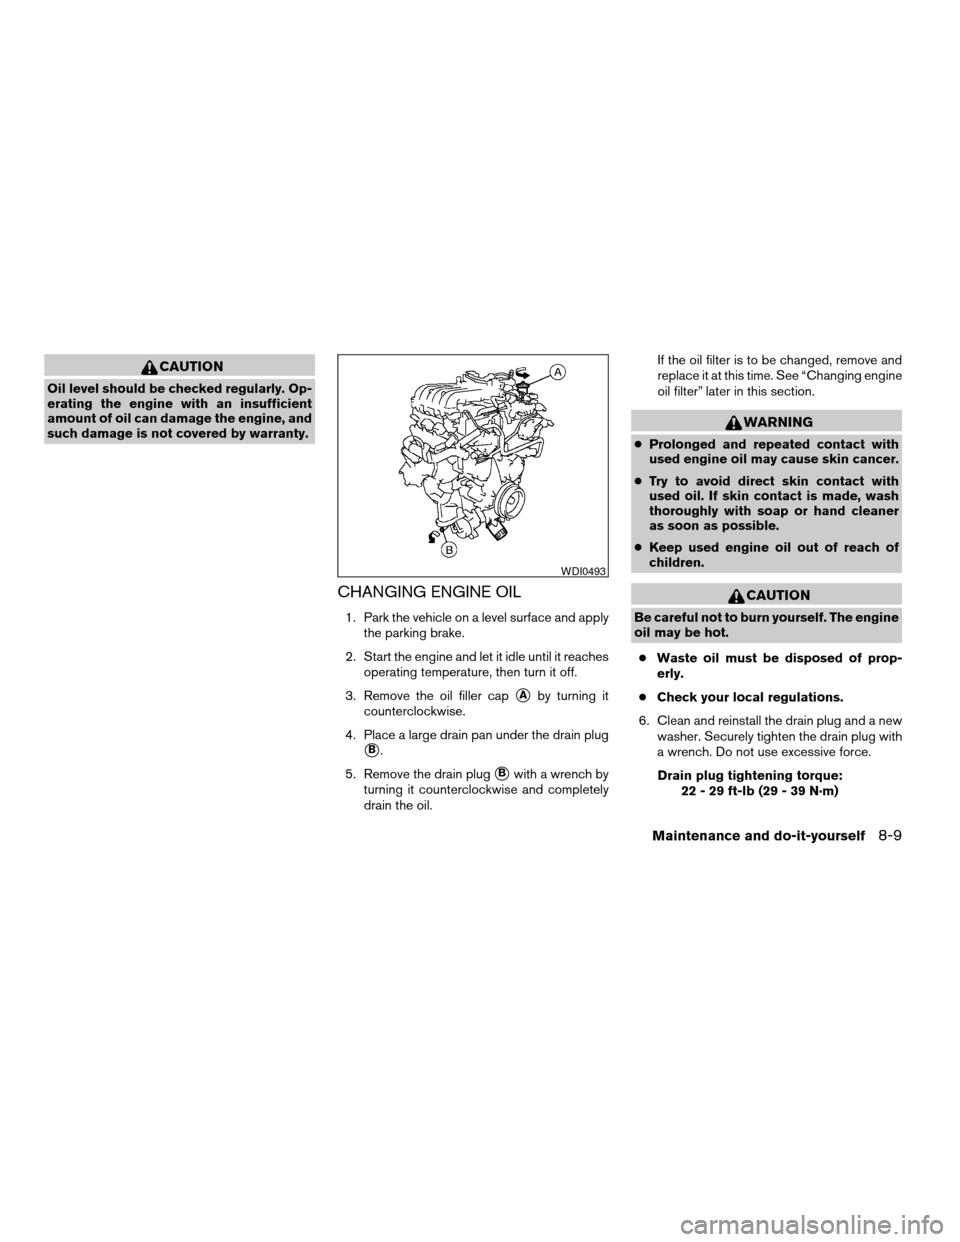
3. Remove the oil filler cap
sAby turning it
counterclockwise.
4. Place a large drain pan under the drain plug
sB.
5. Remove the drain plug
sBwith a wrench by
turning it counterclockwise and completely
drain the oil.If the oil filter is to be changed, remove and
replace it at this time. See “Changing engine
oil filter” later in this section.
WARNING
cProlonged and repeated contact with
used engine oil may cause skin cancer.
cTry to avoid direct skin contact with
used oil. If skin contact is made, wash
thoroughly with soap or hand cleaner
as soon as possible.
cKeep used engine oil out of reach of
children.
CAUTION
Be careful not to burn yourself. The engine
oil may be hot.
cWaste oil must be disposed of prop-
erly.
cCheck your local regulations.
6. Clean and reinstall the drain plug and a new
washer. Securely tighten the drain plug with
a wrench. Do not use excessive force.
Drain plug tightening torque:
22 - 29 ft-lb (29 - 39 N·m)
WDI0493
Maintenance and do-it-yourself8-9
ZREVIEW COPYÐ2007 Quest(van)
Owners ManualÐUSA_English(nna)
02/27/06Ðdebbie
X
Page 370 of 384

CD player (See audio system).........4-55
Child restraint with top tether strap......1-30
Child restraints.......1-17, 1-18, 1-25, 1-27
Precautions on child
restraints............1-25, 1-40, 1-47
Top tether strap anchor point locations . .1-30
Child safety sliding door lock..........3-9
Chimes, audible reminders...........2-14
Cleaning exterior and interior..........7-2
Clock
(models with navigation system)......4-27
(models without navigation system). .4-5, 4-16
Clock set..............4-5, 4-16, 4-27
C.M.V.S.S. certification label..........9-10
Cold weather driving..............5-25
Compact disc (CD) player...........4-55
Console box...................2-29
Control panel buttons
Brightness/contrast button . .4-6, 4-16, 4-28
Back button..............4-7, 4-18
Enter button..............4-7, 4-17
Setting button.........4-5, 4-11, 4-22
Startup screen...............4-18
Trip button............4-3, 4-8, 4-18
With navigation system...........4-17
Without navigation system.......4-2, 4-7
Controls
Audio controls (steering wheel)......4-59
Heater and air conditioner
controls................4-31, 4-40
Rear audio controls.............4-60
Rear seat air conditioner..........4-42
Coolant
Capacities and recommended
fuel/lubricants.................9-2
Changing engine coolant..........8-8Checking engine coolant level........8-7
Engine coolant temperature gauge.....2-5
Cornering light.................2-24
Corrosion protection...............7-5
Cruise control..................5-15
Cup holders...............2-34, 2-35
Curtain side-impact air bag system
(See supplemental side air bag and curtain
side-impact air bag system)..........1-62
D
Daytime running light system
(Canada only)..................2-21
Defroster switch
Rear window and outside mirror defroster
switch....................2-18
Digital video disc DVD.............4-62
Dimensions and weights.............9-8
Dimmer switch for instrument panel......2-22
Display controls
(see control panel buttons).....4-2, 4-7, 4-17
Distance to empty..........4-3, 4-9, 4-19
Door locks....................3-3
Door open warning................4-6
Door open warning light.............2-8
Drive belts....................8-15
Drive positioner, Automatic...........3-25
Driving
Cold weather driving............5-25
Driving with automatic transmission. . . .5-10
Precautions when starting and driving . . .5-2
DVD entertainment system...........4-62E
Economy - fuel.................5-17
Emission control information label.......9-10
Emission control system warranty.......9-23
Engine
Before starting the engine..........5-9
Capacities and recommended
fuel/lubricants.................9-2
Changing engine coolant..........8-8
Changing engine oil.............8-9
Changing engine oil filter..........8-10
Checking engine coolant level........8-7
Checking engine oil level..........8-8
Engine compartment check locations. . . .8-7
Engine coolant temperature gauge.....2-5
Engine cooling system............8-7
Engine oil...................8-8
Engine oil and oil filter recommendation . .9-5
Engine oil pressure warning light......2-8
Engine oil viscosity..............9-5
Engine serial number............9-10
Engine specifications.............9-7
Starting the engine.............5-10
English/metric setting.......4-5, 4-15, 4-26
Enter button................4-7, 4-17
Event data recorders..............9-25
Exhaust gas (Carbon monoxide)........5-2
Eyeglass case..................2-28
10-2
ZREVIEW COPYÐ2007 Quest(van)
Owners ManualÐUSA_English(nna)
02/27/06Ðdebbie
X
Page 371 of 384

F
Flashers
(See hazard warning flasher switch)......2-24
Flat tire......................6-2
Floor mat positioning aid.............7-4
Fluid
Brake fluid..................8-12
Capacities and recommended
fuel/lubricants.................9-2
Engine coolant................8-7
Engine oil...................8-8
Power steering fluid.............8-11
Window washer fluid............8-12
F.M.V.S.S. certification label..........9-10
Fog light switch.................2-23
Front air bag system
(See supplemental restraint system).....1-58
Front seats....................1-2
Fuel
Capacities and recommended
fuel/lubricants.................9-2
Fuel economy................5-17
Fuel gauge..................2-5
Fuel octane rating..............9-4
Fuel recommendation............9-3
Fuel-filler door and cap...........3-19
Fuel-filler door lock opener lever......3-19
Fuel economy setting........4-4, 4-8, 4-19
Fuses......................8-20
Fusible links...................8-21G
Garage door opener, HomeLinkTUniversal
Transceiver...................2-46
Garment hook..................2-37
Gascap.....................3-19
Gauge
Engine coolant temperature gauge.....2-5
Fuel gauge..................2-5
Odometer...................2-4
Speedometer.................2-4
Tachometer..................2-4
Trip odometer.................2-4
General maintenance..............8-2
Glove box....................2-31
Glove box lock.................2-31
Grocery hooks.................2-32
H
Hazard warning flasher switch.........2-24
Head restraints..................1-8
Active head restraint.............1-7
Headlight and turn signal switch........2-19
Headlight control switch............2-19
Headlights....................8-24
Headphones
(See DVD entertainment system).......4-65
Headrest storage................2-37
Heated seats..................2-25
Heater
Heater and air conditioner
controls................4-31, 4-40
Heater operation...........4-33, 4-41Rear seat air conditioner..........4-42
HomeLinkTUniversal Transceiver.......2-46
Hood release..................3-14
Horn.......................2-25
I
Ignition switch..................5-8
Immobilizer system..........2-16, 3-2, 5-9
Important vehicle information label.......9-10
In-cabin microfilter...............8-16
Increasing fuel economy............5-17
Indicator lights and audible reminders
(See warning/indicator lights and audible
reminders).....................2-7
Inside automatic anti-glare mirror.......3-23
Inside mirror...................3-23
Instrument brightness control.........2-22
Instrument panel..............0-6, 2-2
Instrument panel dimmer switch........2-22
Interior lights
(see Lights on demand switch)........2-43
ISOFIX child restraints.............1-27
J
Jump starting...................6-8
K
Key ........................3-2
Keyfob battery replacement..........8-23
10-3
ZREVIEW COPYÐ2007 Quest(van)
Owners ManualÐUSA_English(nna)
02/27/06Ðdebbie
X