2007 NISSAN QUEST child lock
[x] Cancel search: child lockPage 60 of 384

8. Before placing the child in the child restraint,
hold the child restraint near the seat belt
path and use force to push the child restraint
from side to side, and tug it forward to make
sure that it is securely held in place. It should
not move more than 1 inch (25 mm) . If it
does move more than 1 inch (25 mm) , pull
again on the shoulder belt to further tighten
the child restraint. If you are unable to prop-
erly secure the restraint, move the restraint
to another seating position and try again, or
try a different child restraint. Not all child
restraints fit in all types of vehicles.
9. Check that the retractor is in the automatic
locking mode by trying to pull more seat belt
out of the retractor. If you cannot pull any
more belt webbing out of the retractor, the
retractor is in the automatic locking mode.
10. Check to make sure the child restraint is
properly secured prior to each use. If the
seat belt is not locked, repeat steps 3
through 8.11. If the child restraint is installed in the front
passenger seat, turn the ignition switch to
the ON position. The passenger air bag sta-
tus light
should illuminate. If this light
is not illuminated see9Front passenger air
bag and status light9in this section.Move
the child restraint to another seating
position.Have the system checked by a
NISSAN dealer.
After the child restraint is removed and the seat
belt is fully retracted, the automatic locking mode
child restraint mode) is canceled.
Rear-facing
Follow these steps to install a rear-facing child
restraint using the vehicle seat belt in the rear
seats:
1.Child restraints for infants must be
used in the rear-facing direction and
therefore must not be used in the front
seat.Position the child restraint on the seat.
Always follow the restraint manufacturer’s
instructions.
Front facing – step 11
WRS0475
Rear-facing – step 1
WRS0256
1-44Safety—Seats, seat belts and supplemental restraint system
ZREVIEW COPYÐ2007 Quest(van)
Owners ManualÐUSA_English(nna)
02/27/06Ðdebbie
X
Page 61 of 384

2. Route the seat belt tongue through the child
restraint and insert it into the buckle until you
hear and feel the latch engage. Be sure to
follow the child restraint manufacturer’s in-
structions for belt routing.3. Pull on the shoulder belt until the belt is fully
extended. At this time, the seat belt retractor
is in the automatic locking mode (child re-
straint mode) . It reverts to emergency lock-
ing mode when the seat belt is fully re-
tracted.4. Allow the seat belt to retract. Pull up on the
shoulder belt to remove any slack in the belt.
Rear facing – step 2
WRS0682
Rear facing – step 3
LRS0669
Rear facing – step 4
LRS0670
Safety—Seats, seat belts and supplemental restraint system1-45
ZREVIEW COPYÐ2007 Quest(van)
Owners ManualÐUSA_English(nna)
02/27/06Ðdebbie
X
Page 62 of 384

5. Remove any additional slack from the child
restraint; press downward and rearward
firmly in the center of the child restraint to
compress the vehicle seat cushion and seat-
back while pulling up on the seat belt.6. Before placing the child in the child restraint,
hold the child restraint near the seat belt
path and use force to push the child restraint
from side to side, and tug it forward to make
sure that it is securely held in place. It should
not move more than 1 inch (25 mm) . If it
does move more than 1 inch (25 mm) , pull
again on the shoulder belt to further tighten
the child restraint. If you are unable to prop-
erly secure the restraint, move the restraint
to another rear seating position and try
again, or try a different child restraint. Not all
child restraints fit in all types of vehicles.7. Check that the retractor is in the automatic
locking mode by trying to pull more seat belt
out of the retractor. If you cannot pull any
more seat belt webbing out of the retractor,
the retractor is in the automatic locking
mode
8. Check to make sure that the child restraint is
properly secured prior to each use. If the belt
is not locked, repeat steps 3 through 6.
After the child restraint is removed and the seat
belt fully retracted, the automatic locking mode
child restraint mode) is canceled.
Rear facing – step 5
WRS0683
Rear facing – step 6
WRS0684
1-46Safety—Seats, seat belts and supplemental restraint system
ZREVIEW COPYÐ2007 Quest(van)
Owners ManualÐUSA_English(nna)
02/27/06Ðdebbie
X
Page 65 of 384

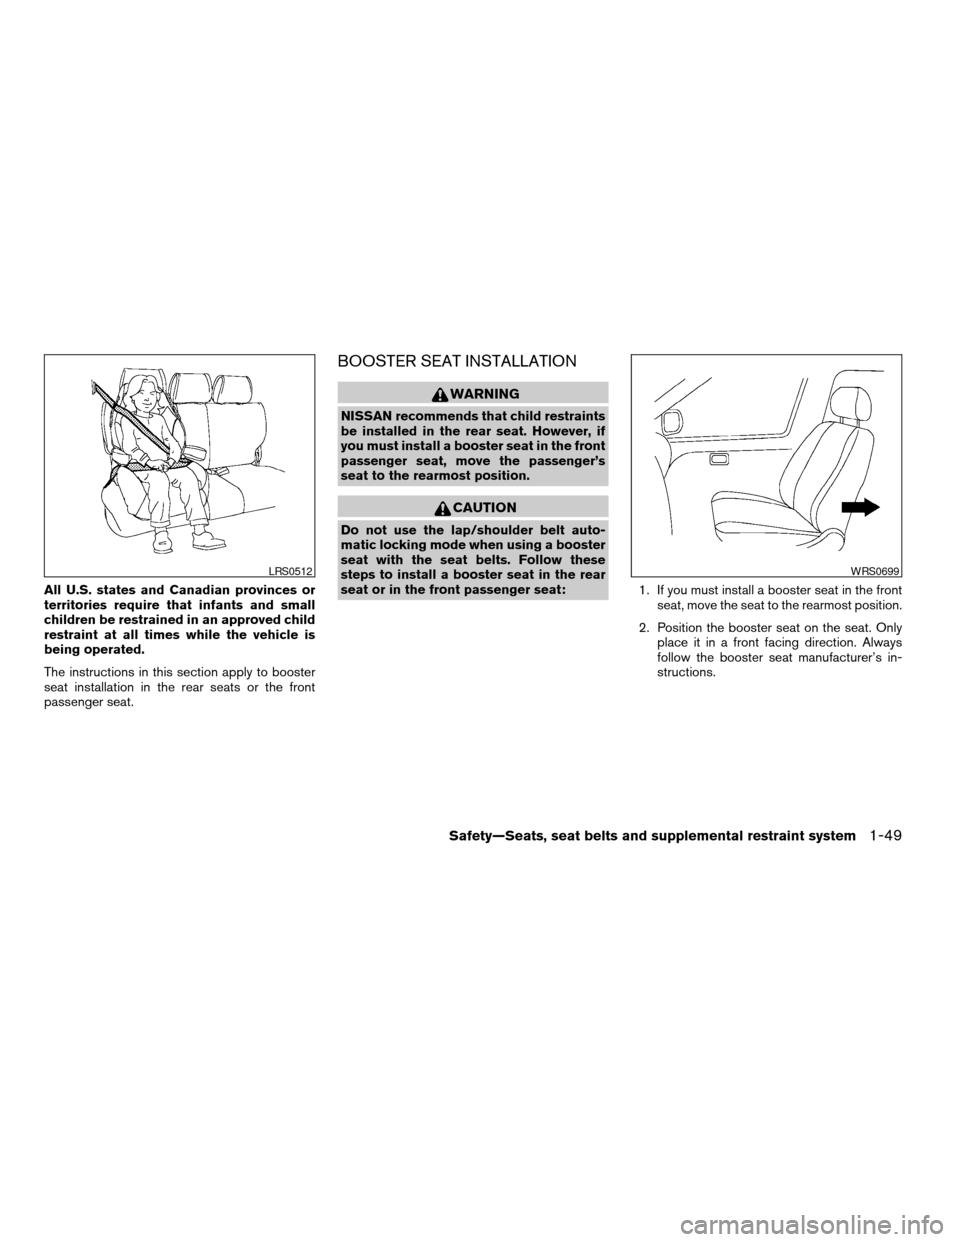
All U.S. states and Canadian provinces or
territories require that infants and small
children be restrained in an approved child
restraint at all times while the vehicle is
being operated.
The instructions in this section apply to booster
seat installation in the rear seats or the front
passenger seat.
BOOSTER SEAT INSTALLATION
WARNING
NISSAN recommends that child restraints
be installed in the rear seat. However, if
you must install a booster seat in the front
passenger seat, move the passenger’s
seat to the rearmost position.
CAUTION
Do not use the lap/shoulder belt auto-
matic locking mode when using a booster
seat with the seat belts. Follow these
steps to install a booster seat in the rear
seat or in the front passenger seat:
1. If you must install a booster seat in the front
seat, move the seat to the rearmost position.
2. Position the booster seat on the seat. Only
place it in a front facing direction. Always
follow the booster seat manufacturer’s in-
structions.
LRS0512WRS0699
Safety—Seats, seat belts and supplemental restraint system1-49
ZREVIEW COPYÐ2007 Quest(van)
Owners ManualÐUSA_English(nna)
02/27/06Ðdebbie
X
Page 76 of 384

The purpose of the regulation is to help reduce
the risk of injury or death from an inflating air bag
to certain front passenger seat occupants, such
as children, by requiring the air bag to be auto-
matically turned OFF. Certain sensors are used
to meet the requirements.
One sensor used is the occupant classification
sensor (pressure sensor) . It is in the bottom of the
front passenger seat cushion and is designed to
detect an occupant and objects on the seat by
weight. It works together with seat belt sensors
described later. For example, if a child is in the
front passenger seat, the advanced air bag sys-
tem is designed to turn the passenger air bag
OFF in accordance with the regulations. Also, if a
child restraint of the type specified in the regula-
tions is on the seat, its weight and the child’s
weight can be detected and cause the air bag to
turn OFF. Occupant classification sensor opera-
tion can vary depending on the front passenger
seat belt sensors.
The front passenger seat belt sensors are de-
signed to detect if the seat belt is buckled and the
amount of tension on the seat belt, such as when
it is in the automatic locking mode (child restraint
mode) . Based on the weight on the seat detected
by the occupant classification sensor and the belt
tension detected on the seat belt, the advanced
air bag system determines whether the front pas-senger air bag should be automatically turned
OFF as required by the regulations.
Front passenger seat adult occupants who are
properly seated and using the seat belt as out-
lined in this manual should not cause the passen-
ger air bag to be automatically turned OFF. For
small adults it may be turned OFF, however if the
occupant takes his/her weight off the seat cush-
ion (for example, by not sitting upright, by sitting
on an edge of the seat, or by otherwise being out
of position) , this could cause the sensor to turn
the air bag OFF. In addition, if the occupant
improperly uses the seat belt in the automatic
locking mode (child restraint mode) , this could
cause the air bag to be turned OFF. Always be
sure to be seated and wearing the seat belt
properly for the most effective protection by the
seat belt and supplemental air bag.
NISSAN recommends that pre-teens and chil-
dren be properly restrained in a rear seat.
NISSAN also recommends that appropriate child
restraints and booster seats be properly installed
in a rear seat. If this is not possible, the occupant
classification sensor and seat belt sensors are
designed to operate as described above to turn
the front passenger air bag OFF for specified
child restraints as required by the regulations.
Failing to properly secure child restraints and to
use the automatic locking mode (child restraint
mode) may allow the restraint to tip or move in anaccident or sudden stop. This can also result in
the passenger air bag inflating in a crash instead
of being OFF. See “Child restraints” earlier in this
section for proper use and installation.
If the front passenger seat is not occupied the
passenger air bag is designed not to inflate in a
crash. However, heavy objects placed on the
seat could result in air bag inflation, because of
the object’s weight detected by the occupant
classification sensor. Other conditions could also
result in air bag inflation, such as if a child is
standing on the seat, or if two children are on the
seat, contrary to the instructions in this manual.
Always be sure that you and all vehicle occupants
are seated and restrained properly.
Using the passenger air bag status light, you can
monitor when the front passenger air bag is au-
tomatically turned OFF with the seat occupied.
The light will not illuminate when the front pas-
senger seat is unoccupied.
If an adult occupant is in the seat but the passen-
ger air bag status light is illuminated (indicating
that the air bag is OFF) , it could be that the
person is a small adult, or is not sitting on the seat
properly or not using the seat belt properly.
If a child restraint must be used in the front seat,
the passenger air bag status light may or may not
be illuminated, depending on the size of the child
and the type of child restraint being used. If the
1-60Safety—Seats, seat belts and supplemental restraint system
ZREVIEW COPYÐ2007 Quest(van)
Owners ManualÐUSA_English(nna)
02/27/06Ðdebbie
X
Page 122 of 384

WARNING
Properly secure all cargo with ropes or
straps to help prevent it from sliding or
shifting. In a sudden stop or collision, un-
secured cargo could cause personal
injury.
CAUTION
Use care when placing or removing items
from the roof rack. If you cannot comfort-
ably lift the items onto the roof rack from
the ground, use a ladder or stool.
POWER WINDOWS
WARNING
cMake sure that all passengers have
their hands, etc. inside the vehicle while
it is in motion and before closing the
windows. Use the window lock switch
to prevent unexpected use of the power
windows.
cDo not leave children unattended inside
the vehicle. They could unknowingly ac-
tivate switches or controls and become
trapped in a window. Unattended chil-
dren could become involved in serious
accidents.
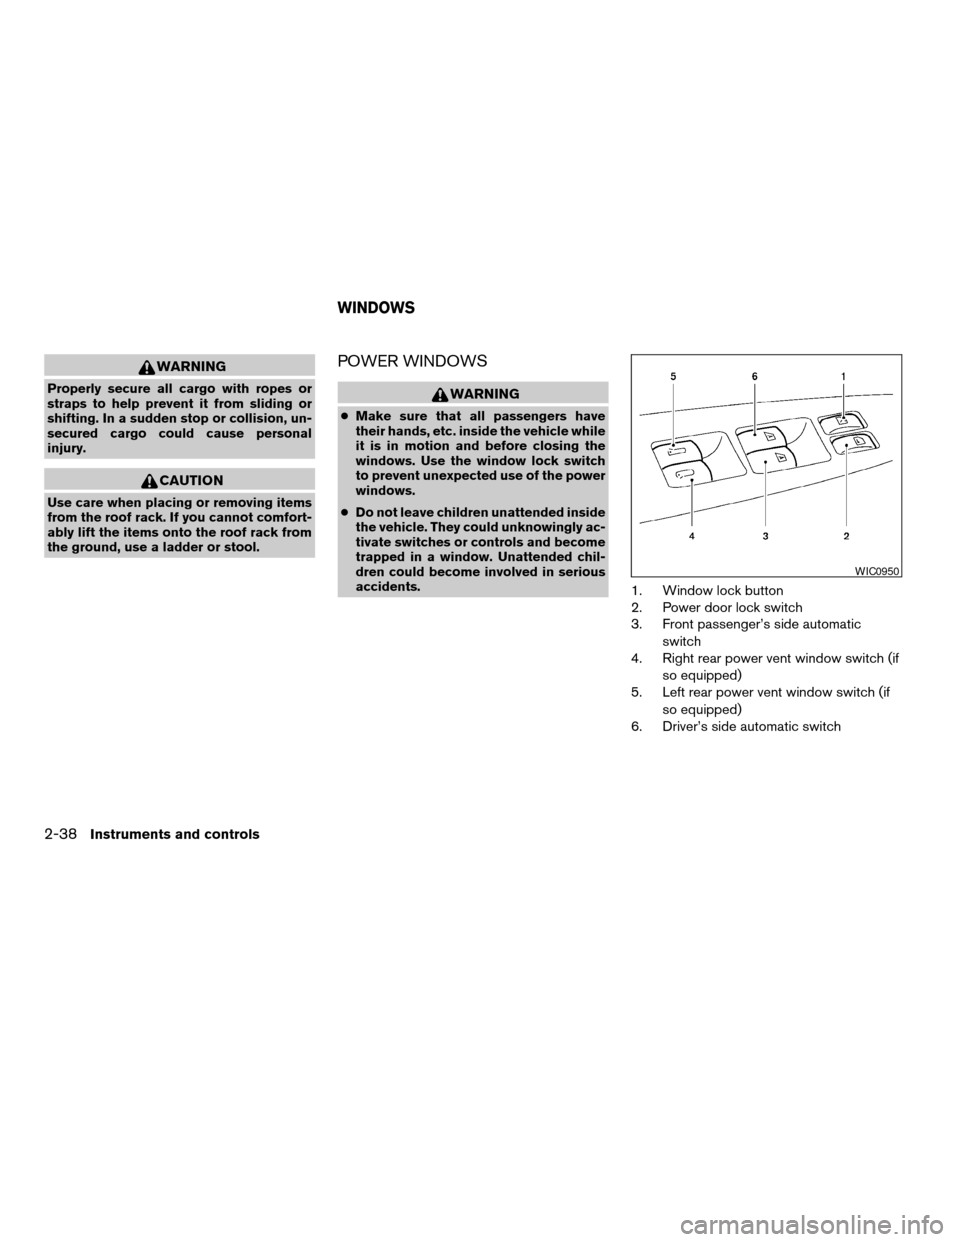
1. Window lock button
2. Power door lock switch
3. Front passenger’s side automatic
switch
4. Right rear power vent window switch (if
so equipped)
5. Left rear power vent window switch (if
so equipped)
6. Driver’s side automatic switch
WIC0950
WINDOWS
2-38Instruments and controls
ZREVIEW COPYÐ2007 Quest(van)
Owners ManualÐUSA_English(nna)
02/27/06Ðdebbie
X
Page 135 of 384

3 Pre-driving checks and adjustments
Keys .............................................3-2
Nissan vehicle immobilizer system keys...........3-2
Doors............................................3-3
Locking with key................................3-3
Locking with inside lock knob....................3-4
Locking with power door lock switch.............3-5
Operating the manual sliding door
(if so equipped)................................3-5
Using the main ON/OFF switch for the
power sliding door (if so equipped)...............3-6
Operating the power sliding door
(if so equipped)................................3-6
Child safety sliding door lock....................3-9
Remote keyless entry system.......................3-9
How to use remote keyless entry system.........3-10
Hood...........................................3-14
Lift gate.........................................3-14
Operating the manual lift gate...................3-15
Using the main ON/OFF switch for the
power lift gate (if so equipped)..................3-15Operating the power lift gate
(if so equipped)...............................3-16
Lift gate release...............................3-18
Fuel-filler door...................................3-19
Opener operation..............................3-19
Fuel-filler cap.................................3-19
Steering wheel...................................3-21
Tilt operation..................................3-21
Pedal position adjustment (if so equipped)..........3-21
Sun visors.......................................3-22
Vanity mirrors.................................3-22
Mirrors..........................................3-23
Rearview mirror (if so equipped).................3-23
Automatic anti-glare rearview mirror
(if so equipped)...............................3-23
Outside mirrors...............................3-24
Automatic drive positioner (if so equipped)..........3-25
Memory storage function.......................3-26
Entry/exit function.............................3-27
System operation..............................3-28
ZREVIEW COPYÐ2007 Quest(van)
Owners ManualÐUSA_English(nna)
02/27/06Ðdebbie
X
Page 137 of 384

WARNING
cAlways have the doors locked while
driving. Along with the use of seat belts,
this provides greater safety in the event
of an accident by helping to prevent
persons from being thrown from the
vehicle. This also helps keep children
and others from unintentionally open-
ing the doors, and will help keep out
intruders.
cBefore opening any door, always look
for and avoid oncoming traffic.
cDo not leave children unattended inside
the vehicle. They could unknowingly ac-
tivate switches or controls. Unattended
children could become involved in seri-
ous accidents.
cAlways be sure that hands and feet are
clear of the door frame to avoid injury
while closing a sliding door.
CAUTION
cAlways use the door handle to open or
close a sliding door. Do not attempt to
open or close the doors by merely plac-
ing your hand on the door edge or door
slide roller, as this may cause injury.cWhen opening a sliding door on a slope,
ensure that it is fully open and that it
does not close by itself.
LOCKING WITH KEY
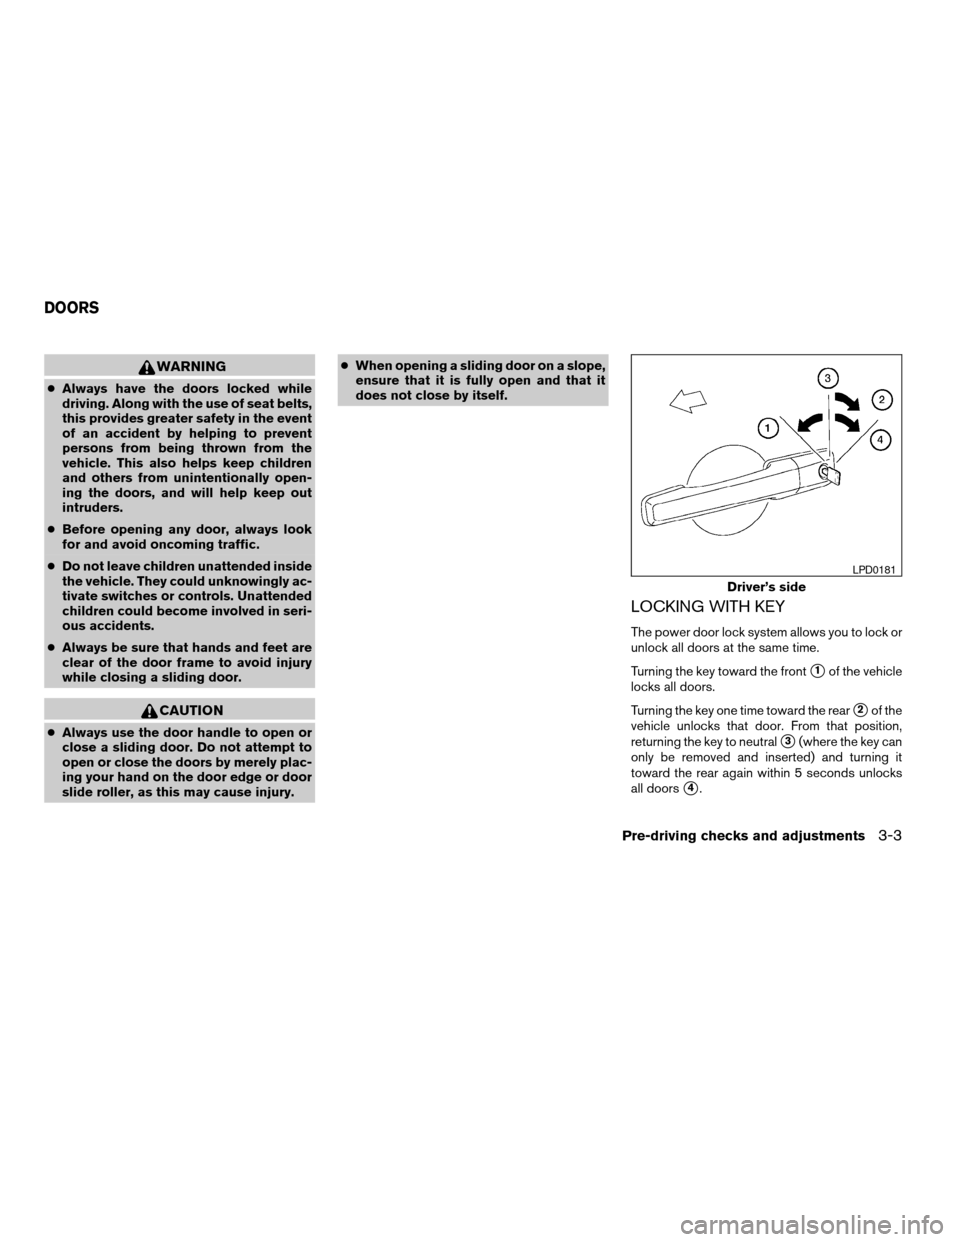
The power door lock system allows you to lock or
unlock all doors at the same time.
Turning the key toward the front
s1of the vehicle
locks all doors.
Turning the key one time toward the rear
s2of the
vehicle unlocks that door. From that position,
returning the key to neutral
s3(where the key can
only be removed and inserted) and turning it
toward the rear again within 5 seconds unlocks
all doors
s4.
Driver’s side
LPD0181
DOORS
Pre-driving checks and adjustments3-3
ZREVIEW COPYÐ2007 Quest(van)
Owners ManualÐUSA_English(nna)
02/27/06Ðdebbie
X