2007 NISSAN QASHQAI Engine compartment
[x] Cancel search: Engine compartmentPage 236 of 297
Downloaded from www.Manualslib.com manuals search engine If you must run the engine in an enclosed
space such as a garage, be sure there is
proper ventilation for exhaust gases.
Do not get under a vehicle that is supported
only by a jack: Use vehicle support stands.
Keep smoking materials, flame and sparks
away from fuel and battery.
Never connect or disconnect either the bat-
tery or any transistorised component connec-
tor while the ignition switch is in the ON posi-
tion.
Never leave the engine or transmission re-
lated component harness connector discon-
nected while the ignition switch is in the ON
position.
On petrol engine models with the multiport
fuel injection (MFI) system, the fuel filter or
fuel lines should be serviced by a NISSAN
dealer or qualified workshop because the fuel
lines are under high pressure even when the
engine is off.
Always wear eye protection whenever you
work on your vehicle.
Failure to follow these or other common sense
guidelines may lead to serious injury or ve-
hicle damage.
NISSAN GREEN PROGRAMImproperly disposed engine oil and/or other
vehicle fluids can pollute the environment. Al-
ways conform to local regulations for disposal
of vehicle fluid.
This section gives instructions regarding only those
items which are relatively easy for an owner to per-
form.
You should be aware that incomplete or improper
servicing may result in operating difficulties or ex-
cessive emissions, and could affect your warranty
coverage. If in doubt about any servicing, have it
done by your NISSAN dealer or qualified work-
shop. For an overview of the engine compartment, see
“Instrument and control layout” in the “0. Illus-
trated table of contents” section
.
ENGINE COMPARTMENT
Maintenance and do-it-yourself8-5
Page 241 of 297
Downloaded from www.Manualslib.com manuals search engine 1. Park the vehicle on a level surface and apply thehandbrake.
2. Start the engine. If the engine is cold, start and let the engine idle until the engine temperature
reaches the operational temperature.
3. Turn the engine off and wait at least 10 minutes to let the engine oil drain back into the oil pan. 4. Open the bonnet. For details, see “Bonnet
release” in the “3. Pre-driving checks and
adjustments” section.
5. Remove the engine oil filler cap.
6. Raise and support the vehicle using a suitable floor jack and safety jack stands.
Place the safety jack stands under the vehicle
jack-up points.
For details, see “Flat tyre” in the “6. In case of
emergency” section.
7. Remove the engine compartment under cover.
8. Place a large drain pan under the drain plug.
9. Remove the drain plug with a wrench and com- pletely drain the oil.
If the engine oil filter needs to be changed, re-
move and replace it at this time. See “Changing
engine oil filter” later in this section.
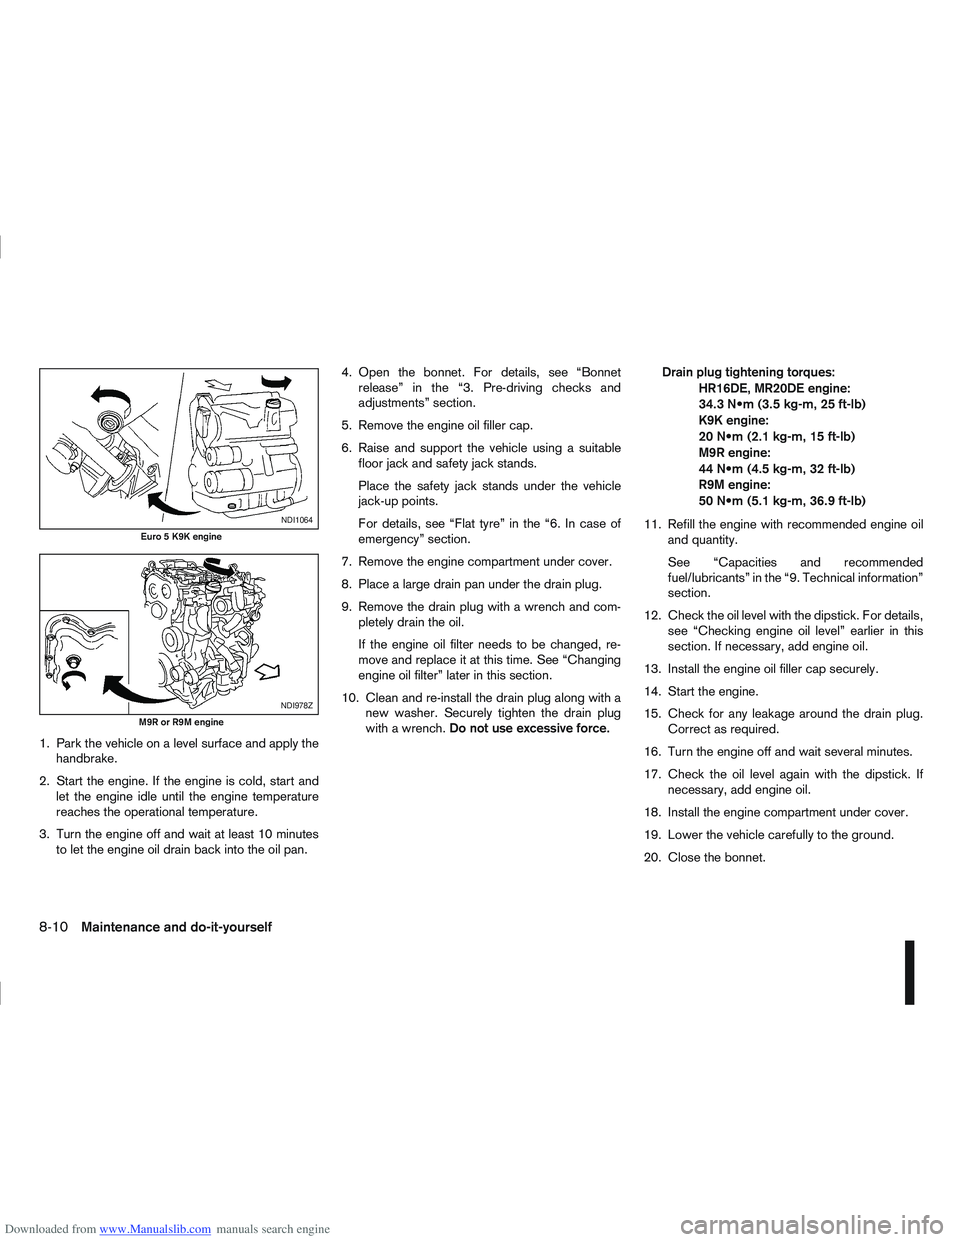
10. Clean and re-install the drain plug along with a new washer. Securely tighten the drain plug
with a wrench. Do not use excessive force. Drain plug tightening torques:
HR16DE, MR20DE engine:
34.3 (3.5 kg-m, 25 ft-lb)
K9K engine:
20 (2.1 kg-m, 15 ft-lb)
M9R engine:
44 (4.5 kg-m, 32 ft-lb)
R9M engine:
50 (5.1 kg-m, 36.9 ft-lb)
11. Refill the engine with recommended engine oil and quantity.
See “Capacities and recommended
fuel/lubricants” in the “9. Technical information”
section.
12. Check the oil level with the dipstick. For details, see “Checking engine oil level” earlier in this
section. If necessary, add engine oil.
13. Install the engine oil filler cap securely.
14. Start the engine.
15. Check for any leakage around the drain plug. Correct as required.
16. Turn the engine off and wait several minutes.
17. Check the oil level again with the dipstick. If necessary, add engine oil.
18. Install the engine compartment under cover.
19. Lower the vehicle carefully to the ground.
20. Close the bonnet.
NDI1064
Euro 5 K9K engine
NDI978Z
M9R or R9M engine
8-10Maintenance and do-it-yourself
Page 243 of 297
Downloaded from www.Manualslib.com manuals search engine 7. After the engine has been warmed up, make surethere are no leaks around the engine oil filter unit
and the drain plug. Correct as required.
8. Turn the engine off and wait several minutes. Check the oil level and add engine oil, if neces-
sary.
9. Install the engine compartment under cover.
10. Lower the vehicle carefully to the ground.
11. Close the bonnet.M9R or R9M engine
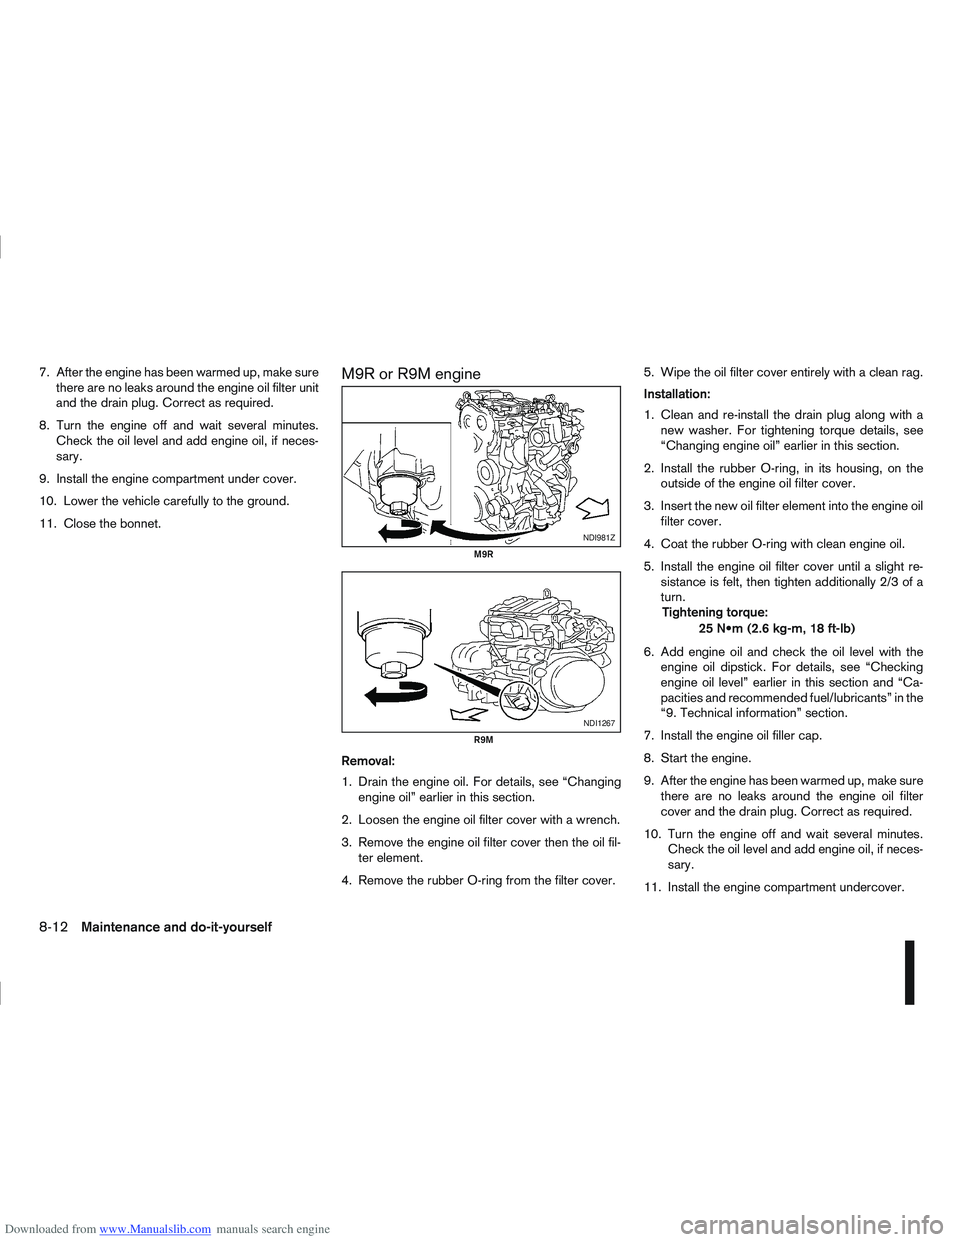
Removal:
1. Drain the engine oil. For details, see “Changing engine oil” earlier in this section.
2. Loosen the engine oil filter cover with a wrench.
3. Remove the engine oil filter cover then the oil fil- ter element.
4. Remove the rubber O-ring from the filter cover. 5. Wipe the oil filter cover entirely with a clean rag.
Installation:
1. Clean and re-install the drain plug along with a
new washer. For tightening torque details, see
“Changing engine oil” earlier in this section.
2. Install the rubber O-ring, in its housing, on the outside of the engine oil filter cover.
3. Insert the new oil filter element into the engine oil filter cover.
4. Coat the rubber O-ring with clean engine oil.
5. Install the engine oil filter cover until a slight re- sistance is felt, then tighten additionally 2/3 of a
turn.Tightening torque:
25 (2.6 kg-m, 18 ft-lb)
6. Add engine oil and check the oil level with the engine oil dipstick. For details, see “Checking
engine oil level” earlier in this section and “Ca-
pacities and recommended fuel/lubricants” in the
“9. Technical information” section.
7. Install the engine oil filler cap.
8. Start the engine.
9. After the engine has been warmed up, make sure there are no leaks around the engine oil filter
cover and the drain plug. Correct as required.
10. Turn the engine off and wait several minutes. Check the oil level and add engine oil, if neces-
sary.
11. Install the engine compartment undercover.
NDI981Z
M9R
NDI1267
R9M
8-12Maintenance and do-it-yourself
Page 254 of 297
Downloaded from www.Manualslib.com manuals search engine BACK DOOR WINDOW WIPER
REPLACEMENT
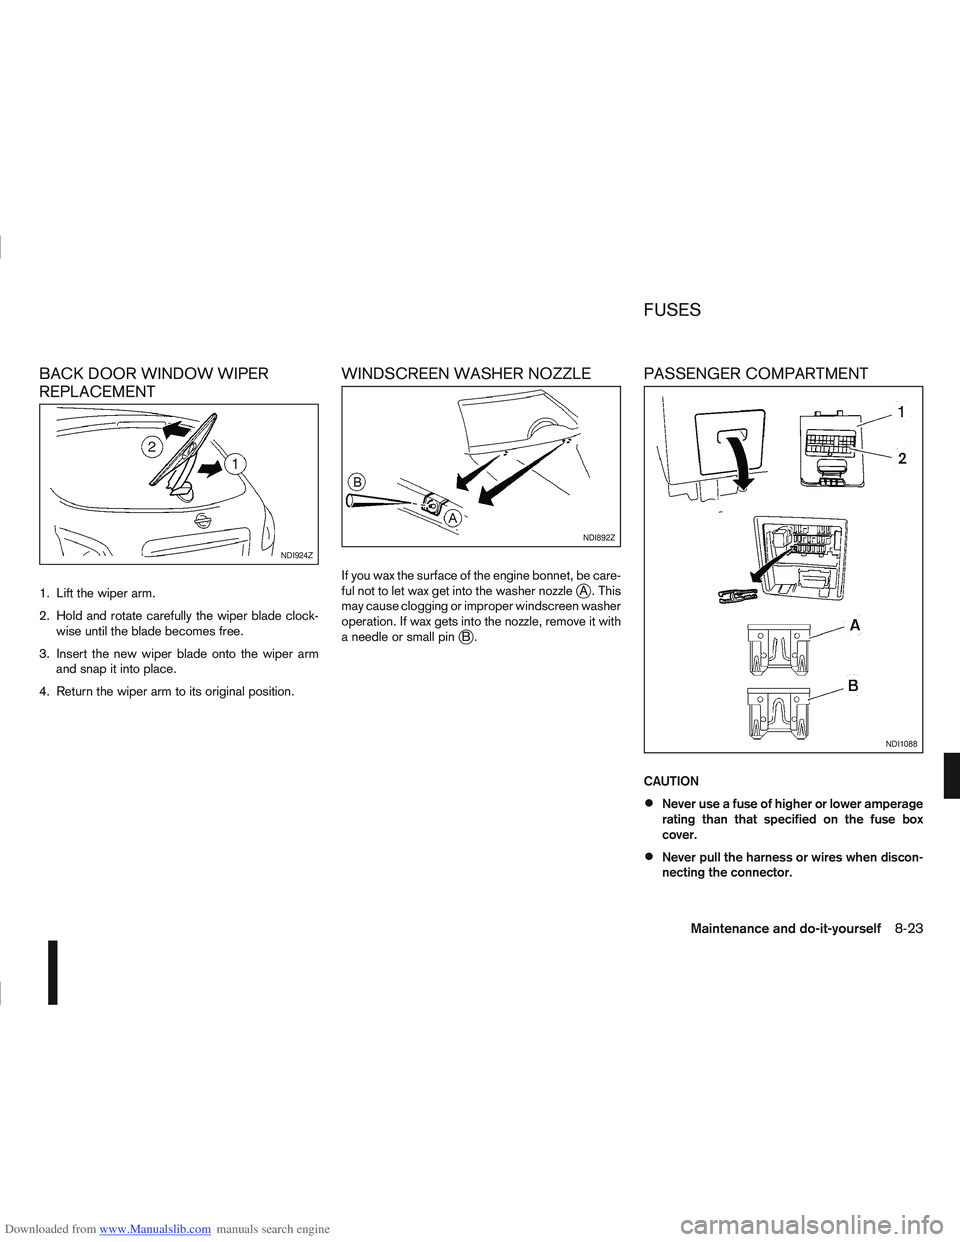
1. Lift the wiper arm.
2. Hold and rotate carefully the wiper blade clock-wise until the blade becomes free.
3. Insert the new wiper blade onto the wiper arm and snap it into place.
4. Return the wiper arm to its original position.
WINDSCREEN WASHER NOZZLE
If you wax the surface of the engine bonnet, be care-
ful not to let wax get into the washer nozzlejA . This
may cause clogging or improper windscreen washer
operation. If wax gets into the nozzle, remove it with
aneedleorsmallpin
jB.
PASSENGER COMPARTMENT
CAUTION
Never use a fuse of higher or lower amperage
rating than that specified on the fuse box
cover.
Never pull the harness or wires when discon-
necting the connector.
NDI924Z
NDI892Z
NDI1088
FUSES
Maintenance and do-it-yourself8-23
Page 255 of 297
Downloaded from www.Manualslib.com manuals search engine Be careful not to damage the connector sup-
port bracket when disconnecting the connec-
tor.
If any electrical equipment does not operate, check
for an open fuse.
The fuse box is located in the lower part of the
instrument panel at the driver’s side.
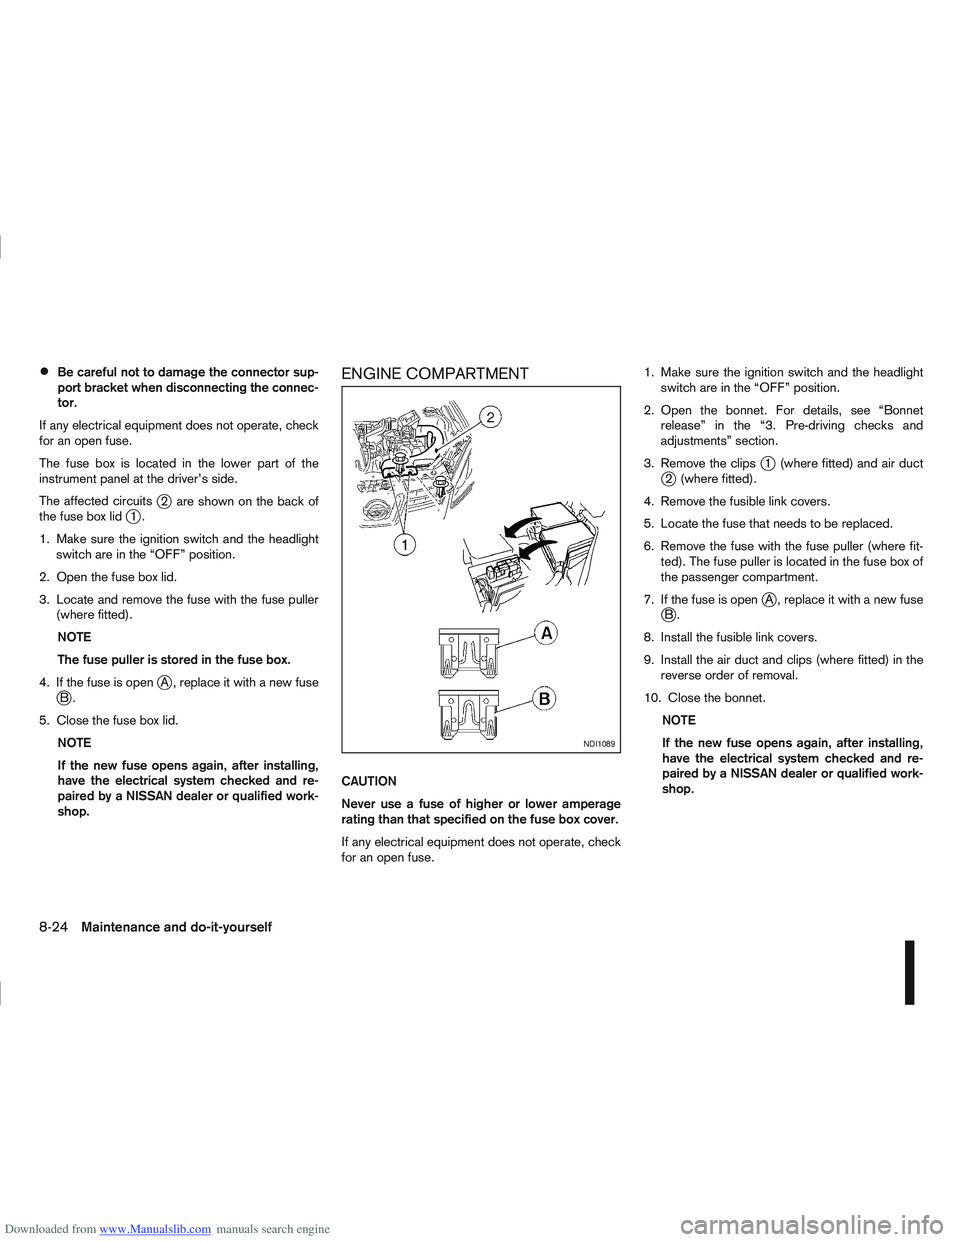
The affected circuits
j2 are shown on the back of
the fuse box lidj1.
1. Make sure the ignition switch and the headlight switch are in the “OFF” position.
2. Open the fuse box lid.
3. Locate and remove the fuse with the fuse puller (where fitted).
NOTE
The fuse puller is stored in the fuse box.
4. If the fuse is open
jA , replace it with a new fusejB.
5. Close the fuse box lid. NOTE
If the new fuse opens again, after installing,
have the electrical system checked and re-
paired by a NISSAN dealer or qualified work-
shop.
ENGINE COMPARTMENT
CAUTION
Never use a fuse of higher or lower amperage
rating than that specified on the fuse box cover.
If any electrical equipment does not operate, check
for an open fuse. 1. Make sure the ignition switch and the headlight
switch are in the “OFF” position.
2. Open the bonnet. For details, see “Bonnet release” in the “3. Pre-driving checks and
adjustments” section.
3. Remove the clips
j1 (where fitted) and air ductj2 (where fitted).
4. Remove the fusible link covers.
5. Locate the fuse that needs to be replaced.
6. Remove the fuse with the fuse puller (where fit- ted). The fuse puller is located in the fuse box of
the passenger compartment.
7. If the fuse is open
jA , replace it with a new fusejB.
8. Install the fusible link covers.
9. Install the air duct and clips (where fitted) in the reverse order of removal.
10. Close the bonnet. NOTE
If the new fuse opens again, after installing,
have the electrical system checked and re-
paired by a NISSAN dealer or qualified work-
shop.
NDI1089
8-24Maintenance and do-it-yourself
Page 258 of 297
Downloaded from www.Manualslib.com manuals search engine EXTERIOR LIGHTS
ItemWattage (W)
Headlight (Low or high beam:
type H7) 55
Front turn signal light 21
Front side light 5
Front fog light (H11 type, where
fitted) *1 55
Side turn signal light 5
Rear combination light Turn signal light 21
Stop/Tail light *1 LED
Reverse light *1 21
High-mounted stop light *1 LED
Number plate light 5
Rear fog light 21
*1: If replacement is required, contact a NISSAN dealer or qualified workshop.
INTERIOR LIGHTS
Item Wattage
(W)
Room light/Map lights (where fitted)
Foot well light (where fitted) 5
3
Room light — rear (where fitted) 5
Reading lights — rear (where fitted) 8
Luggage compartment light (where fitted) 5
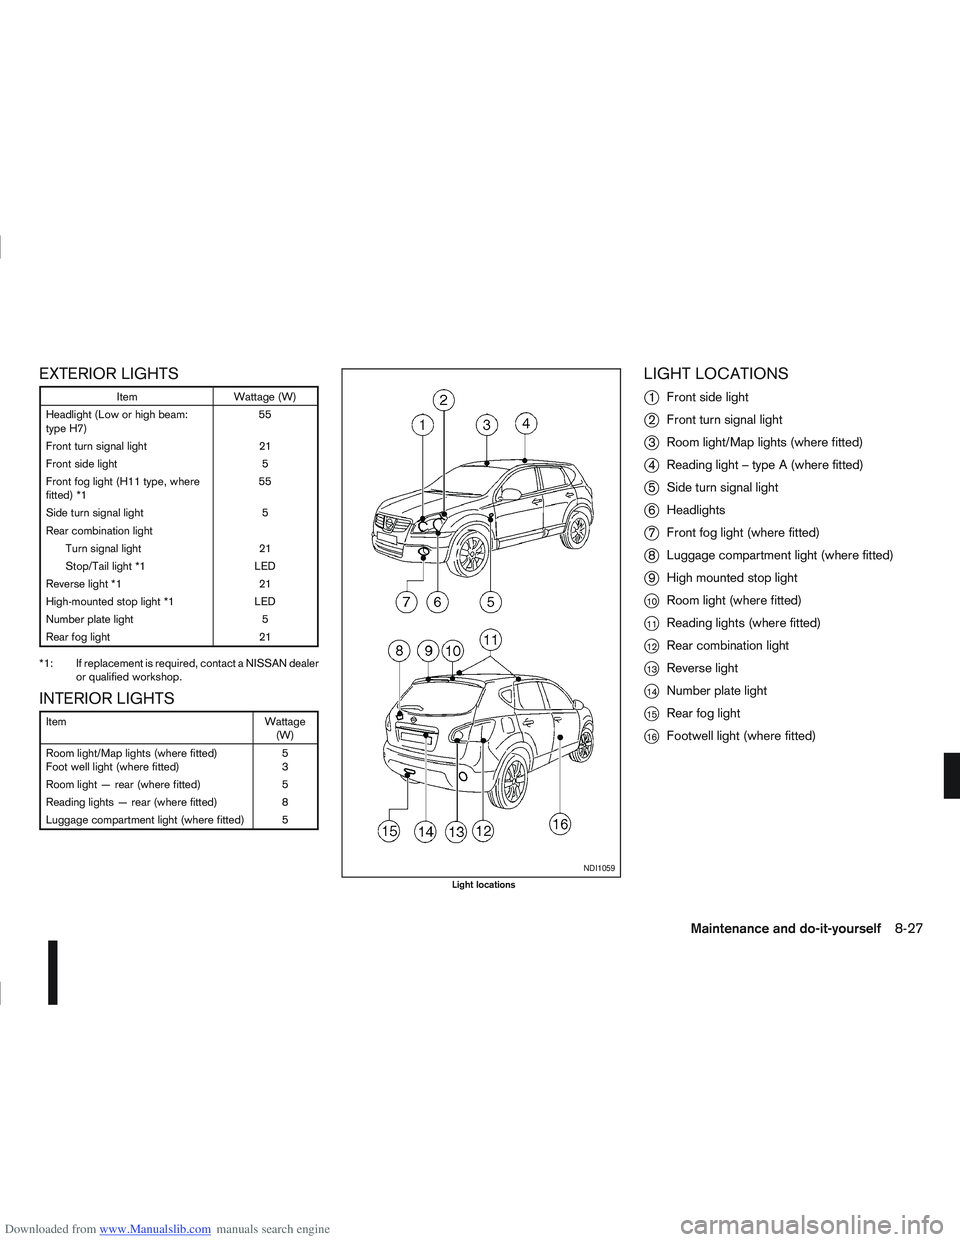
LIGHT LOCATIONS
j
1 Front side light
j2Front turn signal light
j3Room light/Map lights (where fitted)
j4Reading light – type A (where fitted)
j5Side turn signal light
j6Headlights
j7Front fog light (where fitted)
j8Luggage compartment light (where fitted)
j9High mounted stop light
j10Room light (where fitted)
j11Reading lights (where fitted)
j12Rear combination light
j13Reverse light
j14Number plate light
j15Rear fog light
j16Footwell light (where fitted)
NDI1059
Light locations
Maintenance and do-it-yourself8-27
Page 261 of 297
Downloaded from www.Manualslib.com manuals search engine NDI1097
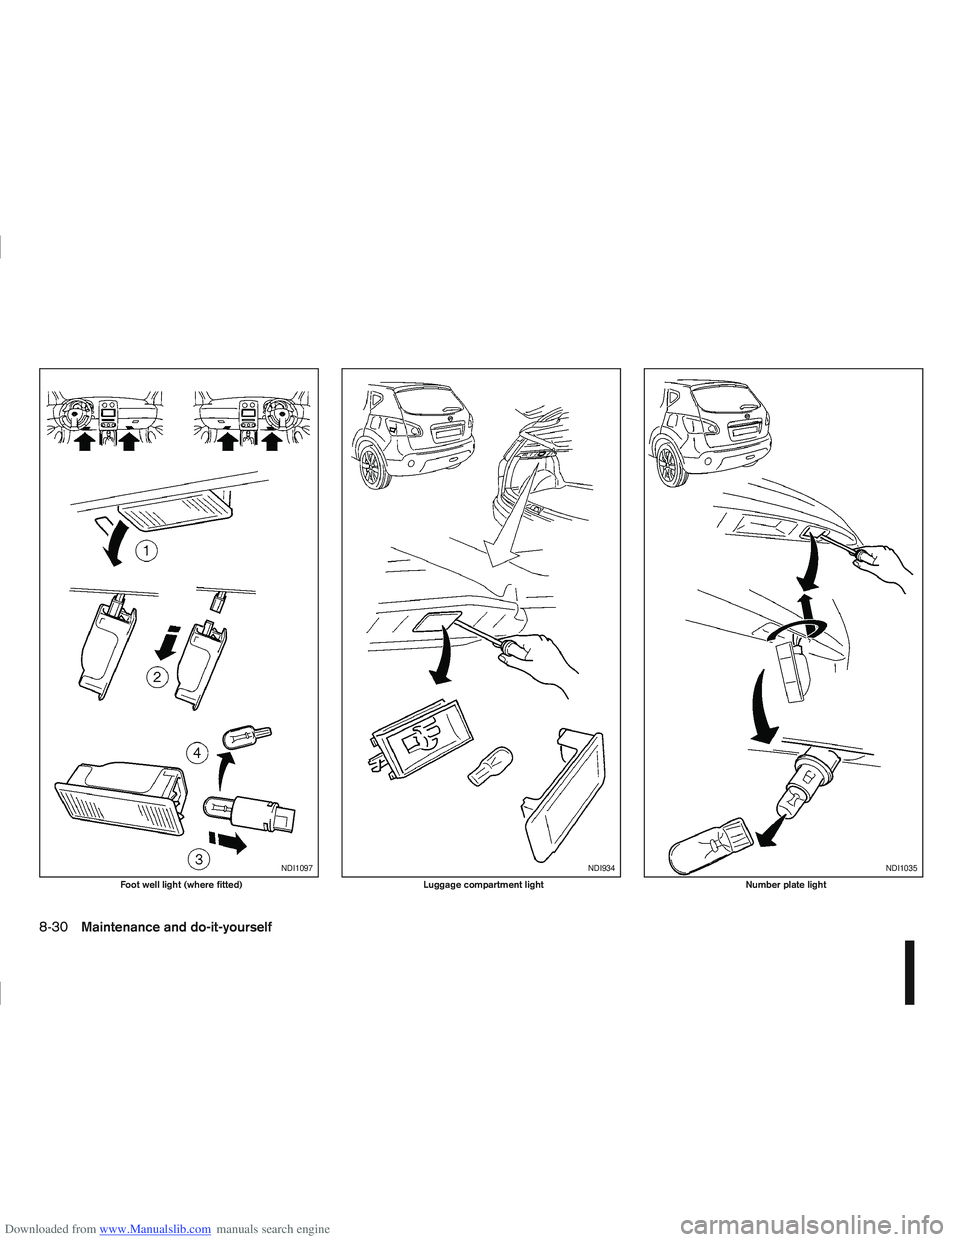
Foot well light (where fitted)
NDI934
Luggage compartment light
NDI1035
Number plate light
8-30Maintenance and do-it-yourself
Page 284 of 297
Downloaded from www.Manualslib.com manuals search engine Display
– Vehicle information display ............................................. 2-11
Door locks ........................................................................\
.... 3-9
– Back door ..................................................................... 3-12
– Child safety rear door locks ........................................... 3-11
– Drive away door locking ................................................. 3-11
– Locking/unlocking with the key — vehicle dead battery .... 3-9
– Power door lock switch ................................................. 3-10
– Remote keyless entry system ........................................... 3-3
– Super Lock system .......................................................... 3-9
– When leaving the vehicle ............................................... 3-10
Drive belts ........................................................................\
... 8-21
Driving
– Care when driving ........................................................... 5-6
– Cold weather driving ..................................................... 5-42
– Driving four-wheel drive (4WD) safely ............................ 5-27
– Driving on wet road ......................................................... 5-6
– Driving the vehicle ......................................................... 5-12
– Driving under winter conditions ........................................ 5-6
– Driving with automatic transmission ...................... 5-14, 5-17
– Driving with continuously variable transmission (Models withmanual shift) .................................................................. 5-14
– Driving with continuously variable transmission (Models without manual shift) .................................................................. 5-17
– Driving with manual transmission ................................... 5-12
– On-pavement and off-road driving precautions ................. 5-4
– Precautions when starting and driving .............................. 5-3
– Stop/Start System ......................................................... 5-21
E
Electronic Stability Programme (ESP) system ...................... 5-40
– ESP OFF switch ........................................................... 5-42
Emergency tyre puncture repair kit ............................... 6-7, 8-34
Emergency/mechanical key ................................................... 3-3 Engine
– Before starting the engine ................................................ 5-2
– Changing engine coolant ................................................. 8-6
– Changing engine oil ......................................................... 8-9
– Changing engine oil filter ............................................... 8-11
– Checking engine coolant level ......................................... 8-6
– Checking engine oil level ................................................. 8-8
– Data ........................................................................\
........ 9-7
– Engine cold start period ................................................... 5-6
– Engine compartment ................................................ 0-7, 8-5
– Engine coolant ............................................................... 5-43
– Engine coolant temperature gauge ................................... 2-2
– Engine cooling system ..................................................... 8-6
– Engine oil ........................................................................\
8-8
– Engine overheat ............................................................. 6-12
– Engine serial number ....................................................... 9-9
– Fuel filter (Diesel engine models) ................................... 8-13
– Starting the engine ........................................................ 5-11
Exhaust gas (Carbon Monoxide) ............................................ 5-3
Exterior lights ...................................................................... 8-27
F
Filter
– Air cleaner filter ............................................................. 8-21
– Air conditioner filter .............................................. 4-17, 4-21
– Fuel filter (Diesel engine models) ................................... 8-13
Floor mats ........................................................................\
..... 7-4
Fluid
– Automatic transmission fluid (ATF) ................................. 8-14
– Brake and clutch fluid .................................................... 8-15
– Continuously variable transmission fluid ......................... 8-14
– Window washer/headlight cleaner fluid .......................... 8-16
Fog light
– Front fog light ................................................................ 2-26
– Rear fog light ................................................................. 2-27
Index10-3