2007 NISSAN QASHQAI oil type
[x] Cancel search: oil typePage 12 of 297

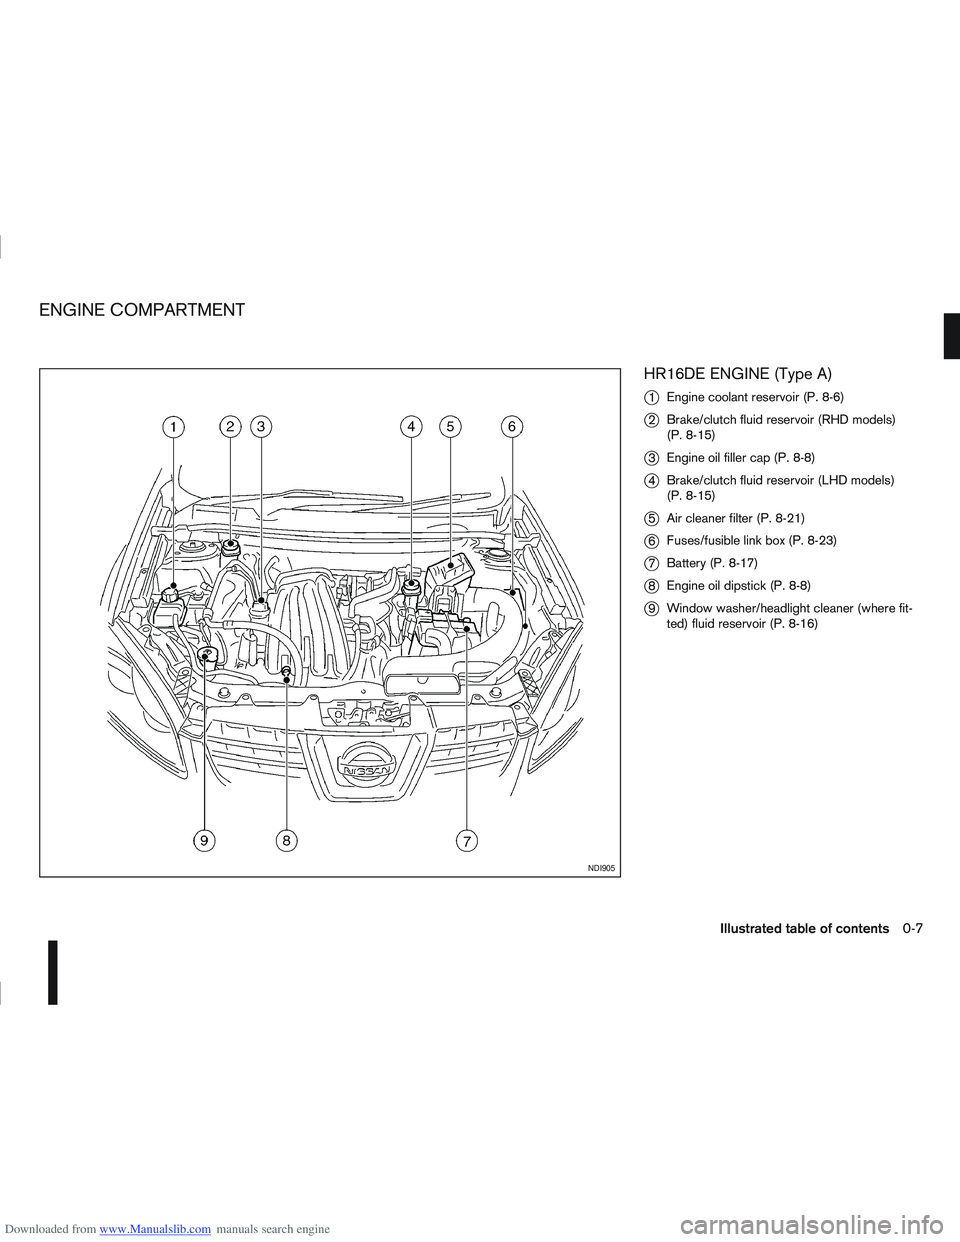
Downloaded from www.Manualslib.com manuals search engine HR16DE ENGINE (Type A)
j
1Engine coolant reservoir (P. 8-6)
j2Brake/clutch fluid reservoir (RHD models)
(P. 8-15)
j3Engine oil filler cap (P. 8-8)
j4Brake/clutch fluid reservoir (LHD models)
(P. 8-15)
j5Air cleaner filter (P. 8-21)
j6Fuses/fusible link box (P. 8-23)
j7Battery (P. 8-17)
j8Engine oil dipstick (P. 8-8)
j9Window washer/headlight cleaner (where fit-
ted) fluid reservoir (P. 8-16)
NDI905
ENGINE COMPARTMENT
Illustrated table of contents0-7
Page 13 of 297

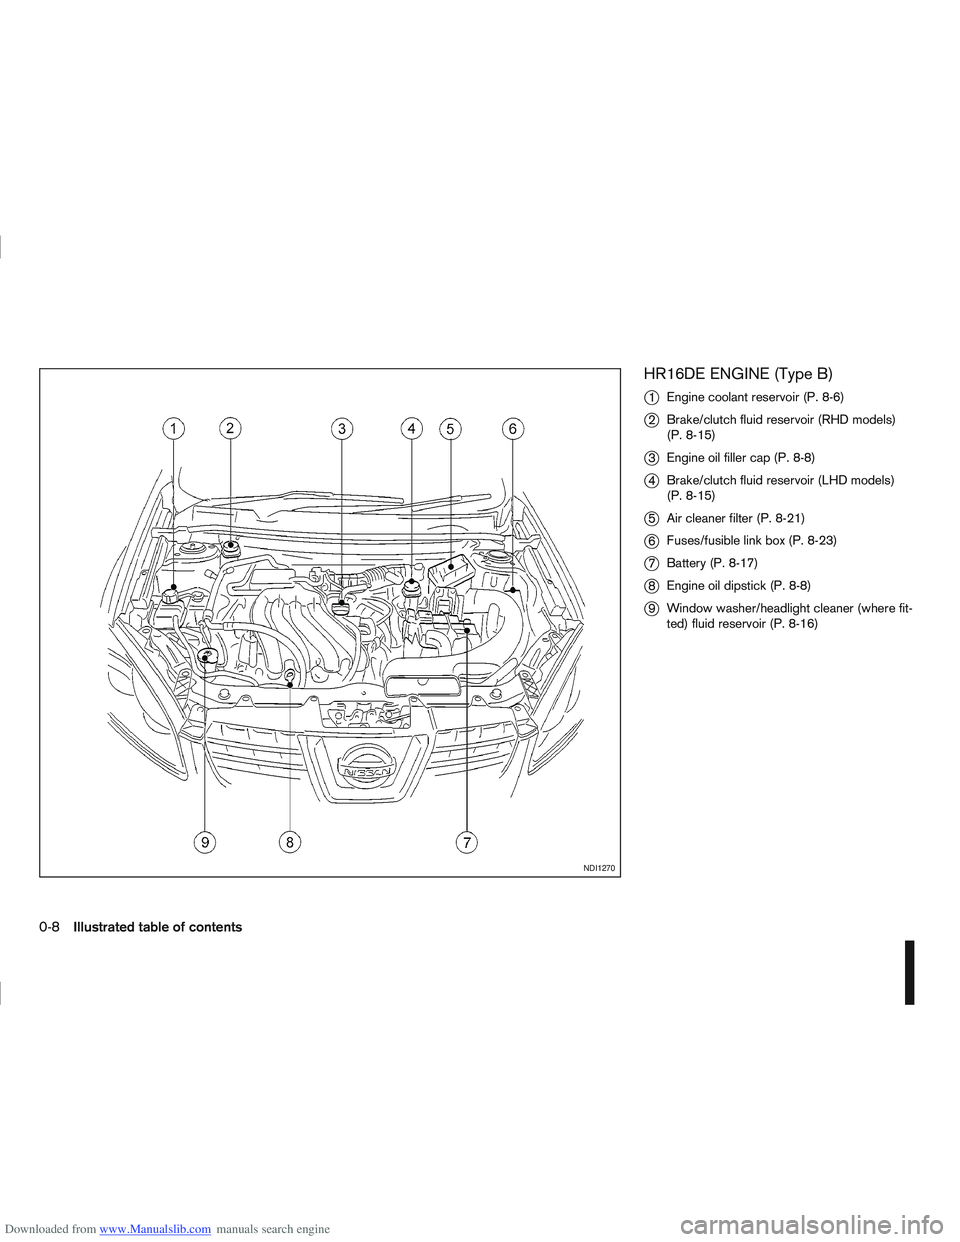
Downloaded from www.Manualslib.com manuals search engine HR16DE ENGINE (Type B)
j
1Engine coolant reservoir (P. 8-6)
j2Brake/clutch fluid reservoir (RHD models)
(P. 8-15)
j3Engine oil filler cap (P. 8-8)
j4Brake/clutch fluid reservoir (LHD models)
(P. 8-15)
j5Air cleaner filter (P. 8-21)
j6Fuses/fusible link box (P. 8-23)
j7Battery (P. 8-17)
j8Engine oil dipstick (P. 8-8)
j9Window washer/headlight cleaner (where fit-
ted) fluid reservoir (P. 8-16)
NDI1270
0-8Illustrated table of contents
Page 64 of 297
![NISSAN QASHQAI 2007 Owners Manual Downloaded from www.Manualslib.com manuals search engine However reset is possible (only after the oil was
changed) using the [Service] menu item in the
[Settings] menu. See “[Maintenance]” later NISSAN QASHQAI 2007 Owners Manual Downloaded from www.Manualslib.com manuals search engine However reset is possible (only after the oil was
changed) using the [Service] menu item in the
[Settings] menu. See “[Maintenance]” later](/manual-img/5/56769/w960_56769-63.png)
Downloaded from www.Manualslib.com manuals search engine However reset is possible (only after the oil was
changed) using the [Service] menu item in the
[Settings] menu. See “[Maintenance]” later in this
section
Have the vehicle inspected by a NISSAN dealer
or qualified workshop if these conditions occur.
j20Distance to maintenance alert
(where fitted)
This alert reminds when maintenance is due in the
shown distance. The alert is shown for 10 seconds
at ignition ON, when the distance to the next main-
tenance interval is below 5000 km (3100 Miles).
The message is shown until the steering wheel
switch
ji (where fitted) is pressed.
NOTE
Visit a NISSAN dealer or qualified workshop
before the maintenance due alertj19reaches
0 km (miles) to perform maintenance (oil
change).
The maintenance interval will reduce faster
with certain types of driving, especially at low
speeds in urban conditions.
j21Tyre change alert
You can set a distance for changing tyres. See
“[Maintenance]” later in this section
j22Maintenance alert
You can set a distance for a non specific mainte-
nance item. See “[Maintenance]” later in this sec-
tion
j23Low temperature warning
If, during driving, the temperature falls below 4ºC
this alert will appear to indicate low outside air tem-
perature. You can switch the low temperature warn-
ing [On] or [Off]. See “[Units]” later in this section
CAUTION
Even if the alert is not on, there is no guarantee
that the road is free of hazards caused by in-
clement weather.
NOTE
The outside air temperature sensor is located at
the front of the vehicle. At low speeds the sensor
can be affected by engine heat, heat reflected
from the road surface and exhaust from other
vehicles, these influences can cause the display
to be inaccurate. To compensate, the outside air
temperature display is designed to react slowly
to increasing temperatures, but quickly to falling
temperatures.
j24Low fuel warning
This warning appears when the fuel level in the tank
is getting low. Refuel as soon as it is convenient,
preferably before the fuel gauge reaches the empty
position. For more information, see “Fuel gauge”
earlier in this section.
j25Driver alert
This warning appears when the previously set time
for a break is reached. You can set the time for up
to 6 hours in the setting menu. (See “Settings menu”
later in this section.)
Stop/Start System (where fitted)
For more information, see “Stop/Start System
(where fitted)” in the “5. Starting and driving” sec-
tion
j26Engine stop:
If the engine stops when the Stop/Start System is
activated, the message is shown.
j27Auto start deactivation:
If the engine stops when the Stop/Start System is
activated, and will not start automatically, the mes-
sage is shown.
j28System fault:
If the Stop/Start System is activated, but does not
operate correctly, the message is shown. Visit a
NISSAN dealer or qualified workshop.
Activating or deactivating using the Stop/Start
System OFF switch:
Using the Stop/Start System OFF switch activates
or deactivates the Stop/Start System. This is shown
in the vehicle information display:
j29 :The Stop/Start System OFF switch is
pushed to the “ON” position.
j30 :The Stop/Start System OFF switch is pushed to
the “OFF” position.
Instruments and controls2-15
Page 231 of 297

Downloaded from www.Manualslib.com manuals search engine 8Maintenance and do-it-yourself
Maintenance and do-it-yourself
Maintenance requirements ....................................... 8-2
Scheduled maintenance...................................... 8-2
General maintenance .......................................... 8-2
Where to go for service ...................................... 8-2
General maintenance ............................................... 8-2 Explanation of general maintenance items ........... 8-2
Maintenance precautions ......................................... 8-4
Engine compartment ................................................ 8-5
Engine cooling system ............................................. 8-6 Checking engine coolant level............................. 8-6
Changing engine coolant .................................... 8-6
Engine oil................................................................. 8-8 Checking engine oil level .................................... 8-8
Changing engine oil ............................................ 8-9
Changing engine oil filter .................................... 8-11
Protect the environment ...................................... 8-13
Fuel filter (Diesel engine models) ............................. 8-13 Draining water .................................................... 8-13
Bleeding the fuel system ..................................... 8-14
Automatic transmission fluid (ATF) ........................... 8-14
Continuously variable transmission (CVT) fluid ......... 8-14
Brakes ..................................................................... 8-15 Checking brake pedal......................................... 8-15
Checking handbrake........................................... 8-15
Brake and clutch fluid .............................................. 8-15
Window washer fluid/headlight cleaner fluid
(where fitted) ........................................................... 8-16
Battery..................................................................... 8-17 Vehicle battery .................................................... 8-17
Jump-starting ...................................................... 8-19 Integrated keyfob/Intelligent Key battery
replacement........................................................ 8-19
Drive belts ............................................................... 8-21
Spark plugs (Petrol engine models).......................... 8-21
Air cleaner filter........................................................ 8-21 Viscous paper type ............................................. 8-22
Dry paper type (where fitted) .............................. 8-22
Wiper blades ........................................................... 8-22 Cleaning ............................................................. 8-22
Front window wiper replacement ........................ 8-22
Back door window wiper replacement ................ 8-23
Windscreen washer nozzle ................................. 8-23
Fuses ...................................................................... 8-23 Passenger compartment ..................................... 8-23
Engine compartment ........................................... 8-24
Lights ...................................................................... 8-25 Headlights .......................................................... 8-25
Exterior lights ...................................................... 8-27
Interior lights....................................................... 8-27
Light locations .................................................... 8-27
Wheels and tyres ..................................................... 8-31 Tyre inflation pressure......................................... 8-31
Types of tyres ..................................................... 8-31
Snow chains....................................................... 8-32
Tyre rotation ....................................................... 8-32
Tyre wear and damage ....................................... 8-33
Tyre age ............................................................. 8-33
Changing tyres and wheels ................................. 8-33
Four-wheel drive (4WD) models ......................... 8-33
Wheel balance.................................................... 8-33
Page 242 of 297

Downloaded from www.Manualslib.com manuals search engine CHANGING ENGINE OIL FILTER
WARNING
NISSAN recommends contacting a NISSAN
dealer or qualified workshop for engine oil fil-
ter servicing.
NISSAN GREEN PROGRAM
A used oil filter should be disposed of at a
rubbish tip having proper facilities.
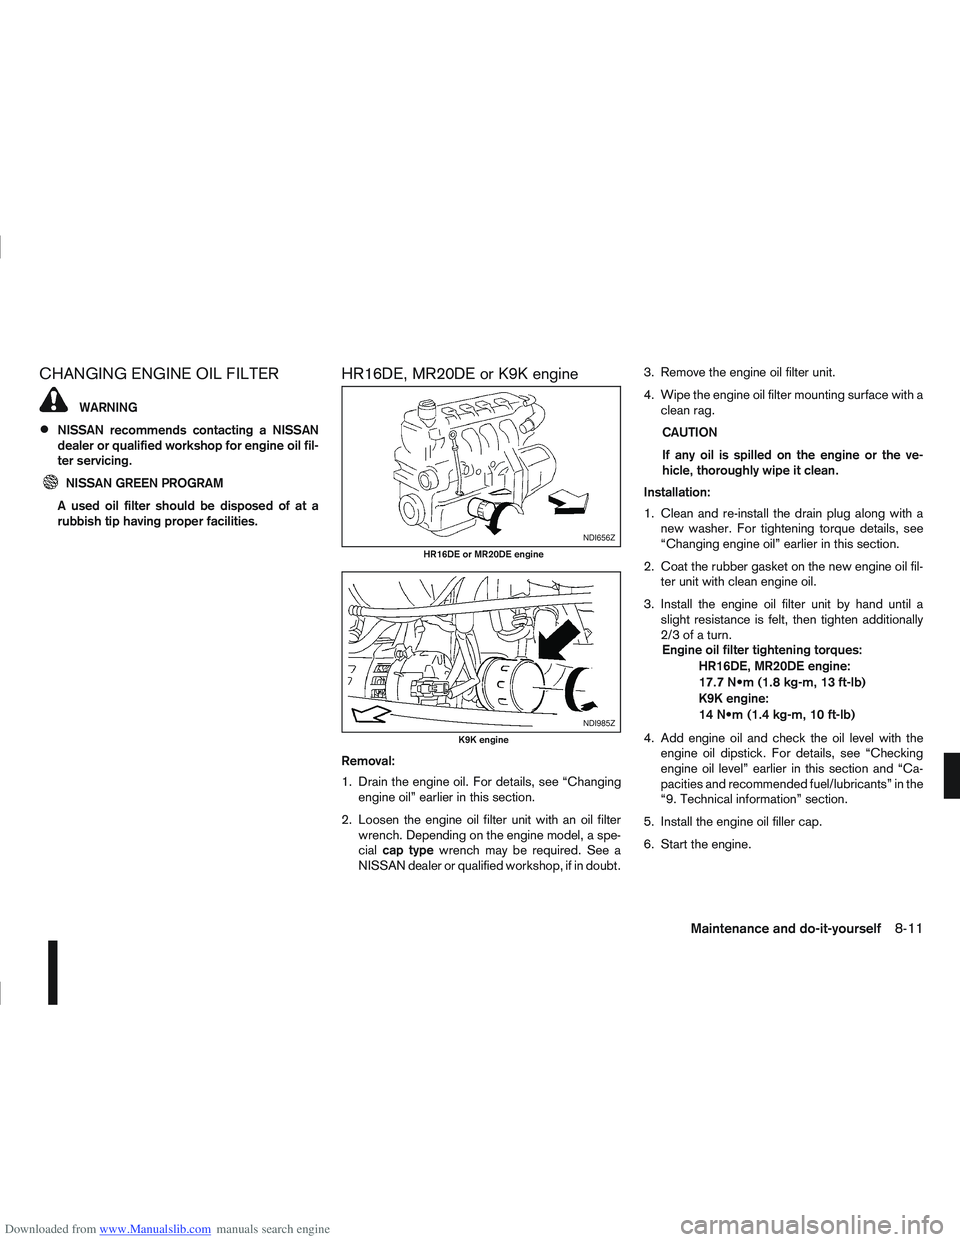
HR16DE, MR20DE or K9K engine
Removal:
1. Drain the engine oil. For details, see “Changing engine oil” earlier in this section.
2. Loosen the engine oil filter unit with an oil filter wrench. Depending on the engine model, a spe-
cial cap type wrench may be required. See a
NISSAN dealer or qualified workshop, if in doubt. 3. Remove the engine oil filter unit.
4. Wipe the engine oil filter mounting surface with a
clean rag.
CAUTION
If any oil is spilled on the engine or the ve-
hicle, thoroughly wipe it clean.
Installation:
1. Clean and re-install the drain plug along with a new washer. For tightening torque details, see
“Changing engine oil” earlier in this section.
2. Coat the rubber gasket on the new engine oil fil- ter unit with clean engine oil.
3. Install the engine oil filter unit by hand until a slight resistance is felt, then tighten additionally
2/3ofaturn.Engine oil filter tightening torques:
HR16DE, MR20DE engine:
17.7 (1.8 kg-m, 13 ft-lb)
K9K engine:
14 (1.4 kg-m, 10 ft-lb)
4. Add engine oil and check the oil level with the engine oil dipstick. For details, see “Checking
engine oil level” earlier in this section and “Ca-
pacities and recommended fuel/lubricants” in the
“9. Technical information” section.
5. Install the engine oil filler cap.
6. Start the engine.
NDI656Z
HR16DE or MR20DE engine
NDI985Z
K9K engine
Maintenance and do-it-yourself8-11
Page 257 of 297

Downloaded from www.Manualslib.com manuals search engine Only hold the xenon headlight bulb by the
base.
The bulb is manufactured from high-quality
quartz and is under high pressure.
Damage, soiling, and fingerprints should be
avoided and, if necessary, removed with alco-
hol before installing the bulb.
When the headlights are switched on, the
bulbs produce a certain amount of UV radia-
tion. In order to avoid any impairment of health
(burning and conjunctivitis), the bulb should
only be used in closed headlights with appro-
priate UV–absorbing front glass.
Due to the risk of burning, the bulb should be
left to cool down for 3 minutes after switching
off before touching.
Due to the use of mercury and various salts,
the bulb should be treated as special waste
when discarded.
The bulb may only be operated with a suitable
ballast which produces very high voltages
when switched on and during operation.
Contact with bulb and wires should therefore
be avoided and a safe distance of at least 30
mm should be maintained.
Replacing the halogen headlight bulb
CAUTION
High pressure halogen gas is sealed inside
the halogen bulb. The bulb may break if the
glass envelope is scratched or the bulb is
dropped.
When handling the bulb, DO NOT TOUCH THE
GLASS ENVELOPE.
Use the same number type and wattage as
originally installed.
Aiming is usually not necessary after replac-
ing the bulb. When aiming adjustment is nec-
essary, contact a NISSAN dealer or qualified
workshop.
Do not leave the bulb out of the headlight
reflector for a long period of time as dust,
moisture or smoke may enter the headlight
body and affect the performance of the head-
light.
The headlight is a semi-sealed beam type which
uses a replaceable headlight (halogen) bulb. A bulb
can be replaced from inside the engine compart-
ment without removing the headlight assembly.
Contact a NISSAN dealer or qualified workshop, if
you need assistance for bulb replacement.
1. Open the bonnet. For details, see “Bonnet release” in the “3. Pre-driving checks and
adjustments” section.
2. Disconnect the negative (—) battery cable. 3. When the broken bulb is located in the headlight
assembly under the air duct, carefully remove the
clips and rotate the air duct
jc clockwise a 1/4
of a turn.
4. Remove the cap (
jAorjB ) of the headlight as-
sembly.
5. Turn the connector 1/4 of a turn in the anti clock- wise direction and remove the headlight bulb.
6. Install the new bulb in the reverse order of re- moval and make sure that the cap is securely
sealed with the headlight body.
7. Where removed (step 3.), re-install the air duct
jc and clips in the order of removal.
8. Reconnect the negative (—) battery cable and close the bonnet.
NOTE
Fog may temporarily form inside the lens of the
exterior lights in the rain or in a car wash. The fog
is caused by a temperature difference between
the inside and the outside of the lens. This is not
a malfunction. If large droplets can be seen, then
contact a NISSAN dealer or qualified workshop.
8-26Maintenance and do-it-yourself
Page 268 of 297

Downloaded from www.Manualslib.com manuals search engine Capacity (approximate)Recommended specifications
Litre Imp measure
Cooling system
Genuine NISSAN engine coolant or equivalent in its quality *3
HR16DE (with reservoir) 6.4 5–5/8 qt
MR20DE (with reservoir)
MT models
7.06–1/8 qt
CVT models 7.46–1/2 qt
K9K (with reservoir) without DPF
7.97 qt
with DPF 9.18 qt
M9R (with reservoir) MT models
8.47–3/8 qt
AT models 8.87–3/4 qt
R9M (with reservoir) 8.07 qt
Reservoir 0.83/4 qt
Differential gear oil 0.61/2 qt
Genuine NISSAN Differential oil Hypoid Super GL5 80W90 or API GL5. viscosity
SAE 80W90
Transfer gear oil 0.43/8 qt
Manual transaxle gear oil 5MT 2.32 qt
Genuine NISSAN gear oil or API GL4, viscosity SAE 75W80
6MT (MR20DE (2WD) or K9K) 2.01–3/4 qt
6MT (MR20DE (4WD), M9R or R9M) 2.01-3/4 qt Genuine NISSAN low viscosity gear oil LV MT-1 75W *7
Automatic Transmission fluid (ATF) M9R with 4WD 7.56–5/8 qt Genuine NISSAN Matic Fluid (ATF) type S *4 *6
Continuously Variable Transmission
(CVT) fluid HR16 with 2WD
7.16–1/4 qt
Genuine NISSAN CVT fluid NS-2 *5 *6
MR20 with 2WD 7.56–5/8 qt
MR20 with 4WD 8.57–1/2 qt
Brake & clutch fluid Refill to the proper oil level accord-
ing to the instructions in the “8.
Maintenance and do-it-yourself”
section.Genuine NISSAN brake fluid or equivalent. DOT 4 (US FMVSS No. 116)
Multi-purpose grease –– NLGI No. 2 (Lithium soap base)
Air conditioning system refrigerant –– HFC-134a (R-134a)
Air conditioning system lubricants –– Genuine NISSAN A/C System Oil Type S or exact equivalent
Technical information9-3
Page 269 of 297

Downloaded from www.Manualslib.com manuals search engine *1: For further details, see “Recommended SAE viscosity number” later in this section.
*2: With the technical performances of oil ACEA B3/B4.
*3: Use Genuine NISSAN engine coolant, or equivalent in its quality, in order to avoid possible aluminium corrosion within the engine cooling system caused by the use of non-genuineengine coolant. Note that any repairs for the incidents within the engine cooling system while using non-genuine engine coolant may not be covered by the warranty, eve n
if such incidents occurred during the warranty period. Contact a NISSAN dealer or qualified workshop for more information regarding the coolant type and capacity.
*4: Using automatic transmission fluid other than Genuine NISSAN Matic Fluid (ATF) type S will cause deterioration in driveability and automatic transmission durability and may dam- age the automatic transmission, which is not covered by the NISSAN warranty.
*5: Use only Genuine NISSAN CVT Fluid NS-2. Using CVT fluid other than Genuine NISSAN CVT Fluid (NS-2) will damage the CVT transmission system, which is not covered by the NISSAN warranty.
*6: Contact a NISSAN dealer or qualified workshop for servicing.
*7: If Genuine NISSAN low viscosity gear oil LV MT-1 75W is not available, Genuine NISSAN gear oil HQ Multi 75W-85 or gear oil meeting SAE 75W-85 API GL4 specifications may be used.
*8: For K9K Euro 5 models
9-4Technical information