2007 NISSAN QASHQAI Engine compartment
[x] Cancel search: Engine compartmentPage 82 of 297
Downloaded from www.Manualslib.com manuals search engine WARNING
Never put anything on the rear parcel shelf, no
matter how small. Any object on it could cause
an injury in an accident or when the brakes are
applied suddenly.
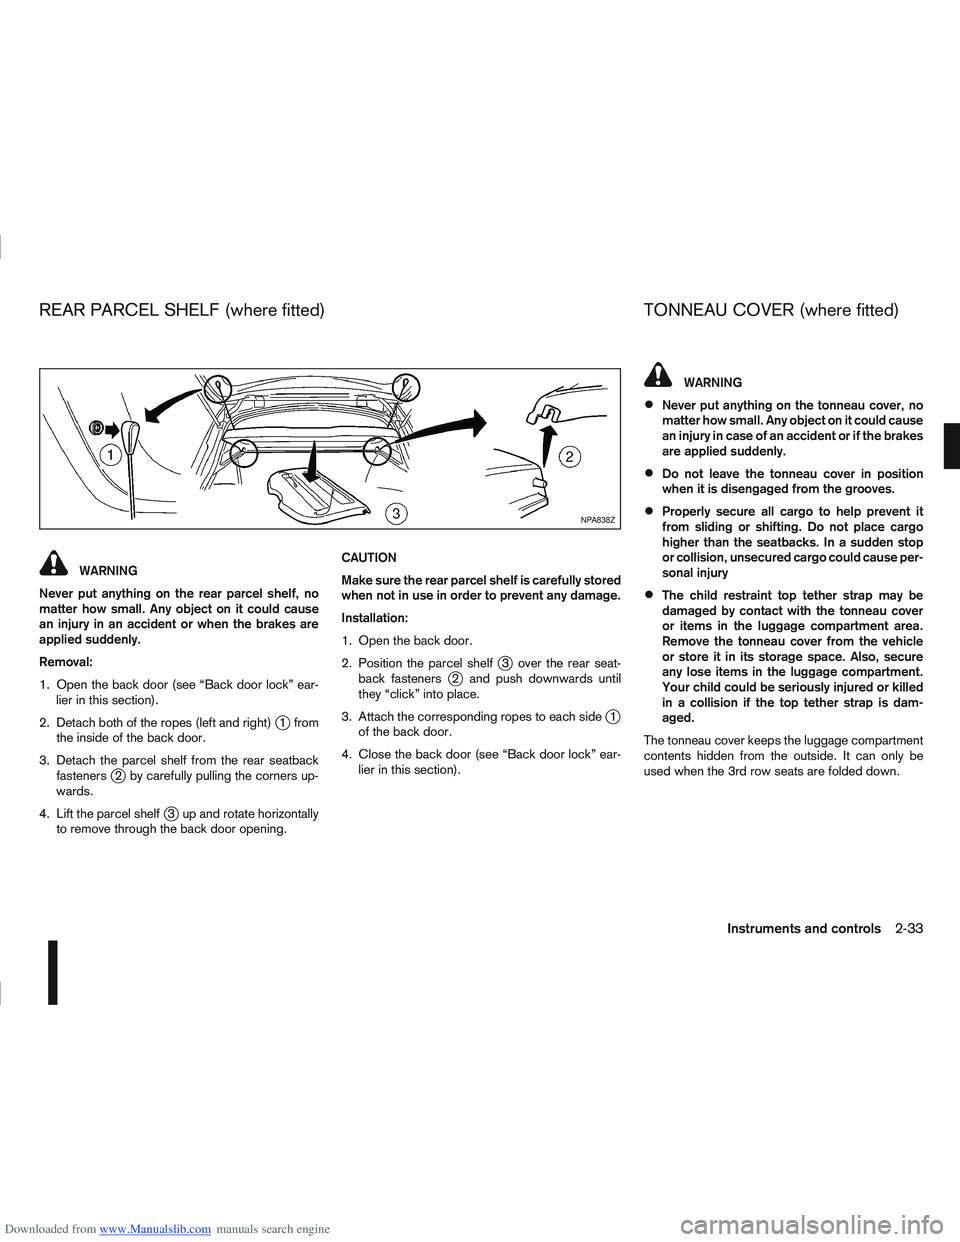
Removal:
1. Open the back door (see “Back door lock” ear- lier in this section).
2. Detach both of the ropes (left and right)
j1 from
the inside of the back door.
3. Detach the parcel shelf from the rear seatback fasteners
j2 by carefully pulling the corners up-
wards.
4. Lift the parcel shelf
j3 up and rotate horizontally
to remove through the back door opening. CAUTION
Make sure the rear parcel shelf is carefully stored
when not in use in order to prevent any damage.
Installation:
1. Open the back door.
2. Position the parcel shelf
j3 over the rear seat-
back fastenersj2 and push downwards until
they “click” into place.
3. Attach the corresponding ropes to each side
j1
of the back door.
4. Close the back door (see “Back door lock” ear- lier in this section).
WARNING
Never put anything on the tonneau cover, no
matter how small. Any object on it could cause
an injury in case of an accident or if the brakes
are applied suddenly.
Do not leave the tonneau cover in position
when it is disengaged from the grooves.
Properly secure all cargo to help prevent it
from sliding or shifting. Do not place cargo
higher than the seatbacks. In a sudden stop
or collision, unsecured cargo could cause per-
sonal injury
The child restraint top tether strap may be
damaged by contact with the tonneau cover
or items in the luggage compartment area.
Remove the tonneau cover from the vehicle
or store it in its storage space. Also, secure
any lose items in the luggage compartment.
Your child could be seriously injured or killed
in a collision if the top tether strap is dam-
aged.
The tonneau cover keeps the luggage compartment
contents hidden from the outside. It can only be
used when the 3rd row seats are folded down.
NPA838Z
REAR PARCEL SHELF (where fitted) TONNEAU COVER (where fitted)
Instruments and controls2-33
Page 87 of 297
Downloaded from www.Manualslib.com manuals search engine Room light timer (where fitted)
The room light will stay on for approximately 30 sec-
onds when:
The ignition is switched off.
The doors are unlocked.
Any door is opened and then closed.
The timer is cancelled, and the interior light will turn
off when:
The doors are locked.
The ignition switch is turned to the ON position.
MAP LIGHTS (where fitted)
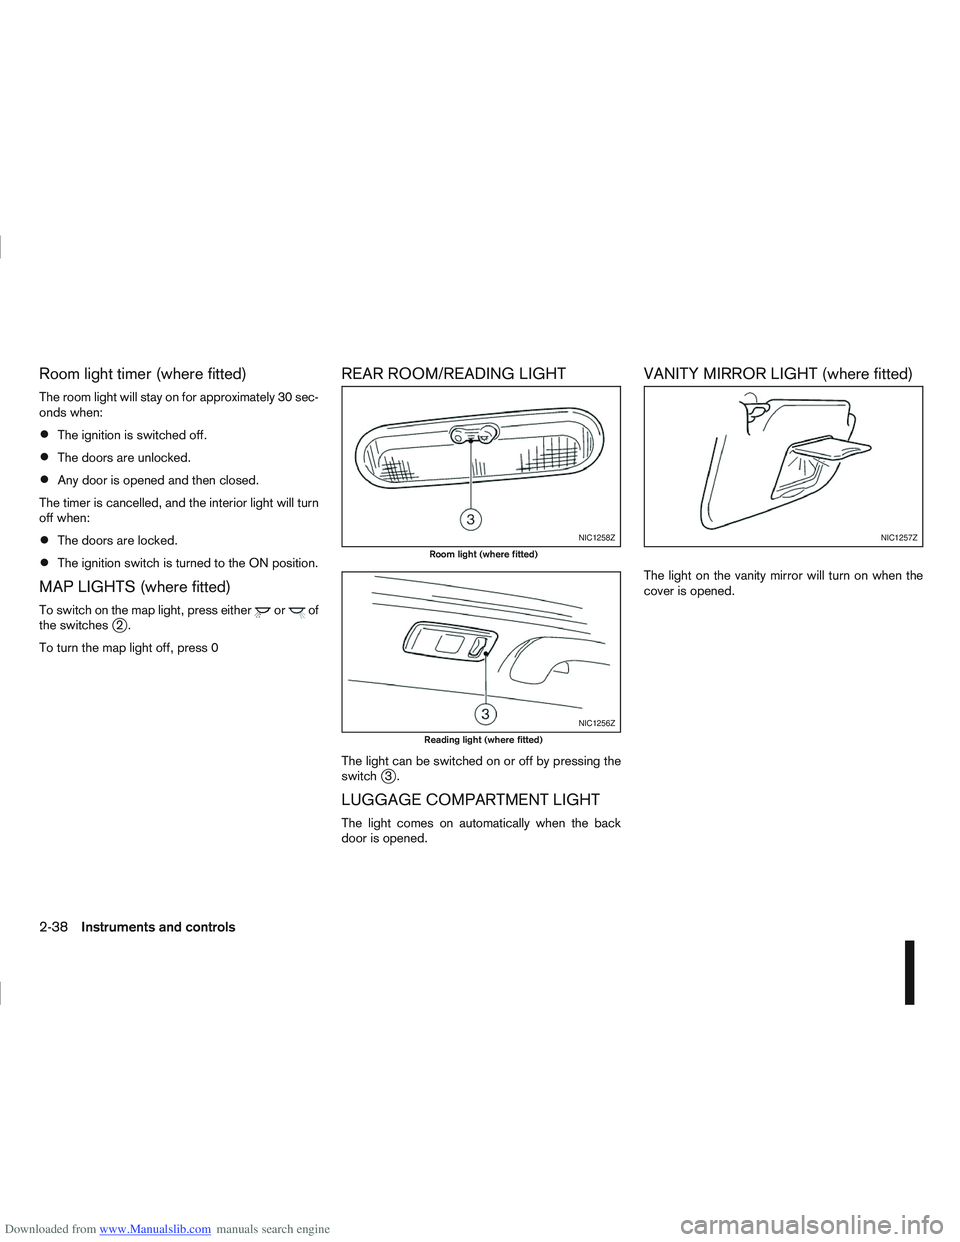
To switch on the map light, press eitherorof
the switchesj2.
To turn the map light off, press 0
REAR ROOM/READING LIGHT
The light can be switched on or off by pressing the
switchj3.
LUGGAGE COMPARTMENT LIGHT
The light comes on automatically when the back
door is opened.
VANITY MIRROR LIGHT (where fitted)
The light on the vanity mirror will turn on when the
cover is opened.
NIC1258Z
Room light (where fitted)
NIC1256Z
Reading light (where fitted)
NIC1257Z
2-38Instruments and controls
Page 95 of 297
Downloaded from www.Manualslib.com manuals search engine Locking the doors
1. Make sure you have the Intelligent Key with youwhen exiting the vehicle.
2. Close all doors.
3. Press any of the outside lock switches (front doors or back door).
– All the doors lock.
– The direction indicators flash once.
– Super Lock system equipped models: The Su-
per Lock system will be activated
CAUTION
Do not leave the duplicate Intelligent Key inside
the vehicle as the locking procedure logic will
not work.
NOTE
If the Intelligent Key is left in the vehicle and the
door/back door outside lock switch is pressed, a
buzzer will sound, warning the owner that the
Intelligent Key has been left inside the vehicle.
Unlocking the doors
For details on setting the unlock mode (anti-hijack or
convenience mode) see “Switching from Conve-
nience mode to Anti-hijack mode” earlier in this sec-
tion. Convenience mode:
Push the door/back door outside lock switch.
– All doors unlock.
– The direction indicators flash twice.
– The message [All door unlock] appears in the
vehicle information display.
Anti-hijack mode:
1. Push the door/back door outside lock switch.
– The corresponding door unlocks
– The direction indicators flash twice quickly
– The message [Single door unlock] appears in the vehicle information display.
2. Push the door/back door outside lock switch again within 5 seconds.
– All doors unlock.
– The direction indicators flash twice, slowly.
NOTE
External interference may impair the Intelligent
Key’s operation. In this case, use the emergency
key located in the Intelligent Key integrated key-
fob. See “Door locks” later in this section for fur-
ther details.
CAUTION
Make sure the Intelligent Key battery is in good
condition. Note that battery life may vary de-
pending on condition, amount of use, ambi-
ent temperature, etc.
The Intelligent Key contains a miniature radio
transmitter that may be affected when placed
near metal objects.
Keep the Intelligent Key away from mobile
phones, laptop computers and other metal
objects or electronics.
STARTING THE ENGINE WITH THE
INTELLIGENT KEY
See “Ignition knob (where fitted)” in the “5. Starting
and driving” section.
CAUTION
Make sure you carry the Intelligent Key with
you when starting and driving the vehicle.
If the Intelligent Key is too far away from the
passenger compartment, the vehicle may not
start. See “Intelligent Key operating range” in
the “3. Pre-driving checks and adjustments”
section
3-8Pre-driving checks and adjustments
Page 97 of 297
Downloaded from www.Manualslib.com manuals search engine The driver’s door can be locked/unlocked from out-
side using the key/emergency key if the vehicle’s
battery is dead.
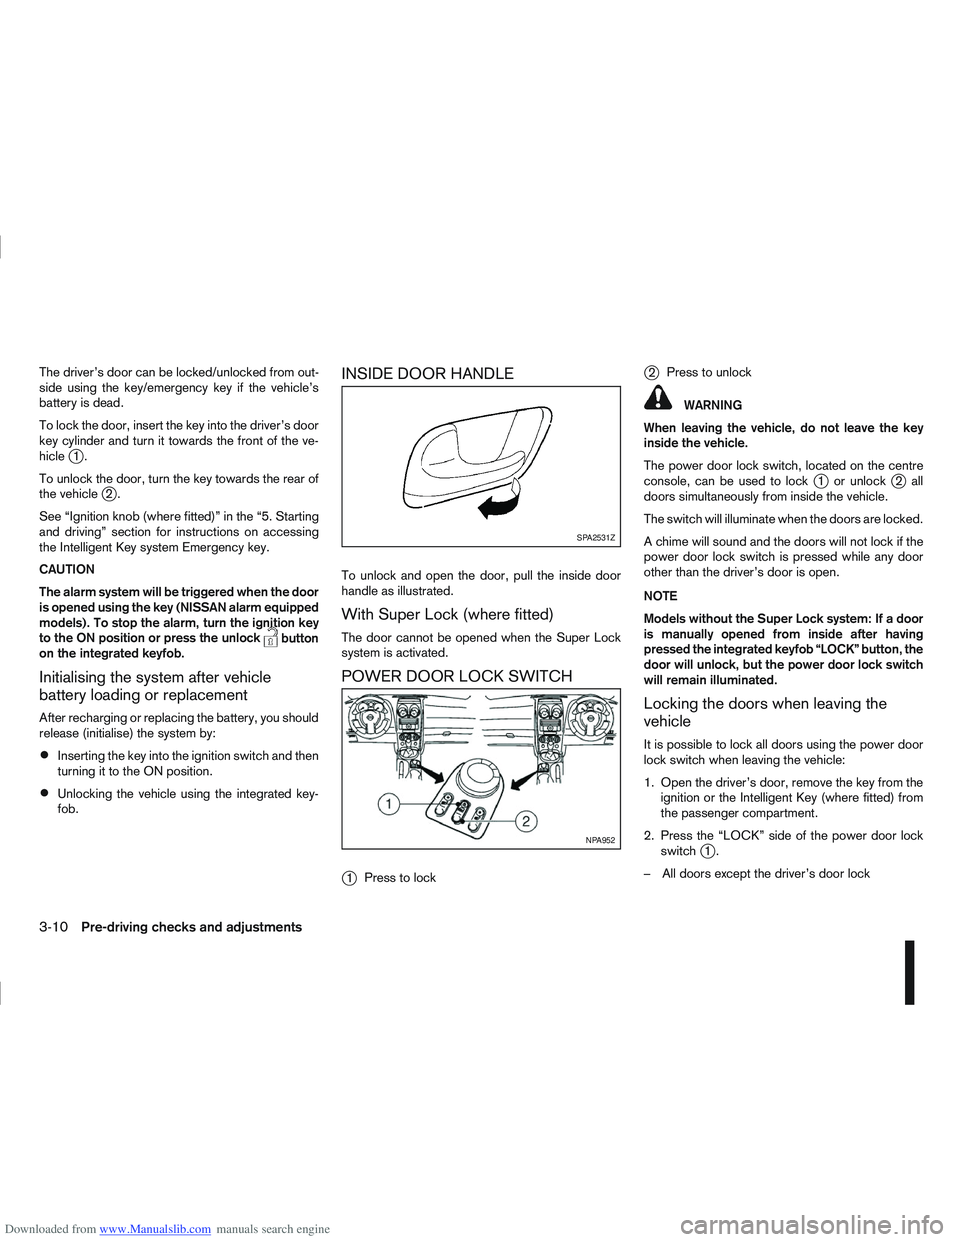
To lock the door, insert the key into the driver’s door
key cylinder and turn it towards the front of the ve-
hicle
j1.
To unlock the door, turn the key towards the rear of
the vehicle
j2.
See “Ignition knob (where fitted)” in the “5. Starting
and driving” section for instructions on accessing
the Intelligent Key system Emergency key.
CAUTION
The alarm system will be triggered when the door
is opened using the key (NISSAN alarm equipped
models). To stop the alarm, turn the ignition key
to the ON position or press the unlock
button
on the integrated keyfob.
Initialising the system after vehicle
battery loading or replacement
After recharging or replacing the battery, you should
release (initialise) the system by:
Inserting the key into the ignition switch and then
turning it to the ON position.
Unlocking the vehicle using the integrated key-
fob.
INSIDE DOOR HANDLE
To unlock and open the door, pull the inside door
handle as illustrated.
With Super Lock (where fitted)
The door cannot be opened when the Super Lock
system is activated.
POWER DOOR LOCK SWITCH
j
1 Press to lock
j2Press to unlock
WARNING
When leaving the vehicle, do not leave the key
inside the vehicle.
The power door lock switch, located on the centre
console, can be used to lock
j1 or unlockj2all
doors simultaneously from inside the vehicle.
The switch will illuminate when the doors are locked.
A chime will sound and the doors will not lock if the
power door lock switch is pressed while any door
other than the driver’s door is open.
NOTE
Models without the Super Lock system: If a door
is manually opened from inside after having
pressed the integrated keyfob “LOCK” button, the
door will unlock, but the power door lock switch
will remain illuminated.
Locking the doors when leaving the
vehicle
It is possible to lock all doors using the power door
lock switch when leaving the vehicle:
1. Open the driver’s door, remove the key from the ignition or the Intelligent Key (where fitted) from
the passenger compartment.
2. Press the “LOCK” side of the power door lock switch
j1.
– All doors except the driver’s door lock
SPA2531Z
NPA952
3-10Pre-driving checks and adjustments
Page 100 of 297

Downloaded from www.Manualslib.com manuals search engine ALARM SYSTEM (where fitted)
The alarm system provides visual and audible alarm
signals if parts of the vehicle are disturbed.
How to arm the alarm system
1. Close all doors, windows, back door and bon-net.
2. Lock the vehicle using the keyfob (lock button), for additional information, see “Integrated key-
fob/remote control system” in the “3. Pre-driving
checks and adjustments” section.
NOTE
If the vehicle is not fully locked, a door/bonnet/
back door is open, or the ignition switch is in the
ON position (after arming the system), the buzzer
will sound. After correctly closing, the buzzer will
stop.
Alarm system operation
The system will give the following alarm:
The siren sounds intermittently and all direction
indicators will flash.
The alarm automatically turns off after 28 sec-
onds.
The alarm is activated when:
The volumetric sensing system (ultrasonic sen-
sors) is triggered.
Any door/the back door is opened.
The bonnet is opened.
The ignition circuit is turned on without the own-
er’s key being used.
The alarm system will stop when:
The vehicle is unlocked using the keyfob unlock
button.
The ignition switch or ignition knob is turned to
the ON position with a registered NATS key.
If the system does not operate as described
above, have it checked by your NISSAN dealer or
qualified workshop.
Ultrasonic sensors (where fitted)
The ultrasonic sensors (volumetric sensing) detect
movements in the passenger’s compartment. When
the alarm system is set to the armed position, it will
automatically switch on the ultrasonic sensors.
It is possible to exclude the ultrasonic sensors (e.g.
when leaving pets inside the car).
To exclude the ultrasonic sensors:
1. Turn the ignition switch 3 times within 7 seconds from the “OFF” to the ON position.
2. Close the door(s)/bonnet/back door and press the lock button
on the keyfob to lock all doors/
back door.
The ultrasonic sensors are now excluded from the
alarm system. All other functions of the system re-
main activated until the alarm system is disarmed
again.
NISSAN ANTI-THEFT SYSTEM (NATS)
The NISSAN Anti-Theft System (NATS)* will not
allow the engine to start without the use of the reg-
istered NATS key.
* Immobilizer
If the engine fails to start using the registered NATS
key, it may be due to interference from another
NATS key, an automated toll road device or an auto-
mated payment device on the key ring. Restart the
engine using the following procedure:
1. Leave the ignition switch in the ON position for approximately 5 seconds.
2. Turn the ignition switch to the “OFF” or LOCK position and wait approximately 5 seconds.
3. Repeat steps 1 and 2.
4. Restart the engine while holding the device (which may have caused the interference) sepa-
rated from the registered NATS key or NATS
Intelligent Key (where fitted).
If this procedure allows the engine to start,
NISSAN recommends placing the registered
NATS key or NATS Intelligent Key (where fitted)
on a separate key-ring to avoid interference from
other devices.
SECURITY SYSTEM
Pre-driving checks and adjustments3-13
Page 121 of 297
Downloaded from www.Manualslib.com manuals search engine Air flow control dial:
Use this dial to manually select the air flow from the
air outlets as described below.
: Air flows from centre and side vents.
: Air flows from centre, side vents and floor
outlets.
: Air flows mainly from floor outlets.
: Air flows from the defogger outlets and floor
outlets.
: Air flows mainly from defogger outlets.
Air recirculation button
m:
Outside air circulation
Press the air recirculation () button to the
“OFF” position to draw outside air into the pas-
senger compartment (the indicator light goes
off). Use the “OFF” position for normal heating
ventilation, or air conditioner (where fitted) op-
eration.
Air recirculation
Press the air recirculation (
) button to the
“ON” position (the indicator light goes on). Use
the “ON” position in situations such as: driving
on a dust raised road, avoiding traffic fumes or
having maximum cooling from the air conditioner
(where fitted).
If the windows fog up, switch on the air condi-
tioning (where fitted). A/C (Air Conditioner) button (where fitted):
Press the A/C button to turn the air conditioner on
or off. When the air conditioner is on, the A/C indi-
cator light illuminates.
Operation
The heater and air conditioner operate when the
engine is running. The air blower will operate even if
the engine is turned off and the ignition switch is in
the ON position.
NOTE
The air conditioner cooling function operates only
when the engine is running and the fan is acti-
vated.
1. Press the air recirculation (
) button to the
“OFF” position.
2. Turn the airflow control dial for: – Cooling: select the
orposition.
– Heating: select the
orposition.
– Heating and defogging : select the
po-
sition.
– Ventilation : select the
orposition.
– Windscreen defogging : select the
po-
sition
3. Turn the fan speed control dial to the desired position.
4. Turn the temperature control dial to the desired position. NOTE
When selecting the
orposition, turn
the temperature control dial to the desired
position between the middle and the maxi-
mum “HOT” (right) position.
5. Press the A/C button (where fitted) to the “ON” position and the indicator light will come on.
Switch this mode on for dehumidified heating or
cooling.
NOTE
The air conditioner mode is used to cool and
dehumidify. For quick cooling when the out-
side temperature is high, select the air recir-
culation mode position (
). Be sure to re-
turn to the outside air mode to avoid windows
from fogging-up and interior air from becom-
ing stale.
A visible mist may be seen coming from the
vents in hot, humid conditions as the air is
cooled rapidly this is not a malfunction.
For quick heating, press the air recirculation
() button to the “ON” position. Be sure to
return to the “OFF” position for normal heat-
ing (no indicator light) in order to avoid win-
dow fog and stale interior.
To quickly defrost/defog the windscreen,
turn:
1) The airflow control dial to
position.
2) The fan speed control dial to speed posi- tion 4.
4-14Display screen, heater and air conditioner, and audio system
Page 122 of 297
Downloaded from www.Manualslib.com manuals search engine 3) The temperature control dial to the maxi-mum “HOT” (right) position.
Operating tips
In order to improve the heater operation, clear
the snow and ice from the wiper blade and air
inlet in front of the windscreen.
After parking in the sun, drive for two or three
minutes with the windows open to vent hot air
from the passenger compartment. Then close
the windows to allow the acceleration of the air
conditioner’s cooling operation.
Keep the windows closed while the air condi-
tioner is operating.
The air conditioning system should be operated
for about 10 minutes, at least once a month. This
helps prevent damage to the system due to lack
of lubrication.
If the coolant temperature gauge exceeds the
“HOT” position, turn the air conditioner off. For
additional information, see “Engine overheat” in
the “6. In case of emergency” section.
If the engine coolant reaches an extremely high
temperature, the air conditioning system will au-
tomatically turn off. This may happen for example
if the engine runs at idle speed for a long time on
a hot day.
Quick reference charts
The following charts show the button, air intake and
dial positions for MAXIMUM AND QUICK heating,
cooling or defrosting. NOTE
The air recirculation mode should not be selected
for either heating or defrosting.
Display screen, heater and air conditioner, and audio system4-15
Page 126 of 297
Downloaded from www.Manualslib.com manuals search engine NOTE
The air conditioner cooling function operates
only when the engine is running, and the am-
bient temperature is above -2°C (28°F).
The air conditioner can be used to dehumidify
when heating, or to reduce air temperature
and dehumidify when cooling. This is possible
in both auto or manual control mode as long
as the fan speed is minimum (first bar).
When the AUTO mode is selected, the tem-
perature of the passenger compartment will
be maintained automatically. Air flow distribu-
tion and fan speed will also be controlled au-
tomatically.
Controls
NOTE
Before any selection or change is made, press
the AUTO button to activate the heater and air
conditioner system.
Cooling and/or dehumidified heating (AUTO
mode):
This mode may be used all year round. The system
works automatically to control the inside tempera-
ture, air flow distribution and fan speed after the
preferred temperature is set manually.
1. Press the AUTO button (the indicator light willilluminate).
2. Operate the driver’s side temperature control dial to set the desired temperature. Adjust the temperature to about 22°C (72°F) for
normal operation.
3. Driver’s side and passenger side temperatures can be set independently using the individual
temperature control dial. When the passenger
side temperature control dial is turned, the DUAL
indicator light will come on. To turn off the pas-
senger side temperature control, press the DUAL
button.
NOTE
A visible mist may be seen coming from the
vents in hot, humid conditions as the air is
cooled rapidly, this is not a malfunction.
It is not possible to use DUAL mode when
windscreen defogger is selected.
Heating (AUTO mode):
Use this mode for heating purposes only.
1. Press the A/C button to turn off the air condi- tioner cooling function (A/C indicator light goes
off).
2. Select the desired temperature with the tempera- ture control dial.
Do not set the temperature at a lower level than
the one of the outside air temperature. Other-
wise the system may not work properly.
This mode is not recommended if the windscreen
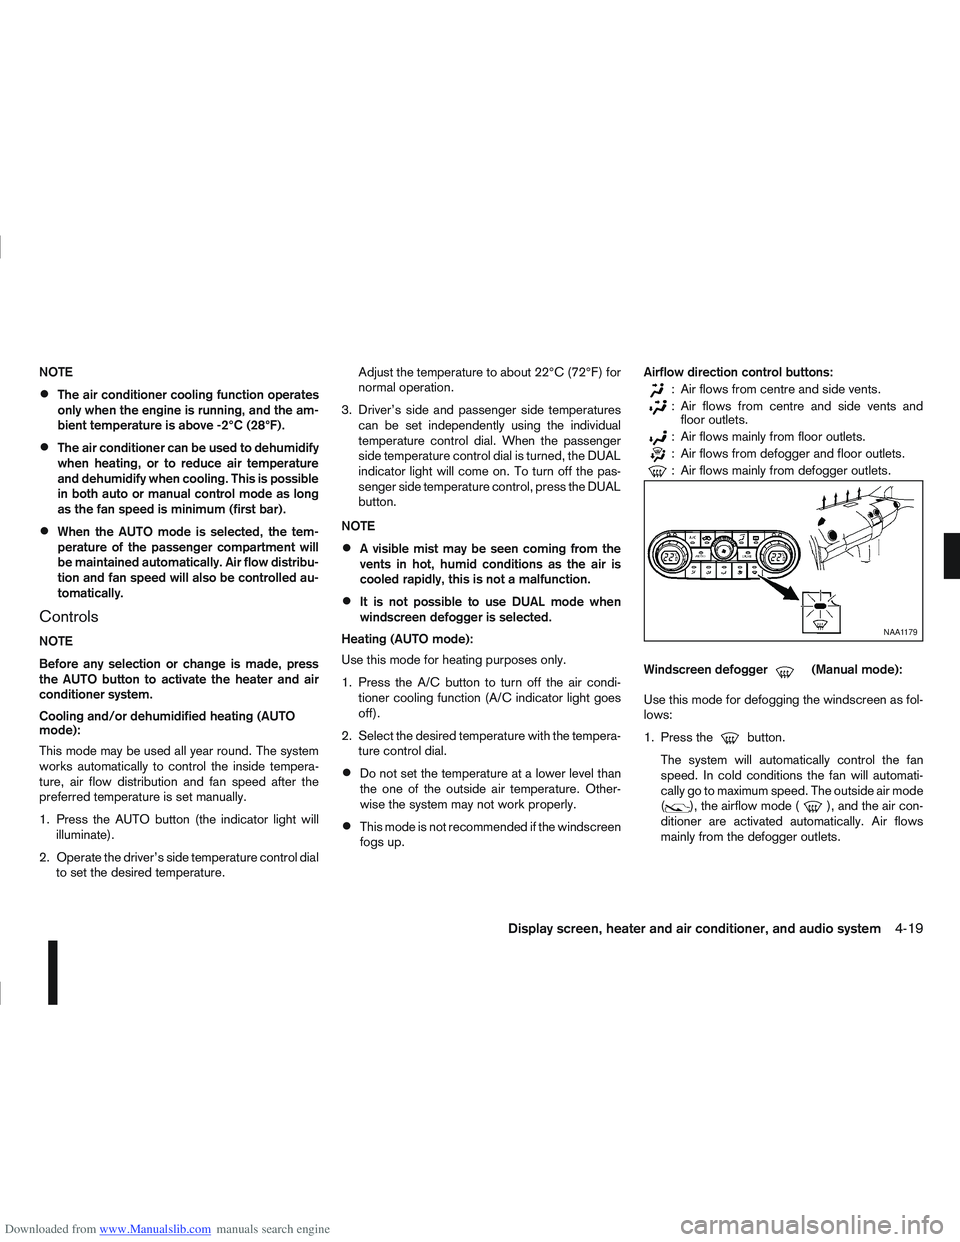
fogs up. Airflow direction control buttons:
: Air flows from centre and side vents.
: Air flows from centre and side vents and
floor outlets.
: Air flows mainly from floor outlets.
: Air flows from defogger and floor outlets.
: Air flows mainly from defogger outlets.
Windscreen defogger
m(Manual mode):
Use this mode for defogging the windscreen as fol-
lows:
1. Press the
button.
The system will automatically control the fan
speed. In cold conditions the fan will automati-
cally go to maximum speed. The outside air mode
(
), the airflow mode (), and the air con-
ditioner are activated automatically. Air flows
mainly from the defogger outlets.
NAA1179
Display screen, heater and air conditioner, and audio system4-19