Page 97 of 345

The autolight system can turn on the headlights
automatically when it is dark and turn off the
headlights when it is light, and keep the head-
lights on for up to 45 seconds after you turn the
ignition switch to the OFF position and open any
door then close all the doors. The headlight off
time can be adjusted on the system setting
display. See the “4. Display screen, heater, air
conditioner and audio system” section.
If the ignition switch is turned OFF and one of
the doors is opened and this condition is con-
tinued, the headlights remain ON for 5 minutes.
Be sure not to put anything on top of the
photo sensor
�A
located on the top left-
hand side of the instrument panel. The
photo sensor controls the autolight; if it is
covered, the photo sensor reacts as if it is
dark and the headlights will illuminate.
Headlight beam select
�1To select the low beam, put the lever in the
neutral position as shown.
�2To select the high beam, push the lever
forward while the switch is in the
po-
sition. Pull it back to select the low beam.
�3Pulling the lever toward you will flash the
headlight high beam.
SIC2052
SIC3293
2-24
Instruments and controls
�
06.7.5/Z50-D/V5.0
�
Page 98 of 345

Battery saver system�When the headlight switch is in the
or
position while the ignition switch is in
the ON position, the lights will automatically
turn off 5 minutes after the ignition switch has
been turned to the OFF position.
�When the headlight switch remains in theor
position after the lights auto-
matically turn off, the lights will turn on for 5
minutes when the headlight switch is turned
to the OFF position and then turned to the
or
position.CAUTION
Even though the battery saver feature
automatically turns off the headlights
after a period of time, you should turn
the headlight switch to the OFF position
when the engine is not running to avoid
discharging the vehicle battery.
Headlight aiming control (if so
equipped)Depending on the number of occupants in the
vehicle and the load it is carrying, the headlight
axis may be higher than desired. If the vehicle is
traveling on a hilly road, the headlights may
directly hit the rearview mirror of the vehicle
ahead or the windshield of the oncoming vehicle.
The light axis can be lowered with the operation
of the switch.
The larger the number designated on the switch,
the lower the axis.When traveling with no heavy load or on a flat
road, select position 0.
WARNING
Xenon headlights are extremely bright
compared to conventional headlights. If
the xenon headlights hit the rearview
mirror of the vehicle ahead or the wind-
shield of oncoming vehicle, the driver of
these vehicles may have difficulty driv-
ing because of the brightness. Use the
headlight aiming control switch to lower
the light axis. See “Xenon headlights”
earlier in this section for additional in-
formation.DAYTIME RUNNING LIGHT SYSTEM
(CANADA ONLY)The daytime running lights automatically illumi-
nate when the engine is started with parking
brake released. The daytime running lights op-
erate with the headlight switch in the OFF
position or in the
position.
The daytime running lights may come on after
turning the switch to the OFF position and
SIC1911
Instruments and controls
2-25
�
06.7.5/Z50-D/V5.0
�
Page 99 of 345
 o")
immediately turning it to the ON position. This is
not a malfunction.
The daytime running lights will be turned off
when the headlight switch is turned to the AUTO
(only when the headlights are lit) or
posi-
tion or when the fog light is turned on.
The daytime running lights will remain on until
the ignition switch is turned to the ACC or OFF
position.
WARNING
When the daytime running light system
is active, tail lights on your vehicle are
not on. It is necessary at dusk to turn on
your headlights. Failure to do so could
cause an accident injuring yourself and
others.
INSTRUMENT BRIGHTNESS
CONTROLThe instrument brightness control operates
when the light switch is in the
or
position and the ignition switch is in the
ON position.
Pushing the control switch
�A
once will change
the brightness to the night mode.
Pushing the control switch
�B
once will change
the brightness to the day mode.
To adjust the brightness of instrument panel
lights, push the control switches. Pushing the
upper switch
�A
will brighten the lights. Thelower switch
�B
dims the lights. Repeatedly
pushing the lower switch will turn the lights off.
SIC2053
2-26
Instruments and controls
�
06.7.5/Z50-D/V5.0
�
Page 100 of 345

TURN SIGNAL SWITCH�1
Turn signal
Move the lever up or down to signal the turning
direction. When the turn is completed, the turn
signals cancel automatically.�2
Lane change signal
To indicate a lane change, move the lever up or
down to the point where lights begin flashing.
FOG LIGHT SWITCH (if so
equipped)To turn the fog lights on, turn the headlight
switch to the
position, then turn the switch
to the
position. To turn them off, turn the
switch to the OFF position.
The headlights must be on for the fog lights to
operate (except for the daytime running light).Push the switch (located on the right side of the
meter panel) on to warn other drivers when you
must stop or park under emergency conditions.
All turn signal lights will flash.
Some state laws may prohibit the use of
the hazard warning flasher switch while
driving.
WARNING
�If stopping for an emergency, be sure
to move the vehicle well off the road.
SIC3294
SIC3295
SIC2475
HAZARD WARNING FLASHER
SWITCH
Instruments and controls
2-27
�
06.7.5/Z50-D/V5.0
�
Page 101 of 345

�Do not use the hazard warning flash-
ers while moving on the highway un-
less unusual circumstances force you
to drive so slowly that your vehicle
might become a hazard to other traf-
fic.
�Turn signals do not work when the
hazard warning flasher lights are on.
The flasher will operate with the ignition switch in
any position.
To sound the horn, push the center pad upper
area of the steering wheel.
WARNING
Do not disassemble the horn. Doing so
could affect proper operation of the
supplemental front air bag system. Tam-
pering with the supplemental front air
bag system may result in serious per-
sonal injury.The front seats are warmed by built-in heaters.
The switches located on the center console can
be operated independently (driver side seat
�A
and front passenger side seat
�B) of each other.
1. Start the engine.
2. Select heat range.
�1For high heat, push the
(High) side
of the switch.
�2For low heat, push the
(Low) side of
the switch.
�3For no heat, the switch has a center OFF
position between low and high.
SIC2627
SIC2056
HORNHEATED SEATS (if so equipped)
2-28
Instruments and controls
�
06.7.5/Z50-D/V5.0
�
Page 104 of 345

hicle battery.
�Avoid using power outlets when the
air conditioner, headlights or rear
window defroster is on.
�Before inserting or disconnecting a
plug, be sure to turn off the power
switch of electrical accessory being
used or the ACC power of the vehicle.
�Push the plug in as far as it will go. If
good contact is not made, the plug
may overheat or the internal tem-
perature fuse may open.
�When not in use, be sure to close the
cap/cover. Do not allow water to con-
tact the outlet.
COIN BOXTo open, push the coin box lid
�1
as illustrated.
The inner tray can be removed
�2
as illustrated.
Do not place valuable items in the box.
Do not use the coin box as an ashtray.
CELLULAR PHONE HOLDER
WARNING
�A cellular telephone should not be
used while driving so full attention
may be given to vehicle operation.
Some jurisdictions prohibit the use
of cellular telephones while driving.
�If a conversation in a moving vehicle
requires you to take notes, pull off
the road to a safe location and stop
SIC2057
SIC2058
STORAGE
Instruments and controls
2-31
�
06.7.5/Z50-D/V5.0
�
Page 115 of 345

CEILING LIGHTThe ceiling light has a three-position switch.
When the switch is in the ON position
�1, the
light will illuminate.
When the switch is in the OFF position
�2, the
light will turn off.
When the switch is in the DOOR position�3,
the light will illuminate when a door is opened.
The light will stay on for about 30 seconds when:
�The doors are unlocked by the remote key-
less entry system, a key, power door lock
switch or using the Intelligent Key systemwhile all doors are closed.
�The driver’s door is opened and then closed
while the key is removed from the ignition
switch or the ignition switch is turned to the
LOCK position (Intelligent Key system).
�The key is removed from the ignition switch or
the ignition switch is turned to the LOCK
position (Intelligent Key system) while all
doors are closed.
The ceiling light will turn off while the 30 second
timer is activated, when:
�The driver’s door is locked by the remote
keyless entry system, a key or the power door
lock switch.
�The ignition switch is turned ON.
When the ceiling light switch or map light
switch or rear personal light switch is in the
ONposition, the ceiling, map, rear and
vanity mirror lights will automatically turn
off 30 minutes after the ignition switch has
been turned to the ACC or OFF position. To
turn on the light again, turn the ignition
switch to the ONposition.
After the above procedure, the ceiling, map, rear
personal and vanity mirror lights will automati-
cally turn off 30 minutes after the latest operationof the following with the ignition switch in the
ACC or OFF position:
�Opening or closing any door
�Locking or unlocking with the remote keyless
entry system, a key, the lock-unlock switch or
the ignition switch is turned to the LOCK
position (Intelligent Key system).
�Inserting or removing a key from the ignition
switch
These lights will turn on again when any of the
above operations is performed after the lights
have turned off automatically. (The lights will turn
off 30 minutes after the latest operation of the
above as well.)
CAUTION
�Turn off the ceiling, map, rear and
vanity mirror lights when you leave
the vehicle.
�Do not use for extended periods of
time with the engine stopped. This
could result in a discharged battery.
SIC2063
INTERIOR LIGHTS2-42
Instruments and controls
�
06.7.5/Z50-D/V5.0
�
Page 116 of 345
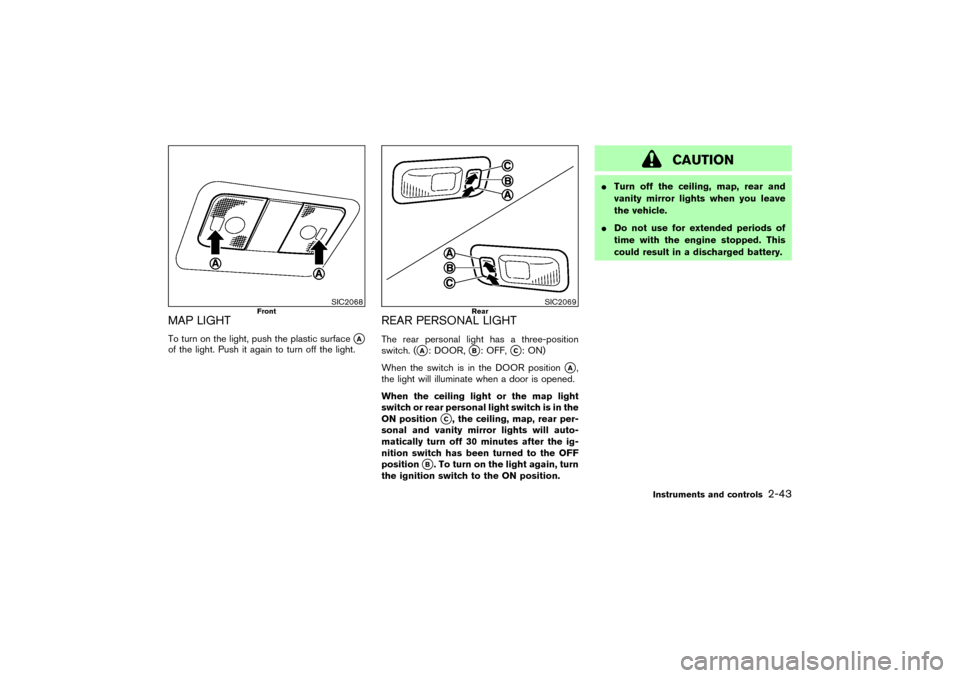
MAP LIGHTTo turn on the light, push the plastic surface
�A
of the light. Push it again to turn off the light.
REAR PERSONAL LIGHTThe rear personal light has a three-position
switch. (
�A: DOOR,
�B: OFF,
�C: ON)
When the switch is in the DOOR position
�A,
the light will illuminate when a door is opened.
When the ceiling light or the map light
switch or rear personal light switch is in the
ONposition
�C, the ceiling, map, rear per-
sonal and vanity mirror lights will auto-
matically turn off 30 minutes after the ig-
nition switch has been turned to the OFF
position
�B. To turn on the light again, turn
the ignition switch to the ONposition.
CAUTION
�Turn off the ceiling, map, rear and
vanity mirror lights when you leave
the vehicle.
�Do not use for extended periods of
time with the engine stopped. This
could result in a discharged battery.
SIC2068
Front
SIC2069
Rear
Instruments and controls
2-43
�
06.7.5/Z50-D/V5.0
�