Page 1463 of 2896
EC-294Revision: June 2006
DTC P0181 FTT SENSOR
2007 Versa
Diagnostic ProcedureUBS00QGH
1. CHECK GROUND CONNECTIONS
1. Turn ignition switch OFF.
2. Loosen and retighten ground screw on the body.
Refer to EC-150, "
Ground Inspection" .
OK or NG
OK >> GO TO 2.
NG >> Repair or replace ground connections.
2. CHECK FUEL TANK TEMPERATURE SENSOR POWER SUPPLY CIRCUIT
1. Turn ignition switch OFF.
2. Disconnect “fuel level sensor unit and fuel pump” harness con-
nector (1).
– : Vehicle front
3. Turn ignition switch ON.
4. Check voltage between “fuel level sensor unit and fuel pump”
terminal 4 and ground with CONSULT-II or tester.
OK or NG
OK >> GO TO 4.
NG >> GO TO 3.
:Vehicle front
1. Body ground E24 2. Engine ground F9 3. Engine ground F16
4. Body ground E15
BBIA0698E
BBIA0702E
Voltage: Approximately 5V
PBIB0932E
Page 1464 of 2896

DTC P0181 FTT SENSOR
EC-295
C
D
E
F
G
H
I
J
K
L
MA
EC
Revision: June 20062007 Versa
3. DETECT MALFUNCTIONING PART
Check the following.
�Harness connectors E8, F8
�Harness connectors M69, E7
�Harness connectors B102, M13
�Harness for open or short between ECM and “fuel level sensor unit and fuel pump”
>> Repair open circuit or short to ground or short to power in harness or connector.
4. CHECK FUEL TANK TEMPERATURE SENSOR GROUND CIRCUIT FOR OPEN AND SHORT
1. Turn ignition switch OFF.
2. Check harness continuity between “fuel level sensor unit and fuel pump” terminal 5 and combination
meter terminal 24. Refer to Wiring Diagram.
3. Also check harness for short to ground and short to power.
OK or NG
OK >> GO TO 6.
NG >> GO TO 5.
5. DETECT MALFUNCTIONING PART
Check the following.
�Harness connectors B102, M13
�Harness for open or short between “fuel level sensor unit and fuel pump” and ground.
>> Repair open circuit or short to ground or short to power in harness or connectors.
6. CHECK FUEL TANK TEMPERATURE SENSOR
Refer to, EC-295, "
Component Inspection" .
OK or NG
OK >> GO TO 7.
NG >> Replace “fuel level sensor unit and fuel pump”.
7. CHECK INTERMITTENT INCIDENT
Perform EC-143, "
TROUBLE DIAGNOSIS FOR INTERMITTENT INCIDENT" .
>>INSPECTION END
Component InspectionUBS00QGI
FUEL TANK TEMPERATURE SENSOR
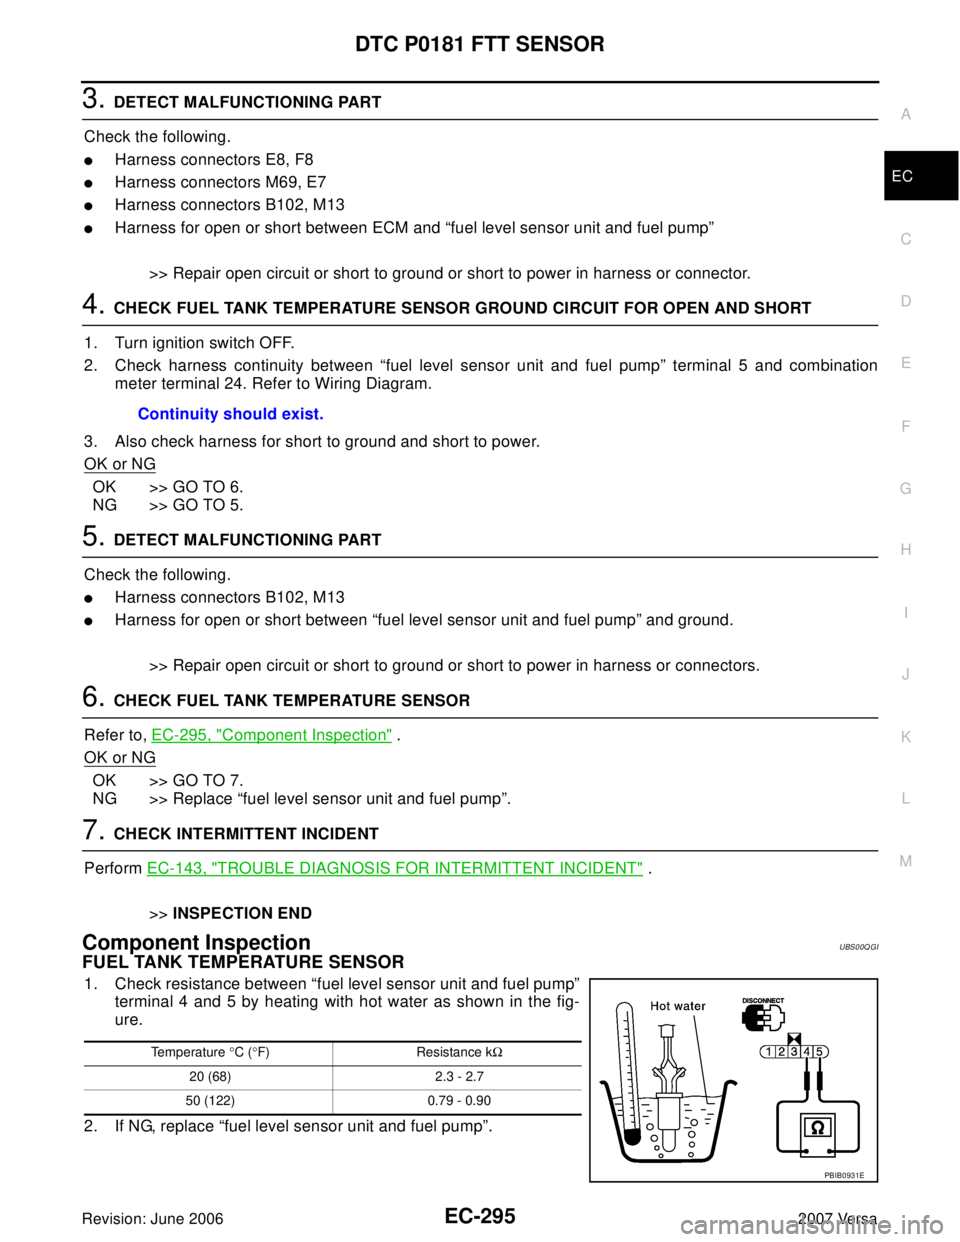
1. Check resistance between “fuel level sensor unit and fuel pump”
terminal 4 and 5 by heating with hot water as shown in the fig-
ure.
2. If NG, replace “fuel level sensor unit and fuel pump”.Continuity should exist.
Temperature °C (°F) Resistance kΩ
20 (68) 2.3 - 2.7
50 (122) 0.79 - 0.90
PBIB0931E
Page 1465 of 2896
EC-296Revision: June 2006
DTC P0181 FTT SENSOR
2007 Versa
Removal and InstallationUBS00QGJ
FUEL TANK TEMPERATURE SENSOR
Refer to FL-5, "FUEL LEVEL SENSOR UNIT, FUEL FILTER AND FUEL PUMP ASSEMBLY" .
Page 1466 of 2896

DTC P0182, P0183 FTT SENSOR
EC-297
C
D
E
F
G
H
I
J
K
L
MA
EC
Revision: June 20062007 Versa
DTC P0182, P0183 FTT SENSORPFP:22630
Component DescriptionUBS00QGK
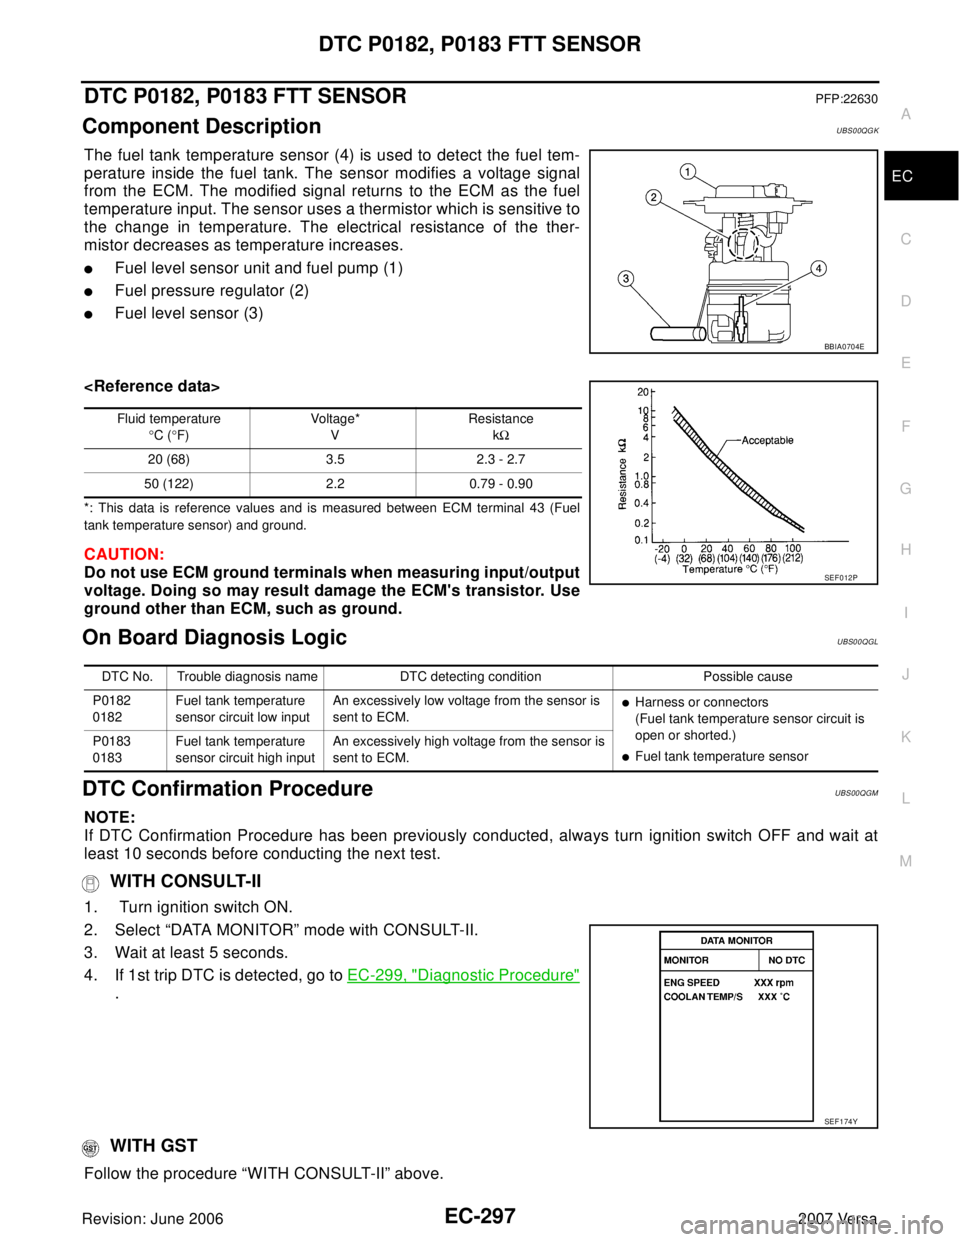
The fuel tank temperature sensor (4) is used to detect the fuel tem-
perature inside the fuel tank. The sensor modifies a voltage signal
from the ECM. The modified signal returns to the ECM as the fuel
temperature input. The sensor uses a thermistor which is sensitive to
the change in temperature. The electrical resistance of the ther-
mistor decreases as temperature increases.
�Fuel level sensor unit and fuel pump (1)
�Fuel pressure regulator (2)
�Fuel level sensor (3)
*: This data is reference values and is measured between ECM terminal 43 (Fuel
tank temperature sensor) and ground.
CAUTION:
Do not use ECM ground terminals when measuring input/output
voltage. Doing so may result damage the ECM's transistor. Use
ground other than ECM, such as ground.
On Board Diagnosis LogicUBS00QGL
DTC Confirmation ProcedureUBS00QGM
NOTE:
If DTC Confirmation Procedure has been previously conducted, always turn ignition switch OFF and wait at
least 10 seconds before conducting the next test.
WITH CONSULT-II
1. Turn ignition switch ON.
2. Select “DATA MONITOR” mode with CONSULT-II.
3. Wait at least 5 seconds.
4. If 1st trip DTC is detected, go to EC-299, "
Diagnostic Procedure"
.
WITH GST
Follow the procedure “WITH CONSULT-II” above.
BBIA0704E
Fluid temperature
°C (°F)Voltage*
VResistance
kΩ
20 (68) 3.5 2.3 - 2.7
50 (122) 2.2 0.79 - 0.90
SEF 0 12 P
DTC No. Trouble diagnosis name DTC detecting condition Possible cause
P0182
0182Fuel tank temperature
sensor circuit low inputAn excessively low voltage from the sensor is
sent to ECM.
�Harness or connectors
(Fuel tank temperature sensor circuit is
open or shorted.)
�Fuel tank temperature sensor P0183
0183Fuel tank temperature
sensor circuit high inputAn excessively high voltage from the sensor is
sent to ECM.
SEF 1 74 Y
Page 1468 of 2896
DTC P0182, P0183 FTT SENSOR
EC-299
C
D
E
F
G
H
I
J
K
L
MA
EC
Revision: June 20062007 Versa
Diagnostic ProcedureUBS00QGO
1. CHECK GROUND CONNECTIONS
1. Turn ignition switch OFF.
2. Loosen and retighten ground screw on the body.
Refer to EC-150, "
Ground Inspection" .
OK or NG
OK >> GO TO 2.
NG >> Repair or replace ground connections.
2. CHECK FUEL TANK TEMPERATURE SENSOR POWER SUPPLY CIRCUIT
1. Disconnect “fuel level sensor unit and fuel pump” harness con-
nector (1).
– : Vehicle front
2. Turn ignition switch ON.
3. Check voltage between “fuel level sensor unit and fuel pump”
terminal 4 and ground with CONSULT-II or tester.
OK or NG
OK >> GO TO 4.
NG >> GO TO 3.
:Vehicle front
1. Body ground E24 2. Engine ground F9 3. Engine ground F16
4. Body ground E15
BBIA0698E
BBIA0702E
Voltage: Approximately 5V
PBIB0932E
Page 1469 of 2896

EC-300Revision: June 2006
DTC P0182, P0183 FTT SENSOR
2007 Versa
3. DETECT MALFUNCTIONING PART
Check the following.
�Harness connectors E8, F8
�Harness connectors M69, E7
�Harness connectors B102, M13
�Harness for open or short to ground or short between ECM and “fuel level sensor unit and fuel pump”
>> Repair open circuit or short to ground or short to power in harness or connector.
4. CHECK FUEL TANK TEMPERATURE SENSOR GROUND CIRCUIT FOR OPEN AND SHORT
1. Turn ignition switch OFF.
2. Check harness continuity between “fuel level sensor unit and fuel pump” terminal 5 and combination
meter terminal 24. Refer to Wiring Diagram.
3. Also check harness for short to ground and short to power.
OK or NG
OK >> GO TO 6.
NG >> GO TO 5.
5. DETECT MALFUNCTIONING PART
Check the following.
�Harness connectors B102, M13
�Harness for open or short between “fuel level sensor unit and fuel pump” and ground
>> Repair open circuit or short to ground or short to power in harness or connector.
6. CHECK FUEL TANK TEMPERATURE SENSOR
Refer to, EC-300, "
Component Inspection" .
OK or NG
OK >> GO TO 7.
NG >> Replace “fuel level sensor unit and fuel pump”.
7. CHECK INTERMITTENT INCIDENT
Perform EC-143, "
TROUBLE DIAGNOSIS FOR INTERMITTENT INCIDENT" .
>>INSPECTION END
Component InspectionUBS00QGP
FUEL TANK TEMPERATURE SENSOR
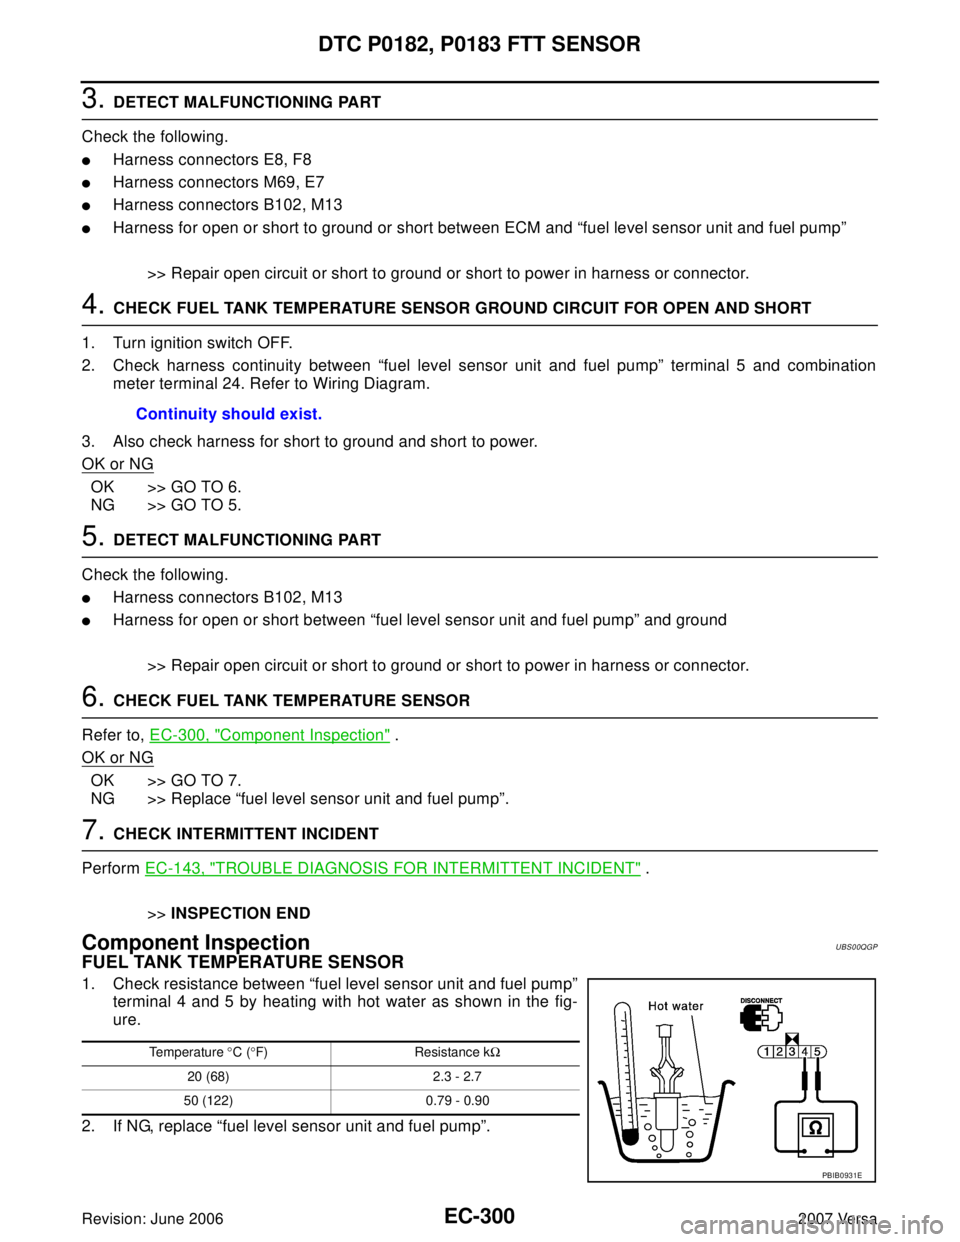
1. Check resistance between “fuel level sensor unit and fuel pump”
terminal 4 and 5 by heating with hot water as shown in the fig-
ure.
2. If NG, replace “fuel level sensor unit and fuel pump”.Continuity should exist.
Temperature °C (°F) Resistance kΩ
20 (68) 2.3 - 2.7
50 (122) 0.79 - 0.90
PBIB0931E
Page 1470 of 2896
DTC P0182, P0183 FTT SENSOR
EC-301
C
D
E
F
G
H
I
J
K
L
MA
EC
Revision: June 20062007 Versa
Removal and InstallationUBS00QGQ
FUEL TANK TEMPERATURE SENSOR
Refer to FL-5, "FUEL LEVEL SENSOR UNIT, FUEL FILTER AND FUEL PUMP ASSEMBLY" .
Page 1480 of 2896

DTC P0300 - P0304 MULTIPLE CYLINDER MISFIRE, NO. 1 - 4 CYLINDER MIS-
FIRE
EC-311
C
D
E
F
G
H
I
J
K
L
MA
EC
Revision: June 20062007 Versa
5. CHECK FUNCTION OF IGNITION COIL-I
CAUTION:
Do the following procedure in the place where ventilation is good without the combustible.
1. Turn ignition switch OFF.
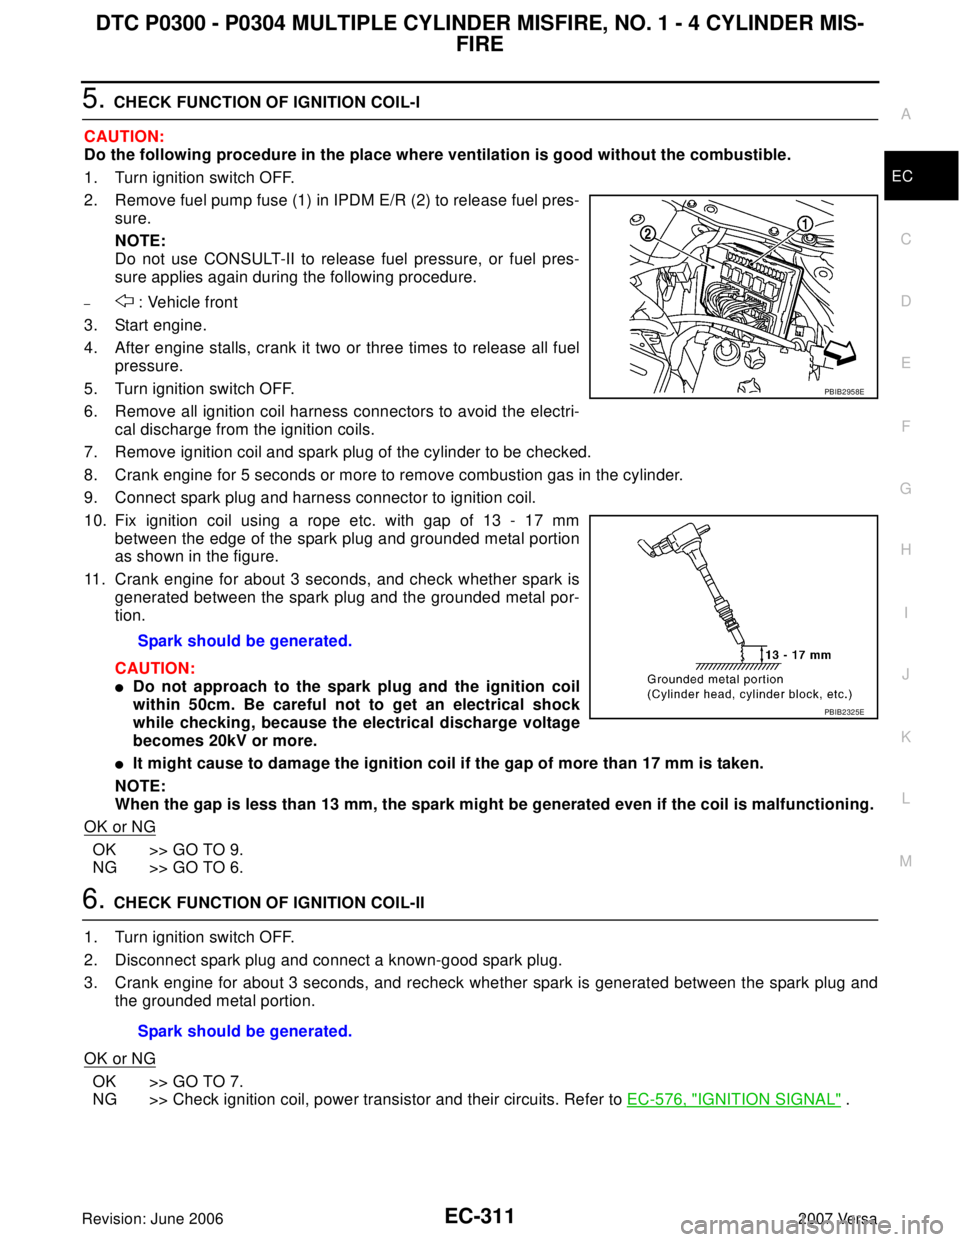
2. Remove fuel pump fuse (1) in IPDM E/R (2) to release fuel pres-
sure.
NOTE:
Do not use CONSULT-II to release fuel pressure, or fuel pres-
sure applies again during the following procedure.
– : Vehicle front
3. Start engine.
4. After engine stalls, crank it two or three times to release all fuel
pressure.
5. Turn ignition switch OFF.
6. Remove all ignition coil harness connectors to avoid the electri-
cal discharge from the ignition coils.
7. Remove ignition coil and spark plug of the cylinder to be checked.
8. Crank engine for 5 seconds or more to remove combustion gas in the cylinder.
9. Connect spark plug and harness connector to ignition coil.
10. Fix ignition coil using a rope etc. with gap of 13 - 17 mm
between the edge of the spark plug and grounded metal portion
as shown in the figure.
11. Crank engine for about 3 seconds, and check whether spark is
generated between the spark plug and the grounded metal por-
tion.
CAUTION:
�Do not approach to the spark plug and the ignition coil
within 50cm. Be careful not to get an electrical shock
while checking, because the electrical discharge voltage
becomes 20kV or more.
�It might cause to damage the ignition coil if the gap of more than 17 mm is taken.
NOTE:
When the gap is less than 13 mm, the spark might be generated even if the coil is malfunctioning.
OK or NG
OK >> GO TO 9.
NG >> GO TO 6.
6. CHECK FUNCTION OF IGNITION COIL-II
1. Turn ignition switch OFF.
2. Disconnect spark plug and connect a known-good spark plug.
3. Crank engine for about 3 seconds, and recheck whether spark is generated between the spark plug and
the grounded metal portion.
OK or NG
OK >> GO TO 7.
NG >> Check ignition coil, power transistor and their circuits. Refer to EC-576, "
IGNITION SIGNAL" . Spark should be generated.
PBIB2958E
PBIB2325E
Spark should be generated.