Page 1558 of 2896
DTC P0452 EVAP CONTROL SYSTEM PRESSURE SENSOR
EC-389
C
D
E
F
G
H
I
J
K
L
MA
EC
Revision: June 20062007 Versa
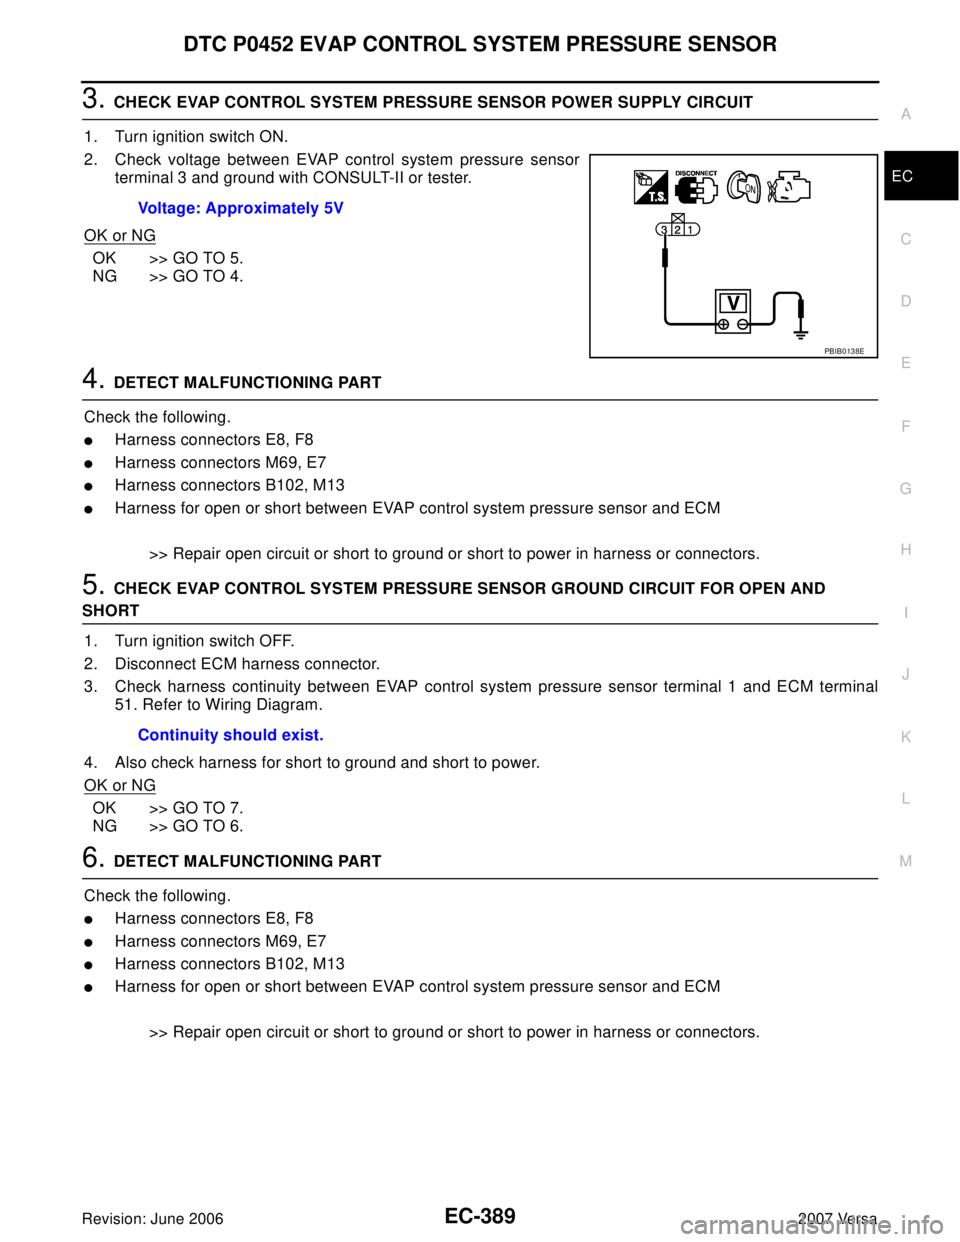
3. CHECK EVAP CONTROL SYSTEM PRESSURE SENSOR POWER SUPPLY CIRCUIT
1. Turn ignition switch ON.
2. Check voltage between EVAP control system pressure sensor
terminal 3 and ground with CONSULT-II or tester.
OK or NG
OK >> GO TO 5.
NG >> GO TO 4.
4. DETECT MALFUNCTIONING PART
Check the following.
�Harness connectors E8, F8
�Harness connectors M69, E7
�Harness connectors B102, M13
�Harness for open or short between EVAP control system pressure sensor and ECM
>> Repair open circuit or short to ground or short to power in harness or connectors.
5. CHECK EVAP CONTROL SYSTEM PRESSURE SENSOR GROUND CIRCUIT FOR OPEN AND
SHORT
1. Turn ignition switch OFF.
2. Disconnect ECM harness connector.
3. Check harness continuity between EVAP control system pressure sensor terminal 1 and ECM terminal
51. Refer to Wiring Diagram.
4. Also check harness for short to ground and short to power.
OK or NG
OK >> GO TO 7.
NG >> GO TO 6.
6. DETECT MALFUNCTIONING PART
Check the following.
�Harness connectors E8, F8
�Harness connectors M69, E7
�Harness connectors B102, M13
�Harness for open or short between EVAP control system pressure sensor and ECM
>> Repair open circuit or short to ground or short to power in harness or connectors. Voltage: Approximately 5V
PBIB0138E
Continuity should exist.
Page 1559 of 2896
EC-390Revision: June 2006
DTC P0452 EVAP CONTROL SYSTEM PRESSURE SENSOR
2007 Versa
7. CHECK EVAP CONTROL SYSTEM PRESSURE SENSOR INPUT SIGNAL CIRCUIT FOR OPEN AND
SHORT
1. Check harness continuity between ECM terminal 42 and EVAP control system pressure sensor terminal
2. Refer to Wiring Diagram.
2. Also check harness for short to ground and short to power.
OK or NG
OK >> GO TO 9.
NG >> GO TO 8.
8. DETECT MALFUNCTIONING PART
Check the following.
�Harness connectors E8, F8
�Harness connectors M69, E7
�Harness connectors B102, M13
�Harness for open or short between ECM and EVAP control system pressure sensor
>> Repair open circuit or short to ground or short to power in harness or connectors.
9. CHECK EVAP CONTROL SYSTEM PRESSURE SENSOR
Refer to EC-390, "
Component Inspection" .
OK or NG
OK >> GO TO 10.
NG >> Replace EVAP control system pressure sensor.
10. CHECK INTERMITTENT INCIDENT
Refer to EC-143, "
TROUBLE DIAGNOSIS FOR INTERMITTENT INCIDENT" .
>>INSPECTION END
Component InspectionUBS00QJ6
EVAP CONTROL SYSTEM PRESSURE SENSOR
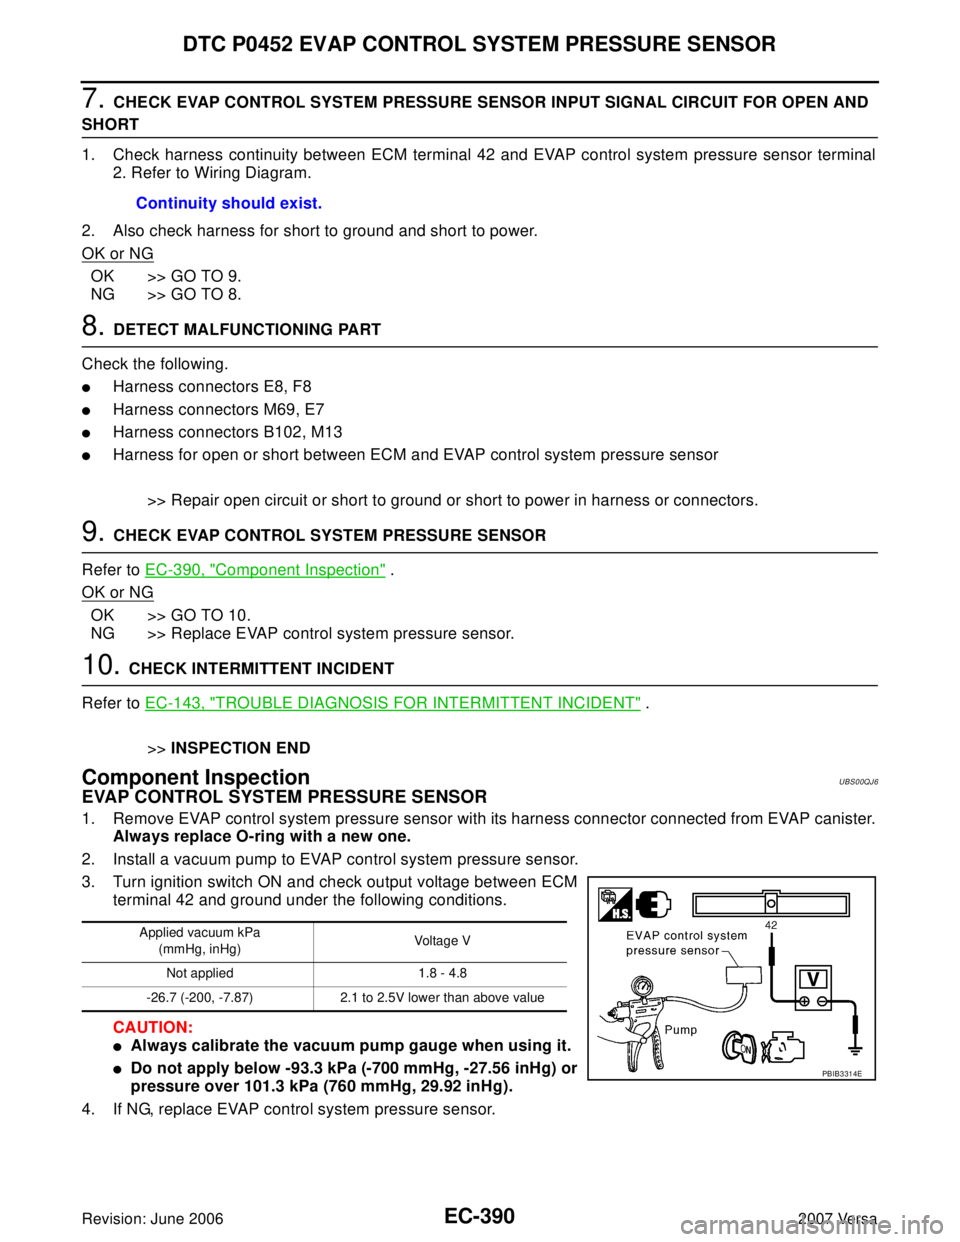
1. Remove EVAP control system pressure sensor with its harness connector connected from EVAP canister.
Always replace O-ring with a new one.
2. Install a vacuum pump to EVAP control system pressure sensor.
3. Turn ignition switch ON and check output voltage between ECM
terminal 42 and ground under the following conditions.
CAUTION:
�Always calibrate the vacuum pump gauge when using it.
�Do not apply below -93.3 kPa (-700 mmHg, -27.56 inHg) or
pressure over 101.3 kPa (760 mmHg, 29.92 inHg).
4. If NG, replace EVAP control system pressure sensor.Continuity should exist.
Applied vacuum kPa
(mmHg, inHg)Voltage V
Not applied 1.8 - 4.8
-26.7 (-200, -7.87) 2.1 to 2.5V lower than above value
PBIB3314E
Page 1562 of 2896
DTC P0453 EVAP CONTROL SYSTEM PRESSURE SENSOR
EC-393
C
D
E
F
G
H
I
J
K
L
MA
EC
Revision: June 20062007 Versa
Wiring DiagramUBS00QJB
BBWA2642E
Page 1564 of 2896
DTC P0453 EVAP CONTROL SYSTEM PRESSURE SENSOR
EC-395
C
D
E
F
G
H
I
J
K
L
MA
EC
Revision: June 20062007 Versa
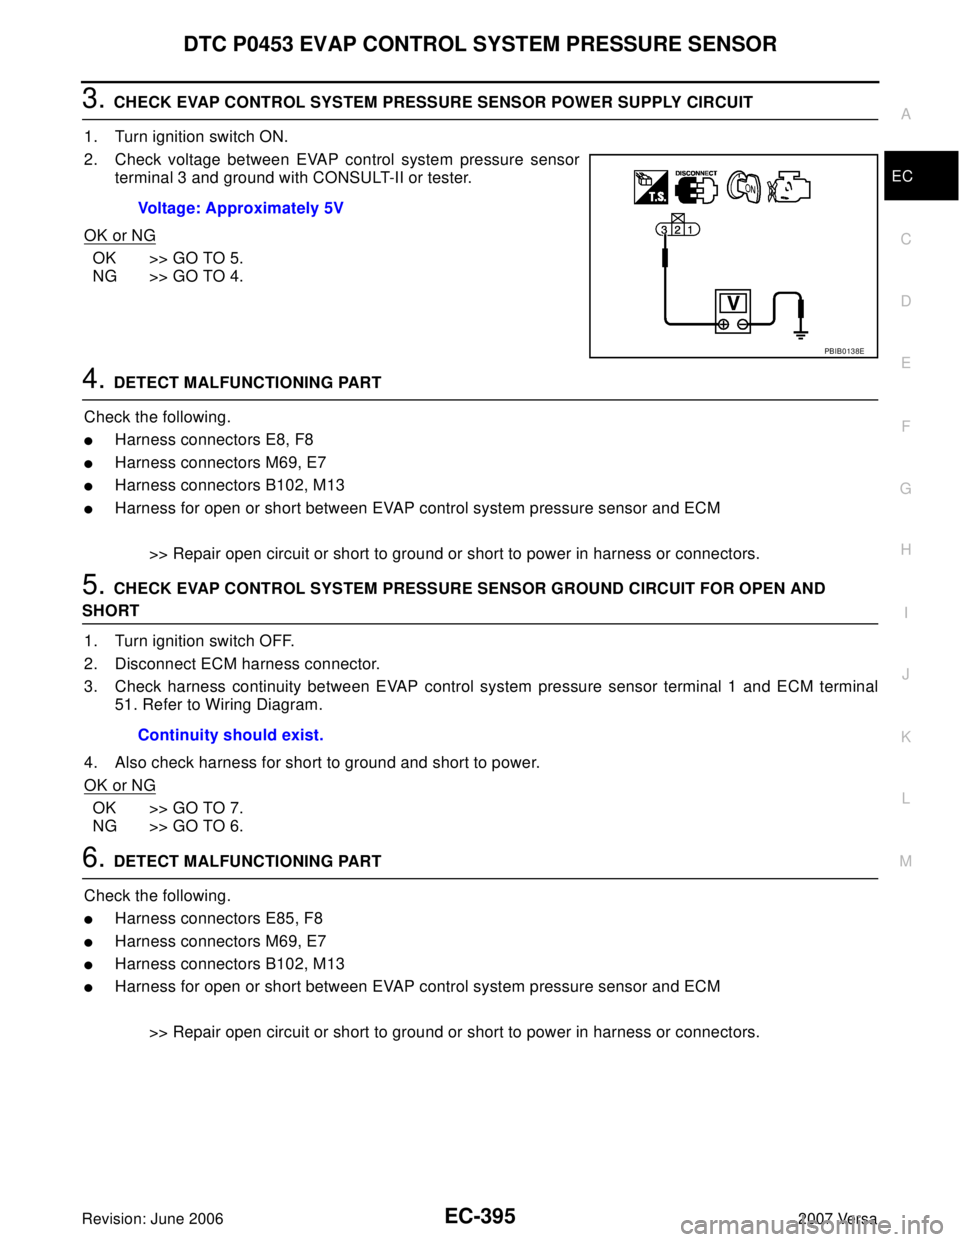
3. CHECK EVAP CONTROL SYSTEM PRESSURE SENSOR POWER SUPPLY CIRCUIT
1. Turn ignition switch ON.
2. Check voltage between EVAP control system pressure sensor
terminal 3 and ground with CONSULT-II or tester.
OK or NG
OK >> GO TO 5.
NG >> GO TO 4.
4. DETECT MALFUNCTIONING PART
Check the following.
�Harness connectors E8, F8
�Harness connectors M69, E7
�Harness connectors B102, M13
�Harness for open or short between EVAP control system pressure sensor and ECM
>> Repair open circuit or short to ground or short to power in harness or connectors.
5. CHECK EVAP CONTROL SYSTEM PRESSURE SENSOR GROUND CIRCUIT FOR OPEN AND
SHORT
1. Turn ignition switch OFF.
2. Disconnect ECM harness connector.
3. Check harness continuity between EVAP control system pressure sensor terminal 1 and ECM terminal
51. Refer to Wiring Diagram.
4. Also check harness for short to ground and short to power.
OK or NG
OK >> GO TO 7.
NG >> GO TO 6.
6. DETECT MALFUNCTIONING PART
Check the following.
�Harness connectors E85, F8
�Harness connectors M69, E7
�Harness connectors B102, M13
�Harness for open or short between EVAP control system pressure sensor and ECM
>> Repair open circuit or short to ground or short to power in harness or connectors. Voltage: Approximately 5V
PBIB0138E
Continuity should exist.
Page 1565 of 2896
EC-396Revision: June 2006
DTC P0453 EVAP CONTROL SYSTEM PRESSURE SENSOR
2007 Versa
7. CHECK EVAP CONTROL SYSTEM PRESSURE SENSOR INPUT SIGNAL CIRCUIT FOR OPEN AND
SHORT
1. Check harness continuity between ECM terminal 42 and EVAP control system pressure sensor terminal
2. Refer to Wiring Diagram.
2. Also check harness for short to ground and short to power.
OK or NG
OK >> GO TO 9.
NG >> GO TO 8.
8. DETECT MALFUNCTIONING PART
Check the following.
�Harness connectors E8, F8
�Harness connectors M69, E7
�Harness connectors B102, M13
�Harness for open or short between ECM and EVAP control system pressure sensor
>> Repair open circuit or short to ground or short to power in harness or connectors.
9. CHECK RUBBER TUBE
1. Disconnect rubber tube connected to EVAP canister vent control valve.
2. Check the rubber tube for clogging, vent and kinked.
OK or NG
OK >> GO TO 10.
NG >> Clean the rubber tube using an air blower, repair or replace rubber tube.
10. CHECK EVAP CANISTER VENT CONTROL VALVE
Refer to EC-374, "
Component Inspection" .
OK or NG
OK >> GO TO 11.
NG >> Replace EVAP canister vent control valve.
11 . CHECK EVAP CONTROL SYSTEM PRESSURE SENSOR
Refer to EC-397, "
Component Inspection" .
OK or NG
OK >> GO TO 12.
NG >> Replace EVAP control system pressure sensor.Continuity should exist.
Page 1600 of 2896
DTC P0643 SENSOR POWER SUPPLY
EC-431
C
D
E
F
G
H
I
J
K
L
MA
EC
Revision: June 20062007 Versa
Wiring DiagramUBS00QKJ
BBWA2649E
Page 1603 of 2896
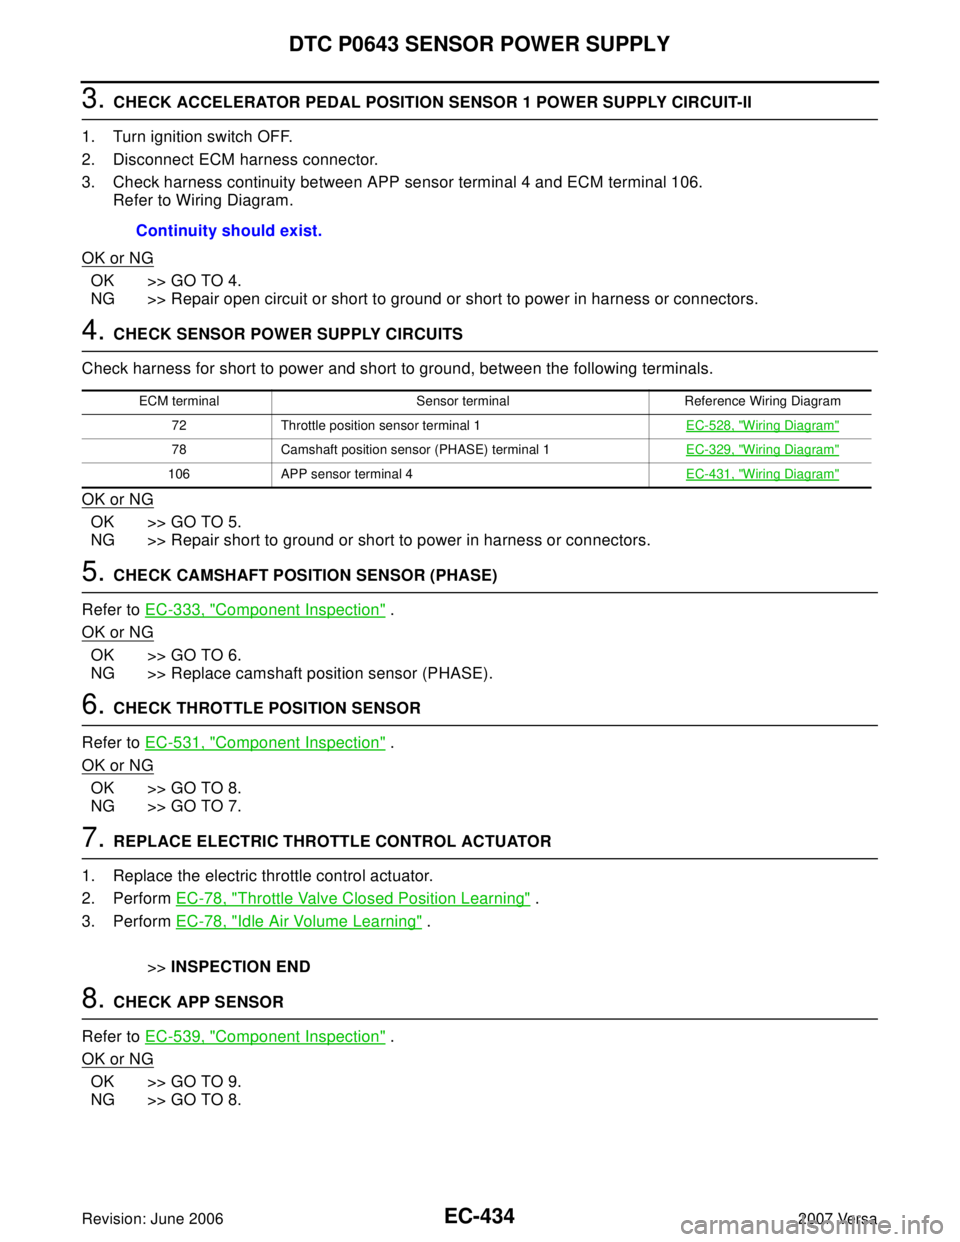
EC-434Revision: June 2006
DTC P0643 SENSOR POWER SUPPLY
2007 Versa
3. CHECK ACCELERATOR PEDAL POSITION SENSOR 1 POWER SUPPLY CIRCUIT-II
1. Turn ignition switch OFF.
2. Disconnect ECM harness connector.
3. Check harness continuity between APP sensor terminal 4 and ECM terminal 106.
Refer to Wiring Diagram.
OK or NG
OK >> GO TO 4.
NG >> Repair open circuit or short to ground or short to power in harness or connectors.
4. CHECK SENSOR POWER SUPPLY CIRCUITS
Check harness for short to power and short to ground, between the following terminals.
OK or NG
OK >> GO TO 5.
NG >> Repair short to ground or short to power in harness or connectors.
5. CHECK CAMSHAFT POSITION SENSOR (PHASE)
Refer to EC-333, "
Component Inspection" .
OK or NG
OK >> GO TO 6.
NG >> Replace camshaft position sensor (PHASE).
6. CHECK THROTTLE POSITION SENSOR
Refer to EC-531, "
Component Inspection" .
OK or NG
OK >> GO TO 8.
NG >> GO TO 7.
7. REPLACE ELECTRIC THROTTLE CONTROL ACTUATOR
1. Replace the electric throttle control actuator.
2. Perform EC-78, "
Throttle Valve Closed Position Learning" .
3. Perform EC-78, "
Idle Air Volume Learning" .
>>INSPECTION END
8. CHECK APP SENSOR
Refer to EC-539, "
Component Inspection" .
OK or NG
OK >> GO TO 9.
NG >> GO TO 8.Continuity should exist.
ECM terminal Sensor terminal Reference Wiring Diagram
72 Throttle position sensor terminal 1EC-528, "
Wiring Diagram"
78 Camshaft position sensor (PHASE) terminal 1EC-329, "Wiring Diagram"
106 APP sensor terminal 4EC-431, "Wiring Diagram"
Page 1607 of 2896
EC-438Revision: June 2006
DTC P0850 PNP SWITCH
2007 Versa
Wiring DiagramUBS00QKQ
BBWA2650E