Page 633 of 2896

BL-144
INTELLIGENT KEY SYSTEM
Revision: June 20062007 Versa
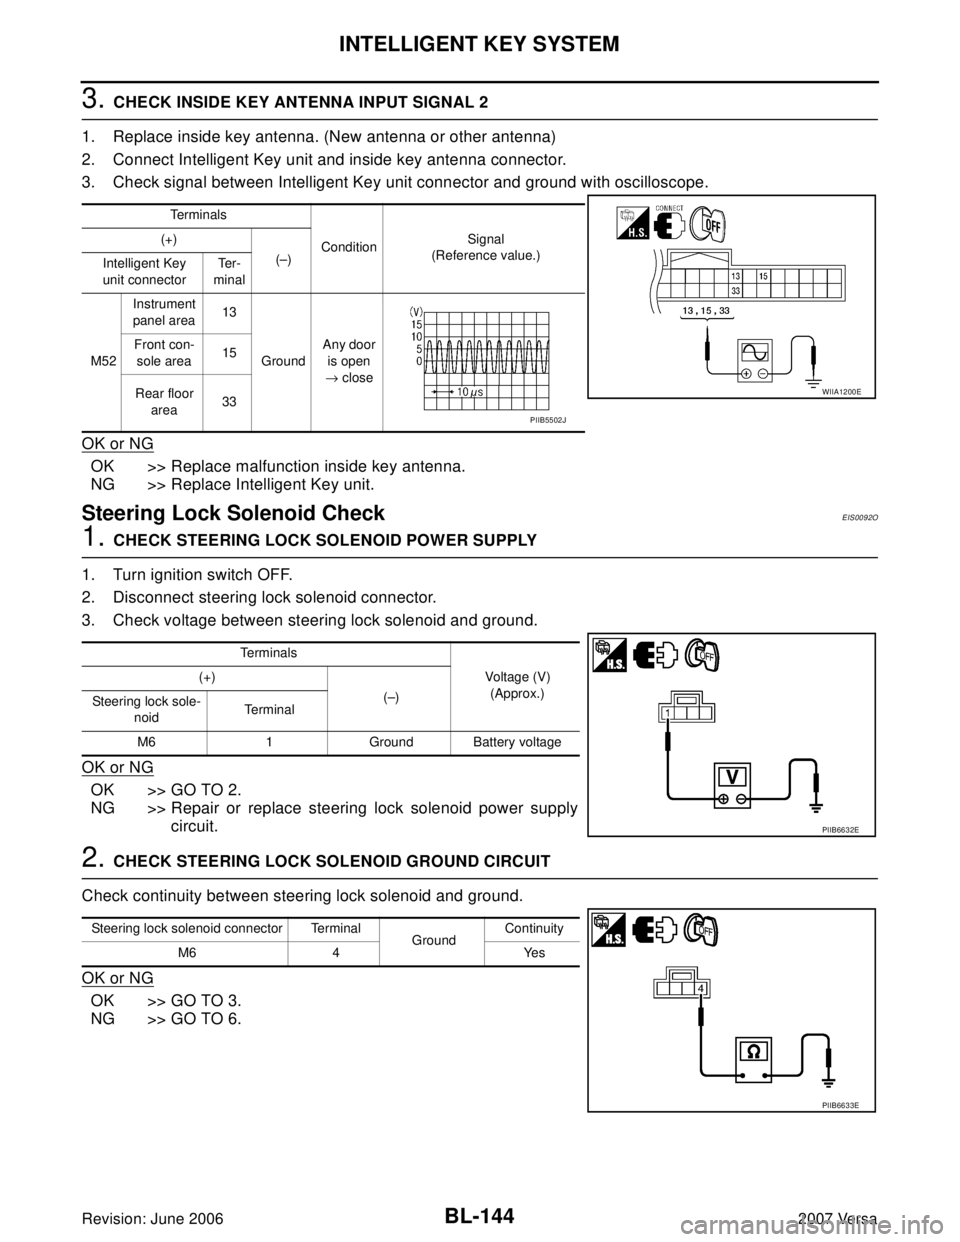
3. CHECK INSIDE KEY ANTENNA INPUT SIGNAL 2
1. Replace inside key antenna. (New antenna or other antenna)
2. Connect Intelligent Key unit and inside key antenna connector.
3. Check signal between Intelligent Key unit connector and ground with oscilloscope.
OK or NG
OK >> Replace malfunction inside key antenna.
NG >> Replace Intelligent Key unit.
Steering Lock Solenoid CheckEIS0092O
1. CHECK STEERING LOCK SOLENOID POWER SUPPLY
1. Turn ignition switch OFF.
2. Disconnect steering lock solenoid connector.
3. Check voltage between steering lock solenoid and ground.
OK or NG
OK >> GO TO 2.
NG >> Repair or replace steering lock solenoid power supply
circuit.
2. CHECK STEERING LOCK SOLENOID GROUND CIRCUIT
Check continuity between steering lock solenoid and ground.
OK or NG
OK >> GO TO 3.
NG >> GO TO 6.
Te r m i n a l s
ConditionSignal
(Reference value.) (+)
(–)
Intelligent Key
unit connectorTe r -
minal
M52Instrument
panel area13
GroundAny door
is open
→ close Front con-
sole area15
Rear floor
area33
WIIA1200E
PIIB5502J
Te r m i n a l s
Voltage (V)
(Approx.) (+)
(–)
Steering lock sole-
noidTerminal
M6 1 Ground Battery voltage
PIIB6632E
Steering lock solenoid connector Terminal
GroundContinuity
M6 4 Yes
PIIB6633E
Page 656 of 2896
DOOR
BL-167
C
D
E
F
G
H
J
K
L
MA
B
BL
Revision: June 20062007 Versa
3. Remove the check link bolt.
4. Remove the hinge nuts and the door assembly.
Installation
Installation is in the reverse order of removal.
BACK DOOR
Removal
1. Remove the back door glass. Refer toGW-15, "REAR WINDOW GLASS AND MOLDING" .
2. Remove the back door lock assembly. Refer to BL-175, "
BACK DOOR LOCK" .
3. Remove the back door wire harness.
4. Remove the rear washer nozzle and hose from the back door. Refer to WW-42, "
REAR WASHER NOZ-
ZLE" .
5. Support the back door.
CAUTION:
Two technicians should be used to avoid damaging the back door during removal.
6. Remove the back door stays.
7. Remove the door side nuts and the back door assembly. 14.7 N·m (1.5 kg-m, 11 ft-lb)
PIIB6543E
24.5 N·m (2.5 kg-m, 18 ft-lb)
PIIB6522E
LIIA2639E
Page 658 of 2896

FRONT DOOR LOCK
BL-169
C
D
E
F
G
H
J
K
L
MA
B
BL
Revision: June 20062007 Versa
FRONT DOOR LOCKPFP:80502
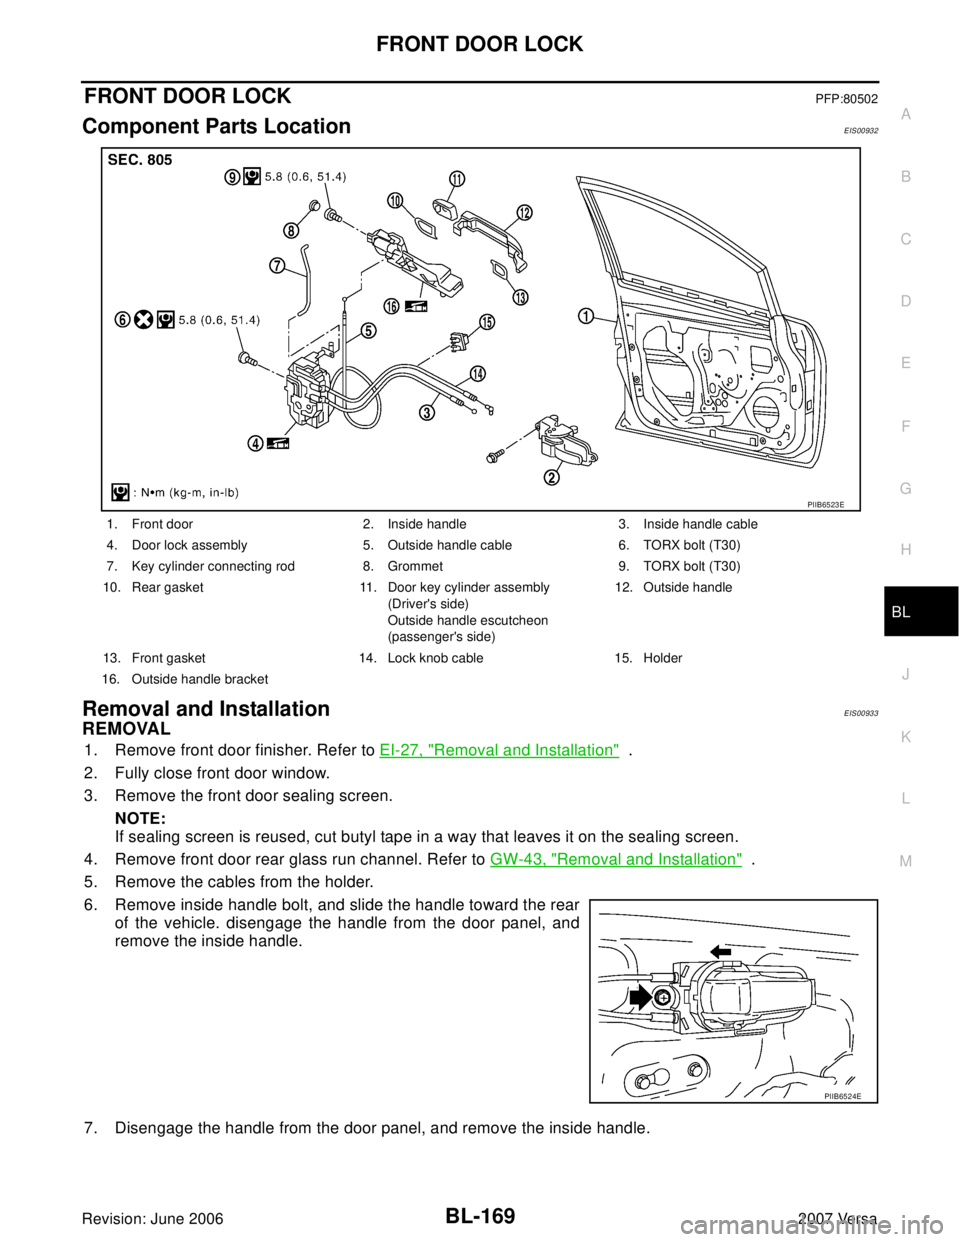
Component Parts LocationEIS00932
Removal and InstallationEIS00933
REMOVAL
1. Remove front door finisher. Refer to EI-27, "Removal and Installation" .
2. Fully close front door window.
3. Remove the front door sealing screen.
NOTE:
If sealing screen is reused, cut butyl tape in a way that leaves it on the sealing screen.
4. Remove front door rear glass run channel. Refer to GW-43, "
Removal and Installation" .
5. Remove the cables from the holder.
6. Remove inside handle bolt, and slide the handle toward the rear
of the vehicle. disengage the handle from the door panel, and
remove the inside handle.
7. Disengage the handle from the door panel, and remove the inside handle.
1. Front door 2. Inside handle 3. Inside handle cable
4. Door lock assembly 5. Outside handle cable 6. TORX bolt (T30)
7. Key cylinder connecting rod 8. Grommet 9. TORX bolt (T30)
10. Rear gasket 11. Door key cylinder assembly
(Driver's side)
Outside handle escutcheon
(passenger's side)12. Outside handle
13. Front gasket 14. Lock knob cable 15. Holder
16. Outside handle bracket
PIIB6523E
PIIB6524E
Page 659 of 2896
BL-170
FRONT DOOR LOCK
Revision: June 20062007 Versa
8. Disconnect the inside handle cable and lock knob cable from the
inside handle.
CAUTION:
During removal and installation, work so as not to bend the
ends of the lock knob cable and inside handle cable.
9. Remove the door side grommet, and the door key cylinder
assembly (escutcheon) bolt.
10. Remove the key cylinder connecting rod (key cylinder side).
11. If equipped, disconnect the door antenna, the door request
switch connector and remove the harness clamp. (Vehicle with
intelligent key systems only).
12. Remove the door cylinder assembly while pulling the outside
handle forward.
13. Pull the outside door handle forward and then slide it toward the
rear of the vehicle to remove.
14. Remove the front and rear gaskets.
PIIB6525E
PIIB5808E
PIIB5809E
PIIB5810E
PIIB6526E
Page 660 of 2896
FRONT DOOR LOCK
BL-171
C
D
E
F
G
H
J
K
L
MA
B
BL
Revision: June 20062007 Versa
15. Remove the door lock assembly bolts.
16. Slide the outside handle bracket toward the rear of the vehicle,
and remove the assembly.
17. If equipped, disconnect the door lock assembly electrical connector.
18. Separate the outside handle cable from the outside handle
bracket.
INSTALLATION
Installation is in the reverse order of removal.
CAUTION:
�To install each rod, be sure to rotate the rod holder until a click is felt.
�When installing door lock assembly, be careful when rotating the outside handle cable as shown
in the figure.
–Place the outside handle bracket cable on the inside of door
lock assembly before installing. 5.8 N·m (0.6 kg-m, 51.4 in-lb)
PIIB6527E
PIIB6528E
PIIB5815E
PIIB6529E
Page 661 of 2896
BL-172
REAR DOOR LOCK
Revision: June 20062007 Versa
REAR DOOR LOCKPFP:82502
Component Parts LocationEIS00934
Removal and InstallationEIS00935
REMOVAL
1. Remove the partition glass. Refer to GW-47, "REAR DOOR GLASS AND REGULATOR" .
2. Support door glass while lifting it up to the door window completely closed position.
3. Remove inside handle bolt, slide handle toward rear of vehicle,
disconnect it from the door panel, and remove the inside handle.
4. Disconnect the inside handle and lock knob cables from the
inside handle.
CAUTION:
During removal and installation, do not to bend the ends of
the lock knob cable and inside handle cable.
1. Rear door 2. Inside handle 3. Inside handle cable
4. Door lock assembly 5. TORX bolt (T30) 6. Outside handle cable
7. Grommet 8. TORX bolt (T30) 9. Rear gasket
10. Outside handle escutcheon 11. Outside handle 12. Front gasket
13. Lock knob cable 14. Outside handle bracket
PIIB6530E
PIIB6524E
PIIB6525E
Page 662 of 2896
REAR DOOR LOCK
BL-173
C
D
E
F
G
H
J
K
L
MA
B
BL
Revision: June 20062007 Versa
5. Remove the door side grommet, and the outside handle
escutcheon screw.
6. Pull the outside handle forward (1), while removing outside han-
dle escutcheon (2).
7. Pull outside door handle forward (1), and slide it toward the rear
of the vehicle to remove (2).
8. Remove the front and rear gaskets.
9. Remove the door lock assembly screws.
PIIB5808E
PIIB5809E
PIIB5810E
PIIB6526E
: 5.8 N·m (0.6 kg-m, 51.4 in-lb)
PIIB6527E
Page 663 of 2896
BL-174
REAR DOOR LOCK
Revision: June 20062007 Versa
10. Slide the outside handle bracket toward the rear of vehicle,
remove the outside handle bracket and the door lock assembly.
11. If equipped, disconnect the door lock assembly electrical connector.
12. Disconnect the outside handle cable from the outside handle
bracket.
INSTALLATION
Installation is in the reverse order of removal.
CAUTION:
�To install each rod, be sure to rotate the rod holder until a click is felt.
�When installing door lock assembly, be careful when rotating the outside handle cable as shown.
–Place the outside handle bracket cable on the inside of door
lock assembly before installing.
PIIB6528E
PIIB5815E
PIIB6529E