2007 NISSAN FRONTIER stop start
[x] Cancel search: stop startPage 215 of 336
WARNING
cDo not stop or park the vehicle over
flammable materials such as dry grass,
waste paper or rags. They may ignite
and cause a fire.
cSafe parking procedures require that
both the parking brake be set and the
transmission placed into P (Park) for
automatic transmission models or in an
appropriate gear for manual transmis-
sion models. Failure to do so could
cause the vehicle to move unexpectedly
or roll away and result in an accident.Make sure the shift lever has been
pushed as far forward as it can go and
cannot be moved without depressing
the foot brake pedal.
cNever leave the engine running while
the vehicle is unattended.
cDo not leave children unattended inside
the vehicle. They could unknowingly ac-
tivate switches or controls. Unattended
children could become involved in seri-
ous accidents.
1. Firmly apply the parking brake.2.Manual transmission models:
Place the shift lever in the R (Reverse) posi-
tion. When parking on an uphill grade, place
the shift lever in 1st gear.
Automatic transmission models:
Move the shift selector lever to the P (Park)
position.
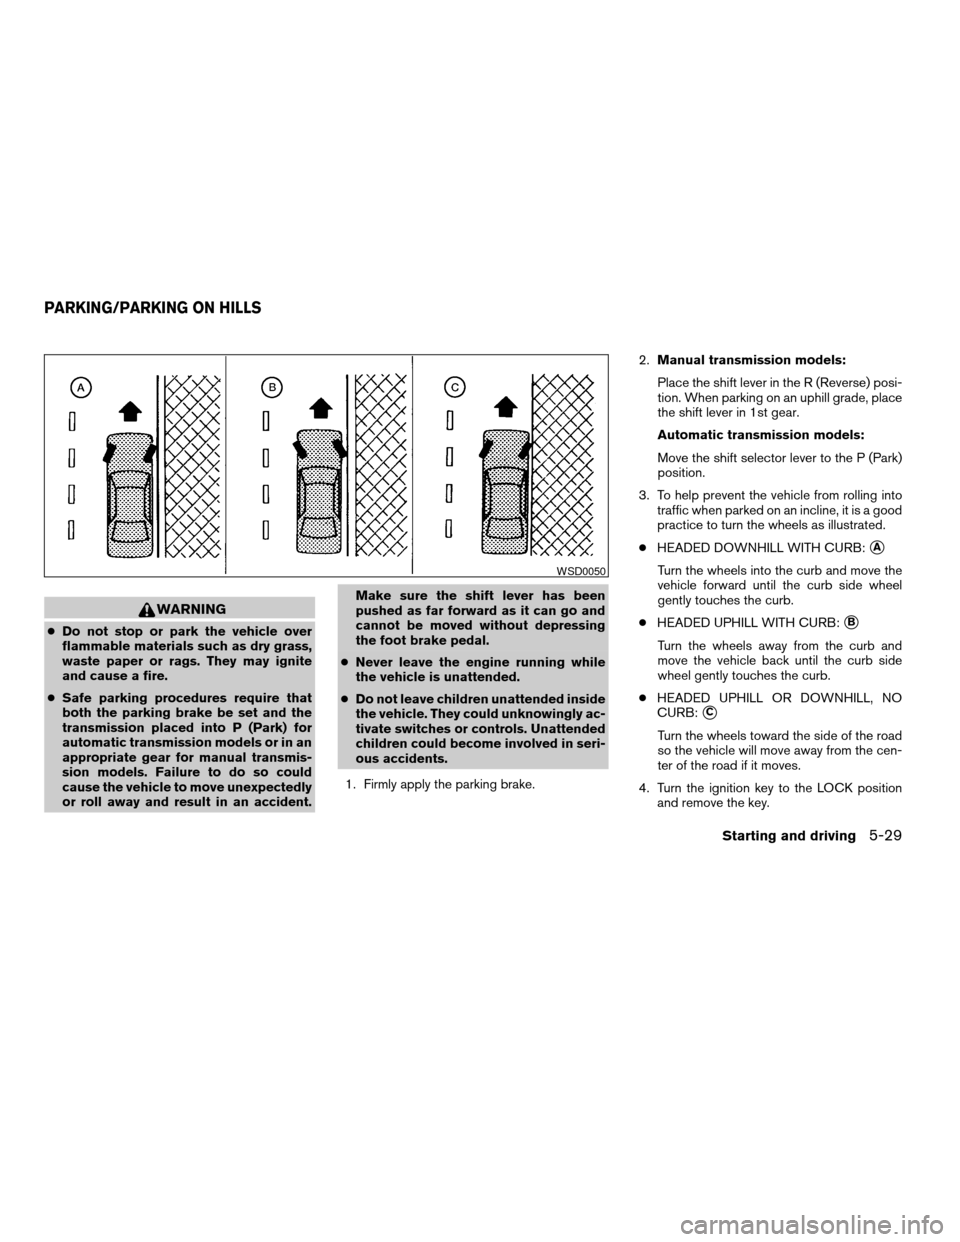
3. To help prevent the vehicle from rolling into
traffic when parked on an incline, it is a good
practice to turn the wheels as illustrated.
cHEADED DOWNHILL WITH CURB:
sA
Turn the wheels into the curb and move the
vehicle forward until the curb side wheel
gently touches the curb.
cHEADED UPHILL WITH CURB:
sB
Turn the wheels away from the curb and
move the vehicle back until the curb side
wheel gently touches the curb.
cHEADED UPHILL OR DOWNHILL, NO
CURB:
sC
Turn the wheels toward the side of the road
so the vehicle will move away from the cen-
ter of the road if it moves.
4. Turn the ignition key to the LOCK position
and remove the key.
WSD0050
PARKING/PARKING ON HILLS
Starting and driving5-29
ZREVIEW COPYÐ2007 Truck/Frontier(d22)
Owners ManualÐUSA_English(nna)
12/13/06Ðcathy
X
Page 216 of 336
The power assisted steering uses a hydraulic
pump, driven by the engine, to assist steering.
If the engine stops or the drive belt breaks, you
will still have control of the vehicle. However,
much greater steering effort is needed, especially
in sharp turns and at low speeds.
WARNING
If the engine is not running or is turned off
while driving, the power assist for the
steering will not work. Steering will be
harder to operate.The brake system has two separate hydraulic
circuits. If one circuit malfunctions, you will still
have braking at two wheels.
BRAKE PRECAUTIONS
Vacuum assisted brakes
The brake booster aids braking by using engine
vacuum. If the engine stops, you can stop the
vehicle by depressing the brake pedal. However,
greater foot pressure on the brake pedal will be
required to stop the vehicle and stopping dis-
tance will be longer.
Using the brakes
Avoid resting your foot on the brake pedal while
driving. This will overheat the brakes, wear out the
brakes and pads faster, and reduce gas mileage.
To help reduce brake wear and to prevent the
brakes from overheating, reduce speed and
downshift to a lower gear before going down a
slope or long grade. Overheated brakes may
reduce braking performance and could result in
loss of vehicle control.
WARNING
cWhile driving on a slippery surface, be
careful when braking, accelerating or
downshifting. Abrupt braking or accel-
erating could cause the wheels to skid
and result in an accident.
cIf the engine is not running or is turned
off while driving, the power assist for
the brakes will not work. Braking will be
harder.
Wet brakes
When the vehicle is washed or driven through
water, the brakes may get wet. As a result, your
braking distance will be longer and the vehicle
may pull to one side during braking.
To dry the brakes, drive the vehicle at a safe
speed while lightly pressing the brake pedal to
heat up the brakes. Do this until the brakes return
to normal. Avoid driving the vehicle at high
speeds until the brakes function correctly.
Parking brake break-in
Break-in the parking brake shoes whenever the
stopping effect of the parking brake is weakened
or whenever the parking brake shoes and/or
drum/rotors are replaced, in order to assure the
best brake performance.
POWER STEERING BRAKE SYSTEM
5-30Starting and driving
ZREVIEW COPYÐ2007 Truck/Frontier(d22)
Owners ManualÐUSA_English(nna)
12/13/06Ðcathy
X
Page 217 of 336
This procedure is described in the vehicle service
manual and can be performed by a NISSAN
dealer.
ANTI-LOCK BRAKING SYSTEM
(ABS)
WARNING
cThe Anti-lock Braking System (ABS) is a
sophisticated device, but it cannot pre-
vent accidents resulting from careless
or dangerous driving techniques. It can
help maintain vehicle control during
braking on slippery surfaces. Remem-
ber that stopping distances on slippery
surfaces will be longer than on normal
surfaces even with ABS. Stopping dis-
tances may also be longer on rough,
gravel or snow covered roads, or if you
are using tire chains. Always maintain a
safe distance from the vehicle in front
of you. Ultimately, the driver is respon-
sible for safety.
cTire type and condition may also affect
braking effectiveness.
– When replacing tires, install the
specified size of tires on all four
wheels.– When installing a spare tire, make
sure that it is the proper size and type
as specified on the Tire and Loading
Information label. See “Tire and
Loading Information label” in the
“Technical and consumer informa-
tion” section of this manual.
– For detailed information, see
“Wheels and tires” in the “Mainte-
nance and do-it-yourself” section of
this manual.
The Anti-lock Braking System (ABS) controls the
brakes so the wheels do not lock during hard
braking or when braking on slippery surfaces.
The system detects the rotation speed at each
wheel and varies the brake fluid pressure to pre-
vent each wheel from locking and sliding. By
preventing each wheel from locking, the system
helps the driver maintain steering control and
helps to minimize swerving and spinning on slip-
pery surfaces.
Using the system
Depress the brake pedal and hold it down. De-
press the brake pedal with firm steady pressure,
but do not pump the brakes. The ABS will oper-
ate to prevent the wheels from locking up. Steer
the vehicle to avoid obstacles.
WARNING
Do not pump the brake pedal. Doing so
may result in increased stopping
distances.
Self-test feature
The ABS includes electronic sensors, electric
pumps, hydraulic solenoids and a computer. The
computer has a built-in diagnostic feature that
tests the system each time you start the engine
and move the vehicle at a low speed in forward or
reverse. When the self-test occurs, you may hear
a “clunk” noise and/or feel a pulsation in the brake
pedal. This is normal and does not indicate a
malfunction. If the computer senses a malfunc-
tion, it switches the ABS off and illuminates the
ABS warning light on the instrument panel. The
brake system then operates normally, but without
anti-lock assistance.
If the ABS warning light illuminates during the
self-test or while driving, have the vehicle
checked by a NISSAN dealer.
Starting and driving5-31
ZREVIEW COPYÐ2007 Truck/Frontier(d22)
Owners ManualÐUSA_English(nna)
12/13/06Ðcathy
X
Page 220 of 336
WARNING
cNever rely solely on the hill descent
control system to control vehicle speed
when driving on steep down hill grades.
Always drive carefully and attentively
when using the hill descent control sys-
tem and decelerate the vehicle speed
by depressing the brake pedal if neces-
sary. Be especially careful when driving
on frozen, muddy or an extremely steep
downhill roads. Failure to control ve-
hicle speed may result in a loss of con-
trol of the vehicle and possible serious
injury or death.
cThe hill descent control may not control
the vehicle speed on a hill under all load
or road conditions. Always be prepared
to depress the brake pedal to control
vehicle speed. Failure to do so may re-
sult in a collision or serious personal
injury.
The hill descent control system helps maintain
vehicle speed when driving under 15-21 mph
(25-35 km/h) on steeper downhill grades. Hill
descent control is useful when engine braking
alone in 4H or 4L cannot control vehicle speed.
hill descent control applies the vehicle brakes to
control vehicle speed allowing the driver to con-centrate on steering while reducing the burden of
brake and accelerator operation.
cWhen additional braking is required on
steep downhill roads activate the hill de-
scent control system by pushing the switch
ON, see “Hill descent control switch” in the
“Instruments and controls” section.
cOnce the system is activated the indicator
light will remain on in the instrument panel,
see “Hill descent control system on indicator
light” in the “Instruments and controls” sec-
tion.
If the accelerator or brake pedal is depressed
while the hill descent control system is on, the
system will stop operating temporarily. As soon
as the accelerator or brake pedal is released, the
hill descent control system begins to function
again if the hill descent control operating condi-
tions are fulfilled.
For the best results, when descending steep
downhill grades, the hill descent control switch
should be ON and the selector lever in 2 (Second
gear) or 1 (Low gear) for engine braking.
WARNING
cNever rely solely on the hill start assist
system to prevent the vehicle from mov-
ing backward on a hill. Always drive
carefully and attentively. Depress the
brake pedal when the vehicle is
stopped on a steep hill. Be especially
careful when stopped on a hill on frozen
or muddy roads. Failure to prevent the
vehicle from rolling backwards may re-
sult in a loss of control of the vehicle
and possible serious injury or death.
cThe hill start assist system is not de-
signed to hold the vehicle at a standstill
on a hill. Depress the brake pedal when
the vehicle is stopped on a steep hill.
Failure to do so may cause the vehicle
to roll backwards and may result in a
collision or serious personal injury.
cThe hill start assist may not prevent the
vehicle from rolling backwards on a hill
under all load or road conditions. Al-
ways be prepared to depress the brake
pedal to prevent the vehicle from rolling
backwards. Failure to do so may result
in a collision or serious personal injury.
HILL DESCENT CONTROL SYSTEM (if
so equipped)HILL START ASSIST (HSA) SYSTEM
(if so equipped)
5-34Starting and driving
ZREVIEW COPYÐ2007 Truck/Frontier(d22)
Owners ManualÐUSA_English(nna)
12/21/06Ðcathy
X
Page 221 of 336

The hill start assist system automatically keeps
the brakes applied to help prevent the vehicle
from rolling backwards in the time it takes the
driver to release the brake pedal and apply the
accelerator when the vehicle is stopped on a hill.
Hill start assist will operate automatically under
the following conditions:
cThe selector lever is shifted to a forward or
reverse gear.
cThe vehicle is stopped completely on a hill
by applying the brake.
The maximum holding time is 2 seconds. After 2
seconds the vehicle will begin to roll back and hill
start assist will stop operating completely.
Hill start assist will not operate when the selector
lever is shifted to N or P or on a flat and level road.FREEING A FROZEN DOOR LOCK
To prevent a door lock from freezing, apply de-
icer through the key hole. If the lock becomes
frozen, heat the key before inserting it into the key
hole or use the remote keyless entry keyfob (if so
equipped) .
ANTI-FREEZE
In the winter when it is anticipated that the tem-
perature will drop below 32°F (0°C) , check the
anti-freeze to assure proper winter protection.
For details, see “Engine cooling system” in the
“Maintenance and do-it-yourself” section of this
manual.
BATTERY
If the battery is not fully charged during extremely
cold weather conditions, the battery fluid may
freeze and damage the battery. To maintain maxi-
mum efficiency, the battery should be checked
regularly. For details, see “Battery” in the “Main-
tenance and do-it-yourself” section of this
manual.
DRAINING OF COOLANT WATER
If the vehicle is to be left outside without anti-
freeze, drain the cooling system, including the
engine block. Refill before operating the vehicle.
For details, see “Changing engine coolant” in the
“Maintenance and do-it-yourself” section of this
manual.
TIRE EQUIPMENT
1. SUMMER tires have a tread designed to
provide superior performance on dry pave-
ment. However, the performance of these
tires will be substantially reduced in snowy
and icy conditions. If you operate your ve-
hicle on snowy or icy roads, NISSAN recom-
mends the use of MUD & SNOW or ALL
SEASON TIRES on all four wheels. Please
consult a NISSAN dealer for the tire type,
size, speed rating and availability informa-
tion.
2. For additional traction on icy roads, studded
tires may be used. However, some U.S.
states and Canadian provinces prohibit their
use. Check local, state and provincial laws
before installing studded tires.
Skid and traction capabilities of studded
snow tires on wet or dry surfaces may be
poorer than that of non-studded snow tires.
COLD WEATHER DRIVING
Starting and driving5-35
ZREVIEW COPYÐ2007 Truck/Frontier(d22)
Owners ManualÐUSA_English(nna)
12/13/06Ðcathy
X
Page 222 of 336
3. Tire chains may be used. For details see
“Tire chains” in the “Maintenance and do-it-
yourself” section of this manual.
SPECIAL WINTER EQUIPMENT
It is recommended that the following items be
carried in the vehicle during winter:
cA scraper and stiff-bristled brush to remove
ice and snow from the windows and wiper
blades.
cA sturdy, flat board to be placed under the
jack to give it firm support.
cA shovel to dig the vehicle out of snowdrifts.
cExtra window washer fluid to refill the reser-
voir tank.
DRIVING ON SNOW OR ICE
WARNING
cWet ice (32°F, 0°C and freezing rain) ,
very cold snow or ice can be slick and
very hard to drive on. The vehicle will
have much less traction or “grip” under
these conditions. Try to avoid driving on
wet ice until the road is salted or
sanded.cWhatever the condition, drive with cau-
tion. Accelerate and slow down with
care. If accelerating or downshifting too
fast, the drive wheels will lose even
more traction.
cAllow more stopping distance under
these conditions. Braking should be
started sooner than on dry pavement.
cAllow greater following distances on
slippery roads.
cWatch for slippery spots (glare ice) .
These may appear on an otherwise
clear road in shaded areas. If a patch of
ice is seen ahead, brake before reach-
ing it. Try not to brake while on the ice,
and avoid any sudden steering
maneuvers.
cDo not use the cruise control on slip-
pery roads.
cSnow can trap dangerous exhaust
gases under your vehicle. Keep snow
clear of the exhaust pipe and from
around your vehicle.
ENGINE BLOCK HEATER (if so
equipped)
WARNING
cDo not use your engine block heater
with an ungrounded electrical system
or a 2-pronged adapter. You can be se-
riously injured by an electrical shock if
you use an ungrounded connection.
cDisconnect and properly store the en-
gine block heater cord before starting
the engine. Damage to the cord could
result in an electrical shock and can
cause serious injury.
cUse a heavy-duty 3-wire, 3-pronged ex-
tension cord rated for at least 10 A. Plug
the extension cord into a Ground Fault
Interrupt (GFI) protected, grounded
110-VAC outlet. Failure to use the
proper extension cord or a grounded
outlet can result in a fire or electrical
shock and cause serious personal
injury.
Engine block heaters are available through
NISSAN dealers to assist in cold temperature
starting. The engine block heater should be used
when the outside temperature is 20° F (-7° C) or
lower.
5-36Starting and driving
ZREVIEW COPYÐ2007 Truck/Frontier(d22)
Owners ManualÐUSA_English(nna)
12/13/06Ðcathy
X
Page 226 of 336
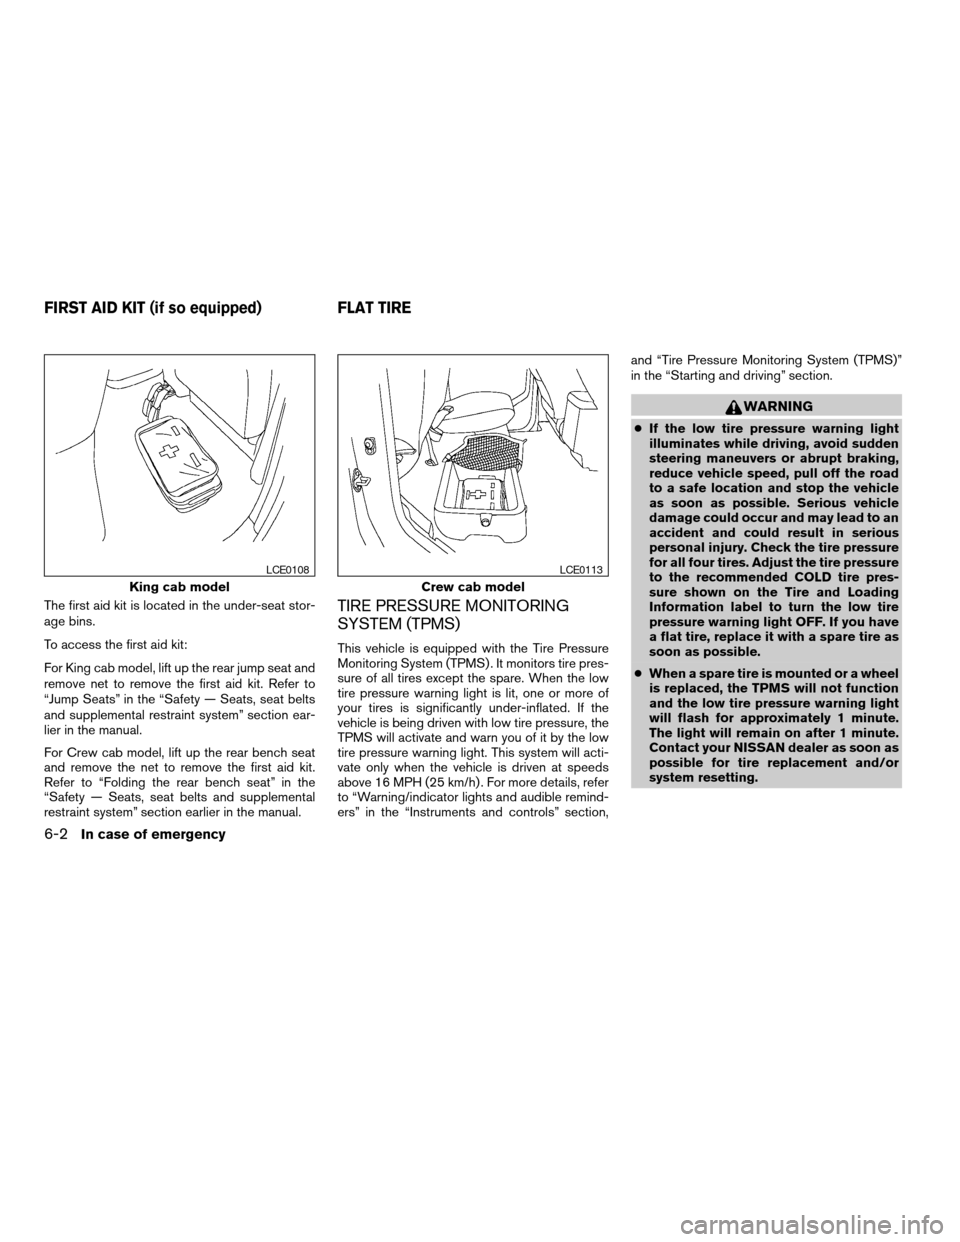
The first aid kit is located in the under-seat stor-
age bins.
To access the first aid kit:
For King cab model, lift up the rear jump seat and
remove net to remove the first aid kit. Refer to
“Jump Seats” in the “Safety — Seats, seat belts
and supplemental restraint system” section ear-
lier in the manual.
For Crew cab model, lift up the rear bench seat
and remove the net to remove the first aid kit.
Refer to “Folding the rear bench seat” in the
“Safety — Seats, seat belts and supplemental
restraint system” section earlier in the manual.TIRE PRESSURE MONITORING
SYSTEM (TPMS)
This vehicle is equipped with the Tire Pressure
Monitoring System (TPMS) . It monitors tire pres-
sure of all tires except the spare. When the low
tire pressure warning light is lit, one or more of
your tires is significantly under-inflated. If the
vehicle is being driven with low tire pressure, the
TPMS will activate and warn you of it by the low
tire pressure warning light. This system will acti-
vate only when the vehicle is driven at speeds
above 16 MPH (25 km/h) . For more details, refer
to “Warning/indicator lights and audible remind-
ers” in the “Instruments and controls” section,and “Tire Pressure Monitoring System (TPMS)”
in the “Starting and driving” section.
WARNING
cIf the low tire pressure warning light
illuminates while driving, avoid sudden
steering maneuvers or abrupt braking,
reduce vehicle speed, pull off the road
to a safe location and stop the vehicle
as soon as possible. Serious vehicle
damage could occur and may lead to an
accident and could result in serious
personal injury. Check the tire pressure
for all four tires. Adjust the tire pressure
to the recommended COLD tire pres-
sure shown on the Tire and Loading
Information label to turn the low tire
pressure warning light OFF. If you have
a flat tire, replace it with a spare tire as
soon as possible.
cWhen a spare tire is mounted or a wheel
is replaced, the TPMS will not function
and the low tire pressure warning light
will flash for approximately 1 minute.
The light will remain on after 1 minute.
Contact your NISSAN dealer as soon as
possible for tire replacement and/or
system resetting.
King cab model
LCE0108
Crew cab model
LCE0113
FIRST AID KIT (if so equipped) FLAT TIRE
6-2In case of emergency
ZREVIEW COPYÐ2007 Truck/Frontier(d22)
Owners ManualÐUSA_English(nna)
12/13/06Ðcathy
X
Page 232 of 336
4. Lower the vehicle slowly until the tire
touches the ground. Then, with the wheel
nut wrench, tighten the wheel nuts securely
in the sequence illustrated. Lower the ve-
hicle completely.
WARNING
cIncorrect wheel nuts or improperly
tightened wheel nuts can cause the
wheel to become loose or come off.
This could cause an accident.
cDo not use oil or grease on the wheel
studs or nuts. This could cause the nuts
to become loose.
cRetighten the wheel nuts when the ve-
hicle has been driven for 600 miles
(1,000 km) (also in cases of a flat tire,
etc.) .
As soon as possible, tighten the wheel nuts
to the specified torque with a torque
wrench.
Wheel nut tightening torque:
98 ft-lb (133 N·m)
The wheel nuts must be kept tightened to
specification at all times. It is recom-
mended that wheel nuts be tightened to
specifications at each lubrication interval.Adjust tire pressure to the COLD pressure.
COLD pressure: After vehicle has been
parked for three hours or more or driven
less than 1 mile (1.6 km) .
COLD tire pressures are shown on the Tire
and Loading Information label affixed to
the driver side center pillar.
5. Securely store the flat tire and jacking equip-
ment in the vehicle.
WARNING
cAlways make sure that the spare tire
and jacking equipment are properly se-
cured after use. Such items can become
dangerous projectiles in an accident or
sudden stop.
cThe spare tire is designed for emer-
gency use. See specific instructions un-
der the heading “Wheels and tires” in
the “Maintenance and do-it-yourself”
section of this manual.To start your engine with a booster battery, the
instructions and precautions below must be fol-
lowed.
WARNING
cIf done incorrectly, jump starting can
lead to a battery explosion, resulting in
severe injury or death. It could also
damage your vehicle.
cExplosive hydrogen gas is always
present in the vicinity of the battery.
Keep all sparks and flames away from
the battery.
cDo not allow battery fluid to come into
contact with eyes, skin, clothing or
painted surfaces. Battery fluid is a cor-
rosive sulfuric acid solution which can
cause severe burns. If the fluid should
come into contact with anything, imme-
diately flush the contacted area with
water.
cKeep battery out of the reach of
children.
cThe booster battery must be rated at 12
volts. Use of an improperly rated battery
can damage your vehicle.
JUMP STARTING
6-8In case of emergency
ZREVIEW COPYÐ2007 Truck/Frontier(d22)
Owners ManualÐUSA_English(nna)
12/13/06Ðcathy
X