Page 9 of 14

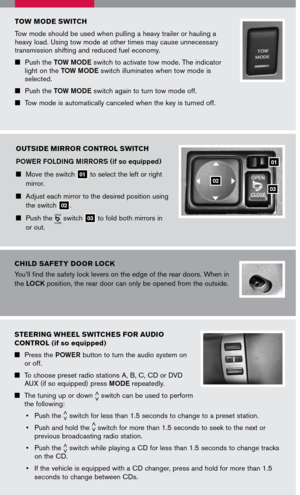
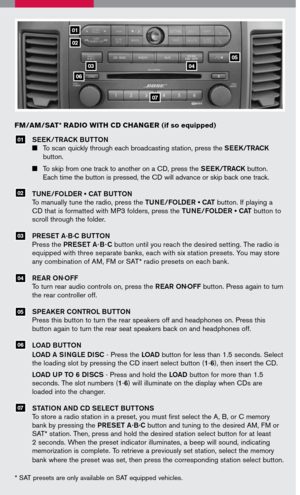
SEEK/TRACK BUTTON
To scan quickly through each broadcasting station, press the SEEK/TRACK
button.
To skip from one track to another on a CD, press the SEEK/TRACK button.
Each time the button is pressed, the CD will advance or skip back one track.
TUNE/FOLDER • CAT BUTTON
To manually tune the radio, press the TUNE/FOLDER • CAT button. If playing a
CD that is formatted with MP3 folders, press the TUNE/FOLDER • CAT button to
scroll through the folder.
PRESET A.B.C BUTTON
Press the PRESET A · B · C button until you reach the desired setting. The radio is
equipped with three separate banks, each with six station presets. You may store
any combination of AM, FM or SAT* radio presets on each bank.
REAR ON.OFF
To turn rear audio controls on, press the REAR ON.OFF button. Press again to turn
the rear controller off.
SPEAKER CONTROL BUTTON
Press this button to turn the rear speakers off and headphones on. Press this
button again to turn the rear seat speakers back on and headphones off.
LOAD BUTTON
LOAD A SINGLE DISC - Press the LOAD button for less than 1.5 seconds. Select
the loading slot by pressing the CD insert select button (1-6), then insert the CD.
LOAD UP TO 6 DISCS - Press and hold the LOAD button for more than 1.5
seconds. The slot numbers (1-6) will illuminate on the display when CDs are
loaded into the changer.
STATION AND CD SELECT BUTTONS
To store a radio station in a preset, you must first select the A, B, or C memory
bank by pressing the PRESET A.B.C button and tuning to the desired AM, FM or
SAT* station. Then, press and hold the desired station select button for at least
2 seconds. When the preset indicator illuminates, a beep will sound, indicating
memorization is complete. To retrieve a previously set station, select the memory
bank where the preset was set, then press the corresponding station select button.
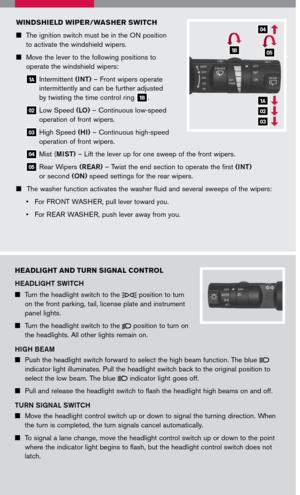
FM/AM/SAT* RADIO WITH CD CHANGER (if so equipped)
05
04
07
06
03
02
01
01
02
0304
06
07
05
* SAT presets are only available on SAT equipped vehicles.
Page 10 of 14

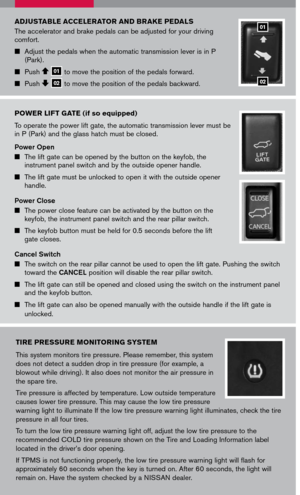
To operate the power lift gate, the automatic transmission lever must be in P (Park) and the glass hatch must be closed.
Power Open
The lift gate can be opened by")
POWER LIFT GATE (if so equipped)
To operate the power lift gate, the automatic transmission lever must be in P (Park) and the glass hatch must be closed.
Power Open
The lift gate can be opened by the button on the keyfob, the instrument panel switch and by the outside opener handle.
The lift gate must be unlocked to open it with the outside opener handle.
Power Close
The power close feature can be activated by the button on the keyfob, the instrument panel switch and the rear pillar switch.
The keyfob button must be held for 0.5 seconds before the lift gate closes.
Cancel Switch
The switch on the rear pillar cannot be used to open the lift gate. Pushing the switch toward the CANCEL position will disable the rear pillar switch.
The lift gate can still be opened and closed using the switch on the instrument panel and the keyfob button.
The lift gate can also be opened manually with the outside handle if the lift gate is
unlocked.
ADJUSTABLE ACCELERATOR AND BRAKE PEDALS
The accelerator and brake pedals can be adjusted for your driving comfort.
Adjust the pedals when the automatic transmission lever is in P (Park).
Push 01 to move the position of the pedals forward.
Push 02 to move the position of the pedals backward.
01
02
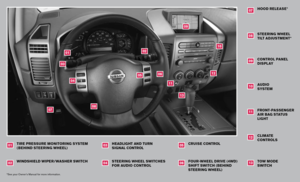
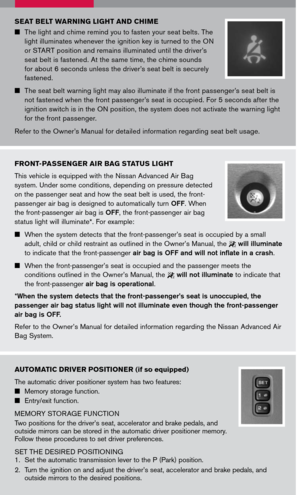
TIRE PRESSURE MONITORING SYSTEM
This system monitors tire pressure. Please remember, this system
does not detect a sudden drop in tire pressure (for example, a
blowout while driving). It also does not monitor the air pressure in
the spare tire.
Tire pressure is affected by temperature. Low outside temperature
causes lower tire pressure. This may cause the low tire pressure
warning light to illuminate If the low tire pressure warning light illuminates, check the tire
pressure in all four tires.
To turn the low tire pressure warning light off, adjust the low tire pressure to the
recommended COLD tire pressure shown on the Tire and Loading Information label
located in the driver’s door opening.
If TPMS is not functioning properly, the low tire pressure warning light will flash for
approximately 60 seconds when the key is turned on. After 60 seconds, the light will
remain on. Have the system checked by a NISSAN dealer.
Page 11 of 14

The automatic driver positioner system has two features:
Memory storage function.
Entry/exit function.
MEMORY STORAGE FUNCTION
Two positions for")
AUTOMATIC DRIVER POSITIONER (if so equipped)
The automatic driver positioner system has two features:
Memory storage function.
Entry/exit function.
MEMORY STORAGE FUNCTION
Two positions for the driver’s seat, accelerator and brake pedals, and outside mirrors can be stored in the automatic driver positioner memory. Follow these procedures to set driver preferences.
SET THE DESIRED POSITIONING
1. Set the automatic transmission lever to the P (Park) position.
2. Turn the ignition on and adjust the driver’s seat, accelerator and brake pedals, and
outside mirrors to the desired positions.
SEAT BELT WARNING LIGHT AND CHIME
The light and chime remind you to fasten your seat belts. The
light illuminates whenever the ignition key is turned to the ON
or START position and remains illuminated until the driver’s
seat belt is fastened. At the same time, the chime sounds
for about 6 seconds unless the driver’s seat belt is securely
fastened.
The seat belt warning light may also illuminate if the front passenger’s seat belt is
not fastened when the front passenger’s seat is occupied. For 5 seconds after the
ignition switch is in the ON position, the system does not activate the warning light
for the front passenger.
Refer to the Owner’s Manual for detailed information regarding seat belt usage.
FRONT-PASSENGER AIR BAG STATUS LIGHT
This vehicle is equipped with the Nissan Advanced Air Bag
system. Under some conditions, depending on pressure detected
on the passenger seat and how the seat belt is used, the front-
passenger air bag is designed to automatically turn OFF. When
the front-passenger air bag is OFF, the front-passenger air bag
status light will illuminate*. For example:
When the system detects that the front-passenger’s seat is occupied by a small
adult, child or child restraint as outlined in the Owner’s Manual, the 2 will illuminate
to indicate that the front-passenger air bag is OFF and will not inflate in a crash.
When the front-passenger’s seat is occupied and the passenger meets the
conditions outlined in the Owner’s Manual, the 2 will not illuminate to indicate that
the front-passenger air bag is operational.
*When the system detects that the front-passenger’s seat is unoccupied, the
passenger air bag status light will not illuminate even though the front-passenger
air bag is OFF.
Refer to the Owner’s Manual for detailed information regarding the Nissan Advanced Air
Bag System.
Page 12 of 14
:
Pull up on the lever under the front of the seat and slide backward or forward; release.
Lift the leve")
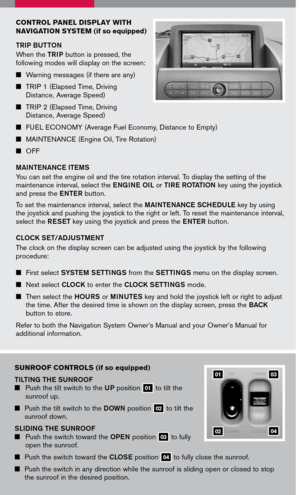
DRIVER FRONT SEAT ADJUSTMENTS
With manual seats (passenger’s side, if so equipped):
Pull up on the lever under the front of the seat and slide backward or forward; release.
Lift the lever 01 on the side of the seat to adjust your seatback backward or forward; release when you have found a comfortable angle and the seat belt fits properly.
With power seats (if so equipped):
Move the control 02 forward or backward to adjust the seat cushion forward or backward.
Pull up on the control 02 to raise the seat cushion; press down to lower the cushion.
Push the switch 03 forward to move the seatback forward; push it back to move the seatback backward.
LUMBAR SUPPORT (if so equipped) Your driver’s seat has a lumbar support; adjust it by
moving the lever 04 up or down.
04
0203
01
3. Press the SET (memory) button and within 5 seconds press the position button (1 or 2) for at least 1 second until the indicator light illuminates. The position is now stored in memory.
LINK TO KEYFOB Within 5 seconds of setting the memory position (indicator light is on and ignition is on), press the button on the remote. A keyfob can be linked to each memory button. If memory positioning is re-set to a new location, the keyfob automatically re-links.
RECALLING A MEMORY SETTING FROM THE MEMORY PAD Set the automatic transmission lever to the P (Park) position, then: Within 45 seconds of opening the driver’s door, push the memory switch (1 or 2) fully for at least 1 second, or Turn the ignition switch to the ON position and push the memory switch (1 or 2) fully for at least 1 second.
FROM THE KEYFOB
If properly linked, operation of the button will automatically return the driver’s seat, accelerator and brake pedals, and outside mirrors to the memorized position.
ENTRY/EXIT FUNCTION
The driver’s seat automatically moves to allow the driver to get into and out of the driver’s seat more easily. The driver’s seat slides backward when:
The driver’s door is opened with the key turned to LOCK. The key is turned from ACC to LOCK with the driver’s door open and the automatic transmission lever is in the P (Park) position.
The driver’s seat returns to the previous position when:
The key is inserted into the ignition switch. The driver’s door is closed with the key turned to LOCK. The key is turned from ACC to ON while the automatic transmission lever is in the P (Park) position.
Page 13 of 14

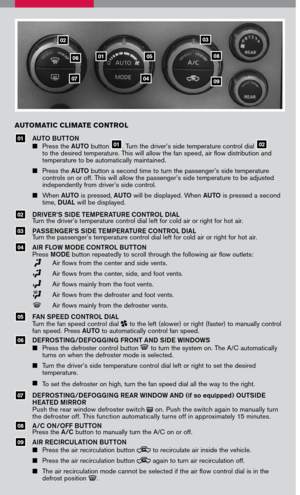
To adjust the seatback, pull up on the lever 01 and lean back. This allows adjustment of the seatback for occupants of different sizes to help obtain proper seat belt fit.
To fold the 2nd row captain’s chair (if so equipped) flat for maximum cargo hauling:
Remove the 2nd row center console (see “Console removal” in the “Instruments and controls” section of the Owner’s Manual).
Pull the strap 02 located in the center of the seat cushion forward, and fold the seat cushion toward the front of the vehicle.
Then lift up on the recline lever 01 to fold the seatback flat forward.
Then fold the carpet panel flap 03 toward the back of the vehicle. (The carpet panel flaps provide a level cargo floor when the 3rd row seats are also folded flat.)
Reverse this process to return the 2nd row captain’s chair to a seating position.
Make sure to properly raise the seatback to an upright position and push the seat cushion down into place.
ADJUSTING AND FOLDING THE 2ND ROW SEAT
TIP UP FOR EASY ENTRY TO THE 3RD ROW
The 2nd row outboard seats can be tipped forward for easy entry or exit from the 3rd
row bench seat. To enter the 3rd row, lift up on the latch 01 located on the upper
corner of the seatback on the 2nd row outboard seats and fold the seatback forward
at an angle at the seat base. This will release the back of the seat so it may be tipped
forward.
Then lift up on the lower corner of the seat base and tip the 2nd row outboard seat
forward. To exit the 3rd row bench seat, lift up on the same latch and fold the
seatback forward onto the seat base. Then, lift up on the seat base and tip it forward.
FOLDING THE 3RD ROW SPLIT BENCH SEAT
To fold the seats flat, disconnect and secure the center seat belt and tongues from the retractor base. Then pull up on the latch 01 located on the
outside corner of each seatback and fold the
seatback forward over the seat base.
To raise the seats, lift the seatbacks and make sure they are fully latched in the upright position.
0102
03
01
0101
Page 14 of 14
This easy-to-use Quick Reference Guide is intended to help you more fully appreciate some of the unique features and functions of your new vehicle. However, it is not intended to replace your Owner’s Manual. The Owner’s Manual contains more detailed information to help you better understand the important safety warnings, features, operation, and maintenance of your vehicle.
QR7E-TA60U1 Printing: September 2006 (10)
Nissan, the Nissan Brand Symbol, “SHIFT_” tagline, Z and Nissan model names are Nissan trademarks. ©2006 Nissan North America, Inc.
Sh ift_