PS-20
POWER STEERING GEAR
Revision: 2006 November2007 350Z
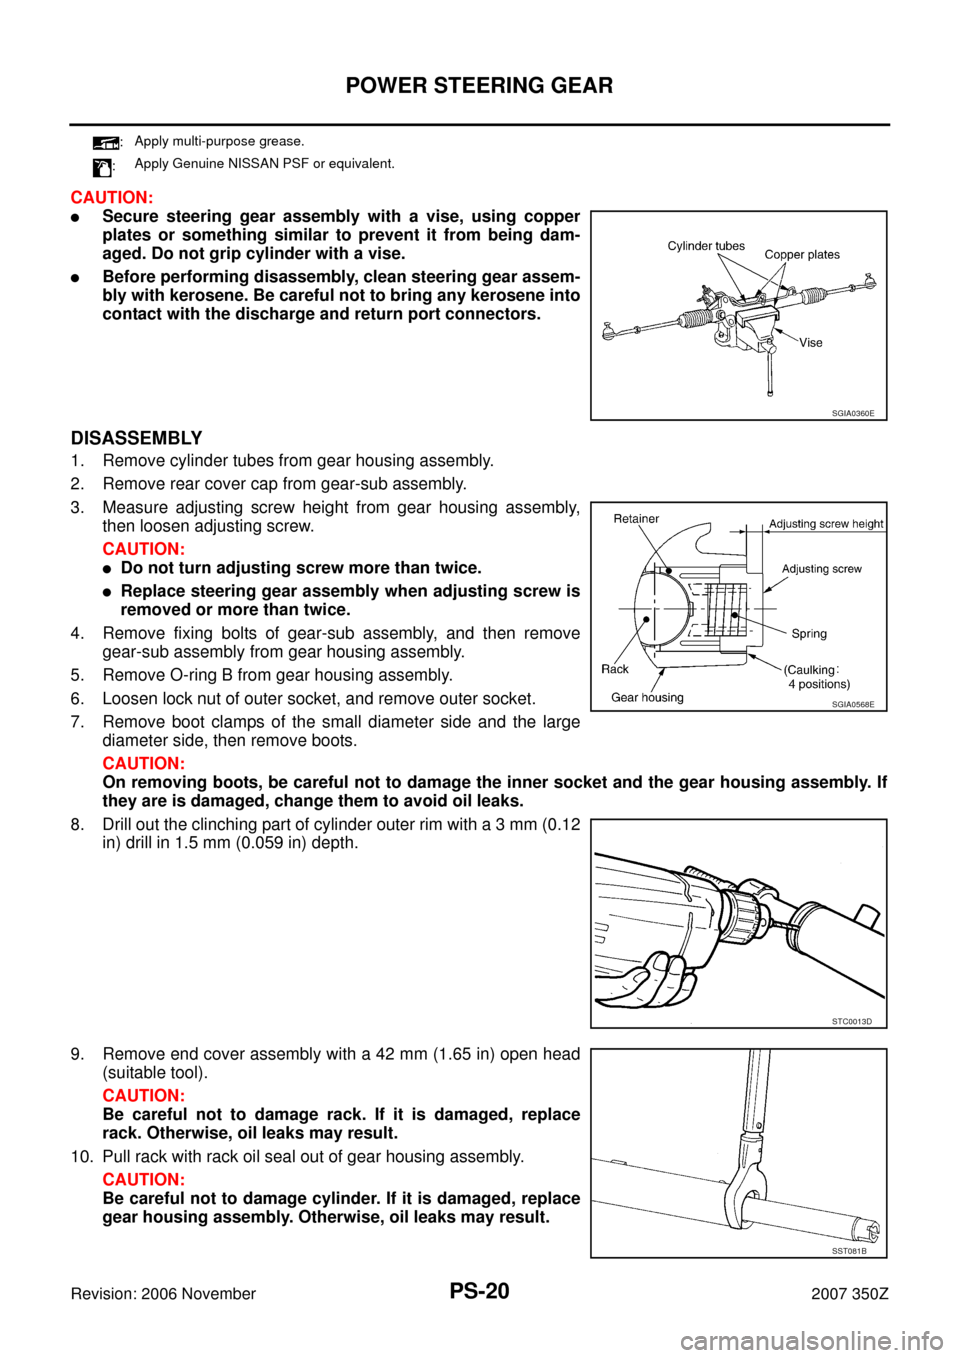
CAUTION:
�Secure steering gear assembly with a vise, using copper
plates or something similar to prevent it from being dam-
aged. Do not grip cylinder with a vise.
�Before performing disassembly, clean steering gear assem-
bly with kerosene. Be careful not to bring any kerosene into
contact with the discharge and return port connectors.
DISASSEMBLY
1. Remove cylinder tubes from gear housing assembly.
2. Remove rear cover cap from gear-sub assembly.
3. Measure adjusting screw height from gear housing assembly,
then loosen adjusting screw.
CAUTION:
�Do not turn adjusting screw more than twice.
�Replace steering gear assembly when adjusting screw is
removed or more than twice.
4. Remove fixing bolts of gear-sub assembly, and then remove
gear-sub assembly from gear housing assembly.
5. Remove O-ring B from gear housing assembly.
6. Loosen lock nut of outer socket, and remove outer socket.
7. Remove boot clamps of the small diameter side and the large
diameter side, then remove boots.
CAUTION:
On removing boots, be careful not to damage the inner socket and the gear housing assembly. If
they are is damaged, change them to avoid oil leaks.
8. Drill out the clinching part of cylinder outer rim with a 3 mm (0.12
in) drill in 1.5 mm (0.059 in) depth.
9. Remove end cover assembly with a 42 mm (1.65 in) open head
(suitable tool).
CAUTION:
Be careful not to damage rack. If it is damaged, replace
rack. Otherwise, oil leaks may result.
10. Pull rack with rack oil seal out of gear housing assembly.
CAUTION:
Be careful not to damage cylinder. If it is damaged, replace
gear housing assembly. Otherwise, oil leaks may result.
:Apply multi-purpose grease.
:Apply Genuine NISSAN PSF or equivalent.
SGIA0360E
SGIA0568E
STC0013D
SST081B
POWER STEERING GEAR
PS-21
C
D
E
F
H
I
J
K
L
MA
B
PS
Revision: 2006 November2007 350Z
11. Heat rack Teflon ring to approximately 40°C (104°F) with a
dryer, then remove it and O-ring A from rack assembly.
CAUTION:
Be careful not to damage rack. If it is damaged, change to a
new one to avoid oil leaks.
12. Use a taped 29 mm (1.14 in) socket and an extension bar.
Remove rack oil seal from gear housing assembly.
CAUTION:
Be careful not to damage gear housing assembly and cylin-
der inner wall. If it is damaged, gear housing assembly
must be replaced. Otherwise, oil leaks will result.
INSPECTION AFTER DISASSEMBLY
Boot
Check boot for cracks and deformation. Replace it, if necessary.
Rack Assembly
Check rack for damage and wear. Replace it, if necessary.
Gear-sub Assembly
�Check pinion gear for damage or wear. Replace if necessary.
�Rotate pinion and check for torque variation or rattle. Replace if necessary.
Gear Housing Assembly
Check gear housing assembly for damage and scratches (inner wall). Replace it, if necessary.
Outer Socket and Inner Socket
Swing Torque
�Hook a spring balance at the point shown in the figure. Confirm
if the reading is within the specification. When ball stud and
inner socket start moving the measured value must be within the
specification. If the reading is outside the specification, replace
socket.
SGIA0151E
SGIA0179E
SGIA0358E
 with a
dryer, then remove it and O-ring A from rack assem")