Page 43 of 82
POWER WINDOW SYSTEM
GW-43
C
D
E
F
G
H
J
K
L
MA
B
GW
Revision: 2006 November2007 350Z
3. CHECK DOOR SWITCH
Check continuity between door switch (driver side) or (passenger side) and ground part of door switch.
OK or NG
OK >> GO TO 4.
NG >> Replace malfunction door switch.
4. CHECK BCM OUTPUT SIGNAL
1. Connect BCM connector.
2. Check voltage between BCM connector M90, B83 terminals 12,
62 and ground.
OK or NG
OK >> Check the condition of the harness and the connector.
NG >> Replace BCM.
TerminalCondition of
door switchContinuity
1Ground part of
door switchPushed No
Released Yes
PIIA3351E
12 (P) – Ground : Battery voltage
62 (L) – Ground : Battery voltage
PIIA6158E
Page 46 of 82
GW-46
POWER WINDOW SYSTEM
Revision: 2006 November2007 350Z
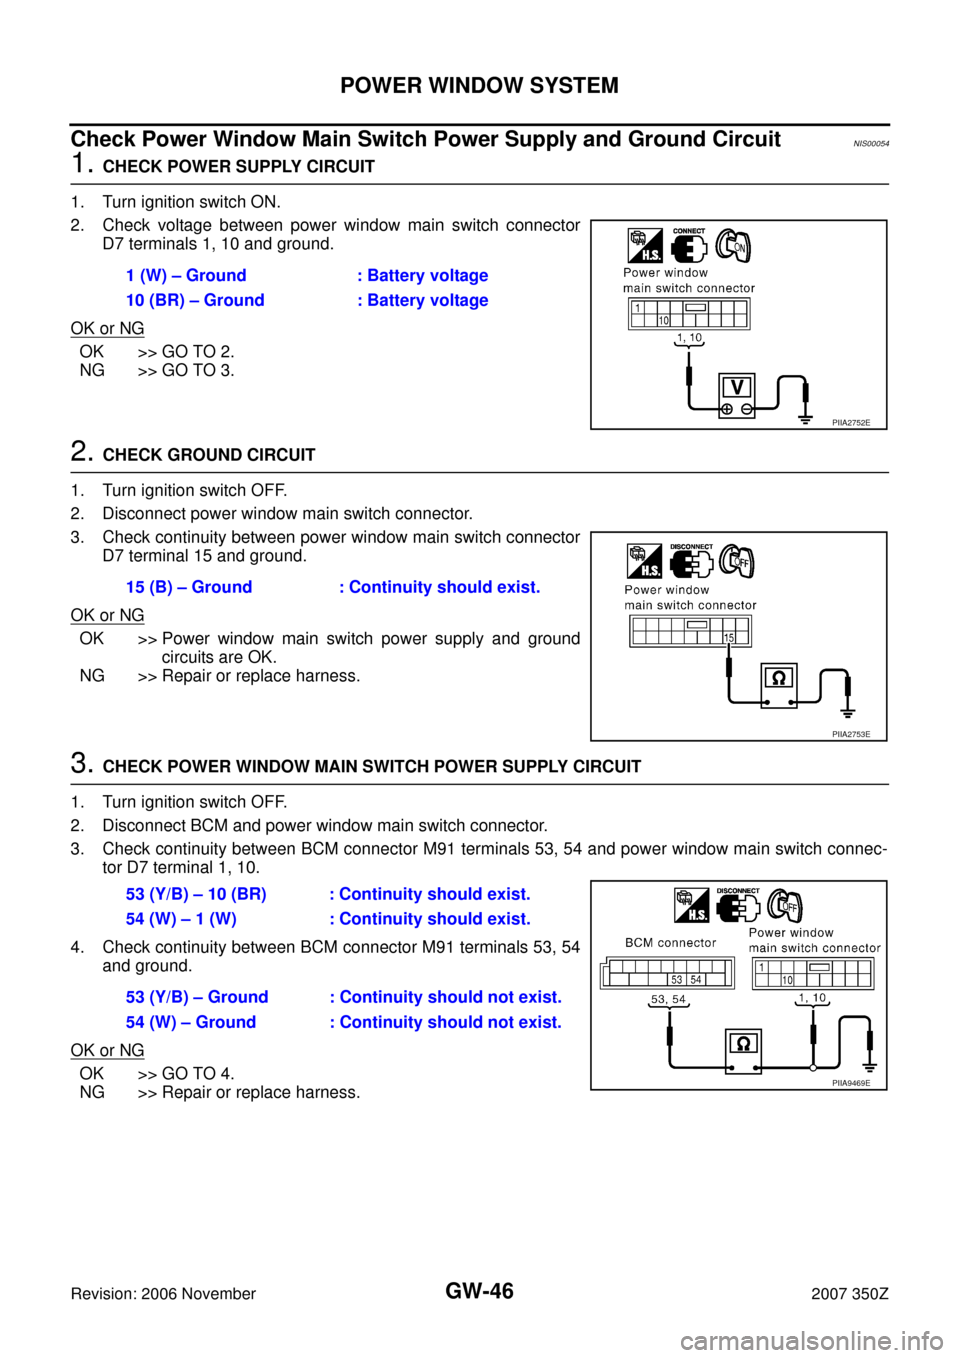
Check Power Window Main Switch Power Supply and Ground CircuitNIS00054
1. CHECK POWER SUPPLY CIRCUIT
1. Turn ignition switch ON.
2. Check voltage between power window main switch connector
D7 terminals 1, 10 and ground.
OK or NG
OK >> GO TO 2.
NG >> GO TO 3.
2. CHECK GROUND CIRCUIT
1. Turn ignition switch OFF.
2. Disconnect power window main switch connector.
3. Check continuity between power window main switch connector
D7 terminal 15 and ground.
OK or NG
OK >> Power window main switch power supply and ground
circuits are OK.
NG >> Repair or replace harness.
3. CHECK POWER WINDOW MAIN SWITCH POWER SUPPLY CIRCUIT
1. Turn ignition switch OFF.
2. Disconnect BCM and power window main switch connector.
3. Check continuity between BCM connector M91 terminals 53, 54 and power window main switch connec-
tor D7 terminal 1, 10.
4. Check continuity between BCM connector M91 terminals 53, 54
and ground.
OK or NG
OK >> GO TO 4.
NG >> Repair or replace harness.1 (W) – Ground : Battery voltage
10 (BR) – Ground : Battery voltage
PIIA2752E
15 (B) – Ground : Continuity should exist.
PIIA2753E
53 (Y/B) – 10 (BR) : Continuity should exist.
54 (W) – 1 (W) : Continuity should exist.
53 (Y/B) – Ground : Continuity should not exist.
54 (W) – Ground : Continuity should not exist.
PIIA9469E
Page 47 of 82
POWER WINDOW SYSTEM
GW-47
C
D
E
F
G
H
J
K
L
MA
B
GW
Revision: 2006 November2007 350Z
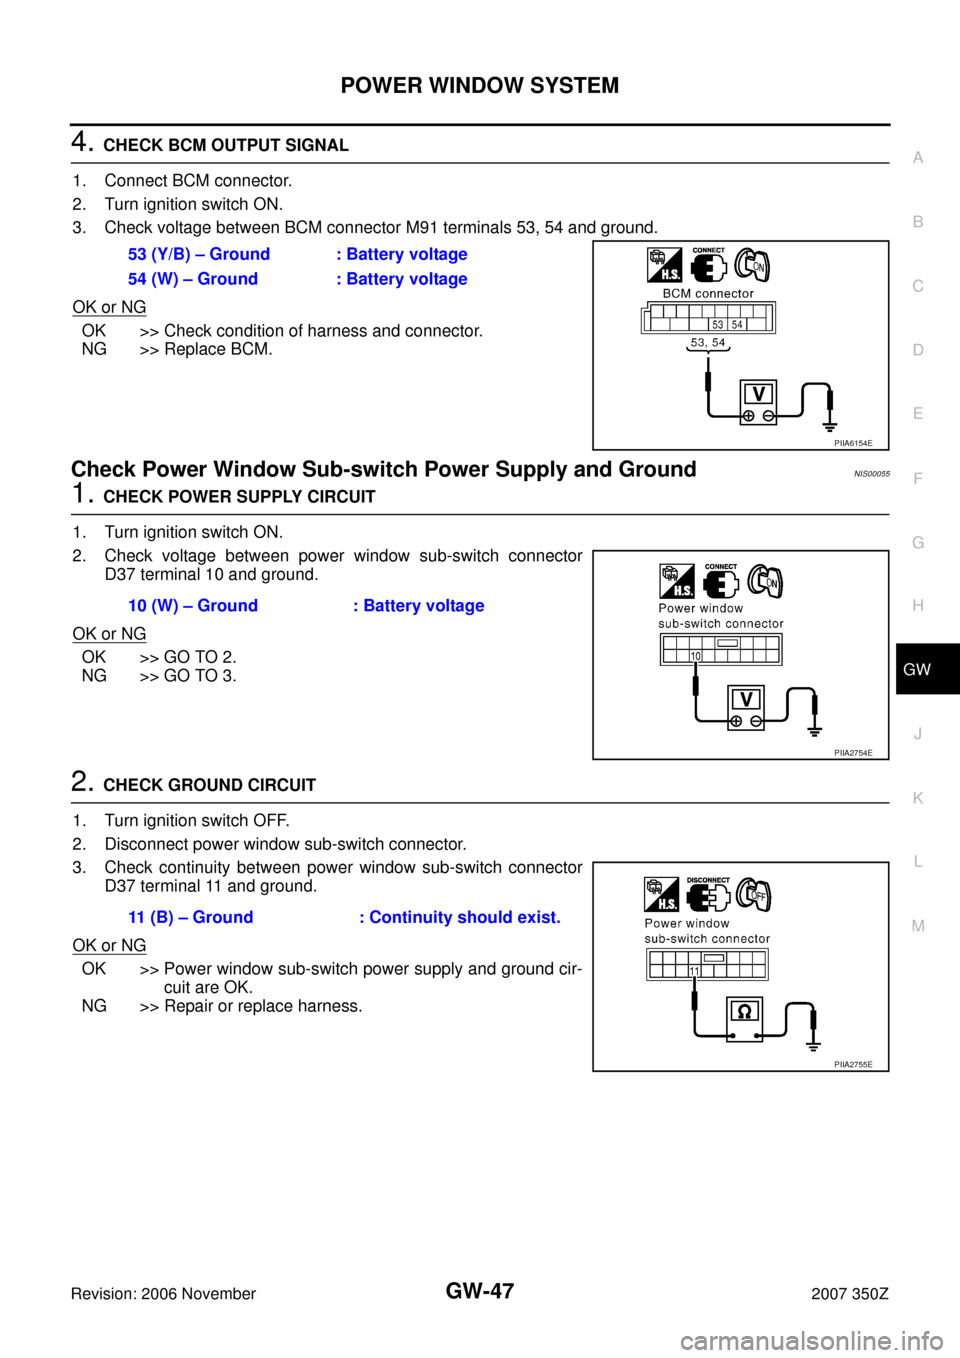
4. CHECK BCM OUTPUT SIGNAL
1. Connect BCM connector.
2. Turn ignition switch ON.
3. Check voltage between BCM connector M91 terminals 53, 54 and ground.
OK or NG
OK >> Check condition of harness and connector.
NG >> Replace BCM.
Check Power Window Sub-switch Power Supply and GroundNIS00055
1. CHECK POWER SUPPLY CIRCUIT
1. Turn ignition switch ON.
2. Check voltage between power window sub-switch connector
D37 terminal 10 and ground.
OK or NG
OK >> GO TO 2.
NG >> GO TO 3.
2. CHECK GROUND CIRCUIT
1. Turn ignition switch OFF.
2. Disconnect power window sub-switch connector.
3. Check continuity between power window sub-switch connector
D37 terminal 11 and ground.
OK or NG
OK >> Power window sub-switch power supply and ground cir-
cuit are OK.
NG >> Repair or replace harness.53 (Y/B) – Ground : Battery voltage
54 (W) – Ground : Battery voltage
PIIA6154E
10 (W) – Ground : Battery voltage
PIIA2754E
11 (B) – Ground : Continuity should exist.
PIIA2755E
Page 50 of 82
GW-50
POWER WINDOW SYSTEM
Revision: 2006 November2007 350Z
5. CHECK POWER WINDOW MAIN SWITCH OUTPUT SIGNAL
1. Connect power window main switch connector.
2. Check voltage between power window main switch connector D7 terminals 6, 7 and ground.
OK or NG
OK >> Check the condition of the harness and the connector.
NG >> Replace power window main switch.6 (B/R) – Ground : Battery voltage
7 (SB) – Ground : Battery voltage
PIIA3352E
Page 67 of 82

REAR WINDOW DEFOGGER
GW-67
C
D
E
F
G
H
J
K
L
MA
B
GW
Revision: 2006 November2007 350Z
Terminal and Reference Value for BCMNIS0005K
Terminal and Reference Value for IPDM E/R.NIS0005L
Terminal and Reference Value for Unified Meter and A/C Amp.NIS0005M
Te r -
minalWire
ColorItemSignal
input/out-
putConditionVoltage (V)
(Approx.)
9L/RRear window defogger
switch signalOutput Rear window defogger switch: Pressed 0
: OFF 5
11 L GIgnition switch ACC power supply
(ACC or ON)InputIgnition switch
(ACC or ON position)Battery voltage
38 W/LIgnition switch ON power supply
(ON or START)InputIgnition switch
(ON or START position)Battery voltage
39 L CAN-HInput/Out-
put——
40 P CAN-LInput/Out-
put——
42 GY Power source (Fuse) Input — Battery voltage
52 B Ground — — 0
55 R Power source (Fusible link) Input — Battery voltage
Te r -
minalWire
ColorItemSignal
input/out-
putConditionVoltage (V)
(Approx.)
5 P Battery power supply Output — Battery voltage
6 W Battery power supply Output — Battery voltage
38 B Ground (Power) — — 0
48 L CAN-HInput/Out-
put——
49 P CAN-LInput/Out-
put——
52 WRear window defogger relay
control signalInput Rear window defogger switch: ON 0
: OFF Battery voltage
60 B Ground (Signal) — — 0
Te r -
minalWire
ColorItemSignal
input/out-
putConditionVoltage (V)
(Approx.)
21 R/W Power source (Fuse) Input — Battery voltage
22 Y/GIgnition switch ON power supply
(ON or START)InputIgnition switch
(ON or START position)Battery voltage
29 B Ground (Power) — — 0
30 B Ground — — 0
38 L/RRear window defogger
switch signalInput Rear window defogger switch.: Pressed 0
: OFF 5
56 B/WRear window defogger
ON signalInput Rear window defogger switch: ON Battery voltage
: OFF 0
72 — Indicator power supply InputIgnition switch
(ON or START position)5
78 —Rear window defogger
indicator signalInput Rear window defogger switch: ON 0
: OFF 5
Page 71 of 82
REAR WINDOW DEFOGGER
GW-71
C
D
E
F
G
H
J
K
L
MA
B
GW
Revision: 2006 November2007 350Z
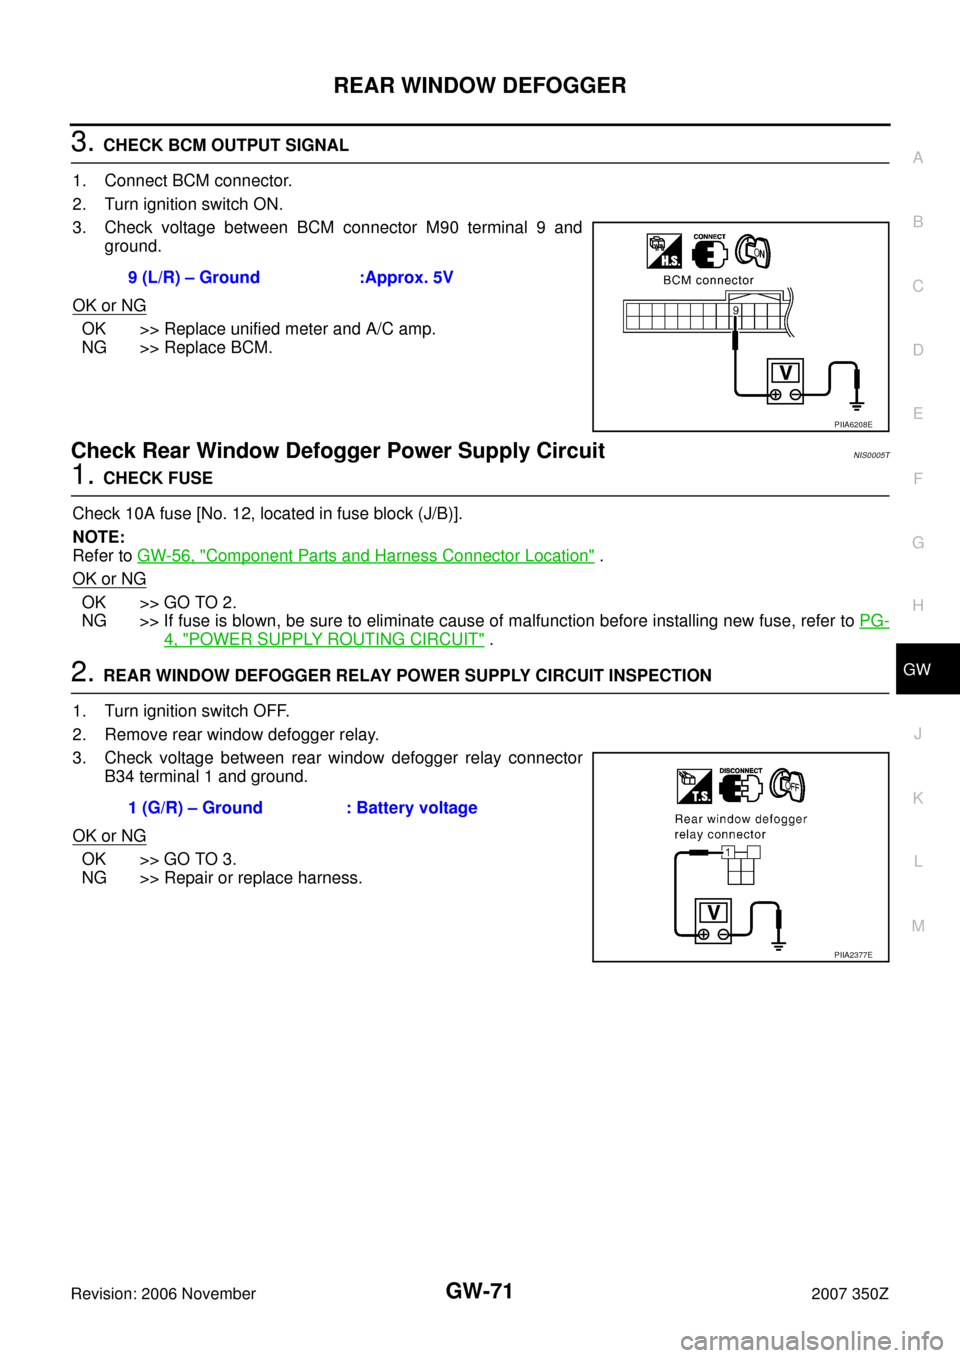
3. CHECK BCM OUTPUT SIGNAL
1. Connect BCM connector.
2. Turn ignition switch ON.
3. Check voltage between BCM connector M90 terminal 9 and
ground.
OK or NG
OK >> Replace unified meter and A/C amp.
NG >> Replace BCM.
Check Rear Window Defogger Power Supply CircuitNIS0005T
1. CHECK FUSE
Check 10A fuse [No. 12, located in fuse block (J/B)].
NOTE:
Refer to GW-56, "
Component Parts and Harness Connector Location" .
OK or NG
OK >> GO TO 2.
NG >> If fuse is blown, be sure to eliminate cause of malfunction before installing new fuse, refer to PG-
4, "POWER SUPPLY ROUTING CIRCUIT" .
2. REAR WINDOW DEFOGGER RELAY POWER SUPPLY CIRCUIT INSPECTION
1. Turn ignition switch OFF.
2. Remove rear window defogger relay.
3. Check voltage between rear window defogger relay connector
B34 terminal 1 and ground.
OK or NG
OK >> GO TO 3.
NG >> Repair or replace harness.9 (L/R) – Ground :Approx. 5V
PIIA6208E
1 (G/R) – Ground : Battery voltage
PIIA2377E
Page 72 of 82
GW-72
REAR WINDOW DEFOGGER
Revision: 2006 November2007 350Z
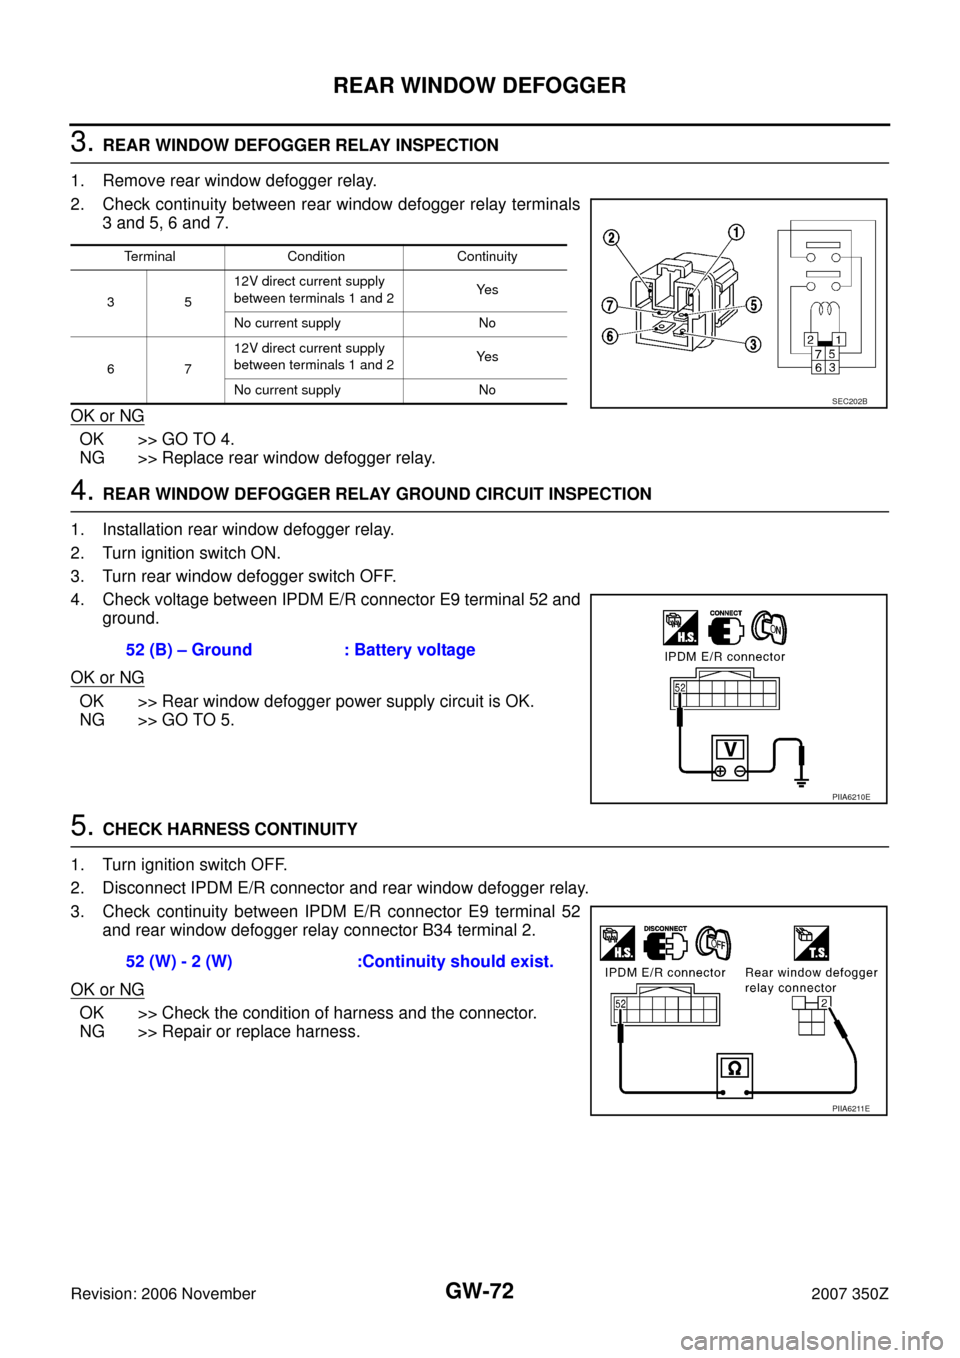
3. REAR WINDOW DEFOGGER RELAY INSPECTION
1. Remove rear window defogger relay.
2. Check continuity between rear window defogger relay terminals
3 and 5, 6 and 7.
OK or NG
OK >> GO TO 4.
NG >> Replace rear window defogger relay.
4. REAR WINDOW DEFOGGER RELAY GROUND CIRCUIT INSPECTION
1. Installation rear window defogger relay.
2. Turn ignition switch ON.
3. Turn rear window defogger switch OFF.
4. Check voltage between IPDM E/R connector E9 terminal 52 and
ground.
OK or NG
OK >> Rear window defogger power supply circuit is OK.
NG >> GO TO 5.
5. CHECK HARNESS CONTINUITY
1. Turn ignition switch OFF.
2. Disconnect IPDM E/R connector and rear window defogger relay.
3. Check continuity between IPDM E/R connector E9 terminal 52
and rear window defogger relay connector B34 terminal 2.
OK or NG
OK >> Check the condition of harness and the connector.
NG >> Repair or replace harness.
Terminal Condition Continuity
3512V direct current supply
between terminals 1 and 2Ye s
No current supply No
6712V direct current supply
between terminals 1 and 2Ye s
No current supply No
SEC202B
52 (B) – Ground : Battery voltage
PIIA6210E
52 (W) - 2 (W) :Continuity should exist.
PIIA6211E
Page 73 of 82
REAR WINDOW DEFOGGER
GW-73
C
D
E
F
G
H
J
K
L
MA
B
GW
Revision: 2006 November2007 350Z
Check Rear Window Defogger Circuit / For CoupeNIS0005U
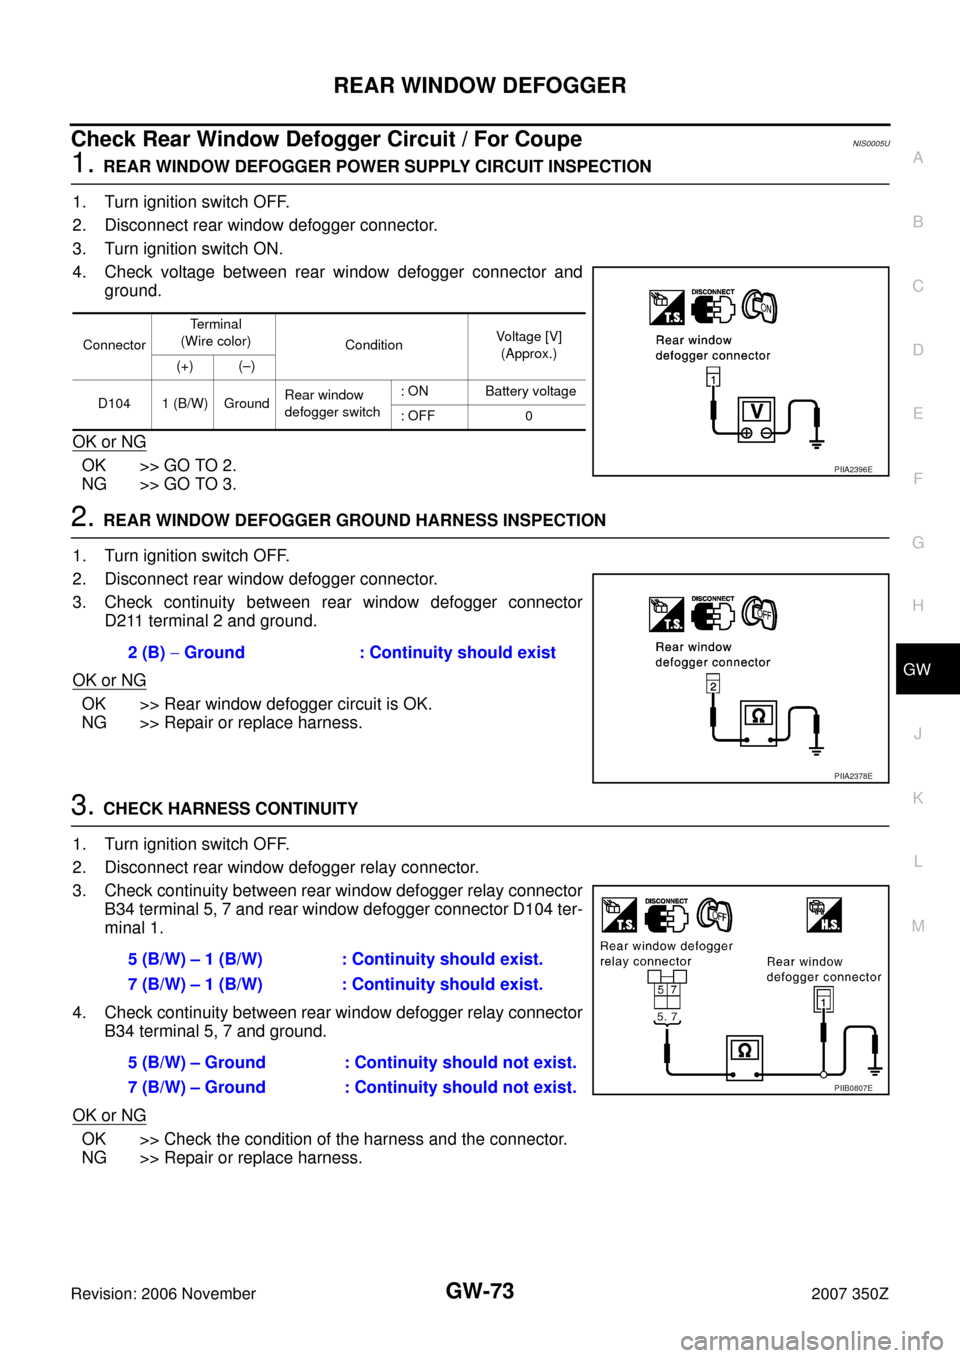
1. REAR WINDOW DEFOGGER POWER SUPPLY CIRCUIT INSPECTION
1. Turn ignition switch OFF.
2. Disconnect rear window defogger connector.
3. Turn ignition switch ON.
4. Check voltage between rear window defogger connector and
ground.
OK or NG
OK >> GO TO 2.
NG >> GO TO 3.
2. REAR WINDOW DEFOGGER GROUND HARNESS INSPECTION
1. Turn ignition switch OFF.
2. Disconnect rear window defogger connector.
3. Check continuity between rear window defogger connector
D211 terminal 2 and ground.
OK or NG
OK >> Rear window defogger circuit is OK.
NG >> Repair or replace harness.
3. CHECK HARNESS CONTINUITY
1. Turn ignition switch OFF.
2. Disconnect rear window defogger relay connector.
3. Check continuity between rear window defogger relay connector
B34 terminal 5, 7 and rear window defogger connector D104 ter-
minal 1.
4. Check continuity between rear window defogger relay connector
B34 terminal 5, 7 and ground.
OK or NG
OK >> Check the condition of the harness and the connector.
NG >> Repair or replace harness.
ConnectorTe r m i n a l
(Wire color)
ConditionVoltage [V]
(Approx.)
(+) (–)
D104 1 (B/W) GroundRear window
defogger switch: ON Battery voltage
: OFF 0
PIIA2396E
2 (B) − Ground : Continuity should exist
PIIA2378E
5 (B/W) – 1 (B/W) : Continuity should exist.
7 (B/W) – 1 (B/W) : Continuity should exist.
5 (B/W) – Ground : Continuity should not exist.
7 (B/W) – Ground : Continuity should not exist.
PIIB0807E