Page 10 of 22

FSU-10
COIL SPRING AND SHOCK ABSORBER
Revision: 2006 November2007 350Z
COIL SPRING AND SHOCK ABSORBERPFP:54302
Removal and InstallationNES00009
REMOVAL
1. Remove tire with power tool.
2. Remove undercover with power tool.
3. Remove harness of wheel sensor from shock absorber. Refer to BRC-73, "
WHEEL SENSORS" (With
TCS), BRC-128, "
WHEEL SENSORS" (With VDC).
CAUTION:
Do not pull on wheel sensor harness.
4. Remove mounting nuts of brake hose from shock absorber.
5. Remove mounting bolt and nut between shock absorber and transverse link with power tool.
6. Remove tower bar. Refer to FSU-20, "
TOWER BAR" .
7. Remove mounting nuts on mounting insulator with power tool, then remove shock absorber from vehicle.
INSTALLATION
�Refer to FSU-8, "Components" for tightening torque. Install in the reverse order of removal.
NOTE:
Refer to component parts location and do not reuse non-reusable parts.
�Perform final tightening of shock absorber lower side (rubber bushing) under unladen condition with tires
on ground. Check wheel alignment. Refer to FSU-21, "
SERVICE DATA AND SPECIFICATIONS (SDS)" .
Disassembly and AssemblyNES0000A
DISASSEMBLY
NOTE:
Make sure piston rod on shock absorber is not damaged when removing components from shock absorber.
1. Install strut attachment (SST) to shock absorber and fix it in a
vise.
CAUTION:
When installing strut attachment (SST) to shock absorber,
wrap a shop cloth around shock absorber to protect it from
damage.
2. Using a spring compressor (commercial service tool), compress
coil spring between spring upper seat and spring lower seat (on
shock absorber) until coil spring is free.
CAUTION:
Be sure spring compressor (commercial service tool) is
securely attached to coil spring. Compress coil spring.
3. Check that coil spring between spring upper seat and spring
lower seat is free and then secure piston rod tip so that piston
rod does not turn, and remove piston rod lock nut.
4. Remove mounting insulator, bound bumper, spring upper seat.
Then remove coil spring from shock absorber.
5. Gradually release spring compressor (commercial service tool),
and remove coil spring.
CAUTION:
Loosen while making sure coil spring attachment position
does not move.
6. Remove strut attachment (SST) from shock absorber.
SEIA0224E
SEIA0218J
Page 11 of 22

COIL SPRING AND SHOCK ABSORBER
FSU-11
C
D
F
G
H
I
J
K
L
MA
B
FSU
Revision: 2006 November2007 350Z
INSPECTION AFTER DISASSEMBLY
Shock Absorber Inspection
�Check shock absorber for deformation, cracks, damage, and replace if necessary.
�Check piston rod for damage, uneven wear, distortion, and replace if necessary.
�Check welded and sealed areas for oil leakage, and replace if necessary.
Mounting Insulator and Rubber Parts Inspection
Check mounting insulator for cracks and rubber parts for wear. Replace them if necessary.
Coil Spring Inspection
Check coil spring for cracks, wear or damage, and replace if necessary.
ASSEMBLY
NOTE:
Make sure piston rod on shock absorber is not damaged when attaching components to shock absorber.
1. Install strut attachment (SST) to shock absorber and fix it in a
vise.
CAUTION:
When installing strut attachment (SST) to shock absorber,
wrap a shop cloth around shock absorber to protect it from
damage.
2. Compress coil spring using a spring compressor (commercial
service tool), and install it onto shock absorber.
CAUTION:
�Install coil spring as shown in the figure.
�Be sure spring compressor (commercial service tool) is
securely attached to coil spring. Compress coil spring.
3. Apply soapy water to bound bumper and insert into mounting
insulator.
CAUTION:
Do not use machine oil.
SEIA0224E
PEIA0074E
Page 12 of 22
FSU-12
COIL SPRING AND SHOCK ABSORBER
Revision: 2006 November2007 350Z
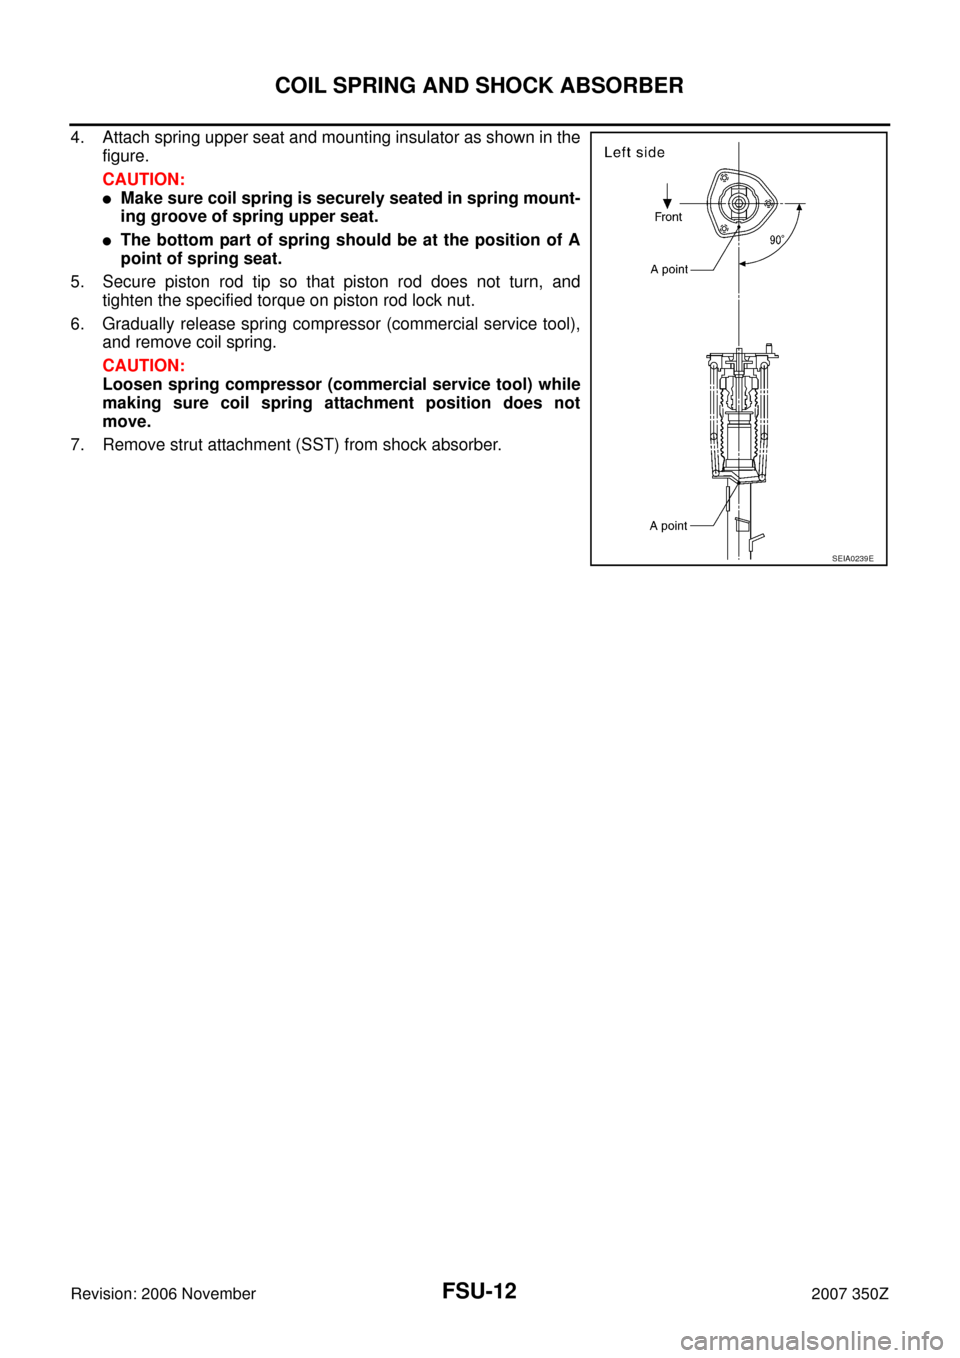
4. Attach spring upper seat and mounting insulator as shown in the
figure.
CAUTION:
�Make sure coil spring is securely seated in spring mount-
ing groove of spring upper seat.
�The bottom part of spring should be at the position of A
point of spring seat.
5. Secure piston rod tip so that piston rod does not turn, and
tighten the specified torque on piston rod lock nut.
6. Gradually release spring compressor (commercial service tool),
and remove coil spring.
CAUTION:
Loosen spring compressor (commercial service tool) while
making sure coil spring attachment position does not
move.
7. Remove strut attachment (SST) from shock absorber.
SEIA0239E