Page 14 of 30

CO-14
RADIATOR
Revision: 2006 November2007 350Z
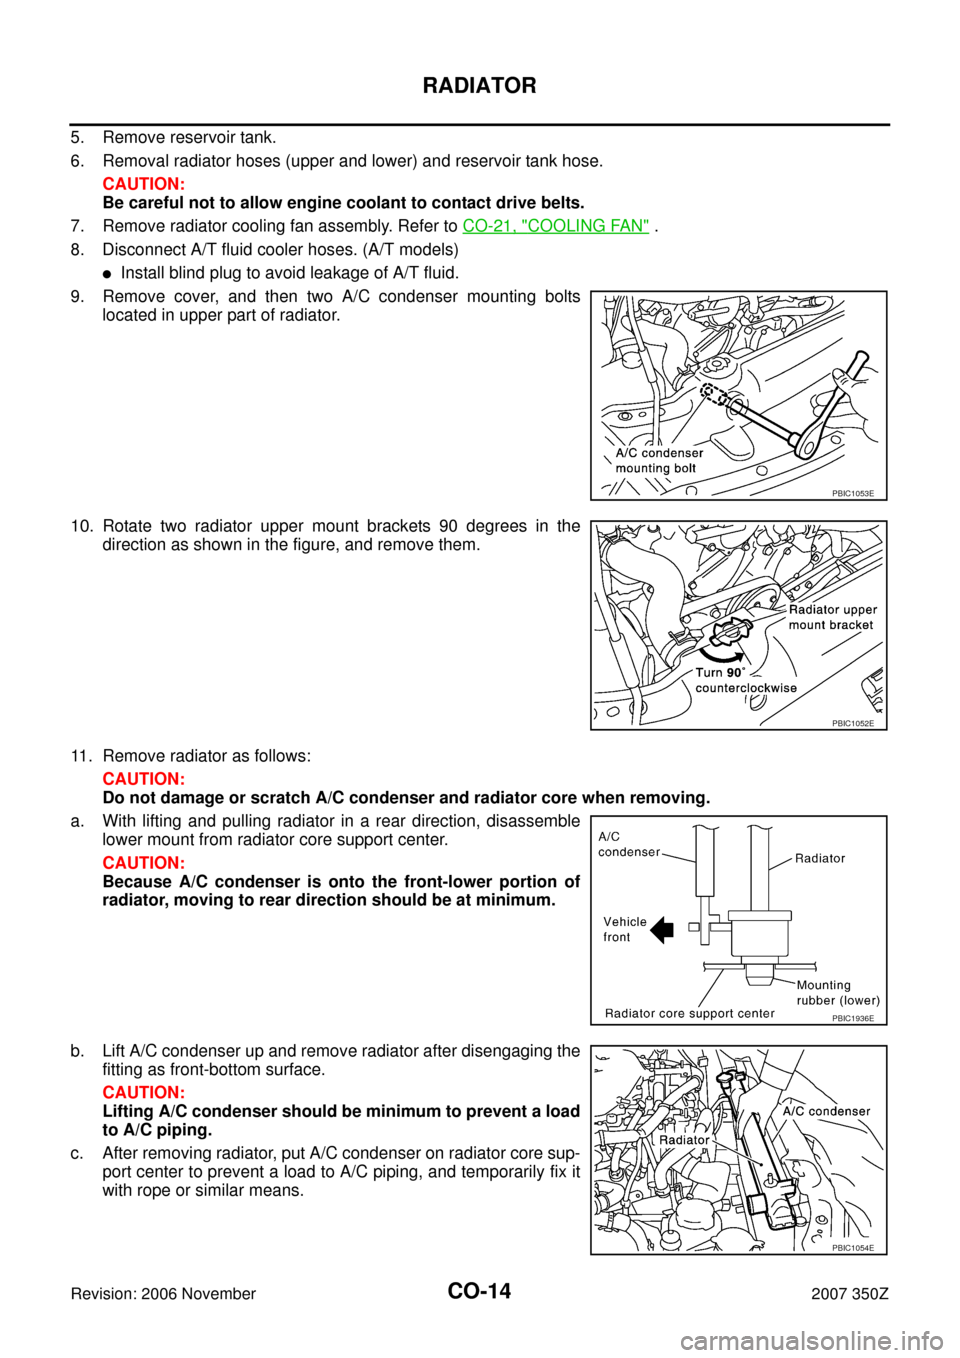
5. Remove reservoir tank.
6. Removal radiator hoses (upper and lower) and reservoir tank hose.
CAUTION:
Be careful not to allow engine coolant to contact drive belts.
7. Remove radiator cooling fan assembly. Refer to CO-21, "
COOLING FAN" .
8. Disconnect A/T fluid cooler hoses. (A/T models)
�Install blind plug to avoid leakage of A/T fluid.
9. Remove cover, and then two A/C condenser mounting bolts
located in upper part of radiator.
10. Rotate two radiator upper mount brackets 90 degrees in the
direction as shown in the figure, and remove them.
11. Remove radiator as follows:
CAUTION:
Do not damage or scratch A/C condenser and radiator core when removing.
a. With lifting and pulling radiator in a rear direction, disassemble
lower mount from radiator core support center.
CAUTION:
Because A/C condenser is onto the front-lower portion of
radiator, moving to rear direction should be at minimum.
b. Lift A/C condenser up and remove radiator after disengaging the
fitting as front-bottom surface.
CAUTION:
Lifting A/C condenser should be minimum to prevent a load
to A/C piping.
c. After removing radiator, put A/C condenser on radiator core sup-
port center to prevent a load to A/C piping, and temporarily fix it
with rope or similar means.
PBIC1053E
PBIC1052E
PBIC1936E
PBIC1054E
Page 15 of 30

RADIATOR
CO-15
C
D
E
F
G
H
I
J
K
L
MA
CO
Revision: 2006 November2007 350Z
INSTALLATION
Installation is the reverse order of removal.
INSPECTION AFTER INSTALLATION
�Check for leaks of engine coolant using radiator cap tester adapter (commercial service tool) and radiator
cap tester (commercial service tool). Refer to CO-10, "
LEAK CHECK" .
�Start and warm up engine. Visually make sure that there is no leaks of engine coolant and A/T fluid.
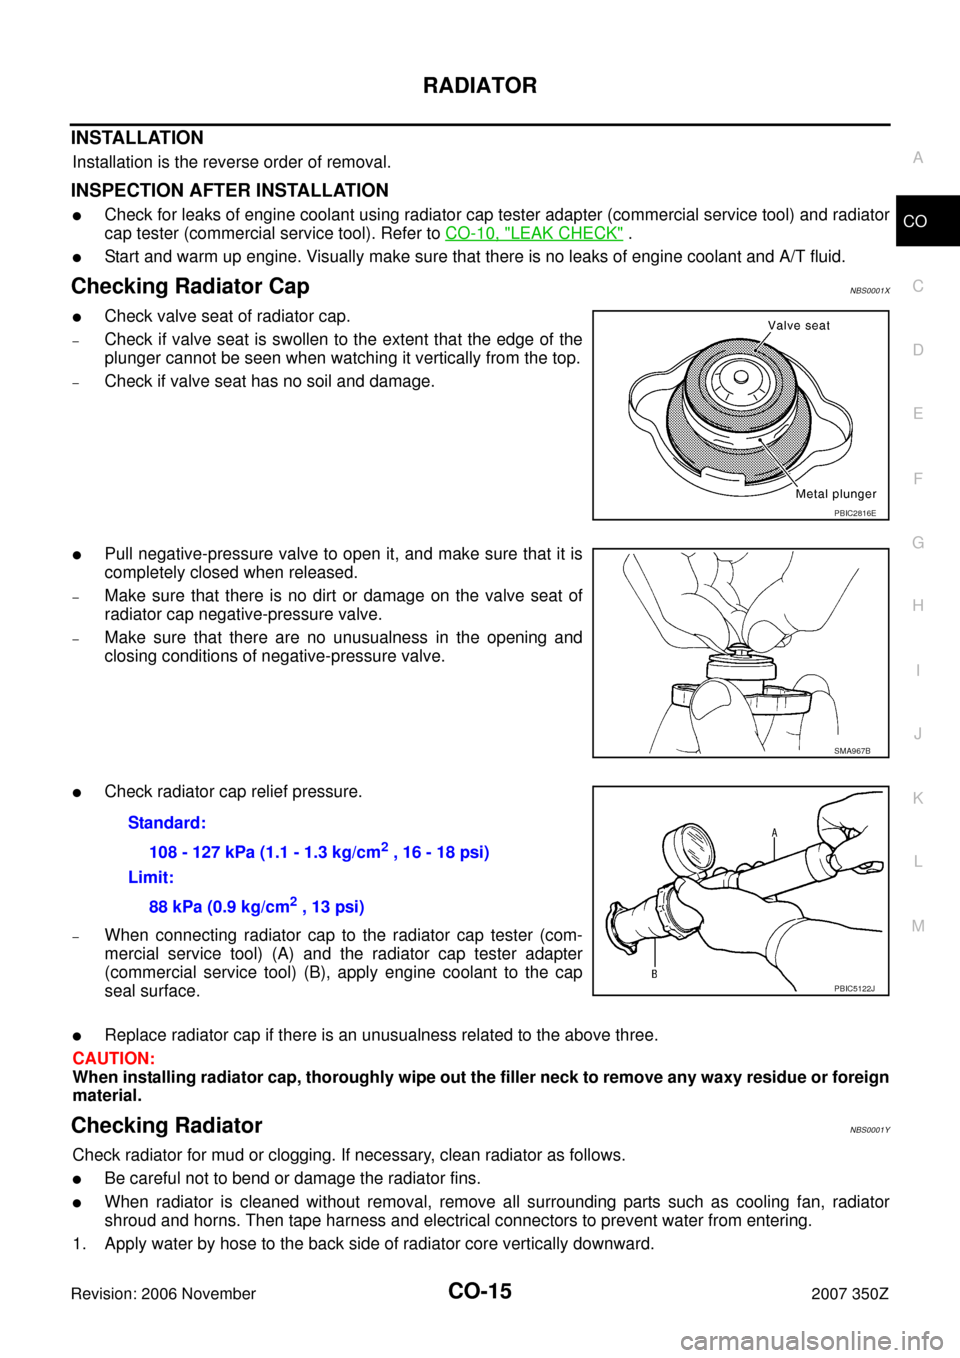
Checking Radiator Cap NBS0001X
�Check valve seat of radiator cap.
–Check if valve seat is swollen to the extent that the edge of the
plunger cannot be seen when watching it vertically from the top.
–Check if valve seat has no soil and damage.
�Pull negative-pressure valve to open it, and make sure that it is
completely closed when released.
–Make sure that there is no dirt or damage on the valve seat of
radiator cap negative-pressure valve.
–Make sure that there are no unusualness in the opening and
closing conditions of negative-pressure valve.
�Check radiator cap relief pressure.
–When connecting radiator cap to the radiator cap tester (com-
mercial service tool) (A) and the radiator cap tester adapter
(commercial service tool) (B), apply engine coolant to the cap
seal surface.
�Replace radiator cap if there is an unusualness related to the above three.
CAUTION:
When installing radiator cap, thoroughly wipe out the filler neck to remove any waxy residue or foreign
material.
Checking Radiator NBS0001Y
Check radiator for mud or clogging. If necessary, clean radiator as follows.
�Be careful not to bend or damage the radiator fins.
�When radiator is cleaned without removal, remove all surrounding parts such as cooling fan, radiator
shroud and horns. Then tape harness and electrical connectors to prevent water from entering.
1. Apply water by hose to the back side of radiator core vertically downward.
PBIC2816E
SMA967B
Standard:
108 - 127 kPa (1.1 - 1.3 kg/cm
2 , 16 - 18 psi)
Limit:
88 kPa (0.9 kg/cm
2 , 13 psi)
PBIC5122J
Page 21 of 30

COOLING FAN
CO-21
C
D
E
F
G
H
I
J
K
L
MA
CO
Revision: 2006 November2007 350Z
COOLING FANPFP:21140
Removal and InstallationNBS00020
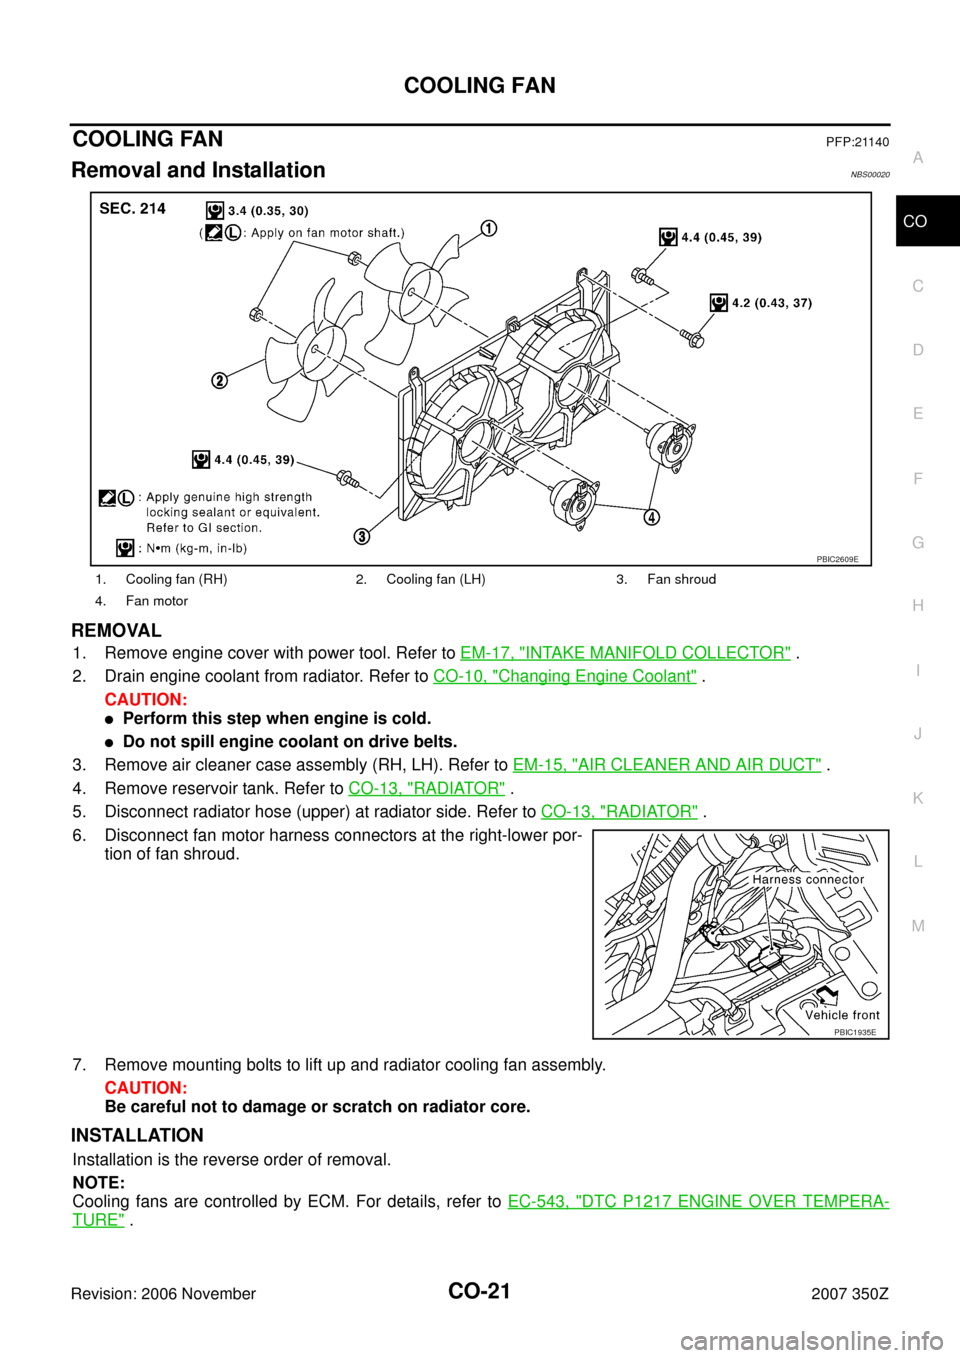
REMOVAL
1. Remove engine cover with power tool. Refer to EM-17, "INTAKE MANIFOLD COLLECTOR" .
2. Drain engine coolant from radiator. Refer to CO-10, "
Changing Engine Coolant" .
CAUTION:
�Perform this step when engine is cold.
�Do not spill engine coolant on drive belts.
3. Remove air cleaner case assembly (RH, LH). Refer to EM-15, "
AIR CLEANER AND AIR DUCT" .
4. Remove reservoir tank. Refer to CO-13, "
RADIATOR" .
5. Disconnect radiator hose (upper) at radiator side. Refer to CO-13, "
RADIATOR" .
6. Disconnect fan motor harness connectors at the right-lower por-
tion of fan shroud.
7. Remove mounting bolts to lift up and radiator cooling fan assembly.
CAUTION:
Be careful not to damage or scratch on radiator core.
INSTALLATION
Installation is the reverse order of removal.
NOTE:
Cooling fans are controlled by ECM. For details, refer to EC-543, "
DTC P1217 ENGINE OVER TEMPERA-
TURE" .
1. Cooling fan (RH) 2. Cooling fan (LH) 3. Fan shroud
4. Fan motor
PBIC2609E
PBIC1935E
Page 22 of 30
CO-22
COOLING FAN
Revision: 2006 November2007 350Z
Disassembly and Assembly NBS00021
DISASSEMBLY
1. Remove cooling fans (RH and LH) from fan motors.
2. Remove fan motors from fan shroud.
INSPECTION AFTER DISASSEMBLY
Cooling Fan
Inspect cooling fan for crack or unusual bend.
�If anything is found, replace cooling fan.
ASSEMBLY
Assembly is the reverse order of disassembly.
CAUTION:
RH and LH cooling fans are different. Be careful not to misassemble them.