RADIATOR
CO-13
C
D
E
F
G
H
I
J
K
L
MA
CO
Revision: 2006 November2007 350Z
RADIATORPFP:21400
Removal and InstallationNBS0001W
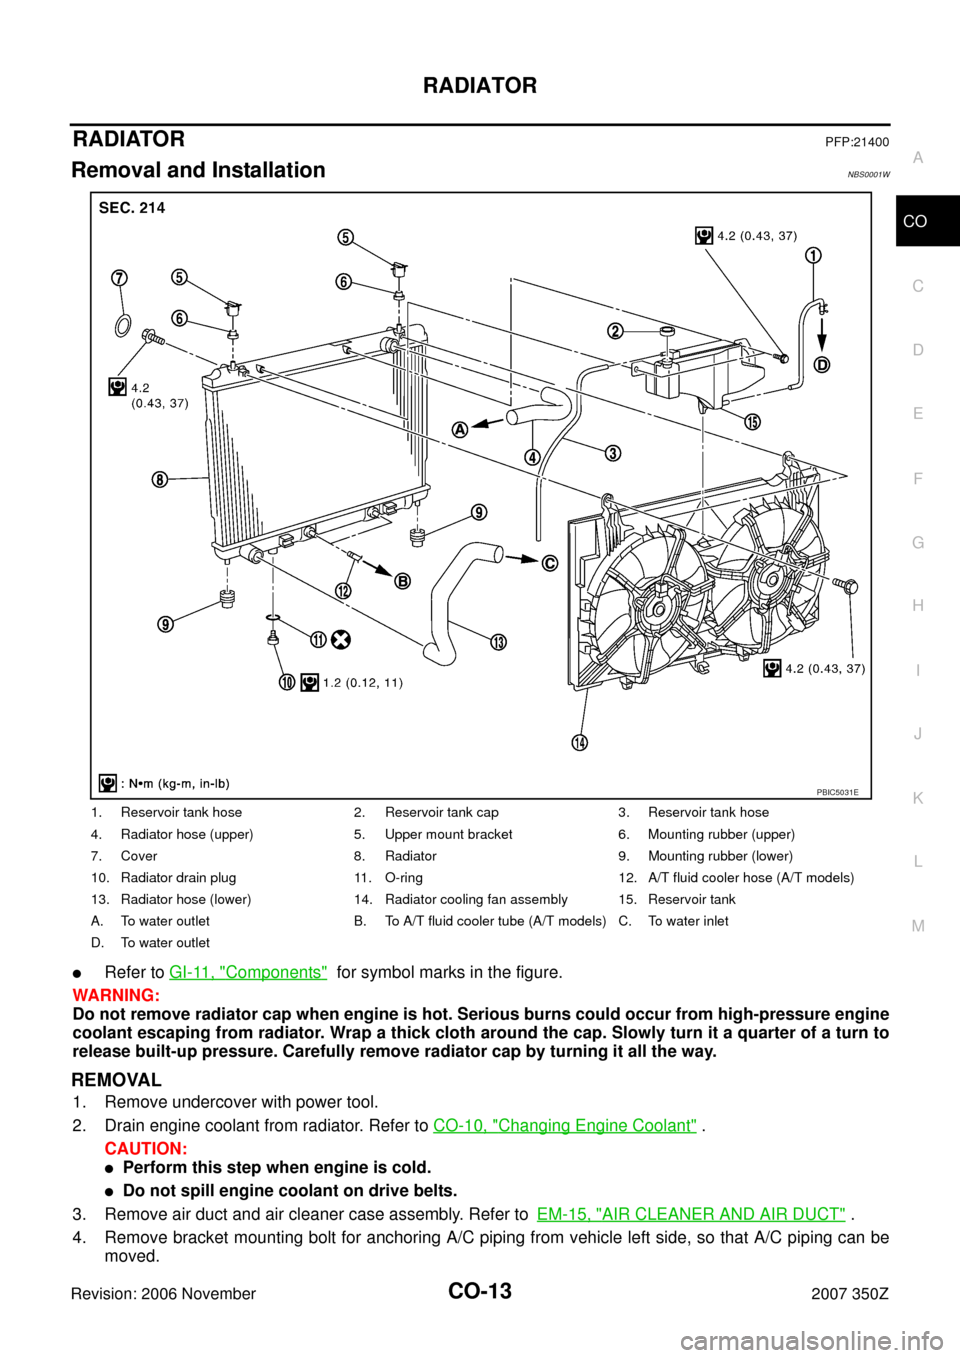
�Refer to GI-11, "Components" for symbol marks in the figure.
WARNING:
Do not remove radiator cap when engine is hot. Serious burns could occur from high-pressure engine
coolant escaping from radiator. Wrap a thick cloth around the cap. Slowly turn it a quarter of a turn to
release built-up pressure. Carefully remove radiator cap by turning it all the way.
REMOVAL
1. Remove undercover with power tool.
2. Drain engine coolant from radiator. Refer to CO-10, "
Changing Engine Coolant" .
CAUTION:
�Perform this step when engine is cold.
�Do not spill engine coolant on drive belts.
3. Remove air duct and air cleaner case assembly. Refer toEM-15, "
AIR CLEANER AND AIR DUCT" .
4. Remove bracket mounting bolt for anchoring A/C piping from vehicle left side, so that A/C piping can be
moved.
1. Reservoir tank hose 2. Reservoir tank cap 3. Reservoir tank hose
4. Radiator hose (upper) 5. Upper mount bracket 6. Mounting rubber (upper)
7. Cover 8. Radiator 9. Mounting rubber (lower)
10. Radiator drain plug 11. O-ring 12. A/T fluid cooler hose (A/T models)
13. Radiator hose (lower) 14. Radiator cooling fan assembly 15. Reservoir tank
A. To water outlet B. To A/T fluid cooler tube (A/T models) C. To water inlet
D. To water outlet
PBIC5031E
COOLING FAN
CO-21
C
D
E
F
G
H
I
J
K
L
MA
CO
Revision: 2006 November2007 350Z
COOLING FANPFP:21140
Removal and InstallationNBS00020
REMOVAL
1. Remove engine cover with power tool. Refer to EM-17, "INTAKE MANIFOLD COLLECTOR" .
2. Drain engine coolant from radiator. Refer to CO-10, "
Changing Engine Coolant" .
CAUTION:
�Perform this step when engine is cold.
�Do not spill engine coolant on drive belts.
3. Remove air cleaner case assembly (RH, LH). Refer to EM-15, "
AIR CLEANER AND AIR DUCT" .
4. Remove reservoir tank. Refer to CO-13, "
RADIATOR" .
5. Disconnect radiator hose (upper) at radiator side. Refer to CO-13, "
RADIATOR" .
6. Disconnect fan motor harness connectors at the right-lower por-
tion of fan shroud.
7. Remove mounting bolts to lift up and radiator cooling fan assembly.
CAUTION:
Be careful not to damage or scratch on radiator core.
INSTALLATION
Installation is the reverse order of removal.
NOTE:
Cooling fans are controlled by ECM. For details, refer to EC-543, "
DTC P1217 ENGINE OVER TEMPERA-
TURE" .
1. Cooling fan (RH) 2. Cooling fan (LH) 3. Fan shroud
4. Fan motor
PBIC2609E
PBIC1935E