Page 525 of 720
DTC P0850 PNP SWITCH
EC-525
C
D
E
F
G
H
I
J
K
L
MA
EC
Revision: 2006 November2007 350Z
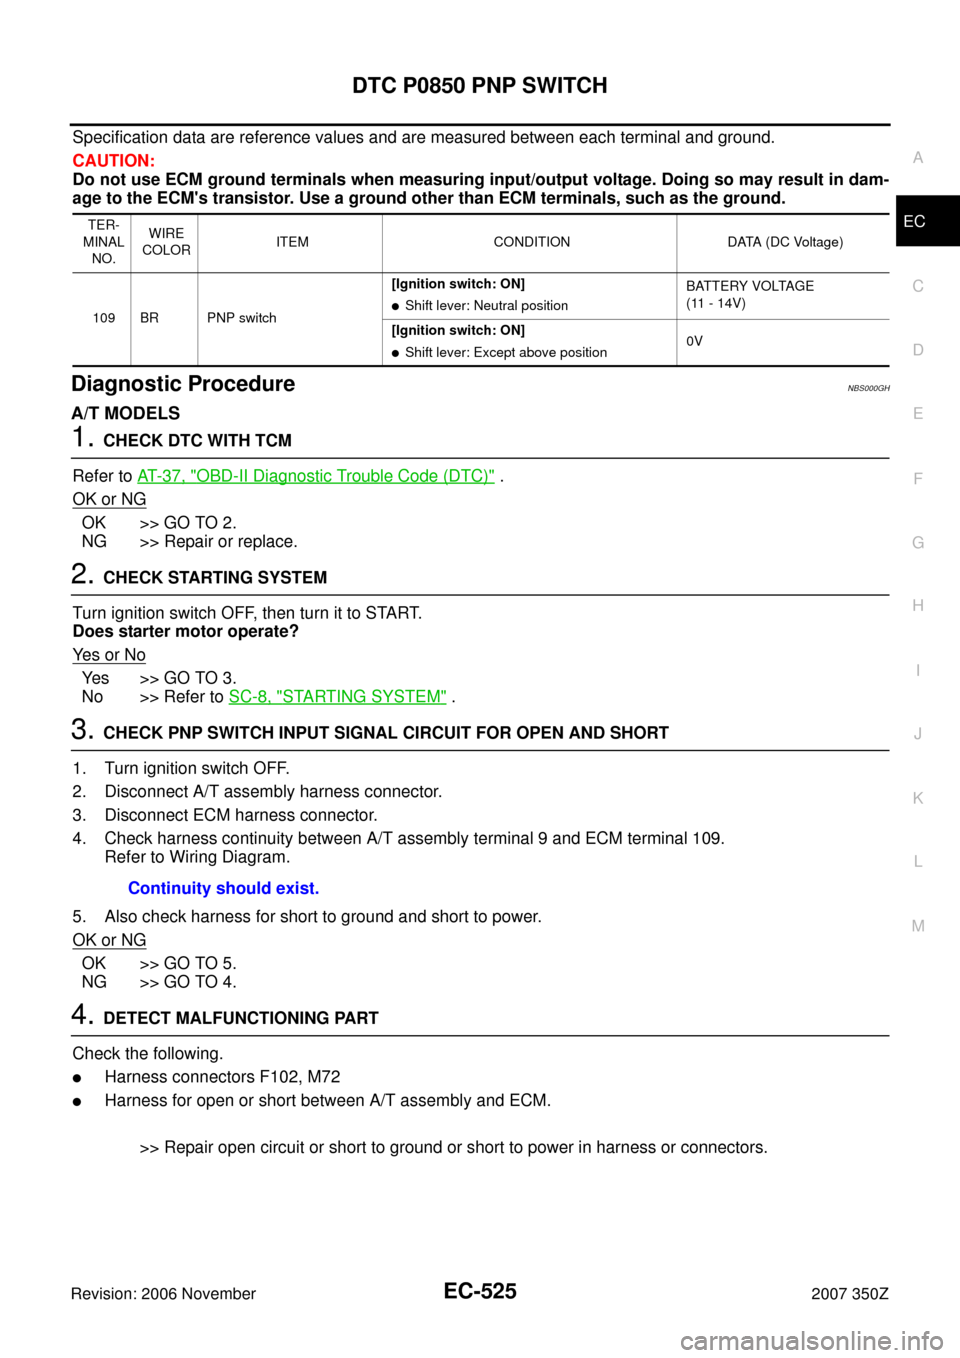
Specification data are reference values and are measured between each terminal and ground.
CAUTION:
Do not use ECM ground terminals when measuring input/output voltage. Doing so may result in dam-
age to the ECM's transistor. Use a ground other than ECM terminals, such as the ground.
Diagnostic ProcedureNBS000GH
A/T MODELS
1. CHECK DTC WITH TCM
Refer to AT- 3 7 , "
OBD-II Diagnostic Trouble Code (DTC)" .
OK or NG
OK >> GO TO 2.
NG >> Repair or replace.
2. CHECK STARTING SYSTEM
Turn ignition switch OFF, then turn it to START.
Does starter motor operate?
Ye s o r N o
Ye s > > G O T O 3 .
No >> Refer to SC-8, "
STARTING SYSTEM" .
3. CHECK PNP SWITCH INPUT SIGNAL CIRCUIT FOR OPEN AND SHORT
1. Turn ignition switch OFF.
2. Disconnect A/T assembly harness connector.
3. Disconnect ECM harness connector.
4. Check harness continuity between A/T assembly terminal 9 and ECM terminal 109.
Refer to Wiring Diagram.
5. Also check harness for short to ground and short to power.
OK or NG
OK >> GO TO 5.
NG >> GO TO 4.
4. DETECT MALFUNCTIONING PART
Check the following.
�Harness connectors F102, M72
�Harness for open or short between A/T assembly and ECM.
>> Repair open circuit or short to ground or short to power in harness or connectors.
TER-
MINAL
NO.WIRE
COLORITEM CONDITION DATA (DC Voltage)
109 BR PNP switch[Ignition switch: ON]
�Shift lever: Neutral positionBATTERY VOLTAGE
(11 - 14V)
[Ignition switch: ON]
�Shift lever: Except above position0V
Continuity should exist.
Page 526 of 720
EC-526
DTC P0850 PNP SWITCH
Revision: 2006 November2007 350Z
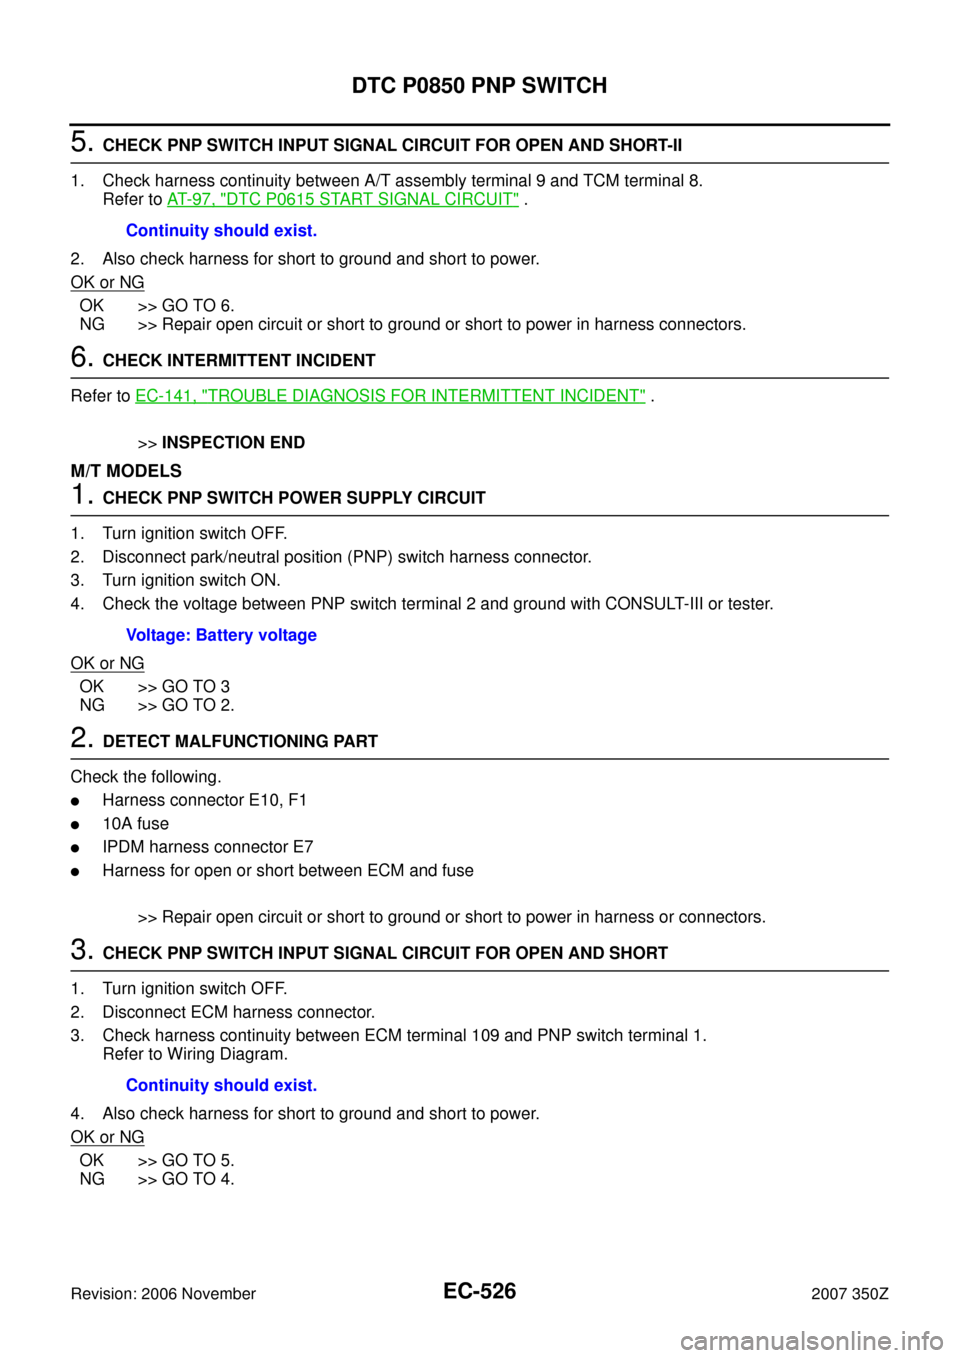
5. CHECK PNP SWITCH INPUT SIGNAL CIRCUIT FOR OPEN AND SHORT-II
1. Check harness continuity between A/T assembly terminal 9 and TCM terminal 8.
Refer to AT- 9 7 , "
DTC P0615 START SIGNAL CIRCUIT" .
2. Also check harness for short to ground and short to power.
OK or NG
OK >> GO TO 6.
NG >> Repair open circuit or short to ground or short to power in harness connectors.
6. CHECK INTERMITTENT INCIDENT
Refer to EC-141, "
TROUBLE DIAGNOSIS FOR INTERMITTENT INCIDENT" .
>>INSPECTION END
M/T MODELS
1. CHECK PNP SWITCH POWER SUPPLY CIRCUIT
1. Turn ignition switch OFF.
2. Disconnect park/neutral position (PNP) switch harness connector.
3. Turn ignition switch ON.
4. Check the voltage between PNP switch terminal 2 and ground with CONSULT-III or tester.
OK or NG
OK >> GO TO 3
NG >> GO TO 2.
2. DETECT MALFUNCTIONING PART
Check the following.
�Harness connector E10, F1
�10A fuse
�IPDM harness connector E7
�Harness for open or short between ECM and fuse
>> Repair open circuit or short to ground or short to power in harness or connectors.
3. CHECK PNP SWITCH INPUT SIGNAL CIRCUIT FOR OPEN AND SHORT
1. Turn ignition switch OFF.
2. Disconnect ECM harness connector.
3. Check harness continuity between ECM terminal 109 and PNP switch terminal 1.
Refer to Wiring Diagram.
4. Also check harness for short to ground and short to power.
OK or NG
OK >> GO TO 5.
NG >> GO TO 4.Continuity should exist.
Voltage: Battery voltage
Continuity should exist.
Page 530 of 720
EC-530
DTC P1078 P1084 EVT CONTROL POSITION SENSOR
Revision: 2006 November2007 350Z
Wiring DiagramNBS000BN
BANK 1
TBWT1656E
Page 535 of 720
DTC P1078 P1084 EVT CONTROL POSITION SENSOR
EC-535
C
D
E
F
G
H
I
J
K
L
MA
EC
Revision: 2006 November2007 350Z
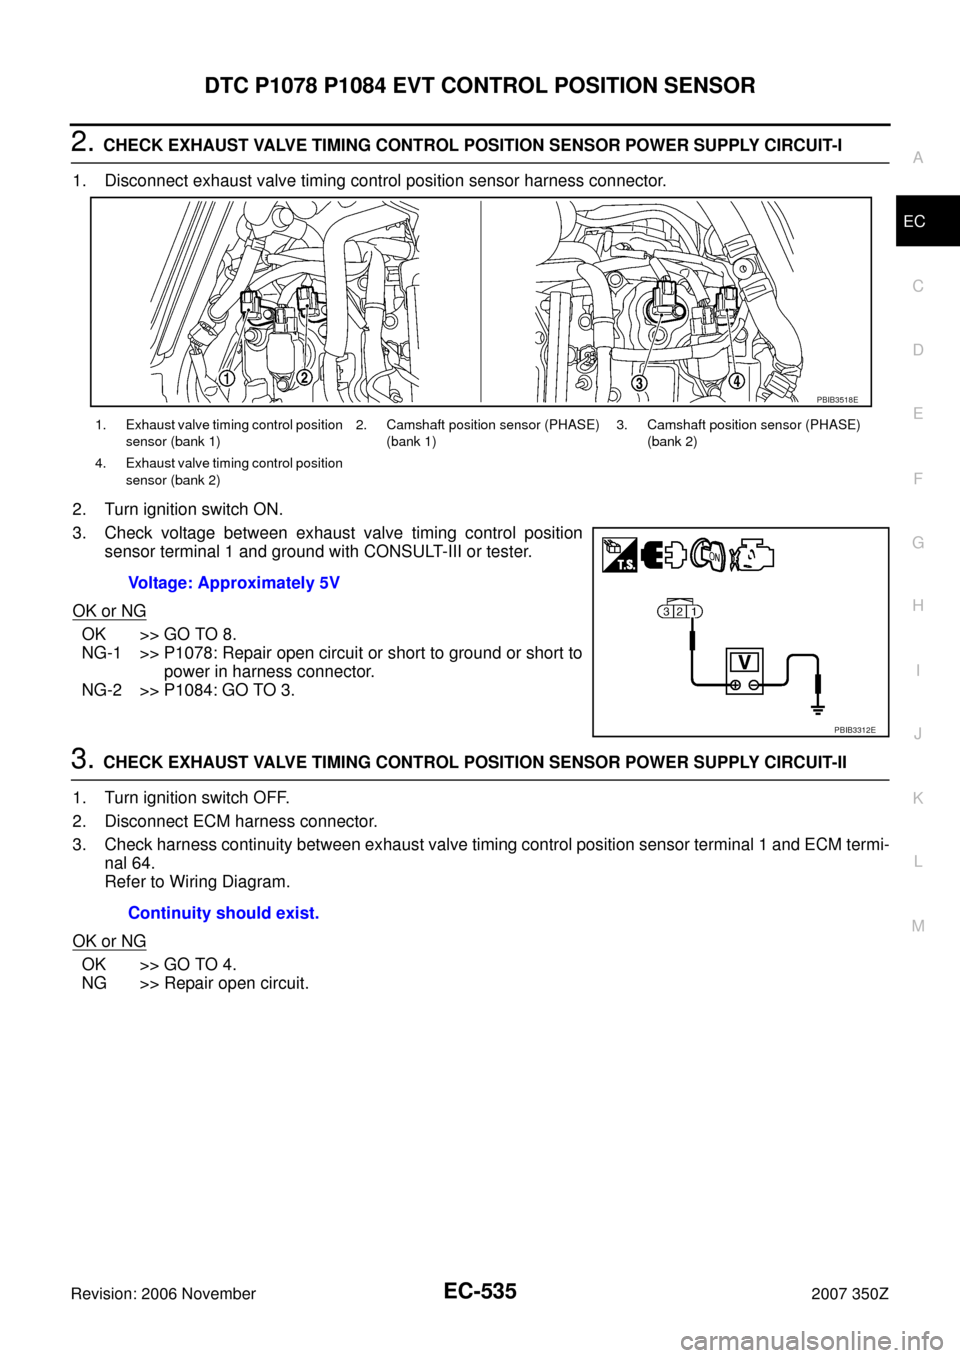
2. CHECK EXHAUST VALVE TIMING CONTROL POSITION SENSOR POWER SUPPLY CIRCUIT-I
1. Disconnect exhaust valve timing control position sensor harness connector.
2. Turn ignition switch ON.
3. Check voltage between exhaust valve timing control position
sensor terminal 1 and ground with CONSULT-III or tester.
OK or NG
OK >> GO TO 8.
NG-1 >> P1078: Repair open circuit or short to ground or short to
power in harness connector.
NG-2 >> P1084: GO TO 3.
3. CHECK EXHAUST VALVE TIMING CONTROL POSITION SENSOR POWER SUPPLY CIRCUIT-II
1. Turn ignition switch OFF.
2. Disconnect ECM harness connector.
3. Check harness continuity between exhaust valve timing control position sensor terminal 1 and ECM termi-
nal 64.
Refer to Wiring Diagram.
OK or NG
OK >> GO TO 4.
NG >> Repair open circuit.
1. Exhaust valve timing control position
sensor (bank 1)2. Camshaft position sensor (PHASE)
(bank 1)3. Camshaft position sensor (PHASE)
(bank 2)
4. Exhaust valve timing control position
sensor (bank 2)
Voltage: Approximately 5V
PBIB3518E
PBIB3312E
Continuity should exist.
Page 536 of 720
EC-536
DTC P1078 P1084 EVT CONTROL POSITION SENSOR
Revision: 2006 November2007 350Z
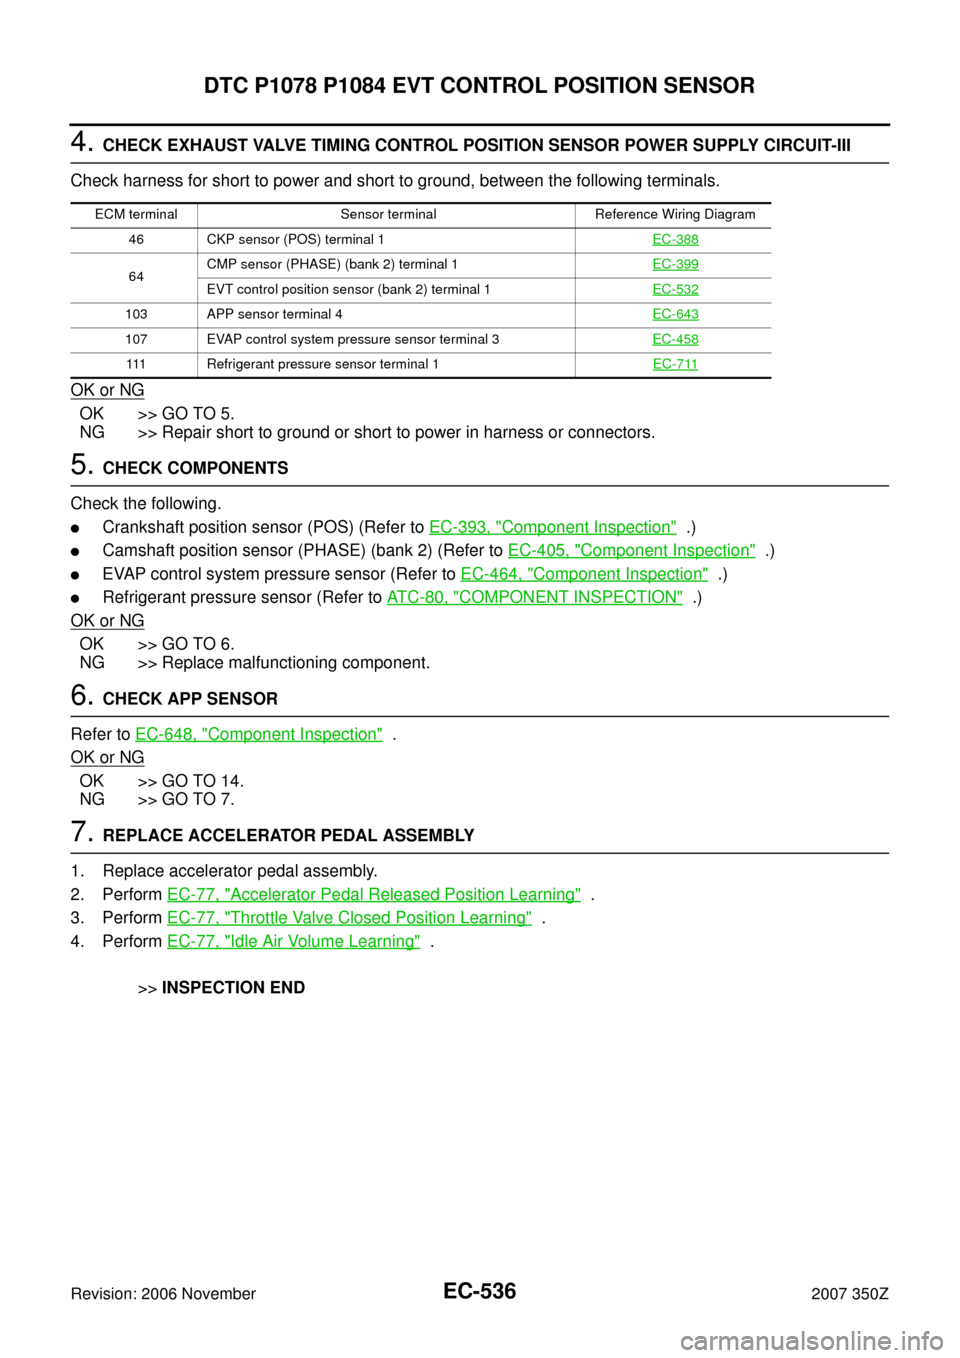
4. CHECK EXHAUST VALVE TIMING CONTROL POSITION SENSOR POWER SUPPLY CIRCUIT-III
Check harness for short to power and short to ground, between the following terminals.
OK or NG
OK >> GO TO 5.
NG >> Repair short to ground or short to power in harness or connectors.
5. CHECK COMPONENTS
Check the following.
�Crankshaft position sensor (POS) (Refer to EC-393, "Component Inspection" .)
�Camshaft position sensor (PHASE) (bank 2) (Refer to EC-405, "Component Inspection" .)
�EVAP control system pressure sensor (Refer to EC-464, "Component Inspection" .)
�Refrigerant pressure sensor (Refer to AT C - 8 0 , "COMPONENT INSPECTION" .)
OK or NG
OK >> GO TO 6.
NG >> Replace malfunctioning component.
6. CHECK APP SENSOR
Refer to EC-648, "
Component Inspection" .
OK or NG
OK >> GO TO 14.
NG >> GO TO 7.
7. REPLACE ACCELERATOR PEDAL ASSEMBLY
1. Replace accelerator pedal assembly.
2. Perform EC-77, "
Accelerator Pedal Released Position Learning" .
3. Perform EC-77, "
Throttle Valve Closed Position Learning" .
4. Perform EC-77, "
Idle Air Volume Learning" .
>>INSPECTION END
ECM terminal Sensor terminal Reference Wiring Diagram
46 CKP sensor (POS) terminal 1EC-388
64CMP sensor (PHASE) (bank 2) terminal 1EC-399EVT control position sensor (bank 2) terminal 1EC-532
103 APP sensor terminal 4EC-643
107 EVAP control system pressure sensor terminal 3EC-458
111 Refrigerant pressure sensor terminal 1EC-711
Page 537 of 720
DTC P1078 P1084 EVT CONTROL POSITION SENSOR
EC-537
C
D
E
F
G
H
I
J
K
L
MA
EC
Revision: 2006 November2007 350Z
8. CHECK EXHAUST VALVE TIMING CONTROL POSITION SENSOR GROUND CIRCUIT FOR OPEN
AND SHORT
1. Turn ignition switch OFF.
2. Disconnect ECM harness connector.
3. Check harness continuity between exhaust valve timing control position sensor terminal 2 and ECM termi-
nal 88. Refer to Wiring Diagram.
4. Also check harness for short to ground and short to power.
OK or NG
OK >> GO TO 9.
NG >> Repair open circuit or short to ground or short to power in harness or connectors..
9. CHECK EXHAUST VALVE TIMING CONTROL POSITION SENSOR INPUT SIGNAL CIRCUIT FOR
OPEN AND SHORT
1. Check harness continuity between ECM terminal 58 (bank 1) or 62 (bank 2) and exhaust valve timing con-
trol position sensor terminal 3.
Refer to Wiring Diagram.
2. Also check harness for short to ground and short to power.
OK or NG
OK >> GO TO 10.
NG >> Repair open circuit or short to ground or short to power in harness or connectors.
10. CHECK EXHAUST VALVE TIMING CONTROL POSITION SENSOR
Refer to EC-539, "
Component Inspection" .
OK or NG
OK >> GO TO 11.
NG >> Replace exhaust valve timing control position sensor.
11 . CHECK CRANKSHAFT POSITION SENSOR (POS)
Refer to EC-393, "
Component Inspection" .
OK or NG
OK >> GO TO 12.
NG >> Replace crankshaft position sensor (POS).
12. CHECK CAMSHAFT POSITION SENSOR (PHASE)
Refer to EC-405, "
Component Inspection" .
OK or NG
OK >> GO TO 13.
NG >> Replace malfunctioning camshaft position sensor (PHASE).Continuity should exist.
Continuity should exist.
Page 547 of 720
DTC P1217 ENGINE OVER TEMPERATURE
EC-547
C
D
E
F
G
H
I
J
K
L
MA
EC
Revision: 2006 November2007 350Z
Wiring DiagramNBS000DI
TBWT1658E
Page 552 of 720
EC-552
DTC P1217 ENGINE OVER TEMPERATURE
Revision: 2006 November2007 350Z
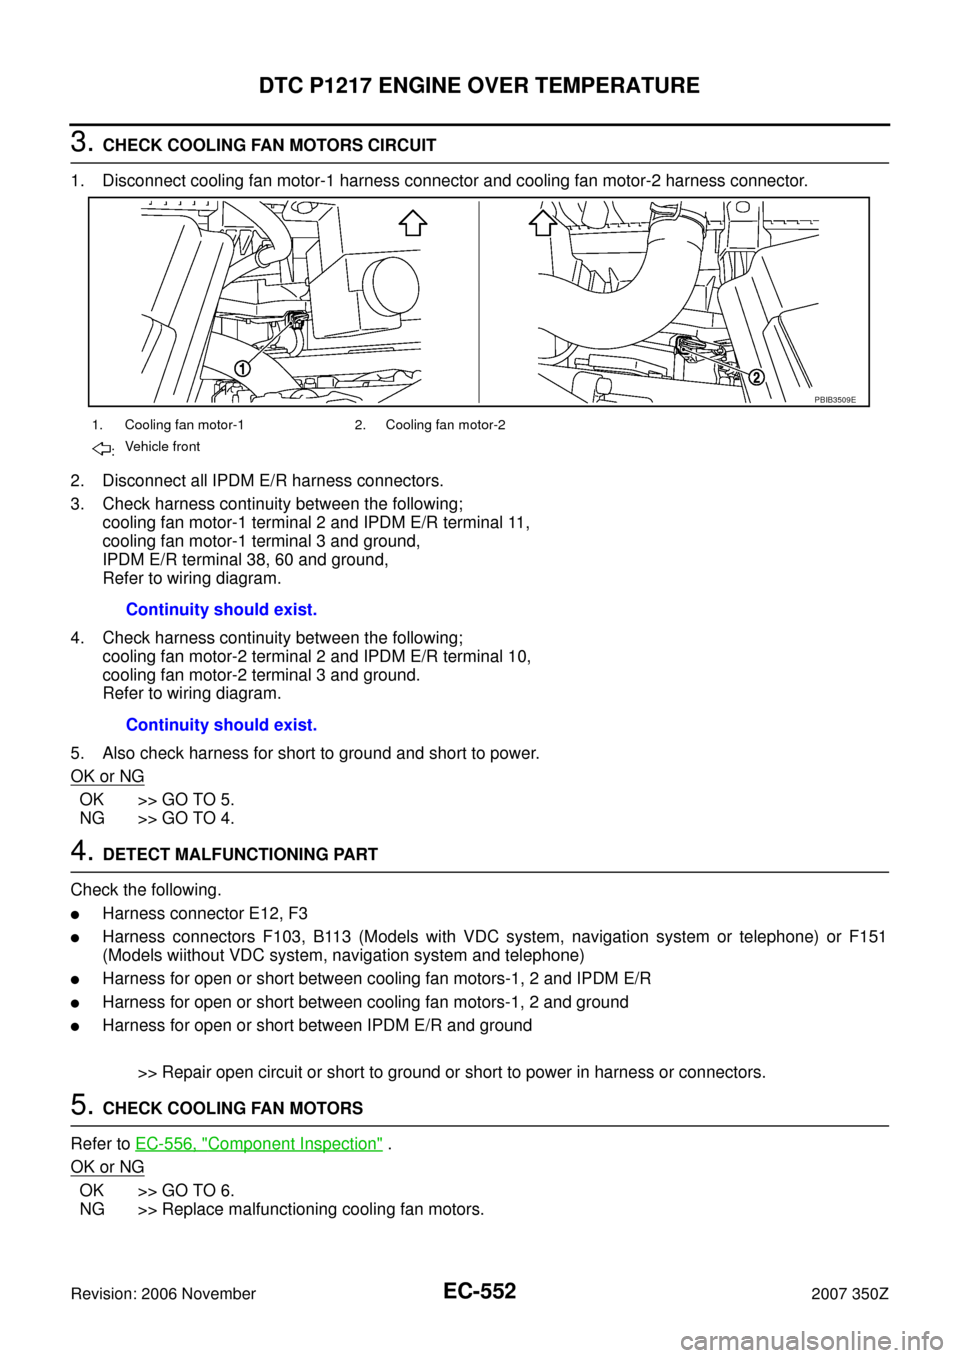
3. CHECK COOLING FAN MOTORS CIRCUIT
1. Disconnect cooling fan motor-1 harness connector and cooling fan motor-2 harness connector.
2. Disconnect all IPDM E/R harness connectors.
3. Check harness continuity between the following;
cooling fan motor-1 terminal 2 and IPDM E/R terminal 11,
cooling fan motor-1 terminal 3 and ground,
IPDM E/R terminal 38, 60 and ground,
Refer to wiring diagram.
4. Check harness continuity between the following;
cooling fan motor-2 terminal 2 and IPDM E/R terminal 10,
cooling fan motor-2 terminal 3 and ground.
Refer to wiring diagram.
5. Also check harness for short to ground and short to power.
OK or NG
OK >> GO TO 5.
NG >> GO TO 4.
4. DETECT MALFUNCTIONING PART
Check the following.
�Harness connector E12, F3
�Harness connectors F103, B113 (Models with VDC system, navigation system or telephone) or F151
(Models wiithout VDC system, navigation system and telephone)
�Harness for open or short between cooling fan motors-1, 2 and IPDM E/R
�Harness for open or short between cooling fan motors-1, 2 and ground
�Harness for open or short between IPDM E/R and ground
>> Repair open circuit or short to ground or short to power in harness or connectors.
5. CHECK COOLING FAN MOTORS
Refer to EC-556, "
Component Inspection" .
OK or NG
OK >> GO TO 6.
NG >> Replace malfunctioning cooling fan motors.
1. Cooling fan motor-1 2. Cooling fan motor-2
:Vehicle front
Continuity should exist.
Continuity should exist.
PBIB3509E