Page 255 of 312
DISASSEMBLY
AT-255
D
E
F
G
H
I
J
K
L
MA
B
AT
Revision: 2006 November2007 350Z
DISASSEMBLYPFP:31020
DisassemblyNCS0009B
CAUTION:
Do not disassemble parts behind Drum Support. Refer to AT- 1 7 , "
Cross-sectional View" .
1. Drain ATF through drain hole.
2. Remove torque converter by holding it firmly and turing while
pulling straight out.
3. Check torque converter one-way clutch using check tool as
shown at figure.
a. Insert check tool into the groove of bearing support built into
one-way clutch outer race.
b. When fixing bearing support with check tool, rotate one- way
clutch spline using screwdriver.
c. Check that inner race rotates clockwise only. If not, replace
torque converter assembly.
4. Remove tightening bolts ( ) for converter housing and trans-
mission case.
5. Remove converter housing from transmission case.
CAUTION:
Be careful not to scratch converter housing.
SCIA5010E
SCIA3171E
SCIA8096E
Page 261 of 312

DISASSEMBLY
AT-261
D
E
F
G
H
I
J
K
L
MA
B
AT
Revision: 2006 November2007 350Z
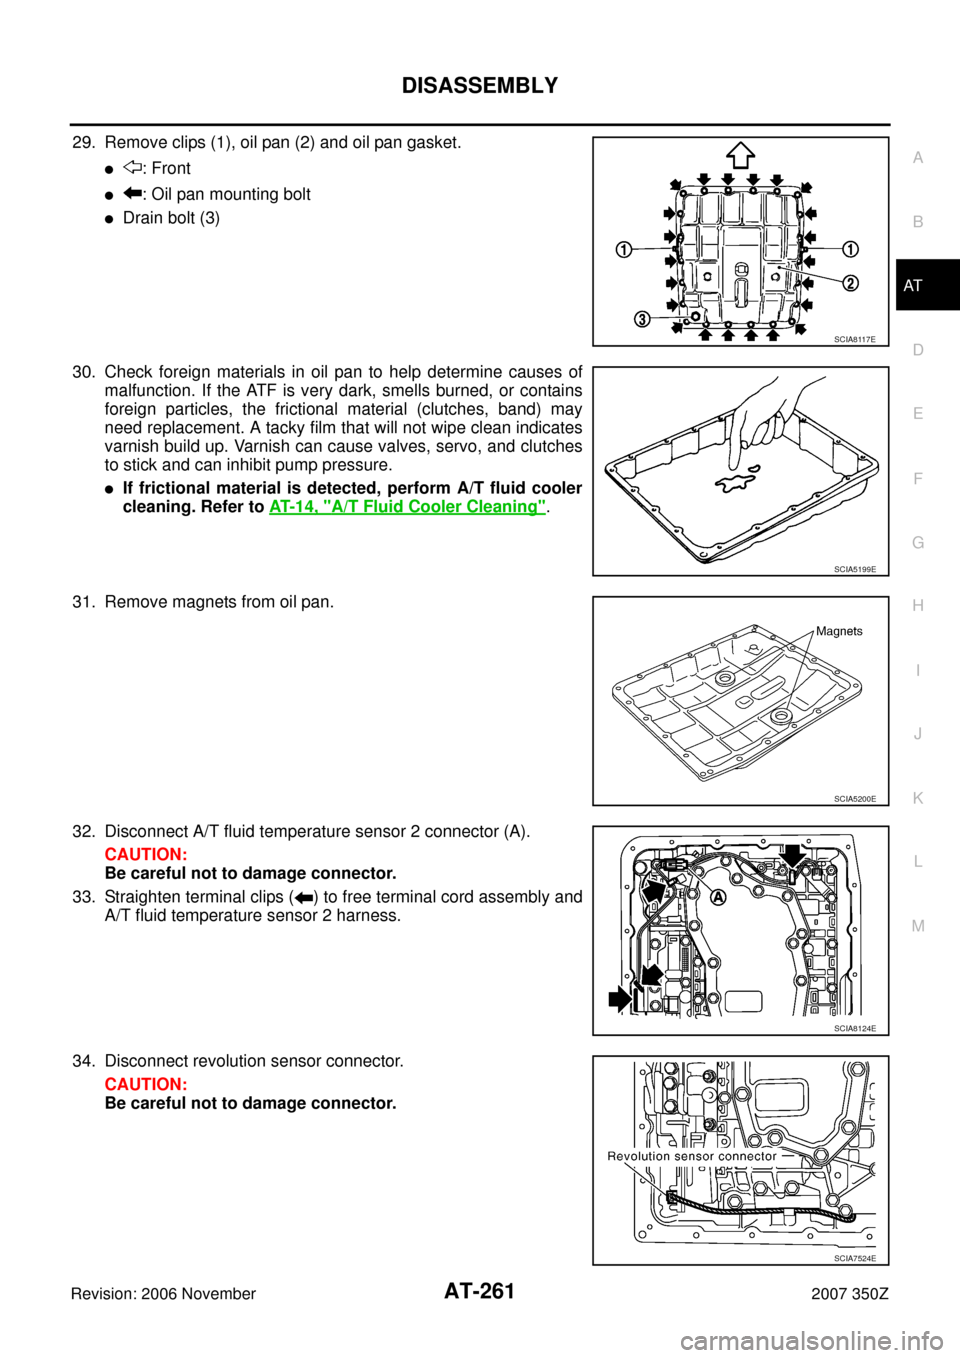
29. Remove clips (1), oil pan (2) and oil pan gasket.
�: Front
�: Oil pan mounting bolt
�Drain bolt (3)
30. Check foreign materials in oil pan to help determine causes of
malfunction. If the ATF is very dark, smells burned, or contains
foreign particles, the frictional material (clutches, band) may
need replacement. A tacky film that will not wipe clean indicates
varnish build up. Varnish can cause valves, servo, and clutches
to stick and can inhibit pump pressure.
�If frictional material is detected, perform A/T fluid cooler
cleaning. Refer to AT- 1 4 , "
A/T Fluid Cooler Cleaning".
31. Remove magnets from oil pan.
32. Disconnect A/T fluid temperature sensor 2 connector (A).
CAUTION:
Be careful not to damage connector.
33. Straighten terminal clips ( ) to free terminal cord assembly and
A/T fluid temperature sensor 2 harness.
34. Disconnect revolution sensor connector.
CAUTION:
Be careful not to damage connector.
SCIA8117E
SCIA5199E
SCIA5200E
SCIA8124E
SCIA7524E
Page 309 of 312
ASSEMBLY
AT-309
D
E
F
G
H
I
J
K
L
MA
B
AT
Revision: 2006 November2007 350Z
14. Pull down A/T assembly harness connector.
CAUTION:
Be careful not to damage connector.
15. Install snap ring to A/T assembly harness connector.
16. Install magnets in oil pan.
17. Install oil pan to transmission case.
a. Install oil pan gasket to oil pan.
CAUTION:
�Do not reuse oil pan gasket.
�Install it in the direction to align hole positions.
�Completely remove all moisture, oil and old gasket, etc. from oil pan gasket mounting surface.
b. Install oil pan (2) (with oil pan gasket) and clips (1) to transmis-
sion case.
�: Front
�: Oil pan mounting bolt
CAUTION:
�Install it so that drain plug (3) comes to the position as
shown in the figure.
�Be careful not to pinch harnesses.
�Completely remove all moisture, oil and old gasket, etc.
from oil pan mounting surface.
SCIA5299E
SCIA5300E
SCIA5200E
SCIA8117E
Page 310 of 312
AT-310
ASSEMBLY
Revision: 2006 November2007 350Z
c. Tighten oil pan mounting bolts to the specified torque in numeri-
cal order shown in the figure after temporarily tightening them.
Refer to AT- 2 4 6 , "
Components" .
CAUTION:
Do not reuse oil pan mounting bolts.
18. Install drain plug to oil pan, and then tighten drain plug to the
specified torque. Refer to AT- 2 4 6 , "
Components" .
CAUTION:
Do not reuse drain plug gasket.
19. Install torque converter.
a. Pour ATF into torque converter.
�Approximately 2 liter (2-1/8 US qt, 1-3/4 Imp qt) of ATF is
required for a new torque converter.
�When reusing old torque converter, add the same amount
of ATF as was drained.
b. Install torque converter while aligning notches of torque con-
verter with notches of oil pump.
CAUTION:
Install torque converter while rotating it.
c. Measure distance “A” to check that torque converter is in proper
position.
SCIA4113E
SAT428DA
SCIA5010E
Distance “A”: 25.0 mm (0.98 in) or more
SCIA5694E
Page:
< prev 1-8 9-16 17-24