Page 27 of 142

AIR CONDITIONER CONTROL
ATC-27
C
D
E
F
G
H
I
K
L
MA
B
AT C
Revision: 2006 November2007 350Z
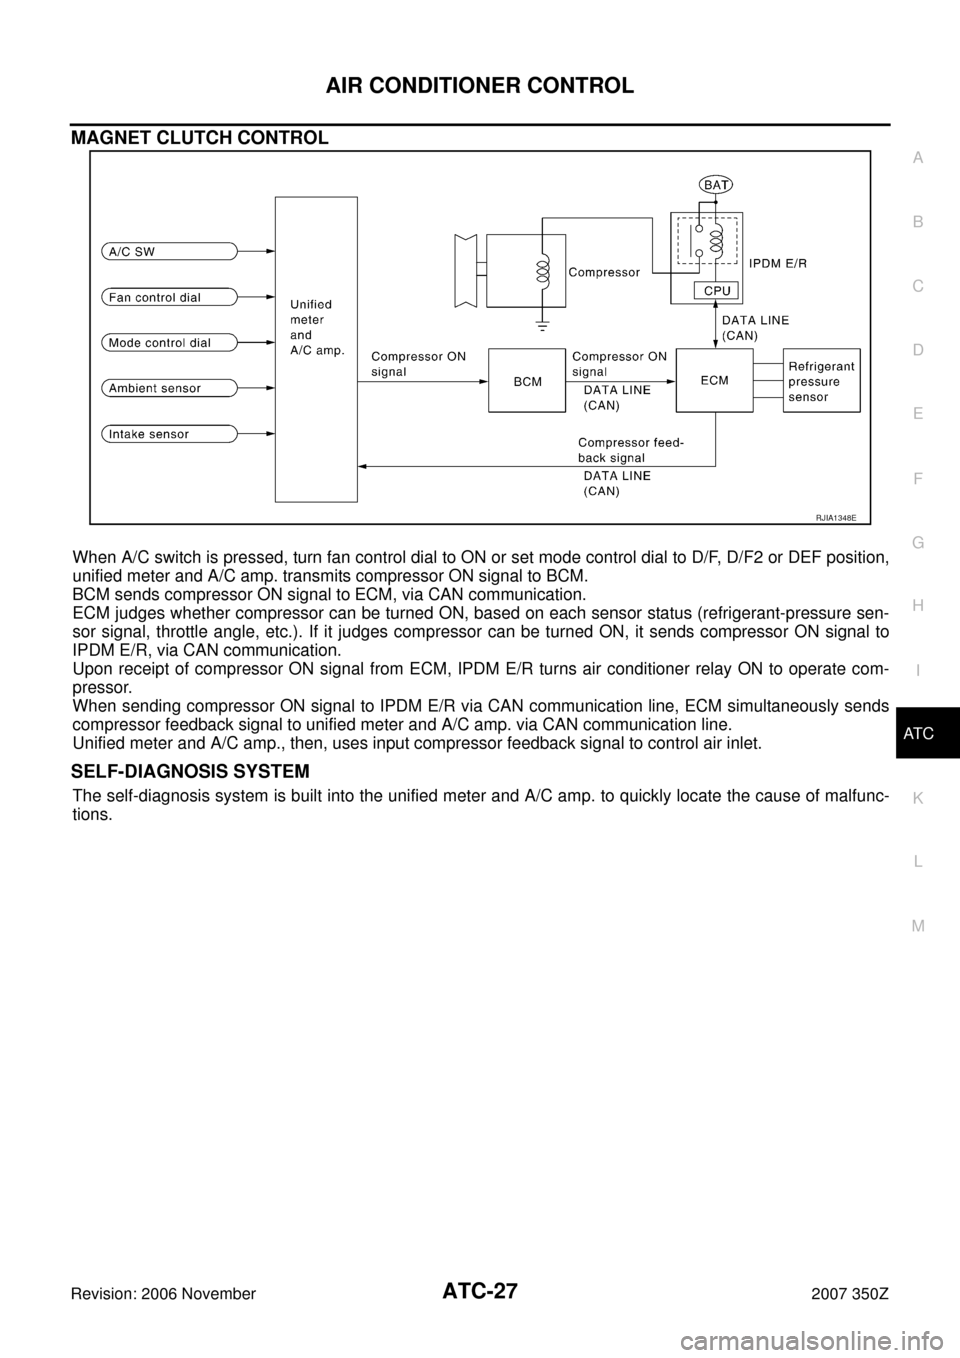
MAGNET CLUTCH CONTROL
When A/C switch is pressed, turn fan control dial to ON or set mode control dial to D/F, D/F2 or DEF position,
unified meter and A/C amp. transmits compressor ON signal to BCM.
BCM sends compressor ON signal to ECM, via CAN communication.
ECM judges whether compressor can be turned ON, based on each sensor status (refrigerant-pressure sen-
sor signal, throttle angle, etc.). If it judges compressor can be turned ON, it sends compressor ON signal to
IPDM E/R, via CAN communication.
Upon receipt of compressor ON signal from ECM, IPDM E/R turns air conditioner relay ON to operate com-
pressor.
When sending compressor ON signal to IPDM E/R via CAN communication line, ECM simultaneously sends
compressor feedback signal to unified meter and A/C amp. via CAN communication line.
Unified meter and A/C amp., then, uses input compressor feedback signal to control air inlet.
SELF-DIAGNOSIS SYSTEM
The self-diagnosis system is built into the unified meter and A/C amp. to quickly locate the cause of malfunc-
tions.
RJIA1348E
Page 28 of 142
ATC-28
AIR CONDITIONER CONTROL
Revision: 2006 November2007 350Z
Description of Control SystemNJS0000L
The control system consists of input sensors, switches, unified meter and A/C amp. (microcomputer) and out-
puts. The relationship of these components is shown in the figure below:
RJIA2101E
Page 43 of 142

TROUBLE DIAGNOSIS
ATC-43
C
D
E
F
G
H
I
K
L
MA
B
AT C
Revision: 2006 November2007 350Z
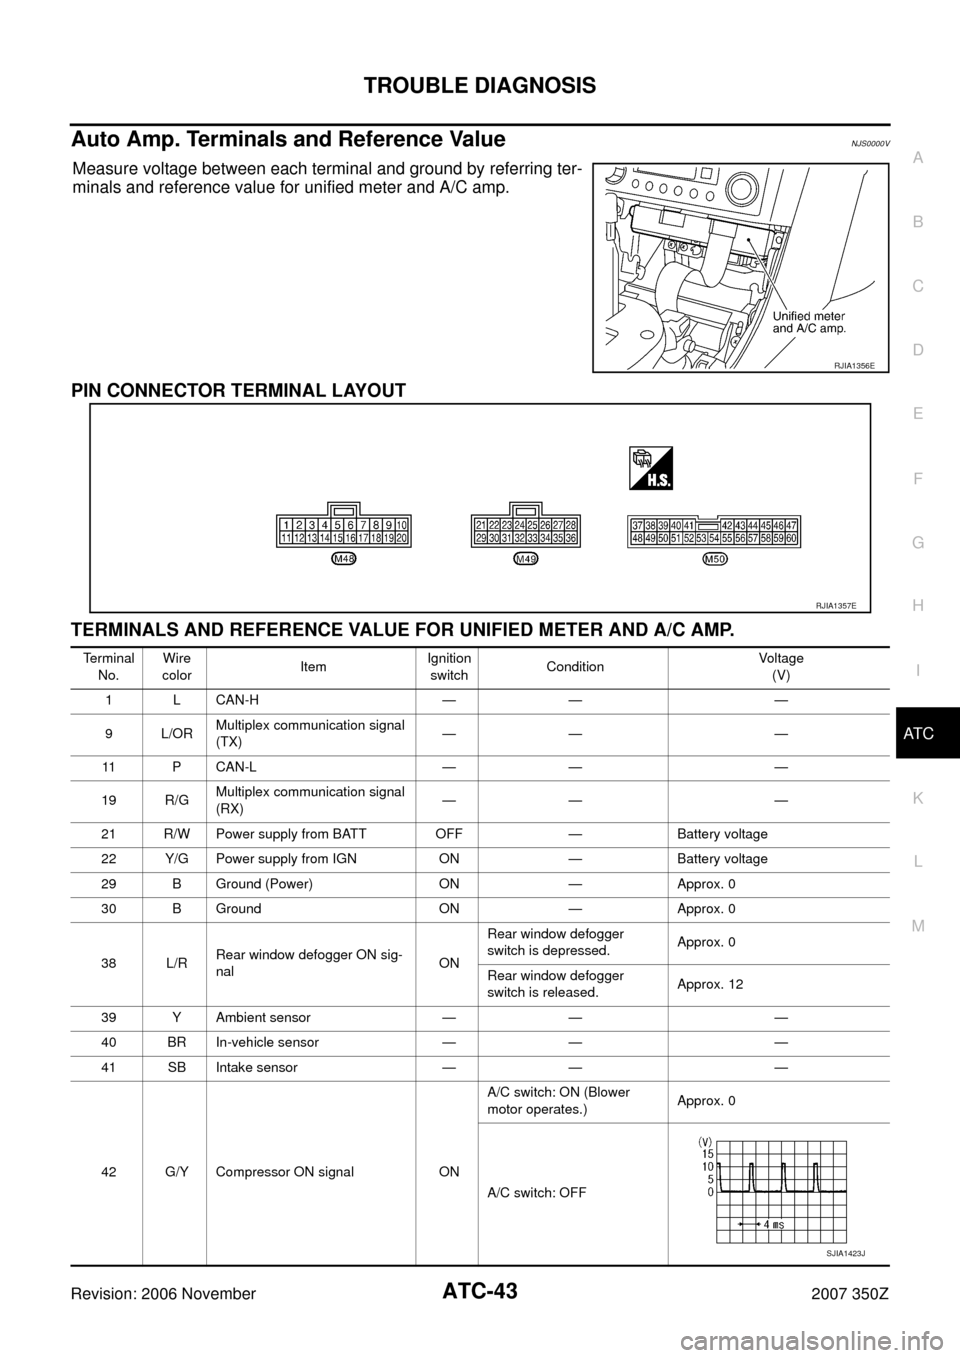
Auto Amp. Terminals and Reference ValueNJS0000V
Measure voltage between each terminal and ground by referring ter-
minals and reference value for unified meter and A/C amp.
PIN CONNECTOR TERMINAL LAYOUT
TERMINALS AND REFERENCE VALUE FOR UNIFIED METER AND A/C AMP.
RJIA1356E
RJIA1357E
Terminal
No.Wire
colorItemIgnition
switchConditionVoltage
(V)
1LCAN-H — — —
9L/ORMultiplex communication signal
(TX)—— —
11 P C A N - L — — —
19 R/GMultiplex communication signal
(RX)—— —
21 R/W Power supply from BATT OFF — Battery voltage
22 Y/G Power supply from IGN ON — Battery voltage
29 B Ground (Power) ON — Approx. 0
30 B Ground ON — Approx. 0
38 L/RRear window defogger ON sig-
nalONRear window defogger
switch is depressed.Approx. 0
Rear window defogger
switch is released.Approx. 12
39 Y Ambient sensor — — —
40 BR In-vehicle sensor — — —
41 SB Intake sensor — — —
42 G/Y Compressor ON signal ONA/C switch: ON (Blower
motor operates.)Approx. 0
A/C switch: OFF
SJIA1423J
Page 44 of 142
ATC-44
TROUBLE DIAGNOSIS
Revision: 2006 November2007 350Z
43 G/B A/C LAN signal ON —
46 L/W Power supply from IGN2ACC or
ON— Battery voltage
49 W/L Sensor ground ON — Approx. 0
50 LG Sunload sensor — — —
53 G Blower motor control signal ONBlower speed: 1st speed
(manual)
54 Y/RPower supply for each door
motorON — Battery voltage
56 B/WRear window defogger feedback
signalONRear window defogger
switch: ONApprox. 12
Rear window defogger
switch: OFFApprox. 0
57 BR/W Blower motor ON signal ONFan control dial: ON (A/C
system operates)Approx. 0
Fan control dial: OFF Approx. 5 Terminal
No.Wire
colorItemIgnition
switchConditionVo l ta g e
(V)
SJIA1453J
SJIA1454J
Page 45 of 142

TROUBLE DIAGNOSIS
ATC-45
C
D
E
F
G
H
I
K
L
MA
B
AT C
Revision: 2006 November2007 350Z
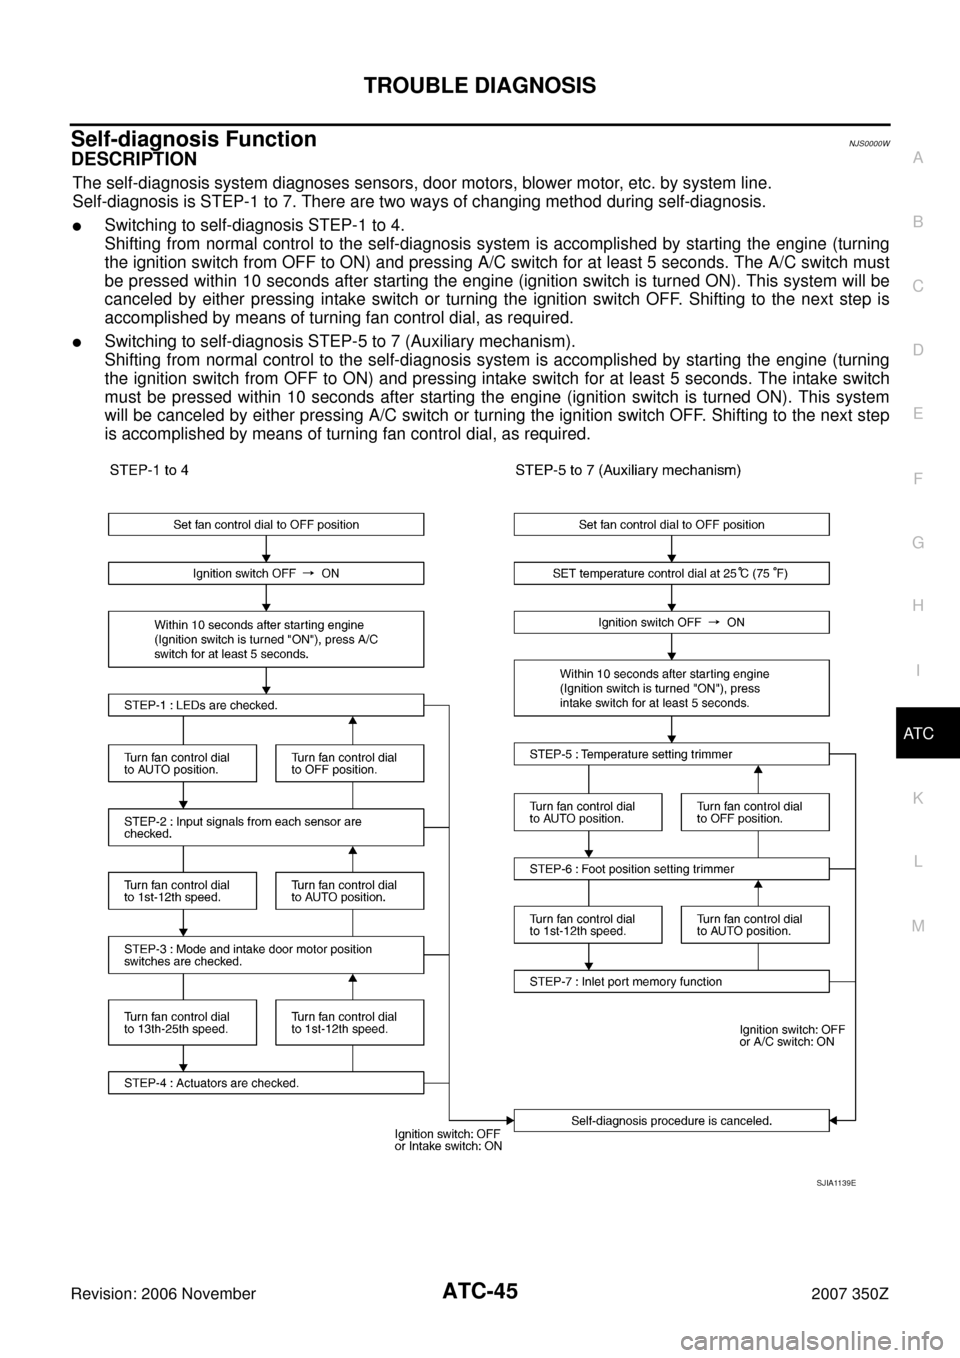
Self-diagnosis FunctionNJS0000W
DESCRIPTION
The self-diagnosis system diagnoses sensors, door motors, blower motor, etc. by system line.
Self-diagnosis is STEP-1 to 7. There are two ways of changing method during self-diagnosis.
�Switching to self-diagnosis STEP-1 to 4.
Shifting from normal control to the self-diagnosis system is accomplished by starting the engine (turning
the ignition switch from OFF to ON) and pressing A/C switch for at least 5 seconds. The A/C switch must
be pressed within 10 seconds after starting the engine (ignition switch is turned ON). This system will be
canceled by either pressing intake switch or turning the ignition switch OFF. Shifting to the next step is
accomplished by means of turning fan control dial, as required.
�Switching to self-diagnosis STEP-5 to 7 (Auxiliary mechanism).
Shifting from normal control to the self-diagnosis system is accomplished by starting the engine (turning
the ignition switch from OFF to ON) and pressing intake switch for at least 5 seconds. The intake switch
must be pressed within 10 seconds after starting the engine (ignition switch is turned ON). This system
will be canceled by either pressing A/C switch or turning the ignition switch OFF. Shifting to the next step
is accomplished by means of turning fan control dial, as required.
SJIA1139E
Page 47 of 142
TROUBLE DIAGNOSIS
ATC-47
C
D
E
F
G
H
I
K
L
MA
B
AT C
Revision: 2006 November2007 350Z
5. STEP-2: SENSOR CIRCUITS ARE CHECKED FOR OPEN OR SHORT CIRCUIT
1. Turn fan control dial to AUTO position.
2. Turn mode control dial to AUTO position.
NOTE:
When switched to STEP-2, LED of REC position blinks for
approximately 25 seconds.
3. Check A/C switch LED is illuminate.
OK or NG
OK >> GO TO 6.
NG >> GO TO 9.
6. STEP-3: MODE DOOR AND INTAKE DOOR POSITIONS ARE CHECKED
1. Turn fan control dial to 1st - 12th speed.
NOTE:
When switched to STEP-3, LED of REC position blinks for
approximately 50 seconds.
2. Check A/C switch LED is illuminate.
OK or NG
OK >> GO TO 7.
NG >> GO TO 10.
7. STEP-4: OPERATION OF EACH ACTUATOR IS CHECKED
1. Turn fan control dial to 13th - 25th speed.
2. Change operation status of air conditioner by changing mode
control dial position.
>> GO TO 8.
S J I A 111 3 E
S J I A 111 4 E
SJIA1133E
Page 49 of 142

TROUBLE DIAGNOSIS
ATC-49
C
D
E
F
G
H
I
K
L
MA
B
AT C
Revision: 2006 November2007 350Z
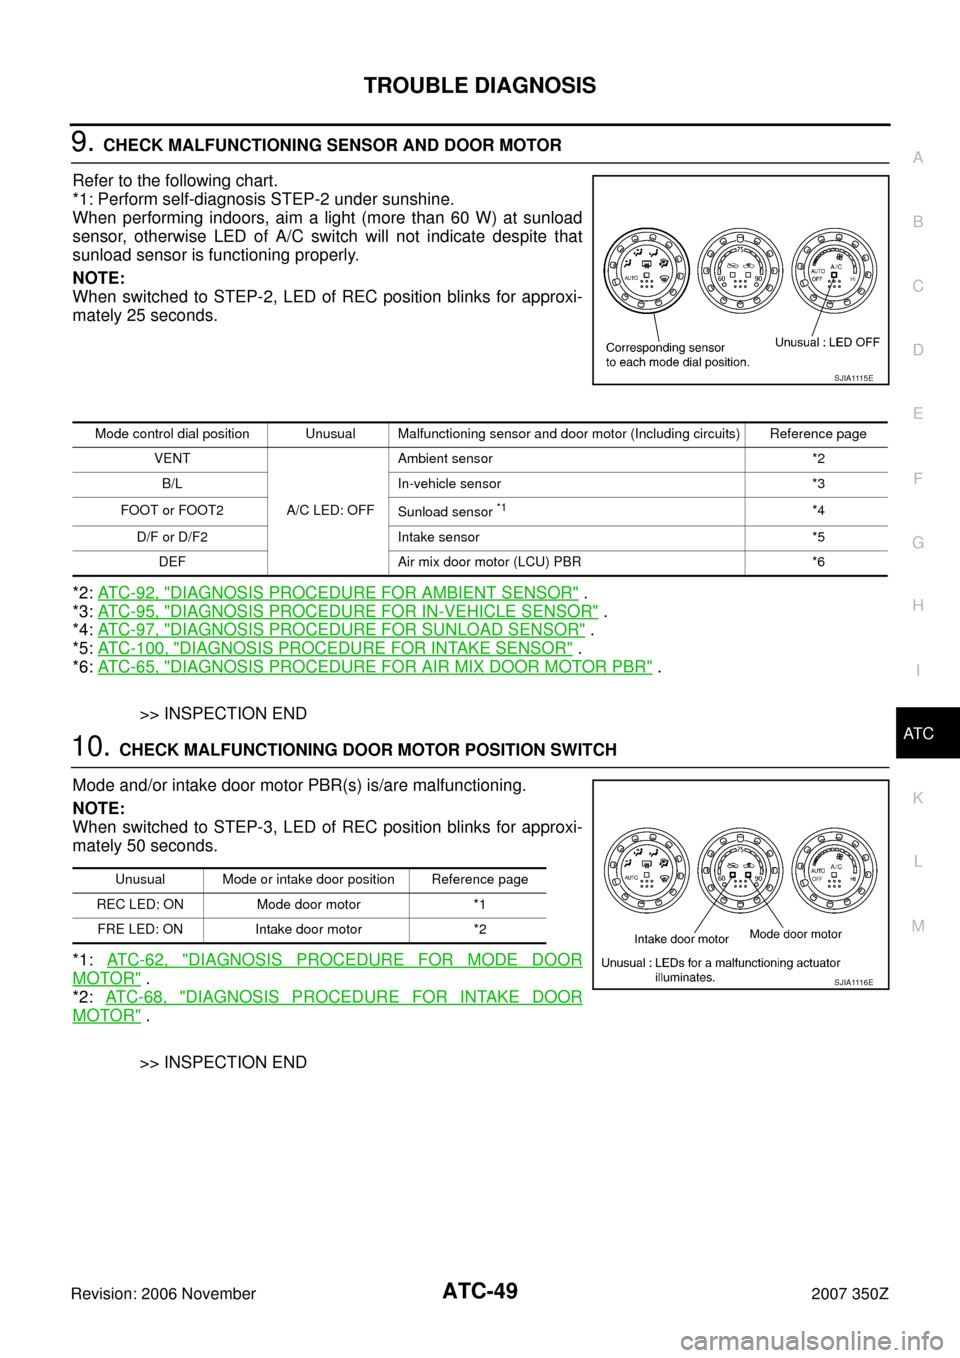
9. CHECK MALFUNCTIONING SENSOR AND DOOR MOTOR
Refer to the following chart.
*1: Perform self-diagnosis STEP-2 under sunshine.
When performing indoors, aim a light (more than 60 W) at sunload
sensor, otherwise LED of A/C switch will not indicate despite that
sunload sensor is functioning properly.
NOTE:
When switched to STEP-2, LED of REC position blinks for approxi-
mately 25 seconds.
*2: AT C - 9 2 , "
DIAGNOSIS PROCEDURE FOR AMBIENT SENSOR" .
*3: AT C - 9 5 , "
DIAGNOSIS PROCEDURE FOR IN-VEHICLE SENSOR" .
*4: AT C - 9 7 , "
DIAGNOSIS PROCEDURE FOR SUNLOAD SENSOR" .
*5: ATC-100, "
DIAGNOSIS PROCEDURE FOR INTAKE SENSOR" .
*6: AT C - 6 5 , "
DIAGNOSIS PROCEDURE FOR AIR MIX DOOR MOTOR PBR" .
>> INSPECTION END
10. CHECK MALFUNCTIONING DOOR MOTOR POSITION SWITCH
Mode and/or intake door motor PBR(s) is/are malfunctioning.
NOTE:
When switched to STEP-3, LED of REC position blinks for approxi-
mately 50 seconds.
*1: AT C - 6 2 , "
DIAGNOSIS PROCEDURE FOR MODE DOOR
MOTOR" .
*2: AT C - 6 8 , "
DIAGNOSIS PROCEDURE FOR INTAKE DOOR
MOTOR" .
>> INSPECTION END
S J I A 111 5 E
Mode control dial position Unusual Malfunctioning sensor and door motor (Including circuits) Reference page
VENT
A/C LED: OFFAmbient sensor *2
B/L In-vehicle sensor *3
FOOT or FOOT2
Sunload sensor
*1*4
D/F or D/F2 Intake sensor *5
DEF Air mix door motor (LCU) PBR *6
Unusual Mode or intake door position Reference page
REC LED: ON Mode door motor *1
FRE LED: ON Intake door motor *2
S J I A 111 6 E
Page 54 of 142
ATC-54
TROUBLE DIAGNOSIS
Revision: 2006 November2007 350Z
Power Supply and Ground Circuit for Auto Amp.NJS0000Y
SYMPTOM: A/C system does not come on.
INSPECTION FLOW
COMPONENT DESCRIPTION
Unified Meter and A/C amp. (Automatic Amplifier)
The unified meter and A/C amp. has a built-in microcomputer which
processes information sent from various sensors needed for air con-
ditioner operation. The air mix door motor, mode door motor, intake
door motor, blower motor and compressor are then controlled.
When the various switches and temperature control dial are oper-
ated, data is input to the unified meter and A/C amp. from the A/C
controller using multiplex communication.
Self-diagnosis functions are also built into unified meter and A/C
amp. to provide quick check of malfunctions in the auto air condi-
tioner system.
*1AT C - 5 5 , "DIAGNOSIS PROCE-
DURE FOR A/C SYSTEM"
*2AT C - 5 3 , "Operational Check"
SJIA1123E
RJIA1356E