Page 17 of 32

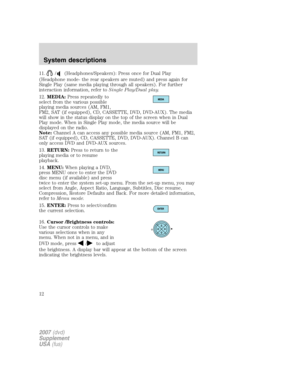
To operate the headphones:
•Press ON/OFF on the ear piece to
turn on the headphones. A red
indicator light will illuminate
indicating the headphones are
ON. Press ON/OFF again to turn
the headphones off.
•Adjust the headphones to
comfortably fit your head using
the headband adjustment.
•Select the desired audio source
(Channel A or B) for each set of
wireless headphones by using the
A/B selection switch on the ear
piece.
•Adjust the volume control to the
desired listening level.
Ensure that the headphones are turned off when not in use. After
approximately one minute of not being in use (no infrared signal is
received), the wireless headphones will automatically turn off. They will
also turn off after two hours of continuous use as a power save feature.
If this happens, simply turn the headphones on again and continue use.
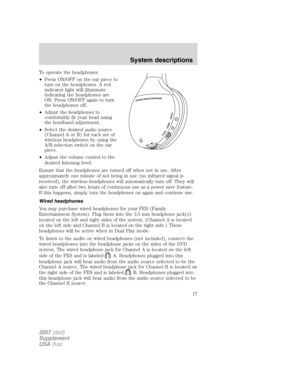
Wired headphones
You may purchase wired headphones for your FES (Family
Entertainment System). Plug them into the 3.5 mm headphone jack(s)
located on the left and right sides of the system. (Channel A is located
on the left side and Channel B is located on the right side.) These
headphones will be active when in Dual Play mode.
To listen to the audio on wired headphones (not included), connect the
wired headphones into the headphone jacks on the sides of the DVD
system. The wired headphone jack for Channel A is located on the left
side of the FES and is labeled
A. Headphones plugged into this
headphone jack will hear audio from the audio source selected to be the
Channel A source. The wired headphone jack for Channel B is located on
the right side of the FES and is labeled
B. Headphones plugged into
this headphone jack will hear audio from the audio source selected to be
the Channel B source.
2007(dvd)
Supplement
USA(fus)
System descriptions
17
Page 18 of 32
Adjust the headphone volume using
the volume control on the DVD
system.
2007(dvd)
Supplement
USA(fus)
System descriptions
18
Page 19 of 32
 to enable the front and rear seat
passengers to listen to a variety of so")
SINGLE PLAY/DUAL PLAY
Your DVD and audio system work together with the infrared headphones
and wired headphones (not included) to enable the front and rear seat
passengers to listen to a variety of sources a variety of ways.
Single Play:Single play consists of all occupants in the vehicle listening
to the same playing media over the front and rear speakers. When the
DVD system is on, and the same source is playing through the front and
rear speakers, SINGLE PLAY will appear in the front radio display.
Dual Play:Dual play is when the rear seat passengers choose to listen
to a different playing media than the front seat passengers. With the
DVD and Rear Seat Controls turned ON, the rear seat passengers may
choose to listen to the radio, CD, MP3, DVD, or DVD-AUX media sources
over headphones while the front speakers play the chosen selection for
the front audio system, they may listen to another over the headphones.
DUAL PLAY will appear in the radio display.
When both the front seat passengers and the rear seat passengers listen
to the same audio source, SHARED MODE will appear on the radio.
Note:If the front seat passengers are listening to the radio, the rear seat
passengers can also listen to the radio, however they will be limited to
listening to the same radio channel.
Press
/on the DVD player to
listen to audio over the headphones.
The headphone control will now be active and a green light next to the
A or B headphone control buttons will illuminate. The system can output
two different audio sources over the headphones. These are called
Channel A and Channel B. Both Channel A and Channel B can be
listened to on the wired headphones (not included) or on the infrared
(IR) wireless headphones.
Press the Headphone Control button
A to change the audio source for
Channel A.
Press MEDIA to change the audio
source for Channel A. This
information will display on the DVD
system screen.
2007(dvd)
Supplement
USA(fus)
Operation
19
Page 20 of 32

Press the Headphone Control button
B to change the audio source for
Channel B.
Press MEDIA to change the audio source for Channel B. This information
will display on the DVD system screen. Channel B can listen to either
the DVD media or the DVD system auxiliary inputs (DVD-AUX).
OPERATION WITH AN AFTERMARKET AUDIO SYSTEM
(HEADPHONE ONLY MODE)
When the Family Entertainment System (FES) detects that the original
radio supplied by Ford Motor Company has been removed from the
vehicle, the Family Entertainment System will work in a state referred to
as “Headphone Only Mode”.
While operating in Headphone Only Mode, the system will have limited
functionality.
•The system will only output audio to the headphones. It will not be
capable of providing audio to the speakers.
•The available sources in FES Headphone Only Mode are DVD-DISC
and DVD-AUX, regardless of headphone channel (A or B).
•When a disc is inserted into the FES while in Headphone Only Mode,
both headphone channels (A&B) will be connected to FES-DISC.
MENU MODE
Press MENU once on the DVD system to access the DVD disc menu if
available.
Press MENU twice to access the DVD set-up menu and the following
features:
1. ZOOM
2. ANGLE
3. ASPECT RATIO
4. LANGUAGE
5. SUBTITLES
2007(dvd)
Supplement
USA(fus)
Operation
20
Page 21 of 32
ANGLE MODE
Select ANGLE to select various
angles of view for the DVD.
This is disc dependent — some
DVD discs may have more viewing
angles to select from. Once you
have made your selection, press
ENTER to confirm. The system
default is Angle 1.
ASPECT RATIO
Select ASPECT RATIO to select the
viewing size and shape of the video
displayed on the LCD screen. This is
disc dependent.
You can select from: WIDE, LETTER
BOX or PAN SCAN. Once you have
made your selection, press ENTER
to confirm. The LCD screen display
will immediately change to your
selection after the system resumes
playback of the DVD. The system
default is WIDE (16:9). This is disc
dependent.
2007(dvd)
Supplement
USA(fus)
Operation
21
Page 22 of 32
LANGUAGE
Select LANGUAGE to select the
language you would like to use for
audio output (English, Spanish,
French). This is disc dependent.
Once you have made your selection,
press ENTER to confirm. The
system default is English.
SUBTITLES
Select SUBTITLES to turn the
subtitle option on or off. The system
default is OFF.
Once you have made your selection,
press ENTER to confirm. This is
disc dependent.
AUDIO CDS
To play audio CDs on your DVD system:
1. Ensure that the vehicle ignition is in the RUN or ACCESSORY postion.
2. Ensure that the DVD system is ON.
3. Insert an audio CD into the DVD system, label side up.
2007(dvd)
Supplement
USA(fus)
Operation
22
Page 23 of 32

4. The track and elapsed time will
appear in the status bar. Use the
DVD cursor controls on the bezel to
hightlight which track you would
like to play. You can also use the
cursor controls to highlight
COMPRESSION, SHUFFLE or
SCAN. Once you have highlighted
the desired track or function, press ENTER on the DVD bezel to confirm
your selection.
COMP (Compression):Compression brings soft and loud CD passages
together for a more consistent listening level when in CD mode. Press to
turn the feature ON/OFF
SHUFFLE:Press to hear all tracks on the current CD in random order.
Press again to stop.
SCAN:Press for a brief sampling of all tracks on the current CD. Press
again to stop.
PLAYING MP3 DISCS
To play an MP3 disc on your DVD system:
1. Ensure that the vehicle ignition is in the RUN or ACCESSORY postion.
2. Ensure that the DVD system is ON.
3. Insert the MP3 disc into the DVD system, label side up.
4. The folder, track and elapsed
time will appear in the status bar.
The screen will list the Artist, Title,
Album and File Name.
COMP (Compression):
Compression brings soft and loud
CD/MP3 passages together for a
more consistent listening level when
in CD mode. Press to turn the feature ON/OFF
SHUFFLE:Press to hear all tracks on the current MP3 folder in random
order. Press again to stop.
SCAN:Press for a brief sampling of all tracks on the current MP3 folder.
Press again to stop.
FOLDER LIST:Press access folder mode and to go to the previous/next
folder in the MP3 disc.
2007(dvd)
Supplement
USA(fus)
Operation
23
Page 24 of 32

MP3 DISC QUALITY FACTORS
Several factors can effect disc playback quality:
•Disc capacity — Each disc contains about 650 MB of storage capacity.
We do not recommend using high capacity discs containing 700MB of
storage.
•Disc type — Some CD-RW discs may operate inconsistently and may
cause an error message to appear. We recommend burning MP3 files
onto CD-R discs.
•Disc finalization — The disc may be left open for the purpose of
adding sessions to it at a later time, but be sure to close each session
or the disc will not play.
•Bit rate — The player supports bit rates from 32–320 kbps, as well as
variable bit rate MP3 files, but lower bit rates will have a noticeable
effect on sound quality and are recommended only for speech or low
fidelity music material. We recommend that you encode MP3 files
using a high quality encoder.
•PC configuration — Encoding MP3 files requires intensive use of your
computer’s resources. Follow the PC configuration recommendations
of the encoder software vendor. We recommend that you avoid
running other software applications on your PC during MP3 encoding
to avoid undesirable noise and distortion.
CD, MP3 AND CD PLAYER CARE
•Handle discs by their edges only. Never touch the playing surface.
•Do not expose discs to direct sunlight or heat sources for extended
periods of time.
•Do not insert more than one disc into the slot of the CD player (if
equipped).
•Always store discs out of direct sunlight. Excessive heat may damage
or warp discs.
•Use care when handling and playing CD-R and CD-RW discs, which
are more susceptible to damage from heat, light and stress than are
regular CDs.
•Always insert and remove a disc by holding the disc flat, with the
playing surface facing down, in order to prevent damage to the disc or
the player.
•Never insert any object other than a compact disc (CD) or digital
versatile disc (DVD) into the player, as doing so may damage the
player and may cause injury to you.
2007(dvd)
Supplement
USA(fus)
Operation
24


Supplement
USA(fus)
System descriptions
18")

. This is disc dependent.
Once you have made your selection,
press ENTER to confirm. Th")