Page 9 of 32
While operating in Headphone Only Mode, the system will have limited
functionality.
•The system will only output audio to the headphones. It will not be
capable of providing audio to the speakers.
•The available sources in FES Headphone Only Mode are DVD-DISC
and DVD-AUX, regardless of headphone channel (A or B).
•When a disc is inserted into the FES while in Headphone Only Mode,
both headphone channels (A and B) will be connected to FES-DISC.
2007(dvd)
Supplement
USA(fus)
Introduction
9
Page 10 of 32
SYSTEM DESCRIPTIONS
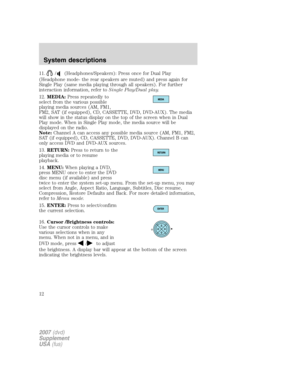
DVD player controls
1.Headphone control A/B:Press
to select either the A or B
headphone source. Then press
MEDIA to select the desired playing
media for that headset. When a
headphone channel has been selected (A or B), selections will affect the
source on that channel only.
Note:Headphone A can access any possible media (AM, FM1, FM2, SAT
(if equipped), CD, CASSETTE, DVD, DVD-AUX). Headphone B can only
access DVD and DVD-AUX.
For further information, refer toSingle play/Dual playlater in this
section.
2.
/(Stop/Eject): Press once
to stop and press a second time to
eject a disc from the DVD system.
3.
(Reverse): Press and
release for the previous chapter or
track. Press and hold to reverse
search a DVD, Video CD, or FES CD in DVD/CD mode.
A
BVIDEOVOLUME MEDIA RETURN MENU ENTER
1
7
2
3
4
5
6
9
10
11
12
13
14
15
16
8
2007(dvd)
Supplement
USA(fus)
System descriptions
10
Page 11 of 32
: Press and
release for the next chapter or
track. Press and hold to forward
search a DVD, Video CD, or FES CD in DVD/CD mode.
5.
/(Play/Pause): Press (Play)
to select DVD mode (and to")
4.(Fast forward): Press and
release for the next chapter or
track. Press and hold to forward
search a DVD, Video CD, or FES CD in DVD/CD mode.
5.
/(Play/Pause): Press (Play)
to select DVD mode (and to turn
the DVD system on if it is off). If a
disc is present, it will resume or begin to play. Press (Pause) while
playing a disc to pause a DVD or CD.
6.On/Off:Press to turn the DVD
system On/Off.
7.VIDEO:Press repeatedly to cycle
through the following video state
options which will be indicated on
the bottom right hand corner of the
display: DVD DISC, DVD-AUX,
NON-DVD and Off (no indicator). If you select the DVD-AUX video
source, the display will turn off if there is no video signal detected. When
a video signal is detected on the auxiliary video input, and the display is
in the DVD-AUX video mode, the display will automatically turn on.
8.Infrared (IR) Receiver & Transmitter:System sensor which reads
the signals from the remote control and sends audio signals to the
infrared (IR) wireless headphones.
9.LCD screen:The eight inch diagonal screen rotates down to view and
up into housing to store when not in use. Ensure that the screen is
latched into the housing when being stored.
10.Volume:When in Single Play,
press to increase (
) or decrease
(
) the volume over all speakers.
When in Dual Play, press to increase
(
) or decrease () the volume
for the wired headphones. (Wireless headphone volume is controlled
with the rotary dial on the right ear piece.)
2007(dvd)
Supplement
USA(fus)
System descriptions
11
Page 12 of 32
: Press once for Dual Play
(Headphone mode- the rear speakers are muted) and press again for
Single Play (same media playing through all speakers). For further
interaction inf")
11./(Headphones/Speakers): Press once for Dual Play
(Headphone mode- the rear speakers are muted) and press again for
Single Play (same media playing through all speakers). For further
interaction information, refer toSingle Play/Dual play.
12.MEDIA:Press repeatedly to
select from the various possible
playing media sources (AM, FM1,
FM2, SAT (if equipped), CD, CASSETTE, DVD, DVD-AUX). The media
will show in the status display on the top of the screen when in Dual
Play mode. When in Single Play mode, the media source will be
displayed on the radio.
Note:Channel A can access any possible media source (AM, FM1, FM2,
SAT (if equipped), CD, CASSETTE, DVD, DVD-AUX). Channel B can
only access DVD and DVD-AUX sources.
13.RETURN:Press to return to the
playing media or to resume
playback.
14.MENU:When playing a DVD,
press MENU once to enter the DVD
disc menu (if available) and press
twice to enter the system set-up menu. From the set-up menu, you may
select from Angle, Aspect Ratio, Language, Subtitles, Disc resume,
Compression, Restore Defaults and Back. For more detailed information,
refer toMenu mode.
15.ENTER:Press to select/confirm
the current selection.
16.Cursor /Brightness controls:
Use the cursor controls to make
various selections when in any
menu. When not in a menu, and in
DVD mode, press
/to adjust
the brightness. A display bar will appear at the bottom of the screen
indicating the brightness levels.
2007(dvd)
Supplement
USA(fus)
System descriptions
12
Page 13 of 32
Remote control
Unless otherwise stated, all operations can be carried out with the
remote control. Always point the remote control directly at the player.
Ensure that there are no obstructions between the remote and player.
1.Power control:Press to turn the FES (Family Entertainment
System) ON/OFF.
2.Cursor controls:Use in various active menus to advance the cursor
up/down/left/right. When not in a Menu, the left and right cursor controls
decrease and increase the display brightness.
3.DISPLAY:Press to access the on-screen display of the FES functions
and adjustments.
4.RETURN:Press to return to the previous menu screen.
5.ANGLE(DVD dependent): Press to select the angle to view the
scene.
6.Channel A/B:Press to select either A or B headphones and then use
the MEDIA control to select the desired playing media for the
headphones.
2007(dvd)
Supplement
USA(fus)
System descriptions
13
Page 14 of 32
:When in Single Play, press to increase ()or
decrease (
) the volume over all speakers. When in Dual Play, press to
increase (
) or decrease () the volume for the wired headphones.
(Wire")
7.VOL (Volume):When in Single Play, press to increase ()or
decrease (
) the volume over all speakers. When in Dual Play, press to
increase (
) or decrease () the volume for the wired headphones.
(Wireless headphone volume is controlled with the rotary dial on the
right ear piece.)
8.Fast Forward/Next:In DVD mode, press and hold for a quick
advance within the DVD. Press and release to advance to the next
chapter. In CD/MP3 mode, press to access the next track.
9.Play/Pause:Press to play or pause a DVD.
10.SHUFFLE:Press to play all tracks on the current CD/MP3 disc in
random order.
11.STOP:Press to stop the current DVD or CD/MP3.
12.
/Speaker/Headphone(Single/Dual Play): Press to toggle
between Single Play (same media playing through all speakers) and Dual
Play (headphone mode — the rear speakers are muted).
13.Keypad:Use the numeric controls to enter in a specific CD/MP3
track or DVD chapter to be played.
14.C (Cancel):Press to cancel/clear the numeric input (i.e. chapter
number).
15.MEDIA:Press to cycle through the possible media sources: AM,
FM1, FM2, SAT (if equipped), CD, CASSETTE, DVD, AUX.
Channel B can only access DVD and AUX sources.
16.VIDEO:Press to cycle through video states: DVD-DISC, DVD-AUX,
NON-DVD, Off.
17.EJECT:Press to eject a disc from the FES.
18.Fast reverse/Previous:When a DVD is playing, press and hold for a
quick reverse within the DVD. Press and release for the previous
chapter. Press PLAY to resume normal playback speed and volume.
In CD/MP3 mode, press to access the previous track.
19.MENU:Press to access the DVD disc menu for selections. Press
MENU again when in the DVD disc menu to access the system set-up
menu.
20.SUBTITLE(DVD dependent): Press to turn the subtitle feature ON
or OFF.
21.LANGUAGE(DVD dependent): Press to select the desired
language.
2007(dvd)
Supplement
USA(fus)
System descriptions
14
Page 15 of 32
22.ENTER:Press to select the highlighted menu option.
23.ILLUMINATION: Press to illuminate the remote control and
backlight all of the buttons.
Battery replacement
Batteries are supplied with the
remote control unit. Since all
batteries have a limited shelf life,
replace them when the unit fails to
control the DVD player.
Remove the screw and unlatch the battery cover to access the batteries.
The remote control unit uses two AAA batteries which are supplied with
the unit.
2007(dvd)
Supplement
USA(fus)
System descriptions
15
Page 16 of 32
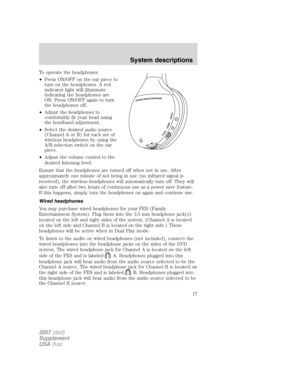
Headphones
Wireless headphones
Your FES system is equipped with two sets of battery powered, infrared
wireless headphones. Two AAA batteries are needed to operate the
headphones. (Batteries are included.)
Additional infrared wireless headphones may be purchased for use with
the system. Also, wired headphones may be purchased and plugged in
where indicated on the left and right hand sides of the system. Refer to
Wired Headphonesbelow.
To install the batteries, remove the
screw at the bottom of the cover.
Then, lightly press down on top and
slide the cover off.
When replacing the batteries, use
two new batteries (alkaline
recommended) and install them
with the correct orientation as
indicated in the battery housing.
2007(dvd)
Supplement
USA(fus)
System descriptions
16