Page 420 of 705
419 Controls in detail
Driving systems
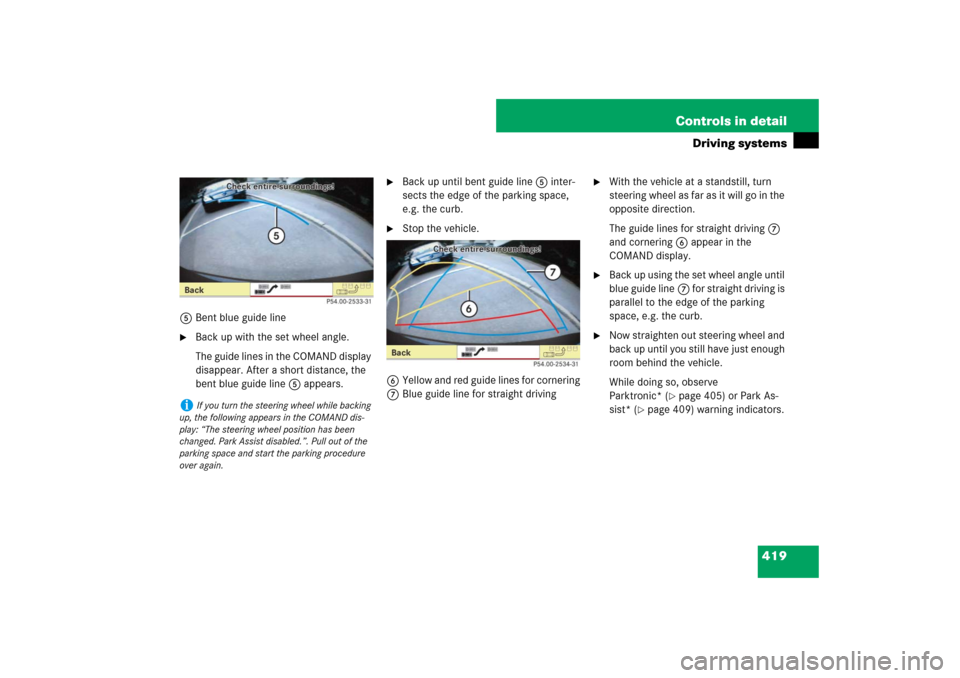
5Bent blue guide line�
Back up with the set wheel angle.
The guide lines in the COMAND display
disappear. After a short distance, the
bent blue guide line5 appears.
�
Back up until bent guide line5 inter-
sects the edge of the parking space,
e.g. the curb.
�
Stop the vehicle.
6Yellow and red guide lines for cornering
7Blue guide line for straight driving
�
With the vehicle at a standstill, turn
steering wheel as far as it will go in the
opposite direction.
The guide lines for straight driving7
and cornering6 appear in the
COMAND display.
�
Back up using the set wheel angle until
blue guide line7 for straight driving is
parallel to the edge of the parking
space, e.g. the curb.
�
Now straighten out steering wheel and
back up until you still have just enough
room behind the vehicle.
While doing so, observe
Parktronic* (
�page 405) or Park As-
sist* (
�page 409) warning indicators.
i
If you turn the steering wheel while backing
up, the following appears in the COMAND dis-
play: “The steering wheel position has been
changed. Park Assist disabled.”. Pull out of the
parking space and start the parking procedure
over again.
Page 423 of 705
422 Controls in detailDriving systemsDirty or fogged-up windshield
If the windshield in front of the camera is
fogged up on the inside or outside or if it is
dirty, the Night View Assist image is dimin-
ished.Removing condensation
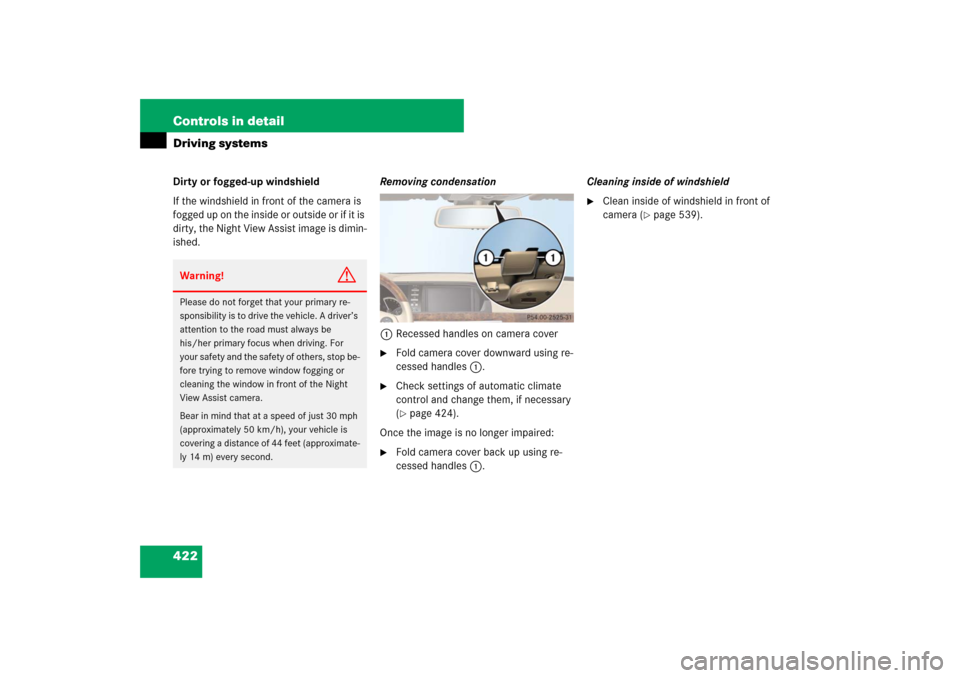
1Recessed handles on camera cover
�
Fold camera cover downward using re-
cessed handles1.
�
Check settings of automatic climate
control and change them, if necessary
(�page 424).
Once the image is no longer impaired:
�
Fold camera cover back up using re-
cessed handles1.Cleaning inside of windshield
�
Clean inside of windshield in front of
camera (
�page 539).
Warning!
G
Please do not forget that your primary re-
sponsibility is to drive the vehicle. A driver’s
attention to the road must always be
his/her primary focus when driving. For
your safety and the safety of others, stop be-
fore trying to remove window fogging or
cleaning the window in front of the Night
View Assist camera.
Bear in mind that at a speed of just 30 mph
(approximately 50 km/h), your vehicle is
covering a distance of 44 feet (approximate-
ly 14 m) every second.
Page 424 of 705
423 Controls in detail
Driving systems
Night View Assist* malfunctionProblem
Possible cause
Suggested solution
The quality of the Night View Assist image
has diminished.
The windshield wipers are leaving streaks
on the windshield.
�
Replace windshield wiper blades
(�page 627).
The area of the windshield within the cam-
era’s field of view is dirty.
�
Clean windshield (
�page 539).
The area of the windshield within the cam-
era’s field of view has been damaged.
�
Replace windshield.
The area of the windshield within the cam-
era’s field of view is fogged over.
�
Remove condensation (
�page 539).
The area of the windshield within the cam-
era’s field of view is iced over.
�
Defrost windshield (
�page 429).
Page 426 of 705
425 Controls in detail
Automatic climate control
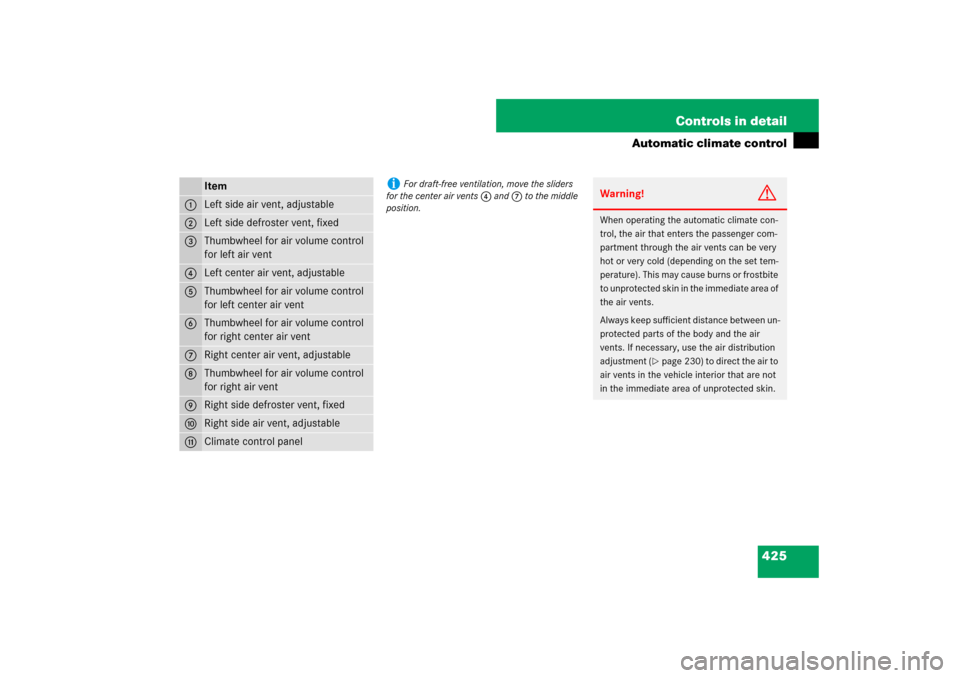
Item
1
Left side air vent, adjustable
2
Left side defroster vent, fixed
3
Thumbwheel for air volume control
for left air vent
4
Left center air vent, adjustable
5
Thumbwheel for air volume control
for left center air vent
6
Thumbwheel for air volume control
for right center air vent
7
Right center air vent, adjustable
8
Thumbwheel for air volume control
for right air vent
9
Right side defroster vent, fixed
a
Right side air vent, adjustable
b
Climate control panel
i
For draft-free ventilation, move the sliders
for the center air vents 4 and 7 to the middle
position.
Warning!
G
When operating the automatic climate con-
trol, the air that enters the passenger com-
partment through the air vents can be very
hot or very cold (depending on the set tem-
perature). This may cause burns or frostbite
to unprotected skin in the immediate area of
the air vents.
Always keep sufficient distance between un-
protected parts of the body and the air
vents. If necessary, use the air distribution
adjustment (
�page 230) to direct the air to
air vents in the vehicle interior that are not
in the immediate area of unprotected skin.
Page 428 of 705
427 Controls in detail
Automatic climate control
The automatic climate control is operation-
al whenever the engine is running. You can
operate the climate control system in ei-
ther the automatic or manual mode. The
system cools or heats the interior depend-
ing on the selected interior temperature
and the current outside temperature.
It can only function optimally when you are
driving with the windows and the tilt/slid-
ing sunroof/panorama sunroof* closed.
It is possible to completely deactivate the
climate control system (
�page 428). Nearly all dust particles, pollutants and
odors are filtered out before outside air en-
ters the passenger compartment through
the air distribution system.The following automatic climate control
functions can be operated via COMAND:
i
If you have the air distribution and air vol-
ume automatically controlled, you can adjust the
temperature, footwell temperature and air flow.
The following basic settings are recommended:
�
Automatic air distribution control
(�page 428)
�
Temperature: 72°F (22°C) (
�page 429)
�
Footwell temperature: 0 (
�page 232)
�
Air flow: focused (
�page 233)
Warning!
G
Follow the recommended settings for heat-
ing and cooling given on the following pages
and in the “COMAND automatic climate
control” section (
�page 229). Otherwise
the windows could fog up, impairing visibili-
ty and endangering you and others.
i
Severe conditions (e.g. strong air pollution)
may require replacement of the filter before its
scheduled interval. A clogged filter will reduce
the air volume to the interior.
If the vehicle interior is hot, ventilate the interior
before driving off, see “Summer opening fea-
ture” (�page 355). The automatic climate con-
trol will then adjust the interior temperature to
the set value much faster.
Keep the air intake grille in front of the wind-
shield free of snow, leaves, sticks, and any other
debris.
Do not obstruct air volume by placing objects on
the air volume-through exhaust slots below the
rear window.Function
Page
Temperature
230
Air distribution
230
Air volume
230
Switching off cooling (“AC
OFF”)
231
Central climate control (“Mono”)
232
Footwell temperature
232
Air flow from air vents
233
Rear climate control*
234
Page 429 of 705
428 Controls in detailAutomatic climate controlDeactivating climate control system�
Deactivating: Press button´
(�page 426) up or down.
The indicator lamp on the button
comes on.
�
Reactivating: Press button´
(�page 426) up or down.
The indicator lamp on the button goes
out.Operating climate control system in au-
tomatic mode
Activating�
Press buttonU (
�page 426) up or
down.
The indicator lamp on the button
comes on.Deactivating
�
Press buttonU (
�page 426) up or
down.
or
�
Adjust air distribution (
�page 230).
or
�
Adjust air volume (
�page 429).
The indicator lamp on buttonU
goes out. The automatic function is
switched off.
You can adjust the air distribution
(
�page 230) or air volume
(�page 429) manually.
Warning!
G
When the automatic climate control is
switched off, the outside air supply and cir-
culation are also switched off. Only choose
this setting for a short time. Otherwise the
windows could fog up, impairing visibility
and endangering you and others.
i
When operating the climate control system
in automatic mode, you will only rarely need to
adjust the temperature, air volume and air distri-
bution.
Page 430 of 705

429 Controls in detail
Automatic climate control
Setting temperature
Use temperature controls %$
2anda (
�page 426) in the center con-
sole or COMAND (
�page 230) to sepa-
rately adjust the air temperature on each
side of the passenger compartment. You
should raise or lower the temperature set-
ting in small increments, preferably start-
ing at 72°F (22°C). The automatic climate
control will adjust to the set temperature
as fast as possible.
�
Press temperature control %$
2and/ora (
�page 426) upward or
downward.
The climate control system will corre-
spondingly adjust the interior air tem-
perature.
Adjusting air volume
Use buttonsQ (
�page 426) in the cen-
ter console or COMAND to separately ad-
just the air volume on each side of the
passenger compartment.
�
Press buttonQ up to increase or
down to decrease air volume.
The indicator lamps on buttonsU
(�page 426) goes out.
Front defroster
You can use this setting to defrost the
windshield, for example if it is iced up. You
can also defog the windshield and the side
windows.Activating
�
Press button; (
�page 426) up or
down.
The indicator lamp on the button
comes on.
The air conditioning switches to the follow-
ing functions automatically:
�
increased blowing and heating power
�
air flows onto the windshield and the
front side windows
�
the air conditioning compressor
switches on at outside temperatures
above approximately 41°F (5°C) for
dehumidifying the air
�
the air recirculation mode is switched
off
i
When you change the air volume, the auto-
matic function of the climate control system is
switched off.
i
Keep this setting selected only until the
windshield is clear again.
Page 431 of 705
430 Controls in detailAutomatic climate controlDeactivating�
Press button; (
�page 426) up or
down.
The indicator lamp on the button goes
out.
The previous settings are once again in
effect, except air recirculation mode
stays off.
Windshield fogged on the outside
�
Switch the windshield wipers on
(�page 351).
�
Press buttonU (
�page 426) up or
down.
The indicator lamp on the button
comes on.
Rear window defroster
Activating�
Switch on the ignition (
�page 315).
�
Press button< (
�page 426) up or
down.
The indicator lamp on the button
comes on.
Deactivating
�
Press button< (
�page 426) up or
down.
The indicator lamp on the button goes
out.
Maximum cooling MAXCOOL (USA only)
If U is selected on both the left and
right side and there is a high demand for
cooling, the display “MAXCOOL” appears
in the COMAND display.
This provides the fastest possible cooling
of the vehicle interior (when windows and
tilt/sliding sunroof or tilt/sliding panel*
are closed).
!
The rear window defroster uses a large
amount of power. To keep battery drain to a min-
imum, switch off the defroster as soon as the
rear window is clear.
i
The defroster is automatically deactivated
after some time of operation depending on the
outside temperature.Warning!
G
Any accumulation of snow and ice should be
removed from the rear window before driv-
ing. Visibility could otherwise be impaired,
endangering you and others.
i
If the rear window defroster switches off too
soon and the indicator lamp goes out, this indi-
cates that too many electrical consumers are op-
erating simultaneously and the load on the
battery is reducing available voltage. The system
responds automatically by deactivating the rear
window defroster.
i
Maximum cooling MAXCOOL is only avail-
able when the engine is running.