Page 613 of 705

612 Practical hintsWhere will I find ...?Vehicle jack
Storage position�
Remove vehicle jack from its
compartment.
�
Turn crank handle in direction of arrow
as far as it will go.
Operational position�
Turn crank handle clockwise.
Before storing the vehicle jack in its
compartment:
�
It should be fully collapsed.
�
The handle must be folded in (storage
position).
Warning!
G
The jack is designed exclusively for jacking
up the vehicle at the jack take-up brackets
built into both sides of the vehicle. To help
avoid personal injury, use the jack only to lift
the vehicle during a wheel change. Never
get beneath the vehicle while it is supported
by the jack. Keep hands and feet away from
the area under the lifted vehicle. Always
firmly set parking brake and block wheels
before raising vehicle with jack.
Do not disengage parking brake while the
vehicle is raised. Be certain that the jack is
always vertical (plumb line) when in use,
especially on hills. Always try to use the jack
on level surface. Make sure the jack arm is
fully seated in the jack take-up bracket.
Always lower the vehicle onto sufficient
capacity jackstands before working under
the vehicle.
Page 614 of 705
613 Practical hints
Where will I find ...?
Minispare wheel
The Minispare wheel is stored in the com-
partment underneath the trunk floor.
1Minispare wheel with spare wheel bolts
in container on wheel rim
2Luggage bowl
3Vehicle tool kit, jack and collapsible
wheel chock
Removing the Minispare wheel�
Turn luggage bowl2 counterclock-
wise.
�
Remove Minispare wheel1.Setting up the collapsible wheel chock
The collapsible wheel chock serves to
additionally secure the vehicle, e.g. while
changing the wheel.
1Tilt the plates upward
2Fold the lower plate outward
3Insert the plate
�
Tilt both plates upward1.
�
Fold the lower plate outward2.
�
Guide the tabs of the lower plate all the
way into the openings of the base
plate3.
Page 615 of 705
614 Practical hintsUnlocking/locking in an emergencyUnlocking the vehicle
If you are unable to unlock the vehicle with
the SmartKey or KEYLESS-GO*, open the
driver’s door and the trunk using the me-
chanical key. Removing the mechanical key
1Mechanical key locking tab
2Mechanical key
�
Move locking tab1 in the direction of
arrow.
�
Slide mechanical key2 out of the
housing.Unlocking the driver’s door
1Unlocking
2Mechanical key
�
Insert mechanical key2 into the driv-
er’s door lock until it stops.
�
Turn mechanical key2 counterclock-
wise to position1.
The driver’s door is unlocked.
�
Pull door handle quickly.
The locking knob moves up.
�
Turn back mechanical key2 and re-
move.
�
Pull door handle again.
i
Unlocking the driver’s door and/or the trunk
with the mechanical key will trigger the anti-theft
alarm system (
�page 75).
To cancel the alarm, insert the SmartKey or
SmartKey with KEYLESS-GO* in the starter
switch.
Page 616 of 705
 is required to open the trunk lid.
1Trunk lid lock�
Insert the mechanical key")
615 Practical hints
Unlocking/locking in an emergency
Unlocking the trunk
A minimum height clearance of 5.9 ft.
(1.80 m) is required to open the trunk lid.
1Trunk lid lock�
Insert the mechanical key into the
trunk lid lock1 until it stops.
�
Turn mechanical key all the way to the
left.
The trunk opens.
�
Turn the mechanical key back and re-
move it from the trunk lid lock.
Locking the vehicle
If you cannot lock the vehicle with the
SmartKey or KEYLESS-GO*, do the follow-
ing:�
Close the front passenger door, the
rear right door and the trunk.
�
Open the driver’s door and the rear left
door.
�
Press the central locking switch on the
driver’s door (
�page 314).
The locking knobs of the front passen-
ger door and the rear doors move
down.
If the vehicle battery is disconnected or
drained:
�
Press down the locking knobs of
the front passenger door and the
rear doors manually.
�
Exit the vehicle.
�
Close the driver’s door.
�
Enter the vehicle through the rear left
door.
�
Press down the locking knob of the
driver’s door.
�
Exit the vehicle.
�
Close the rear left door.
The vehicle is locked.
!
The trunk lid swings open upwards automat-
ically. Always make sure that there is sufficient
overhead clearance.
!
To prevent inadvertent lockout, make sure
to have the SmartKey or SmartKey with KEY-
LESS-GO* with you before proceeding with the
next step. The next step will lock the vehicle.
Page 617 of 705

616 Practical hintsUnlocking/locking in an emergencyMechanically releasing the electric parking brake
The mechanical release device for the
electric parking brake is underneath the
fuel filler flap next to the fuel cap.
1Fuel filler flap
2Release tool
3Protective cap
�
Shift the automatic transmission to P
(�page 367).
�
Place chock from vehicle tool kit
(�page 611) under a rear wheel.
�
Open fuel filler flap1.
�
Remove protective cap3.
�
Screw release tool2 from vehicle tool
kit clockwise 2 to 3 rotations onto re-
lease lever.
�
Pull release tool2 in direction of ar-
row.
The electric parking brake is released.
The red indicator lamp 0 (USA only)
or ! (Canada only) in the instru-
ment cluster for the electric parking
brake flashes. The message “Parking
brake See Oper. Manual” appears on
the driver’s display.
After it has been unlocked, you can engage
the electric parking brake again from the
driver’s seat.
�
Press the electric parking brake handle
(�page 364).
Warning!
G
If you mechanically release the electric
parking brake, the vehicle may start to move
on its own. Make sure that no one is in front
of or behind the vehicle. Otherwise, an acci-
dent could occur resulting in injury or fatali-
ty. Shift the automatic transmission to P and
secure your vehicle in place using the chock
from the vehicle tool kit.
i
You must pull the release tool with more
force if the electric parking brake cannot be re-
leased.
!
Reattach protective cap
3
after you have
mechanically released the electric parking
brake.
Page 618 of 705
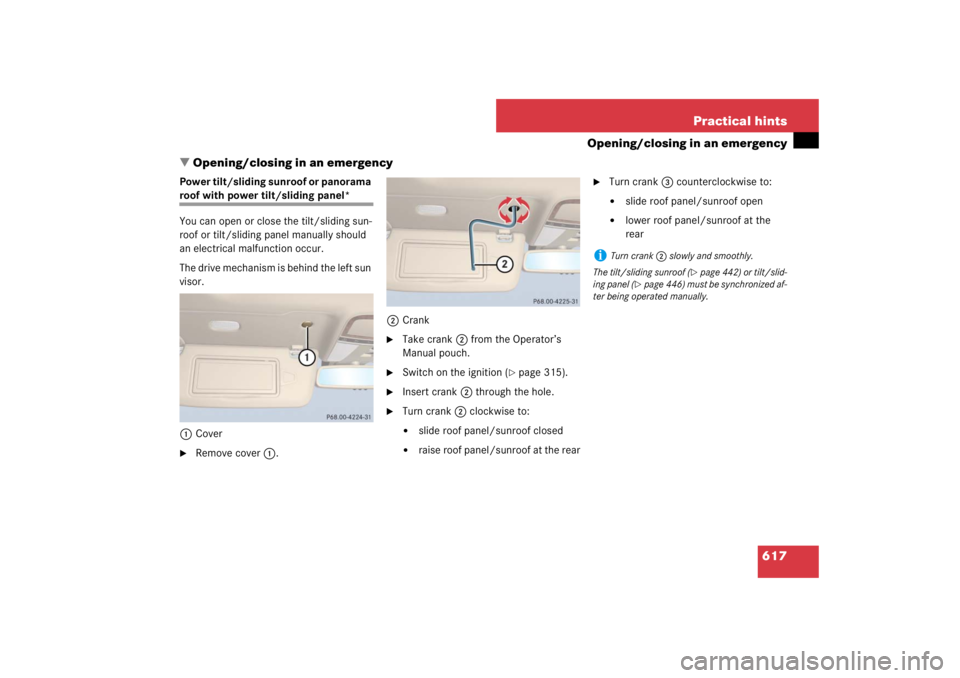
617 Practical hints
Opening/closing in an emergency
�Opening/closing in an emergency
Power tilt/sliding sunroof or panorama roof with power tilt/sliding panel*
You can open or close the tilt/sliding sun-
roof or tilt/sliding panel manually should
an electrical malfunction occur.
The drive mechanism is behind the left sun
visor.
1Cover�
Remove cover1.2Crank
�
Take crank2 from the Operator’s
Manual pouch.
�
Switch on the ignition (
�page 315).
�
Insert crank2 through the hole.
�
Turn crank2 clockwise to:�
slide roof panel/sunroof closed
�
raise roof panel/sunroof at the rear
�
Turn crank3 counterclockwise to:�
slide roof panel/sunroof open
�
lower roof panel/sunroof at the
rear
i
Turn crank2 slowly and smoothly.
The tilt/sliding sunroof (
�page 442) or tilt/slid-
ing panel (
�page 446) must be synchronized af-
ter being operated manually.
Page 620 of 705

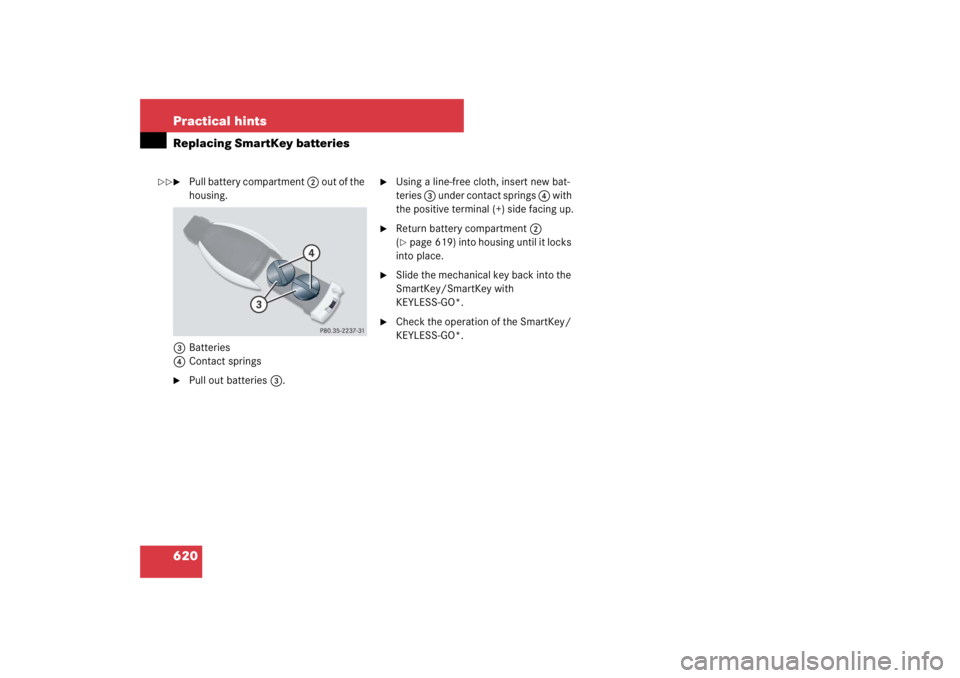
619 Practical hints
Replacing SmartKey batteries
�Replacing SmartKey batteries
If the batteries in the SmartKey or the
SmartKey with KEYLESS-GO* are dis-
charged, the vehicle can no longer be
locked or unlocked. It is recommended to
have the batteries replaced at an autho-
rized Mercedes-Benz Center.Batteries contain materials that can harm
the environment if disposed of improperly.
Recycling of batteries is the preferred
method of disposal. Many states require
sellers of batteries to accept old batteries
for recycling.SmartKey/SmartKey with
KEYLESS-GO*
Replacement batteries: Lithium, type
CR 2025 or equivalent.�
Remove the mechanical key out of the
SmartKey or the SmartKey with
KEYLESS-GO* (
�page 614).
1Mechanical key
2Battery compartment
�
Insert mechanical key 1 into opening.
�
Press mechanical key 1 in direction of
arrow.
The battery compartment is unlatched.
Warning!
G
Batteries contain poisonous and corrosive
substances. Therefore keep the batteries
out of reach of children.
If a battery is swallowed, seek medical help
immediately.
i
When inserting the batteries, make sure
they are clean and free of lint.
i
When changing batteries, always replace
both batteries.
The required replacement batteries are available
at any authorized Mercedes-Benz Center.
��
Page 621 of 705
620 Practical hintsReplacing SmartKey batteries�
Pull battery compartment 2 out of the
housing.
3Batteries
4Contact springs
�
Pull out batteries3.
�
Using a line-free cloth, insert new bat-
teries 3 under contact springs 4 with
the positive terminal (+) side facing up.
�
Return battery compartment 2
(�page 619) into housing until it locks
into place.
�
Slide the mechanical key back into the
SmartKey/SmartKey with
KEYLESS-GO*.
�
Check the operation of the SmartKey/
KEYLESS-GO*.
��