Page 437 of 570

436 Practical hints
What to do if …
Display messagePossible cause/consequencePossible solution
ABSunavailable
See Operator’s ManualIf the yellow ESP® warning
lampv flashes while driving and
this message appears, the electron-
ic traction system has switched off
to prevent overheating of the drive
wheel brakes.As soon as the brakes have cooled off, the
electronic traction system switches on again.
The message in the multifunction display disap-
pears and the ESP
® warning lampv goes
out.
The self-diagnosis has not yet been
completed yet.The display will clear after driving a short
distance at a vehicle speed of above
12 mph (20 km/h).
Cruise
control and
SPEEDTRONIC
inoperativeThe cruise control is malfunctioning.�Have cruise control checked by an
authorized Mercedes-Benz Light Truck
Center.
Cruise
control––– mphYou have attempted to set a
speed while driving below
20 mph (30 km/h).�Accelerate to a speed exceeding
20 mph (30 km/h) and set the speed
(
�page 266).
The ESP® is switched off.�Switch on the ESP® (�page 105).
The automatic transmission is set to
position P, R, or N.�Set the automatic transmission to
positionD (
�page 197).
The vehicle is secured with the
parking brake.�Release the parking brake (�page 57).
Page 438 of 570
437 Practical hints
What to do if …
Display messagePossible cause/consequencePossible solution
DISTRONIC––– mphYou have attempted to set a
speed while driving below
20 mph (30 km/h).�Accelerate to a speed exceeding
20 mph (30 km/h) and set the speed
(
�page 266).
The ESP® is switched off.�Switch on the ESP® (�page 105).
The automatic transmission is set to
position P, R, or N.�Set the automatic transmission to posi-
tion D (
�page 197).
The vehicle is secured with the
parking brake.�Release the parking brake (�page 57).
inoperativeThe Distronic* or the Distronic*
display are malfunctioning.�Have the system checked by an
authorized Mercedes-Benz Light Truck
Center.
OverrideYou have accelerated. The
Distronic* has switched off.�Stop accelerating.
Page 446 of 570

445 Practical hints
What to do if …
Display messagePossible
cause/consequencePossible solution
Front passenger airbag
enabled
See Operator’s ManualFront passenger front
air bag is activated
while driving even
though a child, small
individual, or object
below the system’s
weight threshold is on
the front passenger
seat, or the front pas-
senger seat is empty.
Objects on the seat or
forces acting on the
seat may make the
system sense supple-
mental weight.Stop the vehicle in a safe location as soon as possible and check the front passen-
ger seat for the following:
�Apply the parking brake (�page 66).
�Switch off the ignition (�page 39).
�Remove child and child restraint from front passenger seat and properly secure
the child in rear seat employing the child restraint if necessary.
�Remove any other items from on and around the front passenger seat and
make sure the storage bag on the back of the front passenger seat is empty.
�Make sure that no objects which apply forces to the seat are present (e.g. ob-
jects such as books, briefcases etc. lodged behind or around the seat, head re-
straints pushing against roof etc.). The system may recognize such forces as
supplemental weight and sense that an occupant on the front passenger seat
is of a heavier weight than actually present.
�Keep the seat unoccupied, close the front passenger door and turn on the igni-
tion (
�page 39).
(Continued on next page)
Page 474 of 570
473 Practical hints
Where will I find ...?
3Securing hook
�Release securing hook 3 (located be-
low the floor handle) from holder.3Securing hook
4Cargo compartment floor, raised
5Upper cargo compartment lip
�Engage securing hook 3 on upper
cargo compartment lip 5.
You can now access the vehicle tool kit.
To remove the vehicle tool kit storage
well casing, proceed as described
on (
�page 476).6Wheel bolt wrench
7Electric air pump
8Jack
9Spare fuses, fuse extractor, fuse chart
aSpare wheel (collapsible tire)
bAlignment bolt
cTowing eye bolt
dCollapsible wheel chock
eSpare wheel bolts
fVehicle tool kit storage well casing
�To remove jack8, loosen the hook
and loop fastener.
!With the cargo compartment cover blind*
installed behind the third-row seats
(
�page 306), disengage cargo compartment
cover blind* and flip it forward. Otherwise the
strap of the securing hook could damage the
cargo compartment cover blind*.
Page 476 of 570

475 Practical hints
Where will I find ...?
Setting up the collapsible wheel chock
The collapsible wheel chock serves to ad-
ditionally secure the vehicle, e.g. while
changing the wheel.
1Tilt the plate upward
2Fold the lower plate outward
3Insert the plate�Tilt both plates upward1.
�Fold the lower plate outward2.
�Guide the tabs of the lower plate all the
way into the openings of base plate3.
For information on where to place wheel
chocks when changing a wheel, see “Lift-
ing the vehicle” (
�page 498).
Spare wheel
Warning!G
The dimensions of the spare wheel are
different from those of the road wheels. As
a result, the vehicle handling characteristics
change when driving with a spare wheel
mounted. Adapt your driving style accord-
ingly.
The spare wheel is for temporary use only.
When driving with a spare wheel mounted,
ensure proper tire inflation pressure and do
not exceed a vehicle speed of
50 mph (80 km/ h).
Drive to the nearest Mercedes-Benz Light
Truck Center as soon as possible to have the
spare wheel replaced with a regular road
wheel.
Never operate the vehicle with more than
one spare wheel mounted.
Do not switch off the ESP
® with a spare
wheel mounted.
Page 478 of 570
477 Practical hints
Where will I find ...?
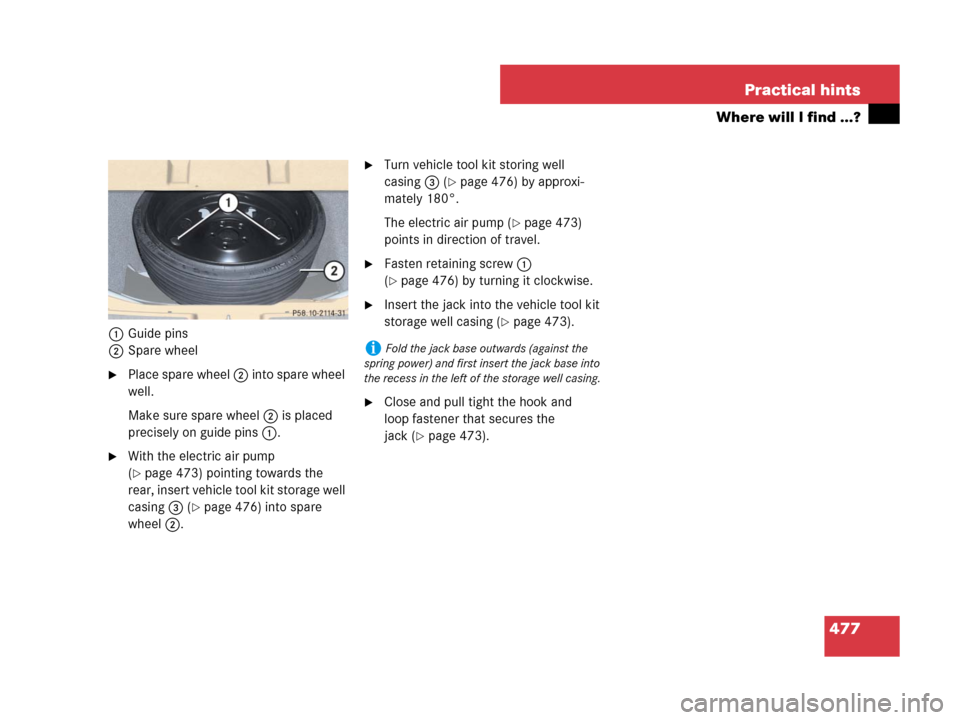
1Guide pins
2Spare wheel
�Place spare wheel 2 into spare wheel
well.
Make sure spare wheel 2 is placed
precisely on guide pins 1.
�With the electric air pump
(
�page 473) pointing towards the
rear, insert vehicle tool kit storage well
casing 3 (
�page 476) into spare
wheel 2.
�Turn vehicle tool kit storing well
casing3 (
�page 476) by approxi-
mately 180°.
The electric air pump (
�page 473)
points in direction of travel.
�Fasten retaining screw 1
(
�page 476) by turning it clockwise.
�Insert the jack into the vehicle tool kit
storage well casing (
�page 473).
�Close and pull tight the hook and
loop fastener that secures the
jack (
�page 473).
iFold the jack base outwards (against the
spring power) and first insert the jack base into
the recess in the left of the storage well casing.
Page 496 of 570

495 Practical hints
Replacing wiper blades
Installing
1Wiper blade
2Attachment
3Guide tab
4Opening
�With guide tab 3 sliding into
opening4, place wiper blade 1 onto
wiper arm in direction of arrow.
�Fold wiper blade 1 towards wiper
arm.
Tabs 2 (
�page 494) must engage
into both recesses of attachment 2.
�Check whether the wiper blade is
securely fastened.
�Fold the wiper arm backward to rest on
the windshield.
Make sure to hold on to the wiper when
folding the wiper arm back.
Rear wiper blade
Warning!G
For safety reasons, switch off wipers and
remove SmartKey from starter switch
(vehicles with KEYLESS-GO*: Make sure the
vehicle’s on-board electronics have
status0) before replacing a wiper blade.
Otherwise the motor could suddenly turn on
and cause injury.
!Hold on to the wiper when folding the wiper
arm back. If released, the force of the impact
from the tensioning spring could crack the rear
window.
Do not allow the wiper arms to contact the rear
window glass without a wiper blade inserted.
For your convenience, we recommend that you
have this work carried out by an authorized
Mercedes-Benz Light Truck Center.
Make sure the wiper blades are properly in-
stalled. Improperly installed wiper blades may
cause rear window damage.
Page 497 of 570
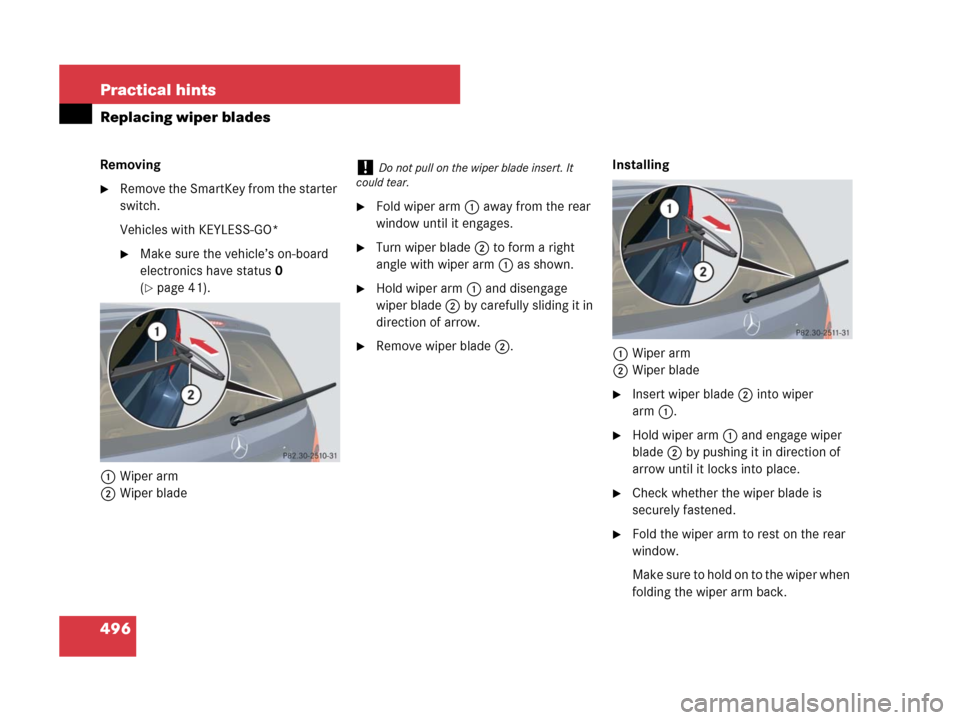
496 Practical hints
Replacing wiper blades
Removing
�Remove the SmartKey from the starter
switch.
Vehicles with KEYLESS-GO*
�Make sure the vehicle’s on-board
electronics have status0
(
�page 41).
1Wiper arm
2Wiper blade
�Fold wiper arm 1 away from the rear
window until it engages.
�Turn wiper blade2 to form a right
angle with wiper arm 1 as shown.
�Hold wiper arm 1 and disengage
wiper blade 2 by carefully sliding it in
direction of arrow.
�Remove wiper blade 2.Installing
1Wiper arm
2Wiper blade
�Insert wiper blade 2 into wiper
arm1.
�Hold wiper arm 1 and engage wiper
blade 2 by pushing it in direction of
arrow until it locks into place.
�Check whether the wiper blade is
securely fastened.
�Fold the wiper arm to rest on the rear
window.
M a k e s u r e t o h o l d o n t o t h e w i p e r w h e n
folding the wiper arm back.
!Do not pull on the wiper blade insert. It
could tear.