Page 301 of 570
300 Controls in detail
Loading
Second seat-row
Two cargo tie-down rings are located in the
footwell behind the driver’s and passenger
seat.
1Cargo tie-down ringThird seat-row
Two cargo tie-down rings are located in the
footwell behind the second-row seats.
1Cargo tie-down ringHooks
Two hooks are located on the rear com-
partment trim panels, one on each side.
1Hook
Use the hooks to secure light weight items
only. The maximum permissible weight per
hook is 9 lbs (4 kg).
Page 302 of 570
301 Controls in detail
Loading
Expanding cargo compartment
You can separately fold each seat of the
rear passenger compartment to expand
the cargo compartment.
Expanding cargo compartment in part
Folding third-row seats
�Completely lower the head restraints of
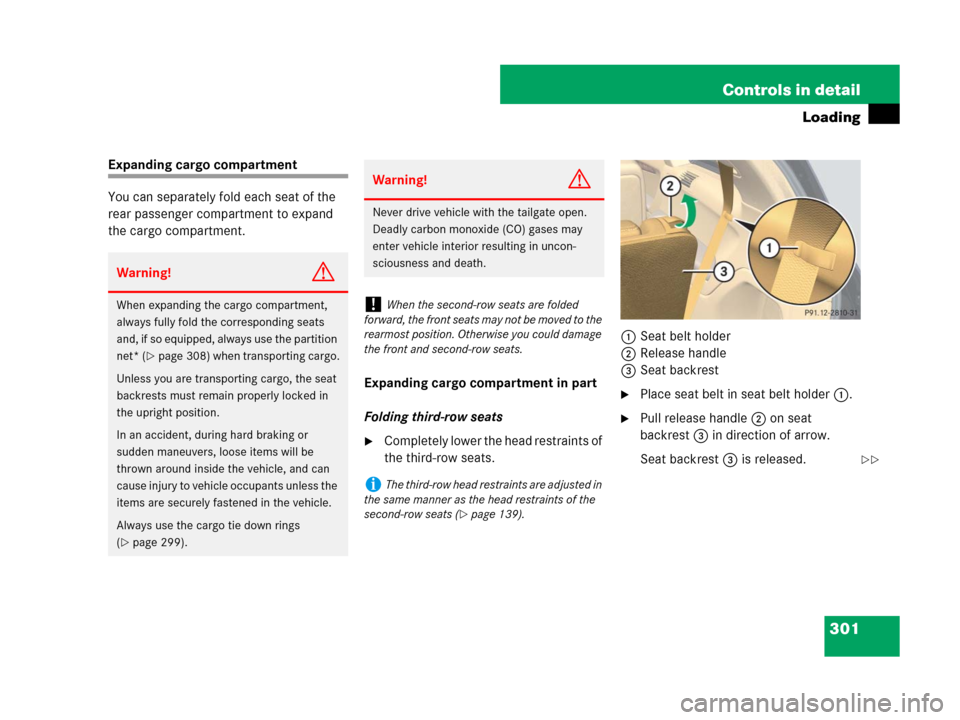
the third-row seats.1Seat belt holder
2Release handle
3Seat backrest
�Place seat belt in seat belt holder 1.
�Pull release handle 2 on seat
backrest3 in direction of arrow.
Seat backrest 3 is released.
Warning!G
When expanding the cargo compartment,
always fully fold the corresponding seats
and, if so equipped, always use the partition
net* (
�page 308) when transporting cargo.
Unless you are transporting cargo, the seat
backrests must remain properly locked in
the upright position.
In an accident, during hard braking or
sudden maneuvers, loose items will be
thrown around inside the vehicle, and can
cause injury to vehicle occupants unless the
items are securely fastened in the vehicle.
Always use the cargo tie down rings
(
�page 299).
Warning!G
Never drive vehicle with the tailgate open.
Deadly carbon monoxide (CO) gases may
enter vehicle interior resulting in uncon-
sciousness and death.
!When the second-row seats are folded
forward, the front seats may not be moved to the
rearmost position. Otherwise you could damage
the front and second-row seats.
iThe third-row head restraints are adjusted in
the same manner as the head restraints of the
second-row seats (
�page 139).
��
Page 309 of 570
308 Controls in detail
Loading
When not in use, you can attach the cover
blind extensions to the cover blind.
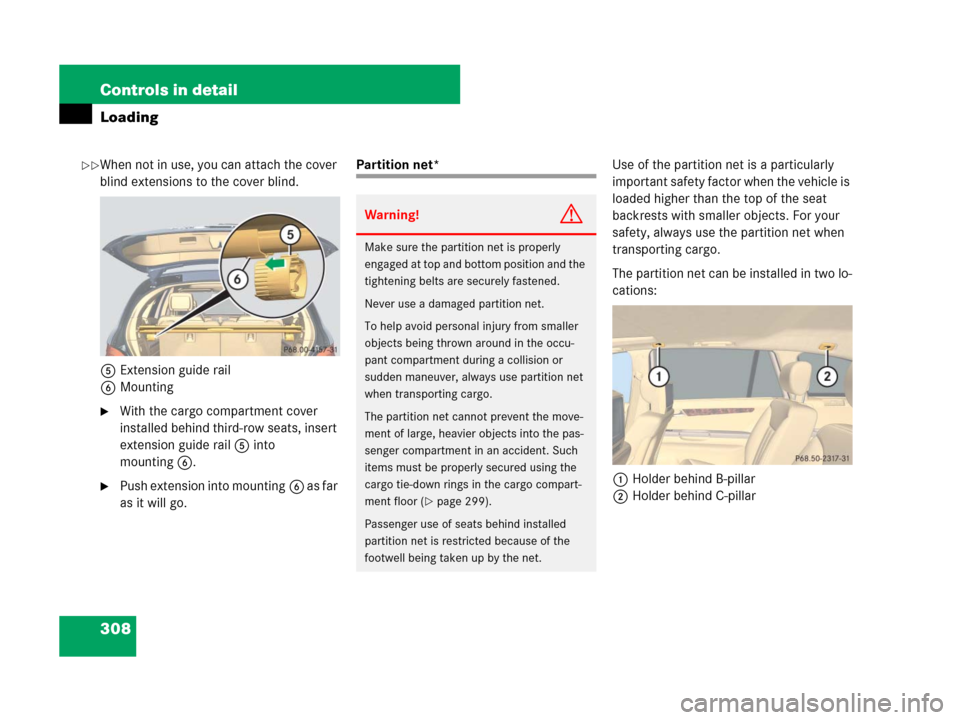
5Extension guide rail
6Mounting
�With the cargo compartment cover
installed behind third-row seats, insert
extension guide rail 5 into
mounting6.
�Push extension into mounting6 as far
as it will go.
Partition net*Use of the partition net is a particularly
important safety factor when the vehicle is
loaded higher than the top of the seat
backrests with smaller objects. For your
safety, always use the partition net when
transporting cargo.
The partition net can be installed in two lo-
cations:
1Holder behind B-pillar
2Holder behind C-pillar
Warning!G
Make sure the partition net is properly
engaged at top and bottom position and the
tightening belts are securely fastened.
Never use a damaged partition net.
To help avoid personal injury from smaller
objects being thrown around in the occu-
pant compartment during a collision or
sudden maneuver, always use partition net
when transporting cargo.
The partition net cannot prevent the move-
ment of large, heavier objects into the pas-
senger compartment in an accident. Such
items must be properly secured using the
cargo tie-down rings in the cargo compart-
ment floor (
�page 299).
Passenger use of seats behind installed
partition net is restricted because of the
footwell being taken up by the net.
��
Page 312 of 570
311 Controls in detail
Useful features
�Useful features
Storage compartments Glove box/CD changer*
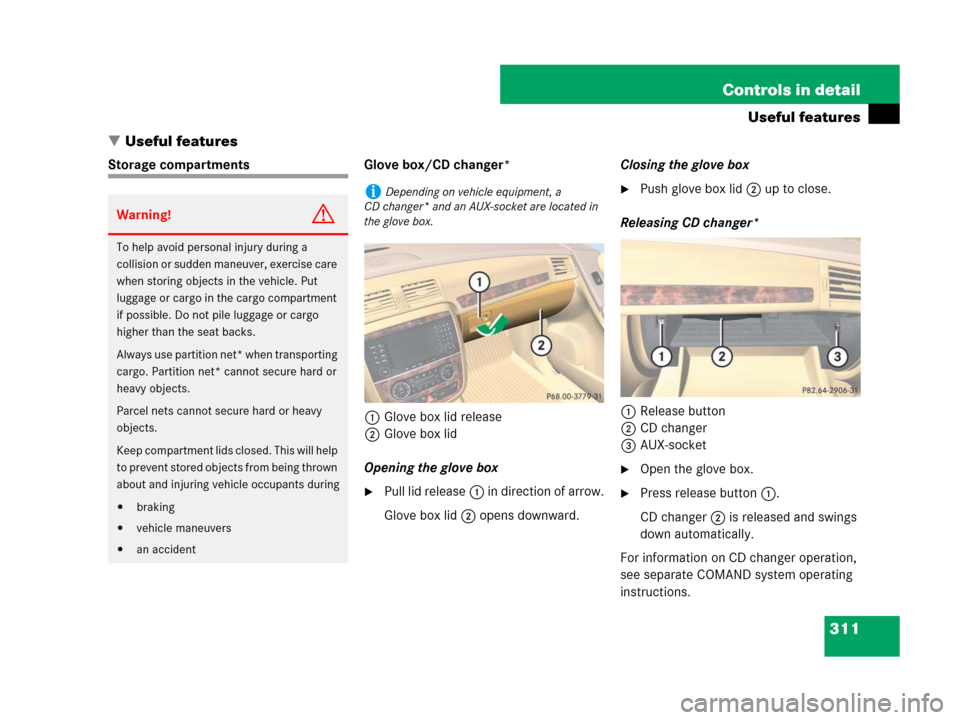
1Glove box lid release
2Glove box lid
Opening the glove box
�Pull lid release1 in direction of arrow.
Glove box lid2 opens downward.Closing the glove box
�Push glove box lid 2 up to close.
Releasing CD changer*
1Release button
2CD changer
3AUX-socket
�Open the glove box.
�Press release button 1.
CD changer 2 is released and swings
down automatically.
For information on CD changer operation,
see separate COMAND system operating
instructions.
Warning!G
To help avoid personal injury during a
collision or sudden maneuver, exercise care
when storing objects in the vehicle. Put
luggage or cargo in the cargo compartment
if possible. Do not pile luggage or cargo
higher than the seat backs.
Always use partition net* when transporting
cargo. Partition net* cannot secure hard or
heavy objects.
Parcel nets cannot secure hard or heavy
objects.
Keep compartment lids closed. This will help
to prevent stored objects from being thrown
about and injuring vehicle occupants during
�braking
�vehicle maneuvers
�an accident
iDepending on vehicle equipment, a
CD changer* and an AUX-socket are located in
the glove box.
Page 321 of 570
320 Controls in detail
Useful features
Removing ashtray insert
�Grip ashtray insert 2 on the sides and
pull it out upwards.
Reinstalling ashtray insert
�Insert ashtray insert 2 and push down
until the ball catch engages.
�Close ashtray cover plate 1.Rear seat ashtray (second row)
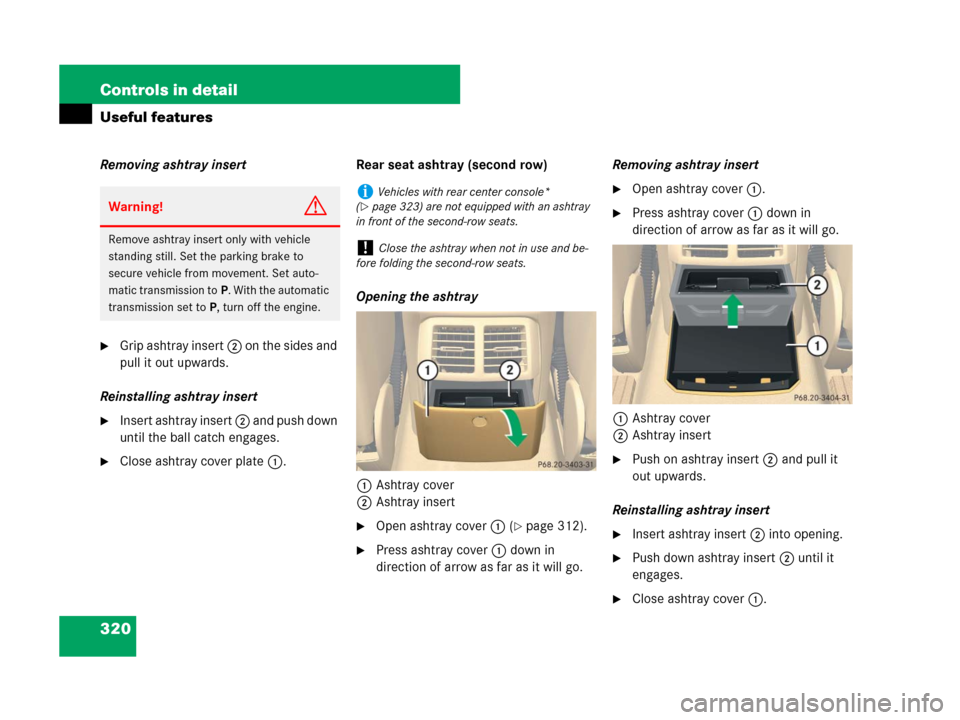
Opening the ashtray
1Ashtray cover
2Ashtray insert
�Open ashtray cover 1 (�page 312).
�Press ashtray cover 1 down in
direction of arrow as far as it will go.Removing ashtray insert
�Open ashtray cover 1.
�Press ashtray cover 1 down in
direction of arrow as far as it will go.
1Ashtray cover
2Ashtray insert
�Push on ashtray insert 2 and pull it
out upwards.
Reinstalling ashtray insert
�Insert ashtray insert 2 into opening.
�Push down ashtray insert 2 until it
engages.
�Close ashtray cover 1.
Warning!G
Remove ashtray insert only with vehicle
standing still. Set the parking brake to
secure vehicle from movement. Set auto-
matic transmission toP. With the automatic
transmission set toP, turn off the engine.
iVehicles with rear center console*
(
�page 323) are not equipped with an ashtray
in front of the second-row seats.
!Close the ashtray when not in use and be-
fore folding the second-row seats.
Page 344 of 570
343 Controls in detail
Useful features
To make sure the display is correct, the
compass must be set to the proper
geographic zone (
�page 186). It may also
be necessary to calibrate the compass
(
�page 187).
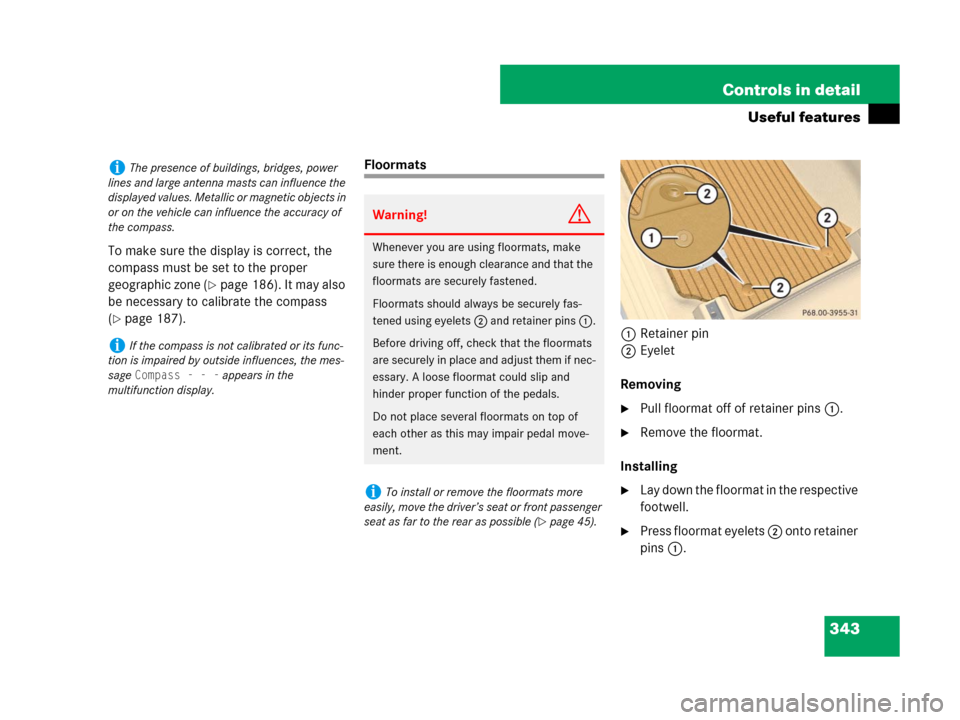
Floormats
1Retainer pin
2Eyelet
Removing
�Pull floormat off of retainer pins 1.
�Remove the floormat.
Installing
�Lay down the floormat in the respective
footwell.
�Press floormat eyelets 2 onto retainer
pins 1.
iThe presence of buildings, bridges, power
lines and large antenna masts can influence the
displayed values. Metallic or magnetic objects in
or on the vehicle can influence the accuracy of
the compass.
iIf the compass is not calibrated or its func-
tion is impaired by outside influences, the mes-
sage
Compass - - - appears in the
multifunction display.
Warning!G
Whenever you are using floormats, make
sure there is enough clearance and that the
floormats are securely fastened.
Floormats should always be securely fas-
tened using eyelets 2 and retainer pins 1.
Before driving off, check that the floormats
are securely in place and adjust them if nec-
essary. A loose floormat could slip and
hinder proper function of the pedals.
Do not place several floormats on top of
each other as this may impair pedal move-
ment.
iTo install or remove the floormats more
easily, move the driver’s seat or front passenger
seat as far to the rear as possible (
�page 45).
Page 357 of 570
356 Operation
Driving instructions
Passenger compartmentDriving abroad
Abroad, there is an extensive
Mercedes-Benz service network at your
disposal. If you plan to drive into areas
which are not listed in the index of your
Mercedes-Benz Light Truck Center
directory, you should request pertinent
information from an authorized
Mercedes-Benz Light Truck Center.!Do not drive through flooded areas or water
of unknown depth. Before driving through water,
determine its depth. Never accelerate before
driving into water. The bow wave could force wa-
ter into the engine and auxiliary equipment, thus
damaging them.
If you must drive through standing water, drive
slowly to prevent water from entering the
passenger compartment or the engine compart-
ment. Water in these areas could cause damage
to electrical components or wiring of the engine
or transmission, or could result in water being
ingested by the engine through the air intake,
causing severe internal engine damage. Any
such damage is not covered by the
Mercedes-Benz Limited Warranty.
Warning!G
Always fasten items being carried as
securely as possible.
In an accident, during hard braking or sud-
den maneuvers, loose items will be thrown
around inside the vehicle, and cause injury
to vehicle occupants unless the items are
securely fastened in the vehicle.
The rear cargo compartment is the preferred
place to carry objects. Always use the parti-
tion net* when transporting cargo. The
partition net* cannot secure hard or heavy
objects. Always fasten items being carried
as securely as possible using the cargo
tie-down rings in the cargo floor area and
fastening materials.
Page 367 of 570

366 Operation
Engine compartment
Closing
�Let the hood drop from a height of
approximately 1 ft (30 cm).
The hood will lock audibly.
�Check to make sure the hood is fully
closed.
If you can raise the hood at a point
above the headlamps, then it is not
properly closed. Open it again and let it
drop with somewhat greater force.
Engine oil
The amount of oil your engine needs will
depend on a number of factors, including
driving style. Increased oil consumption
can occur when
�the vehicle is new
�the vehicle is driven frequently at
higher engine speeds
Engine oil consumption checks should only
be made after the vehicle break-in period.Checking engine oil level with the
control system (R 500 only)
When checking the oil level
�the vehicle must be parked on level
ground
�with the engine at operating tempera-
ture, the vehicle must have been
stationary for at least 5 minutes with
the engine turned off
�with the engine not at operating tem-
perature yet, the vehicle must have
been stationary for at least 30 minutes
with the engine turned off
To check the engine oil level via the
multifunction display, do the following:
�Switch on the ignition (�page 39).
The standard display (
�page 166)
should appear in the multifunction
display.
Warning!G
When closing the hood, use extreme caution
not to catch hand or fingers. Be careful that
you do not close the hood on anyone.
Make sure the hood is securely engaged be-
fore driving. Do not continue driving if the
hood can no longer engage after an accident
for example. The hood could otherwise
come loose while the vehicle is in motion
and injure you and/or others.
iDo not use any special lubricant additives,
as these may damage the drive assemblies.
Using special additives not approved by
Mercedes-Benz may cause damage not covered
by the Mercedes-Benz Limited Warranty.
More information on this subject is available at
any Mercedes-Benz Light Truck Center.