Page 483 of 570
482 Practical hints
Resetting activated head restraints
If the active head restraints have been
triggered in a rear-end collision, the active
head restraints must be reset. Otherwise,
the active head restraints cannot offer any
additional protection in the event of anoth-
er rear-end collision.
You can tell that the active head restraints
have been activated when they have been
moved forward and cannot be adjusted.
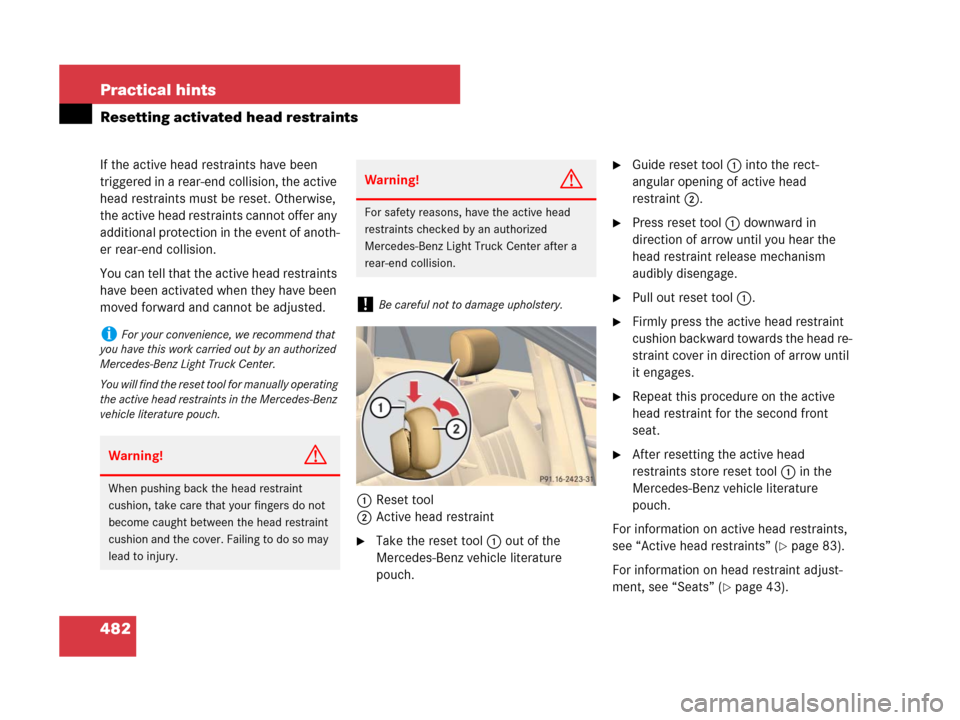
1Reset tool
2Active head restraint
�Take the reset tool1 out of the
Mercedes-Benz vehicle literature
pouch.
�Guide reset tool1 into the rect-
angular opening of active head
restraint2.
�Press reset tool1 downward in
direction of arrow until you hear the
head restraint release mechanism
audibly disengage.
�Pull out reset tool1.
�Firmly press the active head restraint
cushion backward towards the head re-
straint cover in direction of arrow until
it engages.
�Repeat this procedure on the active
head restraint for the second front
seat.
�After resetting the active head
restraints store reset tool1 in the
Mercedes-Benz vehicle literature
pouch.
For information on active head restraints,
see “Active head restraints” (
�page 83).
For information on head restraint adjust-
ment, see “Seats” (
�page 43).
iFor your convenience, we recommend that
you have this work carried out by an authorized
Mercedes-Benz Light Truck Center.
You will find the reset tool for manually operating
the active head restraints in the Mercedes-Benz
vehicle literature pouch.
Warning!G
When pushing back the head restraint
cushion, take care that your fingers do not
become caught between the head restraint
cushion and the cover. Failing to do so may
lead to injury.
Warning!G
For safety reasons, have the active head
restraints checked by an authorized
Mercedes-Benz Light Truck Center after a
rear-end collision.
!Be careful not to damage upholstery.
Page 484 of 570
483 Practical hints
Replacing SmartKey batteries
�Replacing SmartKey batteries
If the batteries in the SmartKey or the
SmartKey with KEYLESS-GO* are
discharged, the vehicle can no longer be
locked or unlocked. It is recommended to
have the batteries replaced at an autho-
rized Mercedes-Benz Light Truck Center.
Batteries contain materials that can harm
the environment if disposed of improperly.
Recycling of batteries is the preferred
method of disposal. Many states require
sellers of batteries to accept old batteries
for recycling.Replacement batteries: Lithium, type
CR 2025 or equivalent.
�Remove the mechanical key from the
SmartKey (
�page 478).
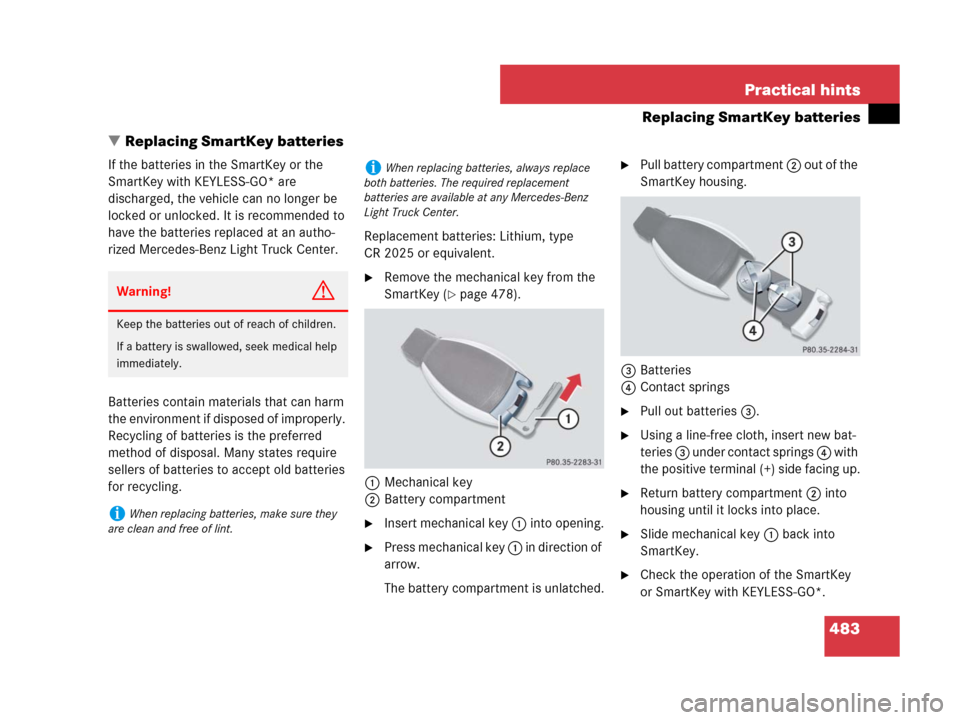
1Mechanical key
2Battery compartment
�Insert mechanical key 1 into opening.
�Press mechanical key 1 in direction of
arrow.
The battery compartment is unlatched.
�Pull battery compartment 2 out of the
SmartKey housing.
3Batteries
4Contact springs
�Pull out batteries3.
�Using a line-free cloth, insert new bat-
teries 3 under contact springs 4 with
the positive terminal (+) side facing up.
�Return battery compartment 2 into
housing until it locks into place.
�Slide mechanical key 1 back into
SmartKey.
�Check the operation of the SmartKey
or SmartKey with KEYLESS-GO*.
Warning!G
Keep the batteries out of reach of children.
If a battery is swallowed, seek medical help
immediately.
iWhen replacing batteries, make sure they
are clean and free of lint.
iWhen replacing batteries, always replace
both batteries. The required replacement
batteries are available at any Mercedes-Benz
Light Truck Center.
Page 485 of 570
484 Practical hints
Replacing bulbs
Bulbs
Safe vehicle operation depends on proper
exterior lighting and signaling. It is there-
fore essential that all bulbs and lamp
assemblies are in good working order at
all times.
Correct headlamp adjustment is extremely
important. Have headlamps checked and
readjusted at regular intervals and when a
bulb has been replaced. See an authorized
Mercedes-Benz Light Truck Center for
headlamp adjustment.iIf the headlamps or front fog lamps are
fogged up on the inside as a result of high humid-
ity, driving the vehicle a distance with the lights
on should clear up the fogging.iSubstitute bulbs will be brought into use
when the following lamps malfunction:
�Turn signal lamps
�Brake lamps
�Parking lamps
�Tail lamps
Read and observe messages in the multifunction
display (
�page 463).
Page 486 of 570
485 Practical hints
Replacing bulbs
Front lamps Rear lamps
LampType
1Parking/standing lampW 5 W
2Turn signal lampPY 21 W
3Additional turn signal
lamp
LED
4Headlamps:
Low beam
H7 (55 W)
Bi-Xenon headlamps*:
Low beam1
1Vehicles with Bi-Xenon* headlamps: Do not
replace the Bi-Xenon bulbs yourself. Contact an
authorized Mercedes-Benz Light Truck Center.
D2S-35 W
5Headlamps:
High beam/high beam
flasher
H7 (55 W)
Bi-Xenon headlamps*:
High beam/high beam
flasher spot lamp
H7 (55 W)
6Side marker lampWY 5 W
7Corner-illuminating
front fog lamp*
H11 (55 W)
LampType
8High-mounted brake
lamp
LED
9Tail, brake, and side
marker lamp
P 21 W
aTurn signal lampPY 21 W
bBackup lampP 21 W
cRear fog lamp (driver’s
side only)
P 21 W
dLicense plate lampsC 5 W
Page 487 of 570
486 Practical hints
Replacing bulbs
Notes on bulb replacement
�Only use 12-volt bulbs of the same type
and with the specified watt rating.
�Switch the lights off before changing a
bulb to prevent short circuits.
�Always use a clean lint-free cloth when
handling bulbs.
�Your hands should be dry and free of oil
and grease.
�If the newly installed bulb does not
come on, contact an authorized
Mercedes-Benz Light Truck Center.Have the LEDs and bulbs for the following
lamps replaced by an authorized
Mercedes-Benz Light Truck Center:
�the additional turn signal lamps in the
exterior rear view mirrors
�the high mounted brake lamp
�the Bi-Xenon* low beam lamps
�the Bi-Xenon* high beam flasher spot-
light
�the front side marker lamps
Warning!G
Bulbs and bulb sockets can be very hot.
Allow the lamp to cool down before chang-
ing a bulb.
Keep bulbs out of reach of children.
Halogen lamps contain pressurized gas.
A bulb can explode if you:
�touch or move it when hot
�drop the bulb
�scratch the bulb
Wear eye and hand protection.
Because of high voltage in Xenon lamps, it is
dangerous to replace the bulb or repair the
lamp and its components. We recommend
that you have such work done by a qualified
technician.!Do not replace the bulbs yourself. You could
otherwise damage the LEDs or parts of the vehi-
cle. Only have the LEDs replaced by a qualified
specialist workshop having the necessary skills
and tools for carrying out the work required.
Page 492 of 570

491 Practical hints
Replacing bulbs
�Turn bulb socket 5 counterclockwise.
�Pull bulb socket 5 out of the housing.
�Pull the bulb out of bulb socket 5.
�Insert the new corner-illuminating front
fog lamp bulb into bulb socket 5.
�Insert bulb socket 5 into the housing.
�Turn bulb socket 5 clockwise until it
engages.
�Insert corner-illuminating front fog
lamp 1 back into bumper.
�Fasten retaining screws4.
�Reinsert cover 2 and press it in until it
engages.
�Fasten retaining screw(s)3.Additional turn signal lamps bulbs
The additional turn signal lamps in the
exterior rear view mirrors have LEDs.
If a malfunction occurs or LEDs fail to
function, the entire turn signal unit must
be replaced. Have the turn signal unit re-
placed by an authorized Mercedes-Benz
Light Truck Center.
Front side marker lamp bulbs
Since replacing the side marker lamp bulbs
is a technically highly demanding process,
we recommend you have the side marker
lamp bulbs replaced by an authorized
Mercedes-Benz Light Truck Center.
Replacing bulbs for rear lamps
Before you start to replace a bulb for a rear
lamp, do the following first:
�Turn the combination switch to
positionM (
�page 146).
Tail lamp unit
�Open the tailgate (�page 123).
iTo access the tail lamp units, you have to
remove the cover in the corresponding side trim
panel of the cargo compartment.
Page 495 of 570
494 Practical hints
Replacing wiper blades
Front wiper blades
Removing
�Remove the SmartKey from the starter
switch.
Vehicles with KEYLESS-GO*:
�Make sure the vehicle’s on-board
electronics have status0
(
�page 41).
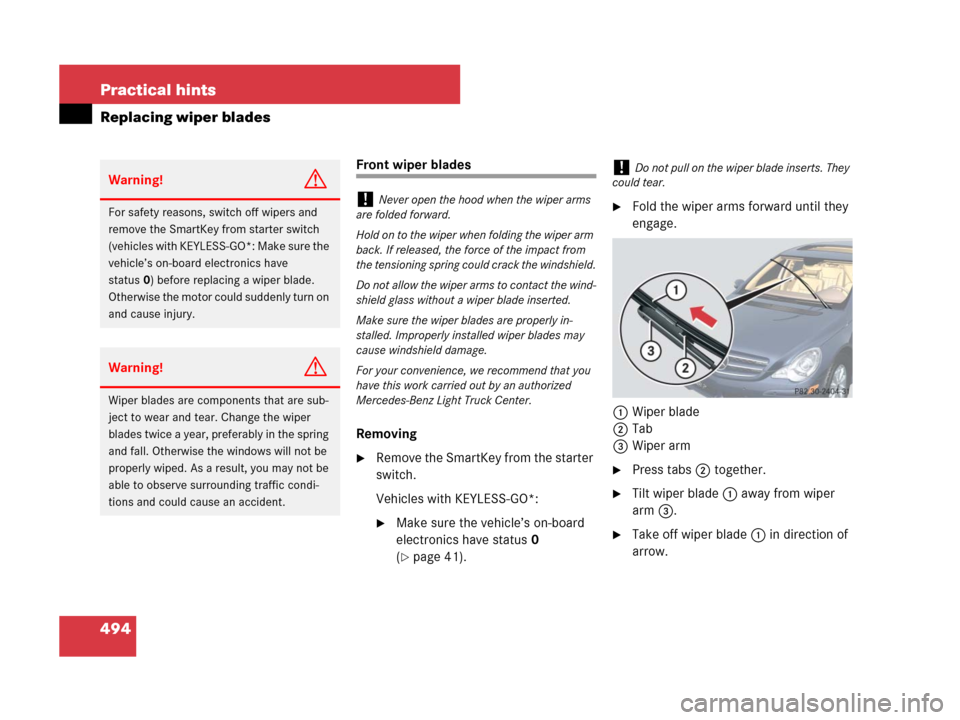
�Fold the wiper arms forward until they
engage.
1Wiper blade
2Tab
3Wiper arm
�Press tabs2 together.
�Tilt wiper blade 1 away from wiper
arm 3.
�Take off wiper blade 1 in direction of
arrow.
Warning!G
For safety reasons, switch off wipers and
remove the SmartKey from starter switch
(vehicles with KEYLESS-GO*: Make sure the
vehicle’s on-board electronics have
status0) before replacing a wiper blade.
Otherwise the motor could suddenly turn on
and cause injury.
Warning!G
Wiper blades are components that are sub-
ject to wear and tear. Change the wiper
blades twice a year, preferably in the spring
and fall. Otherwise the windows will not be
properly wiped. As a result, you may not be
able to observe surrounding traffic condi-
tions and could cause an accident.
!Never open the hood when the wiper arms
are folded forward.
Hold on to the wiper when folding the wiper arm
back. If released, the force of the impact from
the tensioning spring could crack the windshield.
Do not allow the wiper arms to contact the wind-
shield glass without a wiper blade inserted.
Make sure the wiper blades are properly in-
stalled. Improperly installed wiper blades may
cause windshield damage.
For your convenience, we recommend that you
have this work carried out by an authorized
Mercedes-Benz Light Truck Center.
!Do not pull on the wiper blade inserts. They
could tear.
Page 496 of 570
495 Practical hints
Replacing wiper blades
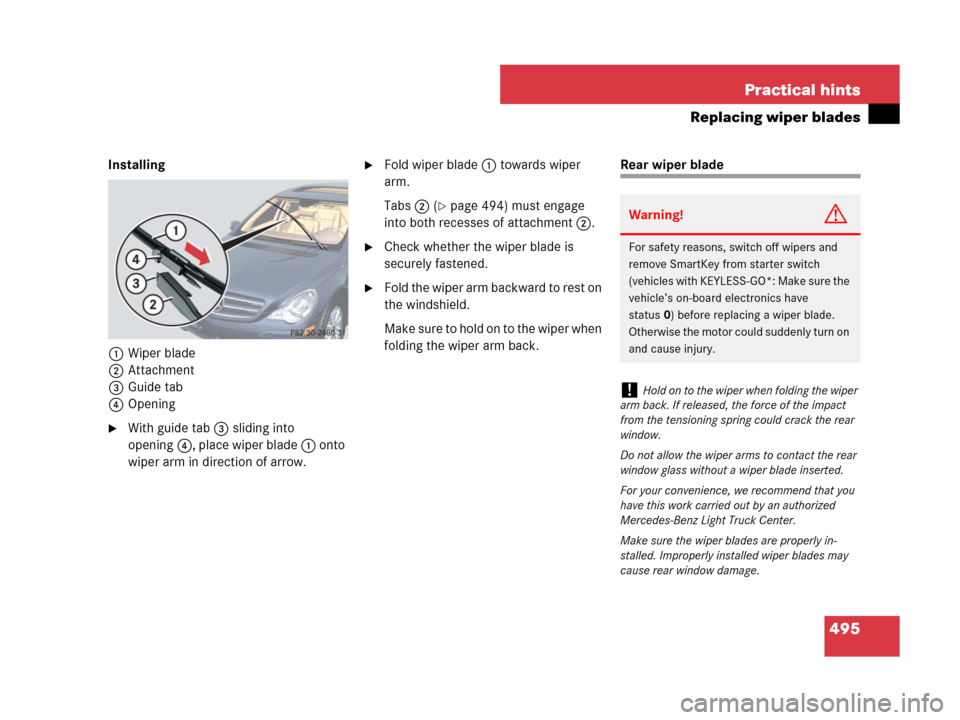
Installing
1Wiper blade
2Attachment
3Guide tab
4Opening
�With guide tab 3 sliding into
opening4, place wiper blade 1 onto
wiper arm in direction of arrow.
�Fold wiper blade 1 towards wiper
arm.
Tabs 2 (
�page 494) must engage
into both recesses of attachment 2.
�Check whether the wiper blade is
securely fastened.
�Fold the wiper arm backward to rest on
the windshield.
Make sure to hold on to the wiper when
folding the wiper arm back.
Rear wiper blade
Warning!G
For safety reasons, switch off wipers and
remove SmartKey from starter switch
(vehicles with KEYLESS-GO*: Make sure the
vehicle’s on-board electronics have
status0) before replacing a wiper blade.
Otherwise the motor could suddenly turn on
and cause injury.
!Hold on to the wiper when folding the wiper
arm back. If released, the force of the impact
from the tensioning spring could crack the rear
window.
Do not allow the wiper arms to contact the rear
window glass without a wiper blade inserted.
For your convenience, we recommend that you
have this work carried out by an authorized
Mercedes-Benz Light Truck Center.
Make sure the wiper blades are properly in-
stalled. Improperly installed wiper blades may
cause rear window damage.