Page 467 of 570

466 Practical hints
What to do if …
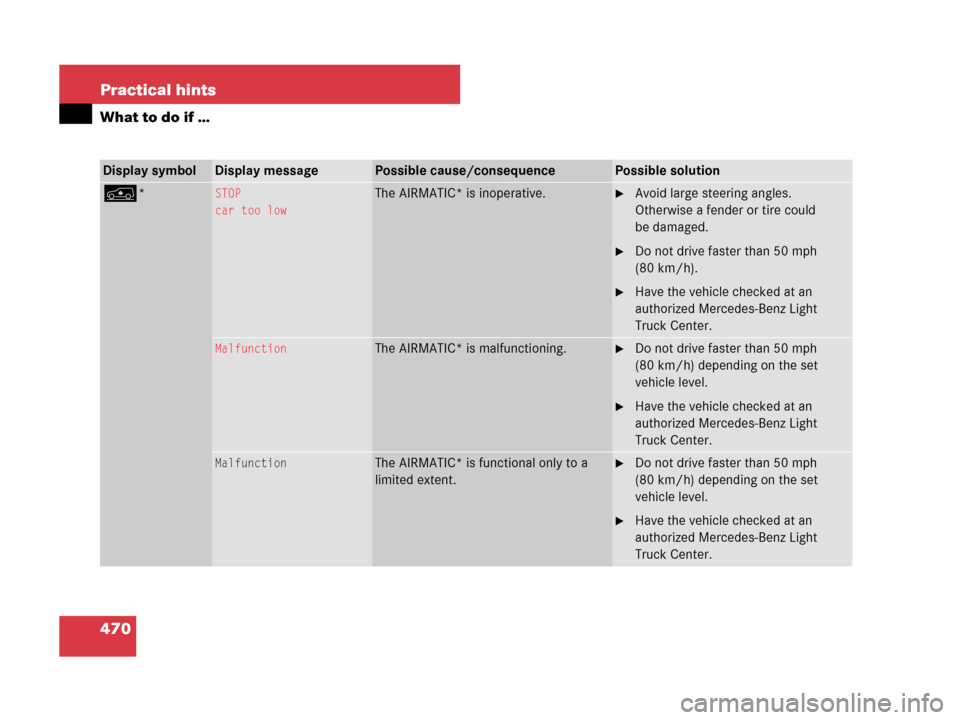
Display symbolDisplay messagePossible cause/consequencePossible solution
. Marker lamp
Front LeftThe left front side marker lamp is
malfunctioning.�Contact an authorized Mercedes-Benz
Light Truck Center as soon as possible.
Marker lamp
Front RightThe right front side marker lamp
is malfunctioning.�Contact an authorized Mercedes-Benz
Light Truck Center as soon as possible.
Parking lamp
Front leftThe front left parking lamp is
malfunctioning. A substitute
bulb is being used.�Replace the bulb as soon as possible
(
�page 484).
Parking lamp
Front rightThe front right parking lamp is
malfunctioning. A substitute
bulb is being used.�Replace the bulb as soon as possible
(
�page 484).
Foglamp
Rear LeftThe left rear fog lamp is malfunc-
tioning.�Replace the bulb as soon as possible
(
�page 484).
Reverse lamp
LeftThe left backup lamp is
malfunctioning.�Replace the bulb as soon as possible
(
�page 484).
Reverse lamp
RightThe right backup lamp is
malfunctioning.�Replace the bulb as soon as possible
(
�page 484).
Page 468 of 570
467 Practical hints
What to do if …
Display symbolDisplay messagePossible cause/consequencePossible solution
. Switch off lightsYou have removed the SmartKey
from the starter switch and
opened the driver’s door or
removed the SmartKey with
KEYLESS-GO* from the vehicle
and left the headlamps on.�Turn the exterior lamp switch toM
(
�page 146).
Switch off lights
or remove keyYou have opened the driver’s
door while the exterior lamp
switch is in position U and
the SmartKey is still in the
starter switch.
The parking lamps are still on.�Turn the exterior lamp switch toM
(
�page 146).
or
�Remove the SmartKey from the starter
switch.
Tail lamp
LeftThe left tail lamp is malfunction-
ing. A substitute bulb is being
used.�Replace the bulb as soon as possible
(
�page 484).
Tail lamp
RightThe right tail lamp is malfunc-
tioning. A substitute bulb is
being used.�Replace the bulb as soon as possible
(
�page 484).
Page 469 of 570

468 Practical hints
What to do if …
Display symbolDisplay messagePossible cause/consequencePossible solution
. Turn signal
Rear LeftThe left rear turn signal lamp is
malfunctioning. A substitute
bulb is being used.�Replace the bulb as soon as possible
(
�page 484).
Turn signal
Rear RightThe right rear turn signal lamp is
malfunctioning. A substitute
bulb is being used.�Replace the bulb as soon as possible
(
�page 484).
Turn signal
Front LeftThe left front turn signal lamp is
malfunctioning. A substitute
bulb is being used.�Replace the bulb as soon as possible
(
�page 484).
Turn signal
Front RightThe right front turn signal lamp is
malfunctioning. A substitute
bulb is being used.�Replace the bulb as soon as possible
(
�page 484).
Turn signal
Left mirrorThe turn signal in the left exteri-
or rear view mirror is malfunc-
tioning. This message will only
appear if all light emitting diodes
have stopped working.�Contact an authorized Mercedes-Benz
Light Truck Center as soon as possible.
Turn signal
Right mirrorThe turn signal in the right exte-
rior rear view mirror is malfunc-
tioning. This message will only
appear if all light emitting diodes
have stopped working.�Contact an authorized Mercedes-Benz
Light Truck Center as soon as possible.
Page 470 of 570
469 Practical hints
What to do if …
Display symbolDisplay messagePossible cause/consequencePossible solution
L Tele Aid
inoperativeOne or more main functions of the
Tele Aid* system are malfunctioning.�Have the Tele Aid* system checked
by an authorized Mercedes-Benz Light
Truck Center.
Tele Aid
batteryThe emergency power battery for the
Tele Aid* system is malfunctioning. If the
vehicle battery is also malfunctioning or
drained, Tele Aid* will not be operational.�Have the Tele Aid* system checked
by an authorized Mercedes-Benz Light
Truck Center.
tFunction
unavailableThis display appears if buttont or
son the multifunction steering wheel
is pressed and the vehicle is not equipped
with a telephone.
WTop up
washer fluidThe fluid level has dropped to
about1/3of total reservoir capacity.
�Add washer fluid (�page 372).
Page 471 of 570
470 Practical hints
What to do if …
Display symbolDisplay messagePossible cause/consequencePossible solution
n*STOP
car too lowThe AIRMATIC* is inoperative.�Avoid large steering angles.
Otherwise a fender or tire could
be damaged.
�Do not drive faster than 50 mph
(80 km/h).
�Have the vehicle checked at an
authorized Mercedes-Benz Light
Truck Center.
MalfunctionThe AIRMATIC* is malfunctioning.�Do not drive faster than 50 mph
(80 km/h) depending on the set
vehicle level.
�Have the vehicle checked at an
authorized Mercedes-Benz Light
Truck Center.
MalfunctionThe AIRMATIC* is functional only to a
limited extent.�Do not drive faster than 50 mph
(80 km/h) depending on the set
vehicle level.
�Have the vehicle checked at an
authorized Mercedes-Benz Light
Truck Center.
Page 476 of 570

475 Practical hints
Where will I find ...?
Setting up the collapsible wheel chock
The collapsible wheel chock serves to ad-
ditionally secure the vehicle, e.g. while
changing the wheel.
1Tilt the plate upward
2Fold the lower plate outward
3Insert the plate�Tilt both plates upward1.
�Fold the lower plate outward2.
�Guide the tabs of the lower plate all the
way into the openings of base plate3.
For information on where to place wheel
chocks when changing a wheel, see “Lift-
ing the vehicle” (
�page 498).
Spare wheel
Warning!G
The dimensions of the spare wheel are
different from those of the road wheels. As
a result, the vehicle handling characteristics
change when driving with a spare wheel
mounted. Adapt your driving style accord-
ingly.
The spare wheel is for temporary use only.
When driving with a spare wheel mounted,
ensure proper tire inflation pressure and do
not exceed a vehicle speed of
50 mph (80 km/ h).
Drive to the nearest Mercedes-Benz Light
Truck Center as soon as possible to have the
spare wheel replaced with a regular road
wheel.
Never operate the vehicle with more than
one spare wheel mounted.
Do not switch off the ESP
® with a spare
wheel mounted.
Page 477 of 570
.
Removin")
476 Practical hints
Where will I find ...?
Your vehicle is equipped with a spare
wheel with collapsible tire. The spare
wheel is located underneath the cargo
compartment floor (
�page 472).
Removing the spare wheel
1Retaining screw
2Spare wheel
3Vehicle tool kit storage well casing
�Remove the jack from the vehicle tool
kit (
�page 473).
�Loosen retaining screw 1 by turning it
counterclockwise.
�Turn vehicle tool kit storing well
casing3 by approximately 180°.
The electric air pump (
�page 473)
points towards the rear.
�Remove vehicle tool kit storage well
casing 3.
�Remove spare wheel 2.Reinstalling the spare wheel after use
There are two guide pins in the spare wheel
well that serve to hold the spare wheel in
place.
1Guide pins
iFor information on how to mount the spare
wheel, see “Mounting the spare wheel”
(
�page 498).
iIf retaining screw 1 does not come loose,
turn vehicle tool kit storing well casing 3 slightly
counterclockwise. Retaining screw 1 should
then come loose easily.
Page 482 of 570

481 Practical hints
Opening / closing in an emergency
�Opening / closing in an emergency
Power tilt/sliding sunroof*
You can open or close the tilt/sliding
sunroof manually should an electrical
malfunction occur.
The tilt/sliding sunroof drive is located
behind a cover on the overhead control
panel.
1Cover
�Remove the SmartKey from the starter
switch.Vehicles with KEYLESS-GO*:
�Turn off the engine by pressing the
KEYLESS-GO start/stop button
(
�page 67).
�Open the driver’s door (this puts
the starter switch to position0,
same as with the SmartKey
removed from starter switch).
The driver’s door can then be
closed again.
�Press on cover1 at the position
indicated by the arrow.
�Take off cover 1.
2Crank
�Take crank 2 out of the Operator’s
Manual pouch.
�Insert crank2 into hole.
�Turn crank2 clockwise to
�slide sunroof closed
�raise sunroof at the rear
�Turn crank2 counterclockwise to
�slide sunroof open
�lower sunroof at the rear
iTurn crank2 slowly and smoothly.
The tilt/sliding sunroof must be synchronized if
it has been operated manually (
�page 260).
iThe panorama roof with power tilt/sliding
panel* cannot be operated as described.
Contact Roadside Assistance or an authorized
Mercedes-Benz Light Truck Center.