Page 364 of 570
363 Operation
At the gas station
Windshield/rear window washer
system and headlamp cleaning
system*
For more information on refilling the wash-
er reservoir, see “Windshield/rear window
washer system and headlamp cleaning*
system” (
�page 372).
Vehicle lighting
Check function and cleanliness. For infor-
mation on replacing light bulbs, see “Re-
placing bulbs” (
�page 484).
For more information, see “Exterior lamp
switch” (
�page 146).
Tire inflation pressure
For more information, see “Checking tire
inflation pressure” (
�page 382).
Page 366 of 570
365 Operation
Engine compartment
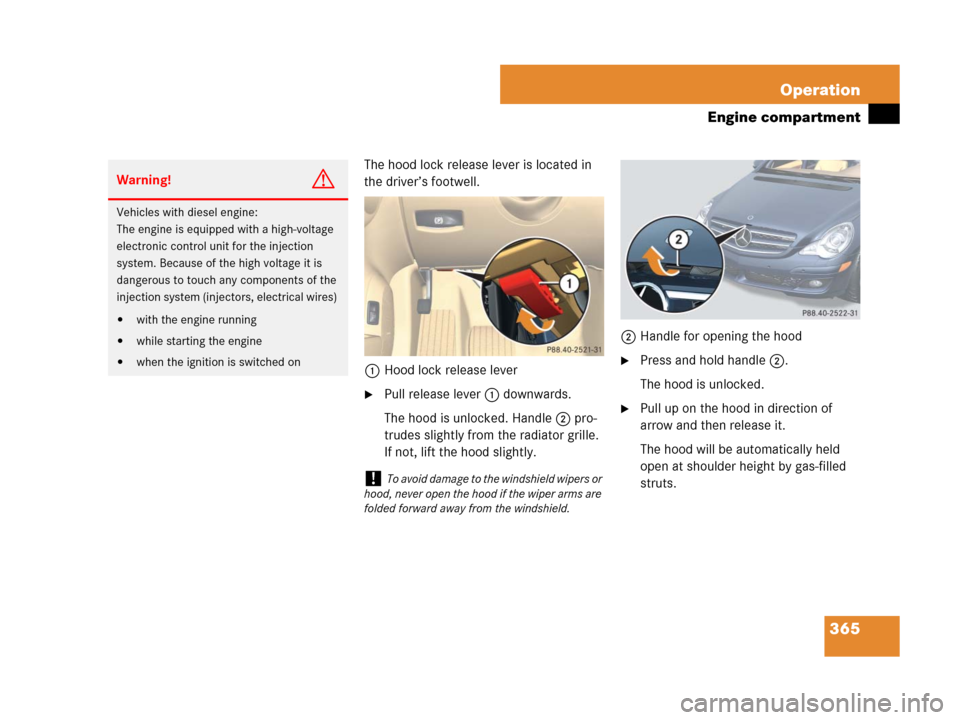
The hood lock release lever is located in
the driver’s footwell.
1Hood lock release lever
�Pull release lever1 downwards.
The hood is unlocked. Handle2 pro-
trudes slightly from the radiator grille.
If not, lift the hood slightly.2Handle for opening the hood
�Press and hold handle2.
The hood is unlocked.
�Pull up on the hood in direction of
arrow and then release it.
The hood will be automatically held
open at shoulder height by gas-filled
struts.
Warning!G
Vehicles with diesel engine:
The engine is equipped with a high-voltage
electronic control unit for the injection
system. Because of the high voltage it is
dangerous to touch any components of the
injection system (injectors, electrical wires)
�with the engine running
�while starting the engine
�when the ignition is switched on
!To avoid damage to the windshield wipers or
hood, never open the hood if the wiper arms are
folded forward away from the windshield.
Page 367 of 570
.
The hood will lock audibly.
�Check to make sure the hood is fully
closed.
If you can raise th")
366 Operation
Engine compartment
Closing
�Let the hood drop from a height of
approximately 1 ft (30 cm).
The hood will lock audibly.
�Check to make sure the hood is fully
closed.
If you can raise the hood at a point
above the headlamps, then it is not
properly closed. Open it again and let it
drop with somewhat greater force.
Engine oil
The amount of oil your engine needs will
depend on a number of factors, including
driving style. Increased oil consumption
can occur when
�the vehicle is new
�the vehicle is driven frequently at
higher engine speeds
Engine oil consumption checks should only
be made after the vehicle break-in period.Checking engine oil level with the
control system (R 500 only)
When checking the oil level
�the vehicle must be parked on level
ground
�with the engine at operating tempera-
ture, the vehicle must have been
stationary for at least 5 minutes with
the engine turned off
�with the engine not at operating tem-
perature yet, the vehicle must have
been stationary for at least 30 minutes
with the engine turned off
To check the engine oil level via the
multifunction display, do the following:
�Switch on the ignition (�page 39).
The standard display (
�page 166)
should appear in the multifunction
display.
Warning!G
When closing the hood, use extreme caution
not to catch hand or fingers. Be careful that
you do not close the hood on anyone.
Make sure the hood is securely engaged be-
fore driving. Do not continue driving if the
hood can no longer engage after an accident
for example. The hood could otherwise
come loose while the vehicle is in motion
and injure you and/or others.
iDo not use any special lubricant additives,
as these may damage the drive assemblies.
Using special additives not approved by
Mercedes-Benz may cause damage not covered
by the Mercedes-Benz Limited Warranty.
More information on this subject is available at
any Mercedes-Benz Light Truck Center.
Page 369 of 570

368 Operation
Engine compartment
If there is excess engine oil with the engine
at operating temperature, the following
message will appear:
Engine oil level
Reduce oil level
�Have excess oil siphoned or drained
off. Contact an authorized
Mercedes-Benz Light Truck Center.
For more information on messages in the
multifunction display concerning engine
oil, see the “Practical hints” section
(
�page 459).Checking engine oil level with the oil
dipstick (except R 500)
When checking the oil level
�the vehicle must be parked on level
ground
�with the engine at operating tempera-
ture, the vehicle must have been
stationary for at least 5 minutes with
the engine turned off
�with the engine not at operating tem-
perature yet, the vehicle also must
have been stationary for at least
5 minutes with the engine turned off1Oil dipstick
2Upper mark
3Lower mark
�Open the hood (�page 364).
�Pull out oil dipstick1.
�Wipe oil dipstick 1 clean.
�Fully insert oil dipstick1 into the
dipstick guide tube.
�Pull out oil dipstick1 again after
approximately 3 seconds to obtain
accurate reading.
The oil level is correct when it is between
lower mark 3 (min.) and upper mark 2
(max.) of the oil dipstick.
!Excess oil must be siphoned or drained off.
It could cause damage to the engine and/or
catalytic converter (gasoline engine) or the
oxidation catalyst (diesel engine) not covered by
the Mercedes-Benz Limited Warranty.
Page 370 of 570
 and
(
�page 540).
For information on messages in the")
369 Operation
Engine compartment
�If necessary, add engine oil.
For more information on engine oil, see
“Technical data” section (
�page 538) and
(
�page 540).
For information on messages in the multi-
function display concerning engine oil, see
the “Practical hints” section (
�page 459).Adding engine oil
R 350 (R 320 CDI similar)
1Filler cap
R 500 (R 63 AMG similar)
1Filler cap
iAll models (except R 63 AMG):
The filling quantity between the upper and
lower marks on the oil dipstick is approximately
2.1 US qt (2.0 l).
R 63 AMG:
The filling quantity between the upper and
lower marks on the oil dipstick is approximately
1.6 US qt (1.5 l).
!Only use approved engine oils and oil filters
required for vehicles with Maintenance System
(U.S. vehicles) or FSS PLUS (Canada vehicles).
For a listing of approved engine oils and oil
filters, refer to the Factory Approved Service
Products pamphlet in your vehicle literature port-
folio, or contact an authorized Mercedes-Benz
Light Truck Center.
Using engine oils and oil filters of specification
other than those expressly required for the
Maintenance System (U.S. vehicles) or
FSS PLUS (Canada vehicles), or changing of oil
and oil filter at change intervals longer than
those called for by the Maintenance System
(U.S. vehicles) or FSS PLUS (Canada vehicles)
will result in engine or emission control system
damage not covered by the Mercedes-Benz
Limited Warranty.
Page 371 of 570

370 Operation
Engine compartment
�Unscrew filler cap1 from filler neck.
�Add engine oil as required. Be careful
not to overfill with oil.
Be careful not to spill any oil when adding.
Avoid environmental damage caused by oil
entering the ground or water.
�Screw filler cap1 back on filler neck.
For more information on engine oil, see
“Technical data” section (
�page 538) and
(
�page 540).
Transmission fluid level
The transmission fluid level does not need
to be checked. If you notice transmission
fluid loss or gear shifting malfunctions,
have an authorized Mercedes-Benz Light
Truck Center check the automatic trans-
mission.Coolant level
The engine coolant is a mixture of water
and anticorrosion/antifreeze. To check
the coolant level, the vehicle must be
parked on level ground.
!Excess oil must be siphoned or drained off.
It could cause damage to the engine or
emission control system not covered by the
Mercedes-Benz Limited Warranty.Warning!G
In order to avoid any possibly serious burns:
�Use extreme caution when opening the
hood if there are any signs of steam or
coolant leaking from the cooling system,
or if the coolant temperature gauge indi-
cates that the coolant is overheated.
�Do not remove pressure cap on coolant
reservoir if coolant temperature is
above 158°F (70°C). Allow engine to
cool down before removing cap. The
coolant reservoir contains hot fluid and
is under pressure.
Page 374 of 570

373 Operation
Tires and wheels
�Tires and wheels
See an authorized Mercedes-Benz Light
Truck Center for information on tested and
recommended rims and tires for summer
and winter operation. They can also offer
advice concerning tire service and
purchase.Important guidelines
�Only use sets of tires and rims of the
same type and make.
�Tires must be of the correct size for the
rim.
�Break in new tires for approximately
60 miles (100 km) at moderate
speeds.
�Regularly check the tires and rims for
damage. Dented or bent rims can
cause tire inflation pressure loss and
damage to the tire beads.
�If vehicle is heavily loaded, check tire
inflation pressure and correct as
required.
�Do not allow your tires to wear down
too far. Adhesion properties on wet
roads are sharply reduced at tread
depths under
1/8in (3 mm).
�When replacing individual tires, you
should mount new tires on the front
wheels first (on vehicles with
same-sized wheels all around).
Warning!G
Replace rims or tires with the same designa-
tion, manufacturer and type as shown on the
original part. See an authorized
Mercedes-Benz Light Truck Center for
further information. If incorrectly sized rims
and tires are mounted:
�The wheel brakes or suspension
components can be damaged.
�The operating clearance of the wheels
and the tires may no longer be correct.
Warning!G
Worn, old tires can cause accidents. If the
tire tread is badly worn, or if the tires have
sustained damage, replace them.
When replacing rims, only use genuine
Mercedes-Benz wheel bolts specified for the
particular rim type. Failure to do so can
result in the bolts loosening and possibly an
accident.
Retreaded tires are not tested or recom-
mended by Mercedes-Benz, since previous
damage cannot always be recognized on
retreads. The operating safety of the vehicle
cannot be assured when such tires are used.
Page 376 of 570
.
Treadwear indicato")
375 Operation
Tires and wheels
Tread depth
Do not allow your tires to wear down too
far. Adhesion properties on wet roads are
sharply reduced at tread depths under
1/8in (3 mm).
Treadwear indicators (TWI) are required by
law. These indicators are located in six
places on the tread circumference and
become visible at a tread depth of approx-
imately
1/16in (1.6 mm), at which point the
tire is considered worn and should be re-
placed.
Recommended minimum tire tread depth:
�Summer tires 1/8in (3 mm)
�Winter tires 1/6in (4 mm)
1TWI (T
read Wear Indicator)
The treadwear indicator appears as a solid
band across the tread.Storing tires
Cleaning tires
Direction of rotation
Unidirectional tires offer added advan-
tages, such as better hydroplaning perfor-
mance. To benefit, however, you must
make sure the tires rotate in the direction
specified.
An arrow on the sidewall indicates the
intended direction of rotation (spinning) of
the tire.
Warning!G
Although the applicable federal motor safety
laws consider a tire to be worn when the
treadwear indicators (TWI) become visible at
approximately
1/16in (1.6 mm), we recom-
mend that you do not allow your tires to
wear down to that level. As tread depth ap-
proaches 1/8in (3 mm), the adhesion prop-
erties on a wet road are sharply reduced.
Depending upon the weather and/or road
surface (conditions), the tire traction varies
widely.!Keep unmounted tires in a cool, dry
place with as little exposure to light as possible.
Protect tires from contact with oil, grease and
fuels.
!Never use a round nozzle to power wash
tires. The intense jet of water can result in
damage to the tire.
Always replace a damaged tire.