Page 295 of 570

294 Controls in detail
Driving systems
Switching the Parktronic system
on/off
You can switch off the Parktronic system
manually.
The Parktronic switch is located in the
upper part of the center console.
1Parktronic switch
2Indicator lamp
Switching off
�Press Parktronic switch1.
Indicator lamp2 comes on.Switching on
�Press Parktronic switch1 once more.
Indicator lamp2 goes out.
Parktronic system malfunction
If only the red distance segments illumi-
nate and an acoustic warning sounds,
there is a malfunction in the Parktronic
system. The Parktronic system will auto-
matically switch off after 20 seconds and
the indicator lamp in the Parktronic switch
comes on.
�Have the Parktronic system checked
by an authorized Mercedes-Benz Light
Truck Center as soon as possible.If only the red distance segments illumi-
nate and no acoustic warning sounds, the
Parktronic system sensors are dirty (e.g.
slush, snow or ice) or there is an interfer-
ence from other radio or ultrasonic signals
(e.g. working jackhammers, car wash or
the air brakes of trucks). The Parktronic
system will automatically switch off after
20 seconds and the indicator lamp in the
Parktronic switch comes on.
�Switch off the ignition (�page 39).
�Clean the Parktronic system sensors
(
�page 414).
�Switch on the ignition (�page 39).
or
�Check the Parktronic system operation
at another location to rule out interfer-
ence from outside radio or ultrasonic
signals.
iThe Parktronic system switches on
automatically when you switch on the ignition
(
�page 39).
Page 296 of 570

295 Controls in detail
Driving systems
Rear view camera*
Warning!G
The rear view camera is only an aid and may
display obstacles from a distorted perspec-
tive or inaccurately, or may not display ob-
stacles at all. The rear view camera does not
relieve you of the responsibility to be cau-
tious, take care and pay careful attention.
The rear view camera may not show objects
which are
�very close to the rear bumper
�under the rear bumper
�above the tailgate handle
You are responsible for safety at all times
and must continue to pay attention to the
immediate surroundings when parking and
maneuvering. This includes the area behind,
in front of and beside the vehicle. Otherwise
you could endanger yourself or others.
Warning!G
Make sure that no persons or animals are in
or near the area in which you are
parking/maneuvering. Otherwise, they
could be injured.
Warning!G
The rear view camera either will not function
or will not function to its full capability if
�the tailgate is open
�it is raining very hard, snowing or foggy
�it is night or you are parking/maneuver-
ing your vehicle in an area where it is
very dark
�the camera is exposed to a very bright
white light
�the immediate surroundings are illumi-
nated with fluorescent light (the display
may flicker)
�there is a sudden change in tempera-
ture, e.g. if you drive into a heated
garage from the cold (lens condensa-
tion)
�the camera lens is dirty or covered
�the rear of your vehicle is damaged
In this case, have the position and set-
ting of the camera checked by a quali-
fied specialist workshop.
Mercedes-Benz recommends that you
contact a Mercedes-Benz Light Truck
Center for this purpose.
Do not use the rear view camera in these sit-
uations. Otherwise you could injure yourself
or others and/or damage property including
your vehicle while parking/maneuvering.
Page 298 of 570

297 Controls in detail
Loading
�Loading
Roof rack*
1Trim cover�Flip roof trim covers 1 open.
�Attach the roof rack to the attachment
points under roof trim covers 1.
Follow roof rack manufacturer’s
installation instructions.
For further information, inquire at your
Mercedes-Benz Light Truck Center.
Warning!G
Only use the roof rack when the basic
carrier bars have been completely mounted.
The left and right roof rails are only
stabilized by means of the basic carriers
being mounted.
Follow the manufacturer’s installation
instructions. Otherwise, an improperly
attached roof rack system or its load could
become detached from the vehicle.
Do not exceed the maximum roof load of
220 lb (100 kg).
Take into consideration that when the roof
rack is loaded, the handling characteristics
are different from those when operating the
vehicles without the roof rack loaded.
!Load the roof rack in such a way that the
vehicle cannot be damaged while driving.
Make sure
�you can completely raise the tilt/sliding
sunroof* (or tilt/sliding panel*) at the rear
�you can open the tilt/sliding sunroof* (or
tilt/sliding panel*) completely
�you can open the tailgate completely
Page 301 of 570
300 Controls in detail
Loading
Second seat-row
Two cargo tie-down rings are located in the
footwell behind the driver’s and passenger
seat.
1Cargo tie-down ringThird seat-row
Two cargo tie-down rings are located in the
footwell behind the second-row seats.
1Cargo tie-down ringHooks
Two hooks are located on the rear com-
partment trim panels, one on each side.
1Hook
Use the hooks to secure light weight items
only. The maximum permissible weight per
hook is 9 lbs (4 kg).
Page 303 of 570

302 Controls in detail
Loading
3Seat backrest
4Seat cushion
5Strap
�Move seat backrest 3 slightly for-
ward.
Seat cushion 4 is released and folds
forward automatically.
�Fold seat backrest 3 to a horizontal
position.Expanding cargo compartment fully
iStrap 5 serves to pull up the seat backrest
when bringing the third-row seats back to their
original position (
�page 304).
WarningG
Folded second-row seats are intended to
serve as cargo compartment expansion in
conjunction with folded third-row seats
only. Do not fold the second-row seats and
allow third-row seat occupants to use folded
second-row seats as a footrest while driving.
Third-row seat occupants must, like all vehi-
cle occupants, keep both feet on the floor in
front of their seat. Otherwise, occupants
could slide under the seat belt in a collision.
If occupants slide under it, the belt would
apply force at the abdomen or neck. That
could cause serious or even fatal injuries.
Do not fold the second-row seats and allow
third-row seat occupants to use folded
second-row seats as a table while driving.
Objects placed on folded second-row seats
may come loose during braking, vehicle ma-
neuvers, or an accident and be thrown
around in the vehicle interior. Objects
thrown around in the vehicle interior may
cause an accident and/or serious personal
injury.
iWhen folding both rows of seats, it is impor-
tant that you fold the second-row seats first, and
then fold the third-row seats.
��
Page 313 of 570

312 Controls in detail
Useful features
Closing CD changer*
1CD changer
�Gently push CD changer 1 up in
direction of arrow until it engages.
For information on CD changer operation,
see separate COMAND system operating
instructions.
Locking and unlocking the glove box
separately
You can lock the glove box separately, e.g.
when the vehicle is in the shop for service.
�Take the mechanical key out of the
SmartKey or SmartKey with
KEYLESS-GO* (
�page 478).
1Unlocking glove box
2Locking glove box
�Insert mechanical key into glove box
lock.
�Turn mechanical key to position 2 to
lock the glove box.
�Turn mechanical key to position 1 to
unlock the glove box.Storage compartment in front center
console
1Cover
2Chrome label
�Tab lightly on chrome label 2 of
cover1.
Cover 1 swings open.
Additional storage compartment in
front center console
A storage compartment is located in front
of the armrest in the front center console.
iThe glove box can only be locked or
unlocked with the mechanical key.
Page 314 of 570
313 Controls in detail
Useful features
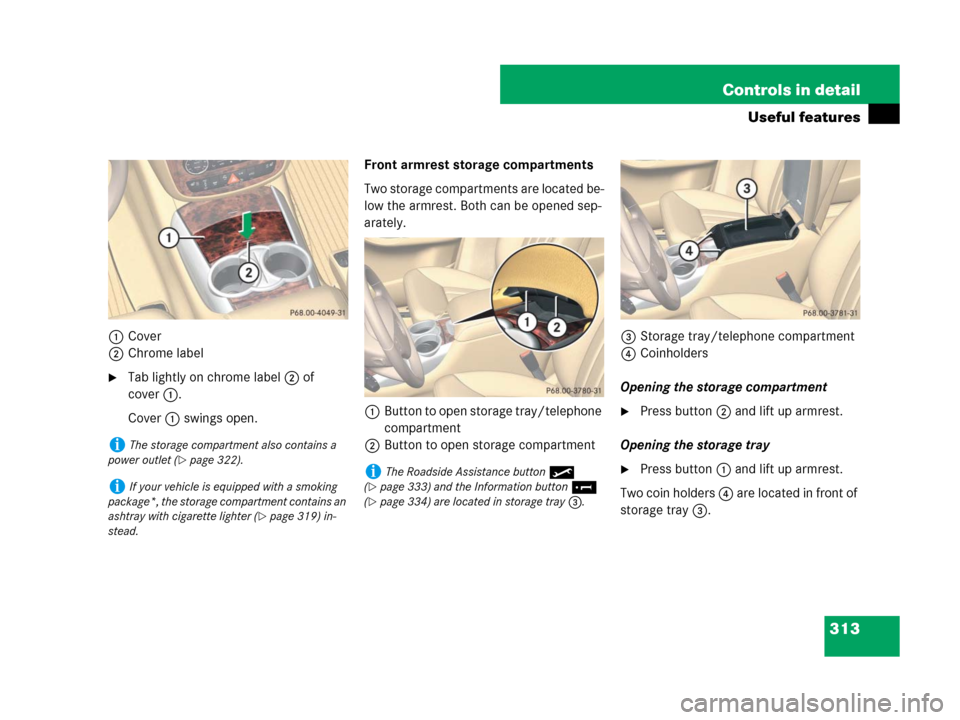
1Cover
2Chrome label
�Tab lightly on chrome label 2 of
cover1.
Cover 1 swings open.Front armrest storage compartments
Two storage compartments are located be-
low the armrest. Both can be opened sep-
arately.
1Button to open storage tray/telephone
compartment
2Button to open storage compartment3Storage tray/telephone compartment
4Coinholders
Opening the storage compartment
�Press button2 and lift up armrest.
Opening the storage tray
�Press button1 and lift up armrest.
Two coin holders 4 are located in front of
storage tray 3.
iThe storage compartment also contains a
power outlet (
�page 322).
iIf your vehicle is equipped with a smoking
package*, the storage compartment contains an
ashtray with cigarette lighter (
�page 319) in-
stead.
iThe Roadside Assistance button•
(
�page 333) and the Information button¡
(
�page 334) are located in storage tray 3.
Page 316 of 570

315 Controls in detail
Useful features
Third-row storage compartment
Storage compartments are located on the
side trims of the third-row seats.
1Storage compartmentParcel nets Parcel net in front passenger footwell
1Parcel net
Parcel nets on front seat backrests
1Parcel net
iIf your vehicle is equipped with a
3-zone automatic climate control*, the storage
compartment is replaced by an adjustable air
vent (
�page 249).
Warning!G
Do not place objects with a combined
weight of more than 4.4 lbs (2 kg) into the
parcel net on the back of the front passen-
ger seat. Otherwise, the Occupant
Classification System OCS (
�page 88) may
not be able to properly approximate the
occupant weight category.
Parcel nets are intended for storing
light-weight items only.
Heavy objects, objects with sharp edges, or
fragile objects may not be transported in the
parcel nets. In an accident, during hard
braking, or sudden maneuvers, they could
be thrown around inside the vehicle and
cause injury to vehicle occupants.
Parcel nets cannot protect transported
goods in the event of an accident.