Page 41 of 242
39 At a glance
Quick reference COMAND
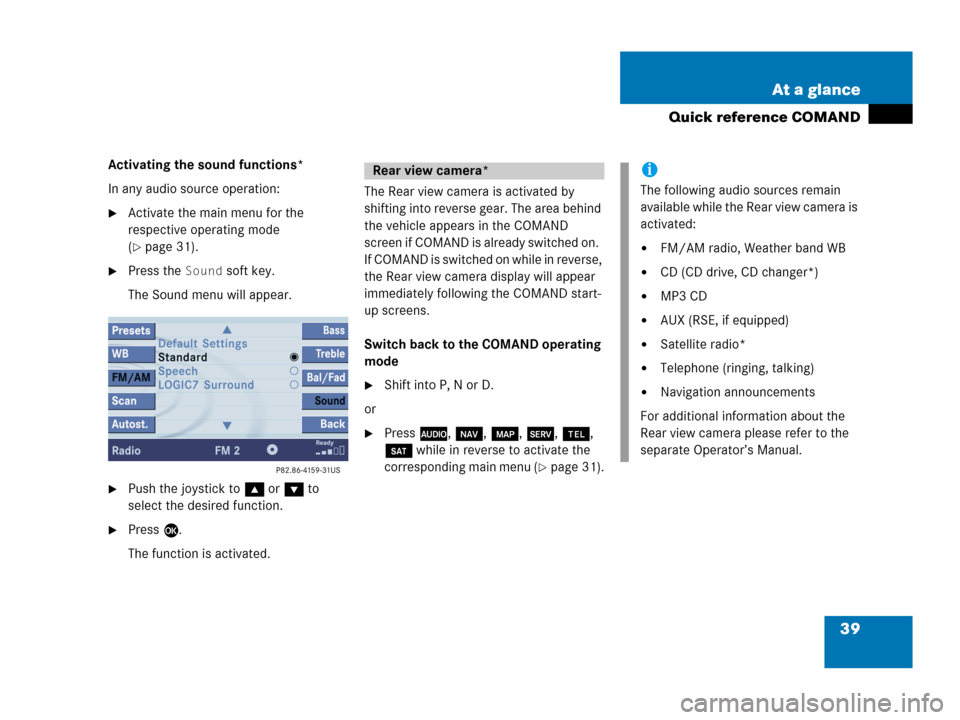
Activating the sound functions*
In any audio source operation:
�Activate the main menu for the
respective operating mode
(
�page 31).
�Press the Sound soft key.
The Sound menu will appear.
�Push the joystick to g or G to
select the desired function.
�Press E.
The function is activated.The Rear view camera is activated by
shifting into reverse gear. The area behind
the vehicle appears in the COMAND
screen if COMAND is already switched on.
If COMAND is switched on while in reverse,
the Rear view camera display will appear
immediately following the COMAND start-
up screens.
Switch back to the COMAND operating
mode
�Shift into P, N or D.
or
�Press A, b, c, C, a,
B while in reverse to activate the
corresponding main menu (
�page 31).
Rear view camera*i
The following audio sources remain
available while the Rear view camera is
activated:
�FM/AM radio, Weather band WB
�CD (CD drive, CD changer*)
�MP3 CD
�AUX (RSE, if equipped)
�Satellite radio*
�Telephone (ringing, talking)
�Navigation announcements
For additional information about the
Rear view camera please refer to the
separate Operator’s Manual.
Page 87 of 242
85 Rear Audio/Video*
Rear Audio operation*
�At the COMAND open the Audio menu
(
�page 42).
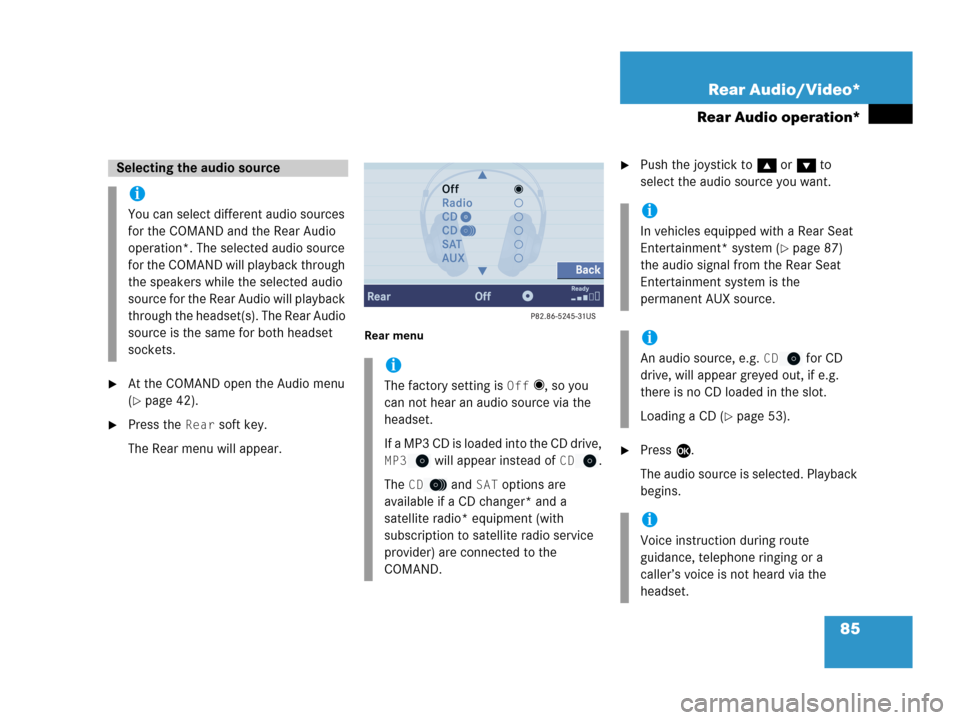
�Press the Rear soft key.
The Rear menu will appear.
Rear menu
�Push the joystick to g or G to
select the audio source you want.
�Press E.
The audio source is selected. Playback
begins.
Selecting the audio source
i
You can select different audio sources
for the COMAND and the Rear Audio
operation*. The selected audio source
for the COMAND will playback through
the speakers while the selected audio
source for the Rear Audio will playback
through the headset(s). The Rear Audio
source is the same for both headset
sockets.
i
The factory setting is Off _, so you
can not hear an audio source via the
headset.
If a MP3 CD is loaded into the CD drive,
MP3 will appear instead of CD.
The
CD and SAT options are
available if a CD changer* and a
satellite radio* equipment (with
subscription to satellite radio service
provider) are connected to the
COMAND.
i
In vehicles equipped with a Rear Seat
Entertainment* system (
�page 87)
the audio signal from the Rear Seat
Entertainment system is the
permanent AUX source.
i
An audio source, e.g. CD for CD
drive, will appear greyed out, if e.g.
there is no CD loaded in the slot.
Loading a CD (
�page 53).
i
Voice instruction during route
guidance, telephone ringing or a
caller’s voice is not heard via the
headset.
Page 119 of 242
117 Satellite radio*
Subscribing
� Subscribing
�Press B to switch to satellite radio
operation.
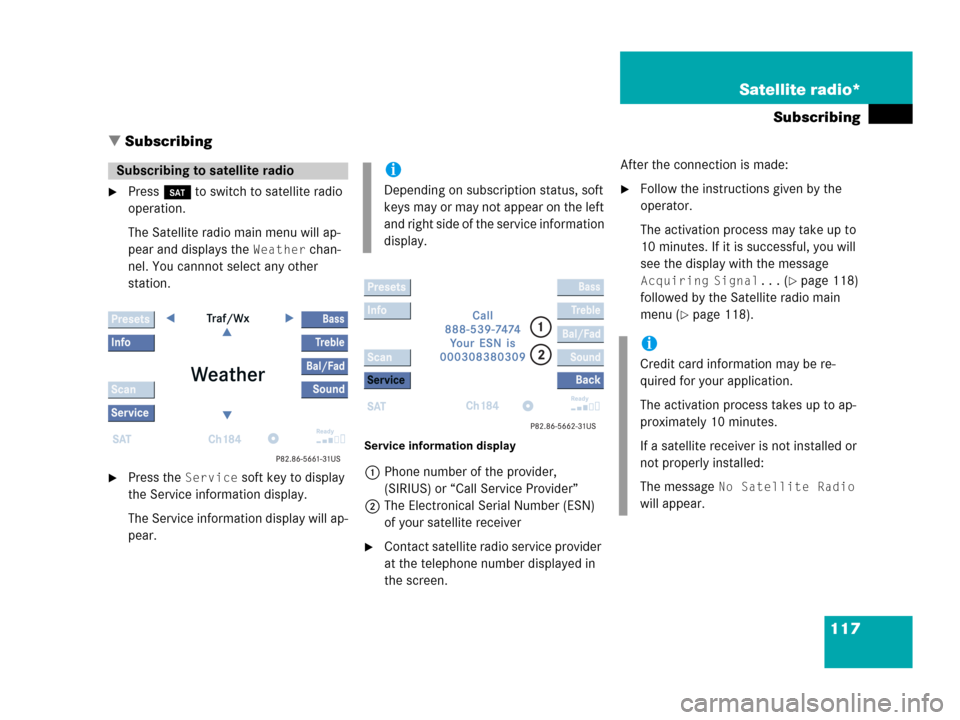
The Satellite radio main menu will ap-
pear and displays the
Weather chan-
nel. You cannnot select any other
station.
�Press the Service soft key to display
the Service information display.
The Service information display will ap-
pear.
Service information display
1Phone number of the provider,
(SIRIUS) or “Call Service Provider”
2The Electronical Serial Number (ESN)
of your satellite receiver
�Contact satellite radio service provider
at the telephone number displayed in
the screen.After the connection is made:
�Follow the instructions given by the
operator.
The activation process may take up to
10 minutes. If it is successful, you will
see the display with the message
Acquiring Signal... (�page 118)
followed by the Satellite radio main
menu (
�page 118).
Subscribing to satellite radioi
Depending on subscription status, soft
keys may or may not appear on the left
and right side of the service information
display.
i
Credit card information may be re-
quired for your application.
The activation process takes up to ap-
proximately 10 minutes.
If a satellite receiver is not installed or
not properly installed:
The message
No Satellite Radio
will appear.
Page 125 of 242
123 Satellite radio*
Satellite radio operation
You can call the provider service center for
questions or releases, whenever you need.
�Press the Service soft key.
The Service information display will ap-
pear.
1Phone number of the provider,
(SIRIUS) or “Call Service Provider”
2The Electronical Serial Number (ESN)
of your satellite receiver
�Press the Back soft key to switch back
to the Satellite radio main menu.
While receiving a new channel list the mes-
sage
Updating station list will ap-
pear.
The station last tuned will be muted until
the update is completed. You cannot ope-
rate the satellite radio.
After completion of the update, the
Satellite radio main menu will appear.
The station last tuned to will begin to play.Refer to chapter “At a glance” on how to
adjust sound settings.
�Volume (�page 35)
�Balance control and fader (�page 36)
�Bass and treble control (�page 37)
�Sound functions* (�page 38)
Displaying service information
Station list updates
Sound settings
Page 127 of 242
125 Telephone*
Important notes
Telephone operation
Page 128 of 242
126 Telephone*
Important notes
� Important notes
In chapter “Telephone”, you will find de-
tailed information regarding the telepho-
ne*, including emergency call.
1 Observe all legal requirements
WarningG
Some jurisdictions prohibit the driver from
using a cellular telephone while driving a ve-
hicle. Whether or not prohibited by law, for
safety reasons, the driver should not use the
cellular telephone while the vehicle is in mo-
tion. Stop the vehicle in a safe location be-
fore answering or placing a call.
If you nonetheless choose to use the cellular
phone while driving, please use the hands-
free device and be sure to pay attention to
the traffic situation at all times. Use the cel-
lular phone
1 only when road, weather and
traffic conditions permit.
Never operate radio transmitters equipped
with a built-in or attached antenna (i.e.
without being connected to an external an-
tenna) from inside the vehicle while the en-
gine is running. Doing so could lead to
malfunction of the vehicle’s electronic sys-
tems, possibly resulting in an accident and
personal injury.
WarningG
Radio transmitters, such as a portable tele-
phone or a citizens band unit should only be
used inside the vehicle if they are connected
to a separate exterior antenna that has been
approved by Mercedes-Benz.
Page 129 of 242
127 Telephone*
Important notes
i
If you have a Mercedes-Benz specified
integrated mobile telephone (TDMA,
CDMA or GSM) and the telephone is
inserted in the cradle, the telephone
functions can be used as follows:
�at the COMAND
�at the multifunction steering wheel
This instruction manual describes the
operation at the COMAND. Unless
otherwise indicated, the descriptions
and illustrations refer to the COMAND.
Operation at the mobile phone is
described in separate operating guides.
Refer to the vehicle Operator’s Manual
for operation of the telephone using the
multifunction steering wheel.
i
In certain menus, the COMAND can
display date and time of the calls.
The COMAND can display phone
number and name of the other party
(e.g. if the COMAND detects an
incoming call, but also in other menus).
For the number to be displayed, the
number information must be
transmitted with the incoming call. The
same goes for the name display which
additionally requires that the caller’s
number and name are saved in the
phone book.
Page 130 of 242

128 Telephone*
Important notes
�Please read the chapter “Telephone”
first before attempting to operate your
telephone.
�Please also read the important notes in
the telephone operating manual.
�Always drive with extreme caution
when you operate the telephone
hands-free.
�For safety reasons, you should not use
the mobile telephone handset to make
a call while driving the vehicle.
�If the signal strength is very weak (dis-
play in the symbol bar of all menus):
Wait until reception improves before
making a call.
�Close the windows and reduce all out-
side noise as much as possible when
you use hands-free operation.
�Also make sure that the air vents are
not pointed in the direction of the
microphones located in the overhead
control panel near the rear view mirror.
Adjust air vents and/or reduce blower
speed if necessary.
�A brief disconnection from the cellular
network is not a malfunction, as this
can occur when the network switches
areas. The phone will automatically try
to sign on to a network again.
�If the message Enter Unlock Code
appears, enter the unlock code to en-
able all telephone functions
(
�page 133). If you do not do so, only
the emergency call (911) is available.
GSM mobile phone
�If the message Please enter PIN-
Code
on the mobile phone appears, en-
ter the PIN-code to enable the telepho-
ne functions (
�page 133). If you do
not do so, only the emergency (911)
call is available on the mobile phone.In the following situations, it is not possible
or not yet possible to use the telephone:
�The telephone is already unlocked but
is not or not yet registered in the net-
work.
The message
No Serv appears in the
status bar. The telephone will try to re-
gister into an existing network. If the
network is available, the telephone will
be ready for use.
The above message also appears
�if the network is no longer available
due to weak signals