Page 277 of 522

276 Controls in detailLoadingUnloading and folding�
Loosen both straps.
�
Disconnect hook1 from eye2.
�
Unload skis.
�
Close flap in trunk.
�
Fold and flatten ski bag lengthwise and
place folded ski bag inside recess of
backrest.
�
Close ski bag compartment cover.Removal of ski bag
For removal of the ski bag, we recommend
that you contact an authorized
Mercedes-Benz Center.
Split rear bench seat*
To expand the trunk, you can fold down the
left and right rear seat backrests.
The two sections can be folded down sep-
arately to enlarge the trunk.
Warning!
G
Never drive vehicle with trunk open while
the ski bag is removed. Deadly carbon mon-
oxide (CO) gases may enter vehicle interior,
resulting in unconsciousness and death.i
To prevent unauthorized persons from ac-
cess to the trunk, always close the cover.
Warning!
G
When expanding the luggage compartment,
always fold the seat cushions fully forward.
Unless you are transporting cargo, the back-
rests must remain properly locked in the up-
right position.
In an accident, during hard braking or sud-
den maneuvers, loose items will be thrown
around inside the vehicle, and cause injury
to vehicle occupants unless the items are
securely fastened in the vehicle.
Always use the cargo tie down rings
(�page 280).
Page 278 of 522

277 Controls in detail
Loading
Folding the backrest forward
1Release handle�
Pull release handle1.
The seat cushion automatically springs
upward slightly.1Seat cushion
2Seat backrest
�
Grip the back of seat cushion1 and
fold forward.
�
Push the rear seat head restraints all
the way in.
�
Pull the handle in the trunk.
The seat backrest is released and the
head restraints fold back.
�
Fold the seat backrest forward.
!
You must always release the seat cushion
and fold it up before folding the seat backrests
forward. The upholstery on the seat backrest
may otherwise be damaged.
i
If tall persons have occupied the driver’s and
front passenger seats, it may be necessary to
move these seats forward slightly in order to fold
the rear seat backrests forward.
i
If the rear center seat is to be occupied
while driving, it may be necessary to fold the seat
belt buckle up again.
!
Make sure the head restraints fit all the way
into the seat cushion pockets. This will prevent
the backrests from being damaged during load-
ing.
Page 279 of 522
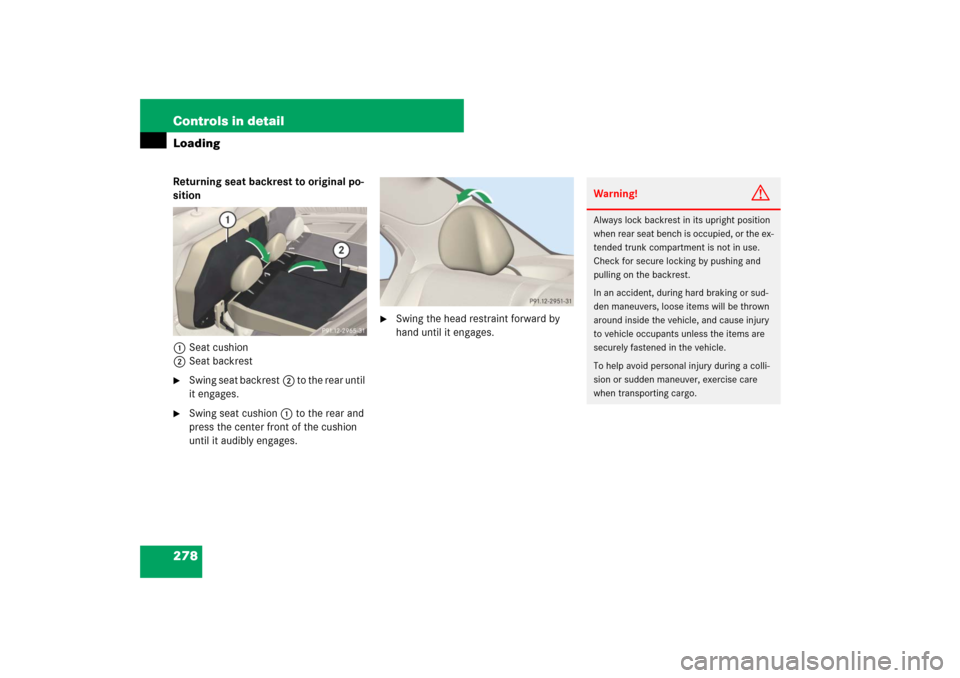
278 Controls in detailLoadingReturning seat backrest to original po-
sition
1Seat cushion
2Seat backrest�
Swing seat backrest2 to the rear until
it engages.
�
Swing seat cushion1 to the rear and
press the center front of the cushion
until it audibly engages.
�
Swing the head restraint forward by
hand until it engages.
Warning!
G
Always lock backrest in its upright position
when rear seat bench is occupied, or the ex-
tended trunk compartment is not in use.
Check for secure locking by pushing and
pulling on the backrest.
In an accident, during hard braking or sud-
den maneuvers, loose items will be thrown
around inside the vehicle, and cause injury
to vehicle occupants unless the items are
securely fastened in the vehicle.
To help avoid personal injury during a colli-
sion or sudden maneuver, exercise care
when transporting cargo.
Page 281 of 522

280 Controls in detailLoadingThe handling characteristics of a fully load-
ed vehicle depend greatly on the load dis-
tribution. It is therefore recommended to
load the vehicle according to the illustra-
tions shown, with the heaviest items being
placed towards the front of the vehicle.
Always place items being carried against
front or rear seat backrests, and fasten
them as securely as possible.
The heaviest portion of the cargo should al-
ways be kept as low as possible since it in-
fluences the handling characteristics of
the vehicle.
Cargo tie-down rings*
Four rings1 are located in the trunk.�
Carefully secure cargo by applying
even load on all rings with rope of suffi-
cient strength to hold down the cargo.
Always follow loading instructions
(�page 279).
Warning!
G
Always fasten items being carried as secure-
ly as possible using cargo tie-down rings and
fastening materials appropriate for the
weight and size of the load.
In an accident, during hard braking or sud-
den maneuvers, loose items will be thrown
around inside the vehicle and can cause in-
jury to vehicle occupants unless the items
are securely fastened in the vehicle.
To help avoid personal injury during a colli-
sion or sudden maneuver, exercise care
when transporting cargo. Put luggage or car-
go in the trunk if possible. Do not pile lug-
gage or cargo higher than the seat backs.
Do not place anything on the rear-window
shelf.
Never drive vehicle with trunk open. Deadly
carbon monoxide (CO) gases may enter ve-
hicle interior resulting in unconsciousness
and death.
Page 282 of 522
281 Controls in detail
Loading
Rear seat
There is a cargo tie-down ring1 located
on each side of the footwell under the rear
seat.
Retaining hooks
Depending on vehicle production date one
or two hooks are located on the upper
edge of the trunk and can be used to
attach cargo items such as bags.�
Pull tab 1 of retaining hook 2 down.
!
Do not use the retaining hooks to tie down
cargo.
Page 283 of 522
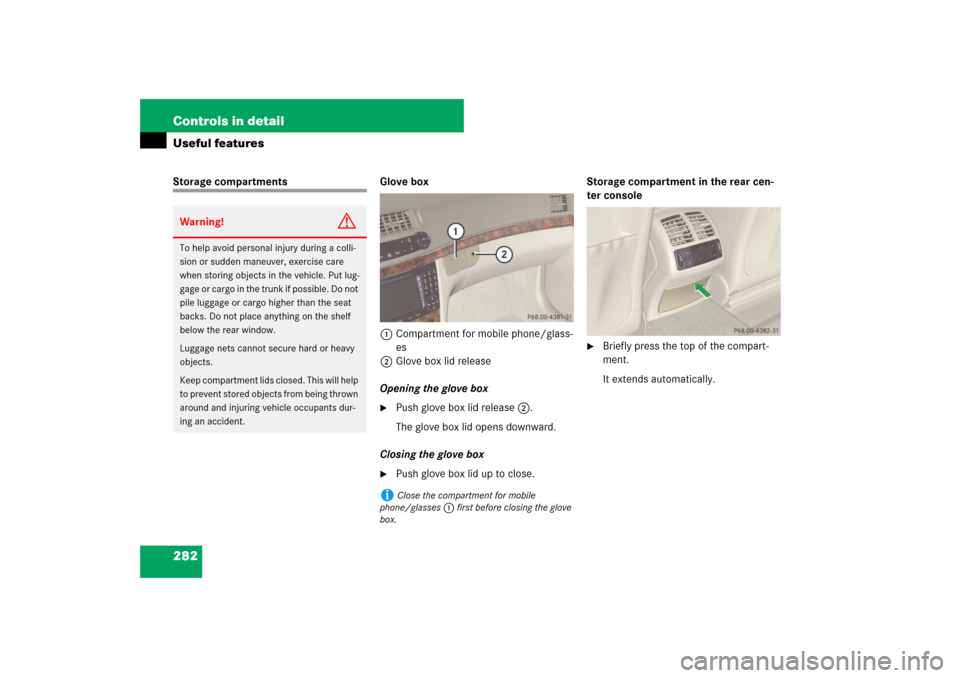
282 Controls in detailUseful featuresStorage compartments Glove box
1Compartment for mobile phone/glass-
es
2Glove box lid release
Opening the glove box
�
Push glove box lid release2.
The glove box lid opens downward.
Closing the glove box
�
Push glove box lid up to close.Storage compartment in the rear cen-
ter console
�
Briefly press the top of the compart-
ment.
It extends automatically.
Warning!
G
To help avoid personal injury during a colli-
sion or sudden maneuver, exercise care
when storing objects in the vehicle. Put lug-
gage or cargo in the trunk if possible. Do not
pile luggage or cargo higher than the seat
backs. Do not place anything on the shelf
below the rear window.
Luggage nets cannot secure hard or heavy
objects.
Keep compartment lids closed. This will help
to prevent stored objects from being thrown
around and injuring vehicle occupants dur-
ing an accident.
i
Close the compartment for mobile
phone/glasses1 first before closing the glove
box.
Page 290 of 522
.
�
Flip up cover and insert electrical plug
(c")
289 Controls in detail
Useful features
Power outlet
The power outlet is located in the rear pas-
senger compartment.�
Switch on the ignition (
�page 37).
�
Flip up cover and insert electrical plug
(cigarette lighter type).
Heated steering wheel (Canada only)
The steering wheel heating warms up the
leather area of the steering wheel.
The stalk is on the lower left-hand side of
the steering wheel.
1Switching on
2Switching off
3Indicator lamp
!
The lighter socket can be used to accommo-
date 12 V DC electrical accessories (up to a
maximum of 85 W) designed for use with the
standard “cigarette lighter” plug type. Keep in
mind, however, that connecting accessories to
the lighter socket (for example extensive con-
necting and disconnecting, or using plugs that do
not fit properly) can damage the lighter socket.
With the socket damaged, the lighter may no
longer be able to be placed in the heating
(pushed-in) position, or the lighter may pop out
too early with the lighter not hot enough.
To help avoid damaging the cigarette lighter
socket, we recommend connecting 12 V DC
electrical accessories designed for use with a
standard “cigarette lighter” plug type to the 12 V
power outlets in your vehicle whenever possible.
i
The power outlet can be used to
accommodate 12 V DC electrical accessories
(e.g. air pump, auxiliary lamps) up to a maximum
of 180 W.
An additional power outlet is located on the left
side in the trunk.
Page 301 of 522
,
and the reserve SmartKey is not handy:�
Contact the Mer")
300 Controls in detailUseful features
Remote door unlock
In case you have locked your vehicle unin-
tentionally (e.g. SmartKey inside vehicle),
and the reserve SmartKey is not handy:�
Contact the Mercedes-Benz Response
Center at 1-800-756-9018 (in the USA)
or 1-888-923-8367 (in Canada).
You will be asked to provide your pass-
word which you provided when you
completed the subscriber agreement.
�
Then return to your vehicle and pull the
trunk recessed handle for a minimum
of 20 seconds until the SOS button is
flashing.
The message
Call connected
appears
in the multifunction display.
As an alternative, you may unlock the vehi-
cle via Internet using the ID and password
sent to you shortly after the completion of
your acquaintance call.
The Response Center will then unlock your
vehicle with the remote door unlocking
feature.
i
When a Tele Aid call has been initiated, the
COMAND system audio is muted and the select-
ed mode (radio or CD) pauses. The optional cel-
lular phone (if installed) switches off. If you must
use this phone, the vehicle must be parked. Dis-
connect the coiled cord and place the call. The
COMAND navigation* system (if engaged) will
continue to run. The multifunction display in the
instrument cluster is available for use, and spo-
ken commands are only available by pressing the
RPT button on the COMAND unit. A pop-up win-
dow will appear in the COMAND display to indi-
cate that a Tele Aid call is in progress.
i
The remote door unlock feature is available
if the relevant cellular phone network is avail-
able.
The SOS button will flash and the message
Call connected
will appear in the multifunc-
tion display to indicate receipt of the door unlock
command.
Once the vehicle is unlocked, a Response Center
specialist will attempt to establish voice contact
with the vehicle occupants.
If the trunk recessed handle was pulled for more
than 20 seconds before door unlock authoriza-
tion was received by the Response Center, you
must wait 15 minutes before pulling the trunk re-
cessed handle again.