Page 126 of 522

In vehicles with trunk opening/closing sys-
tem* and KEYLESS-GO, you can close")
125 Controls in detail
Locking and unlocking
Closing trunk and locking vehicle from
outside (vehicles with KEYLESS-GO*)
In vehicles with trunk opening/closing sys-
tem* and KEYLESS-GO, you can close the
trunk and lock the vehicle simultaneously
from the outside using the KEYLESS-GO
locking/closing switch.
1KEYLESS-GO locking/closing switch�
Make sure you have the SmartKey with
KEYLESS-GO with you.
�
Press switch1 briefly.
With all doors closed:�
The locking knobs in the doors
move down.
�
The trunk starts to close automati-
cally.
�
All turn signal lamps flash three
times to confirm locking once the
trunk has closed completely.
�
An acoustic signal sounds three
times.
�
The anti-theft alarm system is
armed.
Trunk emergency release
With the emergency release button, the
trunk can be opened from inside the trunk.
1Emergency release button�
Briefly press emergency release
button1.
The trunk unlocks and the trunk opens.
i
If the trunk lid comes into contact with an
object while closing (e.g. luggage that has been
piled too high) in the upper motion sequence, the
closing procedure is stopped and the trunk re-
opens slightly.
i
The emergency release button unlocks and
opens the trunk while the vehicle is standing still
or in motion.
Page 127 of 522

126 Controls in detailLocking and unlockingIllumination of the emergency release but-
ton:�
The button will flash for 30 minutes af-
ter opening the trunk.
�
The button will flash for 60 minutes af-
ter closing the trunk.
Valet locking
1Neutral position
2Locked�
Close the trunk (
�page 122).
�
Remove the mechanical key from the
SmartKey (
�page 436).
�
Insert the mechanical key in the trunk
lid lock.
i
The emergency release button does not
open the trunk, if the vehicle battery is dis-
charged or disconnected.
i
If the vehicle has previously been locked us-
ing the SmartKey or KEYLESS-GO*, opening the
trunk from the inside using the emergency re-
lease button will trigger the anti-theft alarm sys-
tem.
To cancel the alarm, do one of the following:
�
Insert the SmartKey or the SmartKey with
KEYLESS-GO* in the starter switch.
�
Press button Œ or ‹ on the SmartKey
or the SmartKey with KEYLESS-GO*.
In vehicles with KEYLESS-GO*:
�
Pull an outside door handle.
The SmartKey with KEYLESS-GO* must be
within 3 ft (1 m) of the vehicle.
�
Press the KEYLESS-GO* start/stop button
(�page 39).
The SmartKey with KEYLESS-GO* must be
inside the vehicle.
i
To deny any unauthorized person access to
the trunk, e.g. when you valet park the vehicle,
lock it separately with the mechanical key. Leave
only the SmartKey or SmartKey with
KEYLESS-GO* less its mechanical key with the
vehicle.
Page 128 of 522

127 Controls in detail
Locking and unlocking
�
Turn the mechanical key clockwise to
position2 to lock the trunk.
The trunk remains locked even when the
vehicle is centrally unlocked.
�
Insert the mechanical key in the trunk
lid lock.
�
Turn the mechanical key counterclock-
wise to neutral position1 to unlock the
trunk.
You can now open the trunk
(�page 120).
Automatic central locking
The doors and the trunk automatically lock
when the ignition is switched on and the
wheels are turning at vehicle speeds of ap-
proximately 9 mph (15 km / h) or more.
The locking knobs in the doors move down.
You can open a locked door from the in-
side. Open door only when conditions are
safe to do so.
You can deactivate the automatic locking
mode using the control system
(�page 176).
Locking and unlocking from the inside
You can lock or unlock the doors and the
trunk from inside using the central locking
switch. This can be useful, for example, if
you want to lock the vehicle before starting
to drive.
The fuel filler flap cannot be locked or un-
locked with the central locking switch.
i
You can only cancel the separate trunk lock-
ing mode by means of the mechanical key.
i
The doors are designed to unlock automati-
cally after an accident if the force of the impact
exceeds a preset threshold. The vehicle locks au-
tomatically when the ignition is switched on and
the wheels are turning at vehicle speeds of ap-
proximately 9 mph (15 km/h) or more. You could
therefore lock yourself out when the vehicle
�
is pushed or towed
�
is on a test stand
Warning!
G
When leaving the vehicle, always remove the
SmartKey or SmartKey with KEYLESS-GO*
from the starter switch, take it with you, and
lock the vehicle. Do not leave children unat-
tended in the vehicle, or with access to an
unlocked vehicle. A child’s unsupervised ac-
cess to a vehicle could result in an accident
and/or serious personal injury.
Page 146 of 522

145 Controls in detail
Lighting
Interior lighting in the front
The controls are located in the overhead
control panel.1Left front reading lamp on/off
2Automatic control on/off
3Rear interior lighting on/off
4Right front reading lamp on/off
5Front interior lighting on/off
6Interior lighting
7Ambient lighting
8Front reading lamps
Deactivating automatic control
�
Press switch2.
The interior lighting remains switched
off in darkness, even when you:�
unlock the vehicle
�
remove the SmartKey from the
starter switch
�
open a door
�
open the trunk
Activating automatic control
�
Press switch2.
The interior lighting switches on in
darkness, when you:�
unlock the vehicle
�
remove the SmartKey from the
starter switch
�
open a door
�
open the trunk
The interior lighting switches off after a
preset time (
�page 176).
!
An interior lamp switched on manually does
not go out automatically.
Leaving an interior lamp switch in the ON posi-
tion for extended periods of time with the engine
turned off could result in a discharged battery.
i
The interior lighting is factory-set to auto-
matic mode.
i
If a door remains open, the interior lighting
switches off automatically after approximately
5minutes.
An interior lamp switched on manually does not
go out automatically.
Page 148 of 522

147 Controls in detail
Lighting
Rear reading lamps�
Press rear reading lamp
switch1or6 to switch on the re-
spective rear reading lamp.
�
Press rear reading lamp
switch1or6 again to switch off the
respective rear reading lamp.
Ambient lighting
�
Press ambient lighting switch3or7
repeatedly until ambient lighting4
has reached the desired intensity.
You can switch the ambient lighting on and
off, using the “Control system”
(
�page 175).
Door entry lamps
For better orientation in the dark, the cor-
responding door entry lamps will switch on
in the darkness when you open a door and
the automatic control is activated.
The door entry lamps will switch off when
the corresponding door is closed.
Trunk lamps
The trunk lamps switch on if the trunk is
opened.
If the trunk lid remains open, the trunk
lamps switch off automatically after ap-
proximately 10 minutes.
i
If you turn the SmartKey in the starter
switch to position0 and switch off the head-
lamps, the door entry lamps will remain lit for ap-
proximately 5 minutes.
Page 274 of 522
273 Controls in detail
Loading
�Loading
Roof rack*
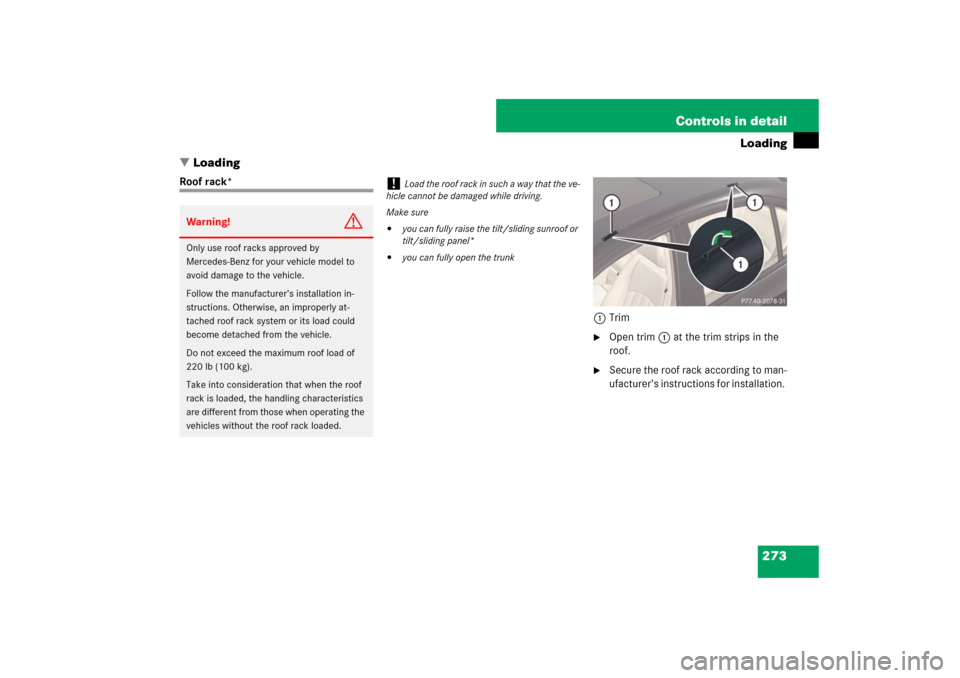
1Trim
�
Open trim1 at the trim strips in the
roof.
�
Secure the roof rack according to man-
ufacturer’s instructions for installation.
Warning!
G
Only use roof racks approved by
Mercedes-Benz for your vehicle model to
avoid damage to the vehicle.
Follow the manufacturer’s installation in-
structions. Otherwise, an improperly at-
tached roof rack system or its load could
become detached from the vehicle.
Do not exceed the maximum roof load of
220 lb (100 kg).
Take into consideration that when the roof
rack is loaded, the handling characteristics
are different from those when operating the
vehicles without the roof rack loaded.
!
Load the roof rack in such a way that the ve-
hicle cannot be damaged while driving.
Make sure
�
you can fully raise the tilt/sliding sunroof or
tilt/sliding panel*
�
you can fully open the trunk
Page 275 of 522
274 Controls in detailLoadingSki bag* (Canada only)
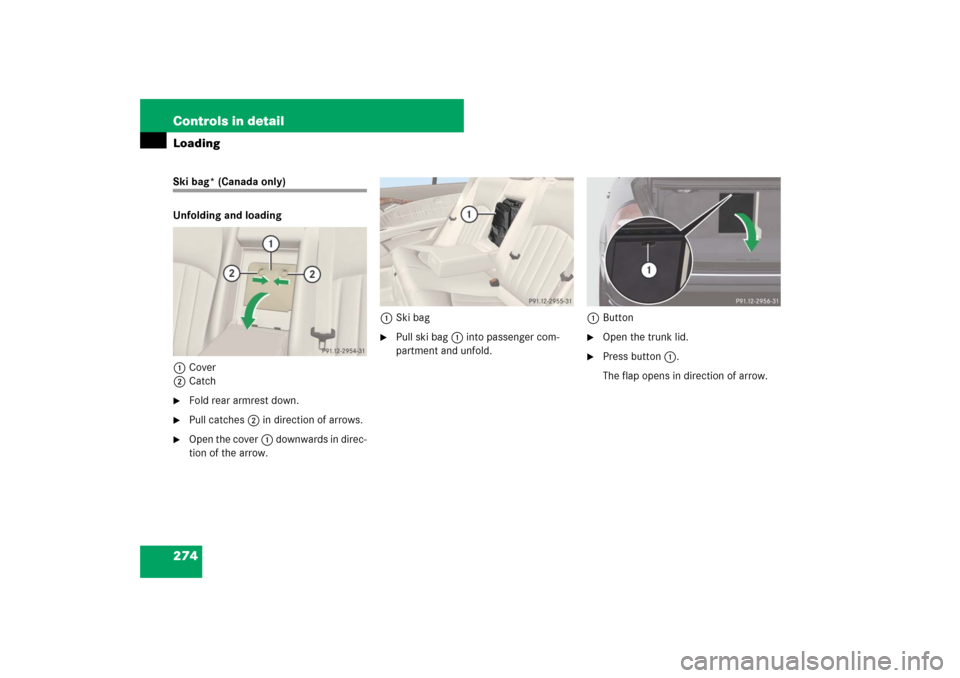
Unfolding and loading
1Cover
2Catch�
Fold rear armrest down.
�
Pull catches2 in direction of arrows.
�
Open the cover1 downwards in direc-
tion of the arrow.1Ski bag
�
Pull ski bag1 into passenger com-
partment and unfold.1Button
�
Open the trunk lid.
�
Press button1.
The flap opens in direction of arrow.
Page 276 of 522
275 Controls in detail
Loading
�
From trunk, slide skis into ski bag.1Strap
�
Tighten strap1 by pulling at the loose
end (arrow) until the skis in the ski bag
are tightly secured.1Hook
2Eye
�
Connect hook1 of front strap to
eye2 located on center tunnel in
front of rear seat bench.
�
Tighten strap by pulling at the loose
end (arrow).
Warning!
G
The ski bag is designed for up to four pairs
of skis. Do not load the ski bag with other
objects.
Always fasten the ski bag securely. In an ac-
cident, an unfastened ski bag can cause in-
jury to vehicle occupants.