Page 269 of 522
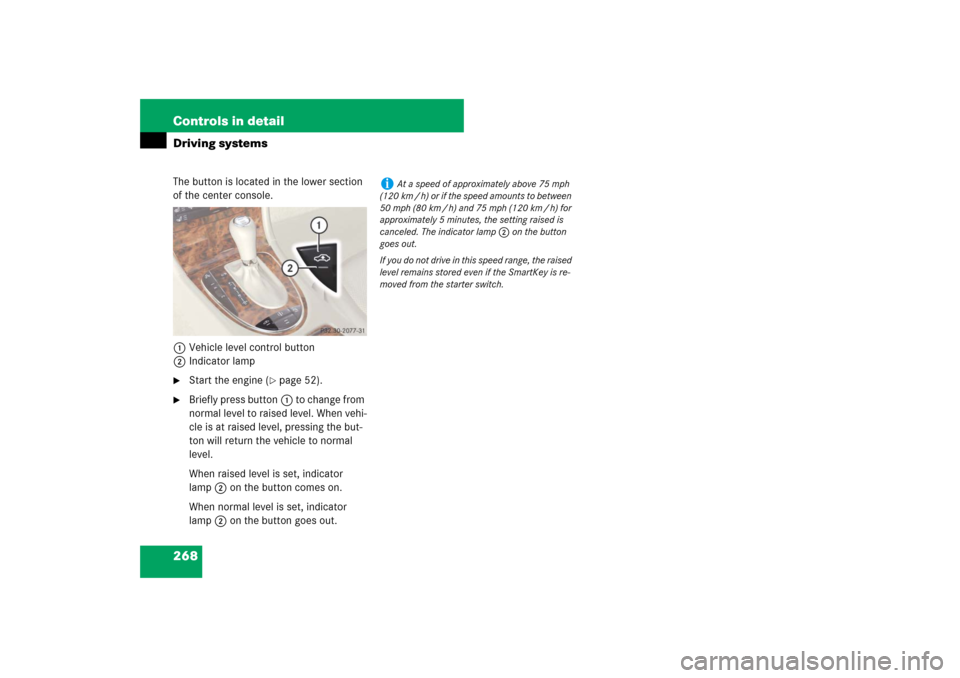
268 Controls in detailDriving systemsThe button is located in the lower section
of the center console.
1Vehicle level control button
2Indicator lamp �
Start the engine (
�page 52).
�
Briefly press button1 to change from
normal level to raised level. When vehi-
cle is at raised level, pressing the but-
ton will return the vehicle to normal
level.
When raised level is set, indicator
lamp2 on the button comes on.
When normal level is set, indicator
lamp2 on the button goes out.
i
At a speed of approximately above 75 mph
(120 km / h) or if the speed amounts to between
50 mph (80 km / h) and 75 mph (120 km / h) for
approximately 5 minutes, the setting raised is
canceled. The indicator lamp 2 on the button
goes out.
If you do not drive in this speed range, the raised
level remains stored even if the SmartKey is re-
moved from the starter switch.
Page 273 of 522

272 Controls in detailDriving systemsSwitching the Parktronic system
on/off
The Parktronic system can be switched off
manually.
The Parktronic switch is located in the low-
er part of the center console (
�page 30).
1Parktronic switch
2Indicator lampSwitching off the Parktronic system
�
Press Parktronic switch 1.
Indicator lamp 2 comes on.
Switching on the Parktronic system
�
Press Parktronic switch 1 again.
Indicator lamp 2 goes out.
Parktronic system malfunction
If only the red distance segments illumi-
nates and an acoustic warning sounds,
there is a malfunction in the Parktronic
system. The Parktronic system will auto-
matically switch off after 20 seconds and
the indicator lamp in the Parktronic switch
comes on.
�
Have the Parktronic system checked
by an authorized Mercedes-Benz Cen-
ter as soon as possible.If only the red distance segments illumi-
nates and no acoustic warning sounds, the
Parktronic system sensors are dirty or
there is an interference from other radio or
ultrasonic signals. The Parktronic system
will automatically switch off after 20 sec-
onds and the indicator lamp in the
Parktronic switch comes on.
�
Switch off the ignition (
�page 37).
�
Clean the Parktronic system sensors
(�page 373).
�
Switch on the ignition (
�page 37).
or
�
Check the Parktronic system operation
at another location to rule out interfer-
ence from outside radio or ultrasonic
signals.
i
The Parktronic system is automatically
switched on when the ignition is switched on
(
�page 37).
Page 288 of 522
287 Controls in detail
Useful features
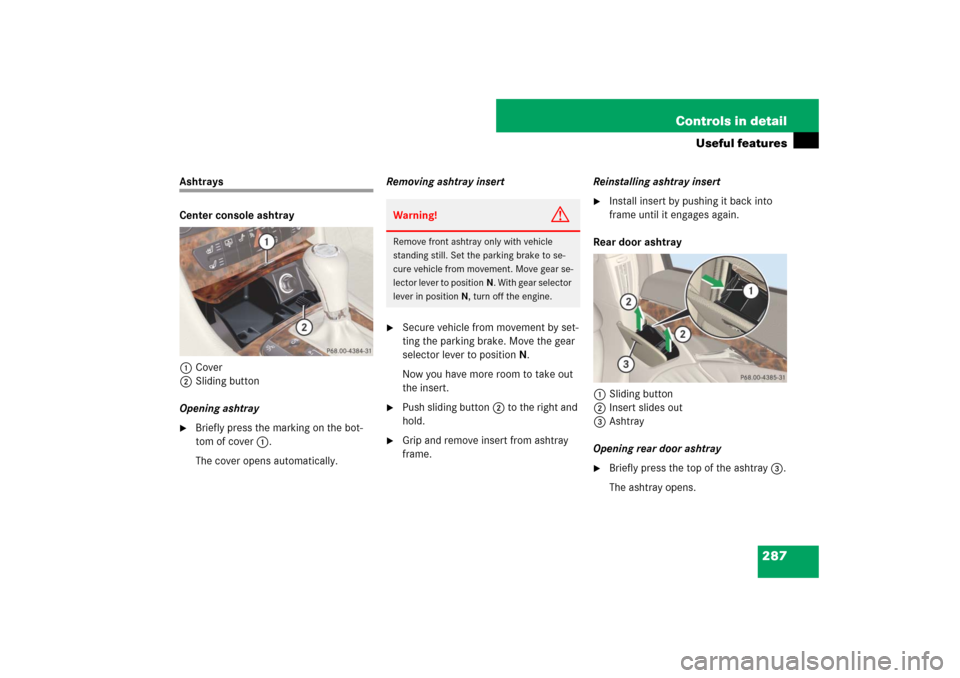
Ashtrays
Center console ashtray
1Cover
2Sliding button
Opening ashtray�
Briefly press the marking on the bot-
tom of cover1.
The cover opens automatically.Removing ashtray insert
�
Secure vehicle from movement by set-
ting the parking brake. Move the gear
selector lever to positionN.
Now you have more room to take out
the insert.
�
Push sliding button2 to the right and
hold.
�
Grip and remove insert from ashtray
frame.Reinstalling ashtray insert
�
Install insert by pushing it back into
frame until it engages again.
Rear door ashtray
1Sliding button
2Insert slides out
3Ashtray
Opening rear door ashtray
�
Briefly press the top of the ashtray3.
The ashtray opens.
Warning!
G
Remove front ashtray only with vehicle
standing still. Set the parking brake to se-
cure vehicle from movement. Move gear se-
lector lever to positionN. With gear selector
lever in positionN, turn off the engine.
Page 289 of 522

and remove insert2 (
�page 287) up-
wards from ashtray frame.
Reinstalling ashtray insert
�
Install ins")
288 Controls in detailUseful featuresRemoving ashtray insert�
Push sliding button1 (
�page 287)
and remove insert2 (
�page 287) up-
wards from ashtray frame.
Reinstalling ashtray insert
�
Install insert2 (
�page 287) by push-
ing it back into ashtray frame until it en-
gages again.
Cigarette lighterThe cigarette lighter is located in the cen-
ter console compartment in front of the
center armrest (
�page 30).
1Cigarette lighter
�
Switch on the ignition (
�page 37).
�
Push in cigarette lighter1.
The lighter will pop out automatically
when hot.
Warning!
G
Never touch the heating element or sides of
the lighter; they are extremely hot. Hold the
knob only.
Make sure that any children traveling with
you do not injure themselves or start a fire
with the hot cigarette lighter.
When leaving the vehicle, always remove the
SmartKey or the SmartKey with
KEYLESS-GO* from the starter switch, take
it with you, and lock the vehicle. Do not
leave children unattended in the vehicle, or
with access to an unlocked vehicle. A child’s
unsupervised access to a vehicle could re-
sult in an accident and/or serious personal
injury.
Page 394 of 522
393 Practical hints
What to do if …
Lamp in center consoleProblem
Possible cause/consequence
Suggested solution
(USA only)75The indicator lamp illuminates and remains
illuminated with the weight of a typical adult
or someone larger than a small individual on
the front passenger seat.
The system is malfunctioning.
�
Have the system checked as soon as
possible by an authorized
Mercedes-Benz Center.
�
Read and observe messages in the
multifunction display and follow cor-
rective steps (
�page 403).
Warning!
G
If the
75
indicator lamp
illuminates and remains illuminated with the
weight of a typical adult or someone larger
than a small individual on the front passen-
ger seat, do not have any passenger use the
front passenger seat until the system has
been repaired.
Page 405 of 522
 and
the multifunction display in the")
404 Practical hintsWhat to do if …Display message
Possible cause/conse-
quence
Possible solutionMonitor the 75 indicator lamp on the center console (
�page 29) and
the multifunction display in the instrument cluster (
�page 26) for the following:
With the seat unoccupied and the ignition turned on,
�
the 75 indicator lamp on the center console should illuminate and
remain illuminated, indicating that the OCS (
�page 80) has deactivated the
front passenger front air bag.
�
the message
Front passenger airbag enabled See Operator’s Manual
or the
message
Front passenger airbag disabled See Operator’s Manual
should
not appear in the multifunction display at any time the seat is unoccupied. Wait
at least 60 seconds for the system to complete the necessary check cycles and
to make sure neither message appears in the multifunction display.
If above conditions are met, you can occupy the front passenger seat again. De-
pending on the front passenger classification sensed by the OCS (
�page 80), the
75 indicator lamp will remain illuminated or go out.
If above conditions are not met, the system is not working properly. Have the sys-
tem checked as soon as possible by an authorized Mercedes-Benz Center.
Warning!
G
If the 75indicator lamp
remains out even after performing the above
corrective steps, do not have any children
12 years old and under and
other small individuals use the front passen-
ger seat until the system has been repaired.
Page 407 of 522
 and
the multifunction display in the")
406 Practical hintsWhat to do if …Display message
Possible cause/conse-
quence
Possible solutionMonitor the 75 indicator lamp on the center console (
�page 29) and
the multifunction display in the instrument cluster (
�page 26) for the following:
With the seat unoccupied and the ignition turned on,
�
the 75 indicator lamp on the center console should illuminate and
remain illuminated, indicating that the OCS (
�page 80) has deactivated the
front passenger front air bag.
�
the message
Front passenger airbag enabled See Operator’s Manual
or the
message
Front passenger airbag disabled See Operator’s Manual
should
not appear in the multifunction display at any time the seat is unoccupied. Wait
at least 60 seconds for the system to complete the necessary check cycles and
to make sure neither message appears in the multifunction display.
If above conditions are met, you can occupy the front passenger seat again. De-
pending on the front passenger classification sensed by the OCS (
�page 80), the
75 indicator lamp will remain illuminated or go out.
If above conditions are not met, the system is not working properly. Have the sys-
tem checked as soon as possible by an authorized Mercedes-Benz Center.
Warning!
G
If the 75 indicator lamp
remains illuminated with an adult occupant
on the front passenger seat even after per-
forming the above corrective steps,
do not have any passenger use the front
passenger seat until the system has been
repaired.
Page 438 of 522
 is required to open the trunk lid. �
Insert the mechanical key1 into the
trun")
437 Practical hints
Unlocking/locking in an emergency
Unlocking the trunk
A minimum height clearance of 5.90 ft
(1.80 m) is required to open the trunk lid. �
Insert the mechanical key1 into the
trunk lid lock until it stops.
�
Turn the mechanical key1 counter-
clockwise to position2 and hold it in
this position.
�
Pull the handle3 and lift the trunk lid.
The trunk opens.
�
Turn the mechanical key1 back and
remove it from the trunk lid lock.
Locking the vehicle
If you are unable to lock the vehicle with
the SmartKey or SmartKey with
KEYLESS-GO*, do the following:�
Close the passenger door, the rear
doors and the trunk.
�
Press the central locking switch in the
center console (
�page 127).
�
Check to see whether the locking
knobs on the doors have moved down.
�
If necessary, push them down
manually.
�
Remove the mechanical key from the
SmartKey (
�page 436).
�
Check whether the trunk is locked.
1
Mechanical key
2
Unlocking in an emergency
3
Handle
!
Always make sure there is sufficient over-
head clearance.
��
75The indicator lamp illuminates and remains
illuminated with the weight of")