Page 157 of 187
156 Navigation*
POIs (Points of Interest)
The details disappear after approx.
3 seconds, or when pressing the
Details
soft key again.
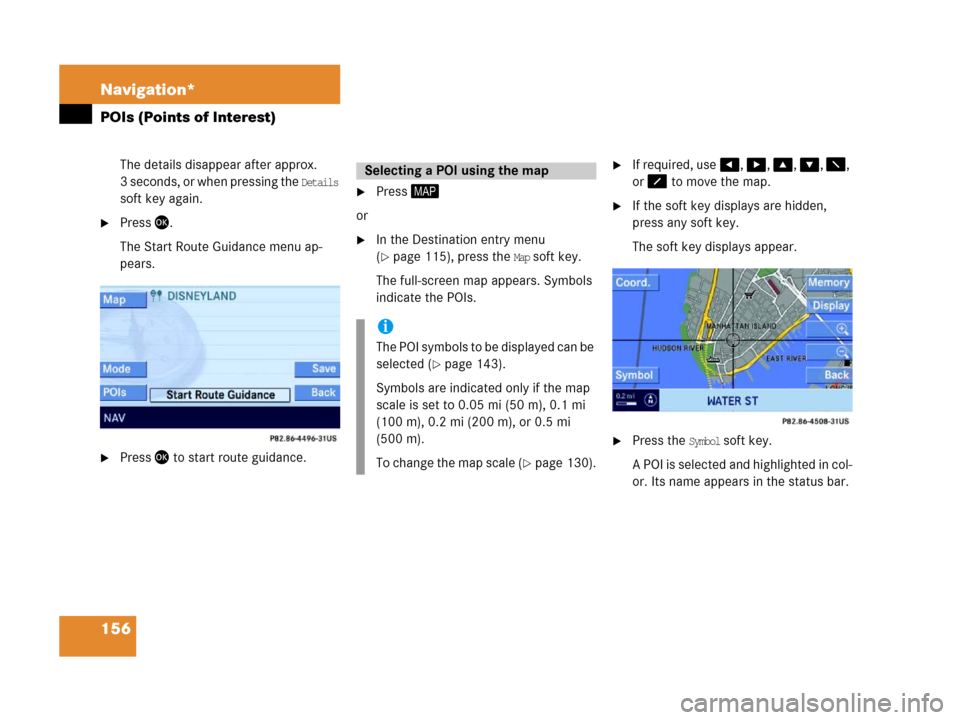
�Press '.
The Start Route Guidance menu ap-
pears.
�Press' to start route guidance.
�Press 6
or
�In the Destination entry menu
(
�page 115), press the Map soft key.
The full-screen map appears. Symbols
indicate the POIs.
�I f r e qu i r ed , u s e#, $, %, &, 7,
or 8 to move the map.
�If the soft key displays are hidden,
press any soft key.
The soft key displays appear.
.
�Press the Symbol soft key.
A POI is selected and highlighted in col-
or. Its name appears in the status bar.
Selecting a POI using the map
i
Th e P O I s y m b o l s t o b e d i s p l a y e d c a n b e
selected (
�page 143).
Symbols are indicated only if the map
scale is set to 0.05 mi (50 m), 0.1 mi
(100 m), 0.2 mi (200 m), or 0.5 mi
(500 m).
To change the map scale (
�page 130).
Page 161 of 187

160 Service
Tele Aid*
Tele Aid incorporates the following func-
tions:
�Emergency call system
�Roadside Assistance
�Information
For certain emergency situations, the sys-
tem automatically triggers an emergency
call. An emergency call can also be trig-
gered manually. Refer to your vehicle Op-
erator's Manual for additional information.
If the system initiates an emergency call,
Connecting appears on the display.
During the emergency call
Call Connected
appears on the display. No operation from
COMAND is possible.Mercedes-Benz Roadside Assistance will
assist if technical problems with your vehi-
cle are experienced.
Roadside Assistance can be requested
manually. Refer to your vehicle Operator's
Manual for additional information.
Upon request of Roadside Assistance the
system initiates the call to the Mercedes-
Benz Response Center.
Connecting appears on the display.
If the connection is made, the message
Call Connected appears on the display.
Even after ending of the connection, the
service may remain active for up to anoth-
er 5 minutes in order to transmit any re-
quired data. During this time, phone calls
cannot be made, nor can SMS messages
be received.During activation of a roadside assistance
call, it is not possible to switch to another
application.
The transmitted data can contain, e.g., text
messages or address details of a
Mercedes-Benz Center.
Cancelling text messages
�Press' after you have read the mes-
sage.
The message disappears.
Starting route guidance
You are prompted to confirm if route guid-
ance to the address is to be started.
�Use# to select the Yes menu item
and confirm with '.
The system starts the route calcula-
tion, and subsequently the route guid-
ance to the defined address
(
�page 128).
Emergency call system
Roadside Assistance
Page 162 of 187

161 Service
Tele Aid*
Ending the connection
On the COMAND control unit
�Press4.
On the multifunction steering wheel
�Presst .
COMAND reverts to the system last ac-
tive before Tele Aid was activated.
A call to the Mercedes-Benz Response
Center will be initiated. Information re-
garding the operation of your vehicle, the
nearest authorized Mercedes-Benz Center
or Mercedes-Benz USA products and ser-
vices is available to you. Refer to your vehi-
cle Operator's Manual for additional
information. When a call to the Mercedes-Benz Re-
sponse Center is initiated,
Connecting ap-
pears on the display.
When the connection is made, the mes-
sage
Call Connected appears on the display.
Even after the connection has been ended,
the service will remain active for 5 minutes
in order to transm it any required da ta. Dur-
ing this time, phone calls can not be made,
nor can SMS messages be received.
The transmitted data can contain, e.g., text
messages or address details of a Mer-
cedes-Benz Center.Cancelling text messages
�Press' after you have read the mes-
sage.
The message disappears.
Starting route guidance
You are prompted to confirm if route guid-
ance to the address is to be started.
�Use# to select the Yes menu item
and confirm with '.
The system starts the route calcula-
tion, and subsequently the route guid-
ance to the defined address
(
�page 128).
Information
Page 165 of 187
164 System
System settings
�Press<.
The System menu appears.
Selectable soft keys
�Time soft key
For setting the date and time.
�Lang. soft key
For setting the language (
�page 166).
�Tones soft key
For switching confirmation beeps
and acoustic signals ON and OFF
(
�page 167).
�Display soft key
For changing the display settings
(
�page 167).
�VC tips soft key
To call up the Voice control settings*
(
�page 168).
�Reset soft key
For reversing COMAND to the factory
settings (
�page 171).
�In the System menu, press the Time so f t
key.
The Date/Time settings menu appears.
The following options are now available:
�Setting the time
�Setting the date
�Setting the date/time format
Calling up the System menuSetting the date/time
Page 167 of 187
166 System
System settings
Setting the format:
�Use% or & to select a format.
�Press'.
The appropriate format is selected.
�Press the Back soft key or wait for the
screen to change.
The new setting is stored.
The language setting changes the display
language as well as the language used for
voice instructions in navigation announce-
ments.
�In the System menu (�page 164),
press the
Lang. soft key.
The language list is displayed.The following options are available:
�Instr. cluster settings:
The system switches to the lan-
guage already set in the vehicle in-
strument cluster (
�Vehicle
Operator’s manual).
�All other options:
The system switches to the re-
quested language.
i
List entry 1-3: Date formats
List entry 4 and 5: Time formats
(Entry 5 is not visible on the display ex-
ample below.)
Solid circle : format set
Empty circle : format not set
Setting the language
Page 168 of 187
167 System
System settings
�Use% or & to select an entry.
�Press'.
�Press the Back soft key or wait for
screen to change.
The new setting is stored.
�In the System menu (�page 164),
press the
Tones soft key.
The list of available sounds is dis-
played.
�Use% or & to select an entry.
�Press'.
The requested sounds are switched ON
or OFF.
�Press the Back soft key or wait for
screen to change.
The System menu appears. The new
setting is stored.
�In the System menu (�page 164),
press the
Display soft key.
The Display Settings menu appears.The following soft key and option are avail-
able:
�Bright. soft key
Provides access to adjusting the dis-
play brightness (
�page 168).
�Switching the display dimming charac-
teristics (
�page 168).
Switching confirmation beeps and
acoustic signals ON/OFF
i
The square next to a list entry shows
the status.
Empty square = sound OFF
Solid square = sound ON
Display settings
Page 169 of 187
168 System
System settings
Switching the display dimming
characteristics
You can select from 3 display dimming
modes:
�Day mode
The display is constantly set to daytime
design.
�Night mode
The display is constantly set to night-
time design.
�Automatic
The display will change depending on
the illumination of the instrument clus-
ter.
�Use% or & to select an entry.
�Press'.Adjusting display brightness
�Press the Bright. soft key.
The Brightness display appears.
�Press# or $.
The brightness changes accordingly.
�Press the Back soft key or wait for
screen to change.
The new setting is stored.Use this function to:
�Start or delete voice control individual-
ization (
�page 169)
�Activate/deactivate the voice control
help window
Activate/deactivate the help window
�Open the System menu (�page 164).
�Press the VC tips soft key.
The Voice control menu appears.
Voice control settings*
Page 170 of 187

169 System
System settings
�Press the % key to select the Help
Window
menu item.
The status bar shows you whether the
help window is activated or deactivat-
ed.
�Press'.
The menu to activate or deactivate the
help window appears. The solid circle
shows whether the help window is
activated or deactivated.
In the following display example, the
help window is activated.
�Press % or & to select the menu
item with the empty circle .
�Press'.
This will activate or deactivate the help
window.
Voice control individualization
The individualization function is used to
adapt the voice control to your own voice
and to therefore improve speech recogni-
tion. This does not affect speech recogni-
tion of other users.
Individualization consists of two stages.
The first stage involves training digits,
whilst the second stage trains specific
commands.
�From the System menu (�page 164),
press the
VC tips soft key.
The Voice control menu appears.
�Press& to select menu item
Individualization.
�Press'.
The Individualization menu appears.