Page 363 of 505

362 Operation
Vehicle care
Cleaning the windows and the wiper
blades
�Make sure the hood is fully closed.
�Make sure the vehicle’s on-board
electronics have status0 (
�page 36).
�Fold the wiper arms forward until they
snap into place.
�Clean the wiper blade inserts with a
clean cloth and detergent solution.
�Use a soft, clean cloth and a mild
window cleaning solution on all outside
and inside glass surfaces.
An automotive glass cleaner is
recommended.Light alloy wheels
If possible, clean wheels once a week.�Use Mercedes-Benz approved Wheel
Care, a soft bristle brush and a strong
spray of water for cleaning the light
alloy wheels.!Never open the hood when the wiper arms
are folded forward.
Warning!G
For safety reasons, switch off wipers and
remove SmartKey from starter switch
(vehicles with KEYLESS-GO*: Make sure the
vehicle's on-board electronics have
status0) before cleaning the windshield
and/or the wiper blades. Otherwise, the
wiper motor could suddenly turn on and
cause injury.
!Do not pull on the wiper blade inserts. They
could tear.
!Fold the windshield wiper arms back onto
the windshield before turning the SmartKey in
the starter switch or pressing the KEYLESS-GO
start/stop button (vehicles with KEYLESS-GO*).
Hold on to the wiper when folding the wiper arm
back. If released, the force of the impact from
the tensioning spring could crack the windshield.
!To clean the window interior, do not use a
dry cloth, abrasives, solvents or cleaners
containing solvents. Do not touch the inside of
the front, rear or side windows with hard objects
such as an ice scraper or ring. Doing so may
damage the windows.
!Only use acid-free cleaning materials. Acid
may cause corrosion or damage the clear coat.
!The vehicle should not be parked for an
extended period of time immediately after it has
been cleaned, especially not after the wheel rims
have been cleaned with wheel rim cleaner.
Wheel rim cleaners can lead to increased
corrosion of the brake disks and brake pads.
Non-approved wheel cleaners may also damage
the wheel paint if the car is not driven after
cleaning. Therefore, the vehicle’s brake system
should always be warmed-up before it is parked
after cleaning. To do so, please drive your vehicle
for several minutes to allow the brakes to dry.
When applying Mercedes-Benz approved Tire
Care and Mercedes-Benz approved Wheel Care
products, take care not to spray them on the
brake disks.
Page 387 of 505
386 Practical hints
What to do if …?
Display messagePossible cause/consequencePossible solution
PSelector lever
in ParkYou have turned off the engine with the
KEYLESS-GO* start/stop button in gear
selector lever positionN and opened the
driver’s door.
or
You have attempted to switch off the en-
gine with the KEYLESS-GO* start/stop
button while the gear selector lever was in
positionR orD.�Place the gear selector lever in
positionP.
Please
shift to
N or PYou have attempted to start the engine
with the KEYLESS-GO* start/stop button
while the gear selector lever was in
positionR orD.�Place the gear selector lever in
positionP or N.
Please engage
roll-over barThe roll bars are malfunctioning.�Have the system checked at an autho-
rized Mercedes-Benz Center as soon
as possible.
Please release
roll-over barThe roll bars are malfunctioning.�Operate the roll bars manually
(
�page 413).
�Have the system checked at an autho-
rized Mercedes-Benz Center as soon
as possible.
Page 396 of 505

395 Practical hints
What to do if …?
Display symbolDisplay messagePossible cause/consequencePossible solution
A Reserve fuelThe fuel level has dropped below the re-
serve mark.�Refuel at the next gas station
(
�page 312).
I Remove keyYou have forgotten to remove the
SmartKey.�Remove the SmartKey from the start-
er switch.
Replace keyNo additional code available for SmartKey
or SmartKey with KEYLESS-GO*.�Contact an authorized Mercedes-Benz
Center as soon as possible.
Change
key batteriesThe SmartKey with KEYLESS-GO* batter-
ies are discharged.�Change the batteries (�page 425).
Key
not detectedThe SmartKey with KEYLESS-GO* is not
recognized while the engine is running be-
cause
�the SmartKey is not in the vehicle
�there is strong radio-frequency inter-
ference
�Stop the vehicle as soon as it is safe to
do so.
�Apply the parking brake (�page 58).
�Search for the SmartKey.
Otherwise the vehicle cannot be centrally
locked nor can the engine be started
again after the engine has been stopped.
The SmartKey with KEYLESS-GO* is mo-
mentarily not recognized.�Change the position of the SmartKey
in the vehicle.
�Operate the vehicle with the SmartKey
in the starter switch if necessary.
Page 397 of 505

396 Practical hints
What to do if …?
Display symbolDisplay messagePossible cause/consequencePossible solution
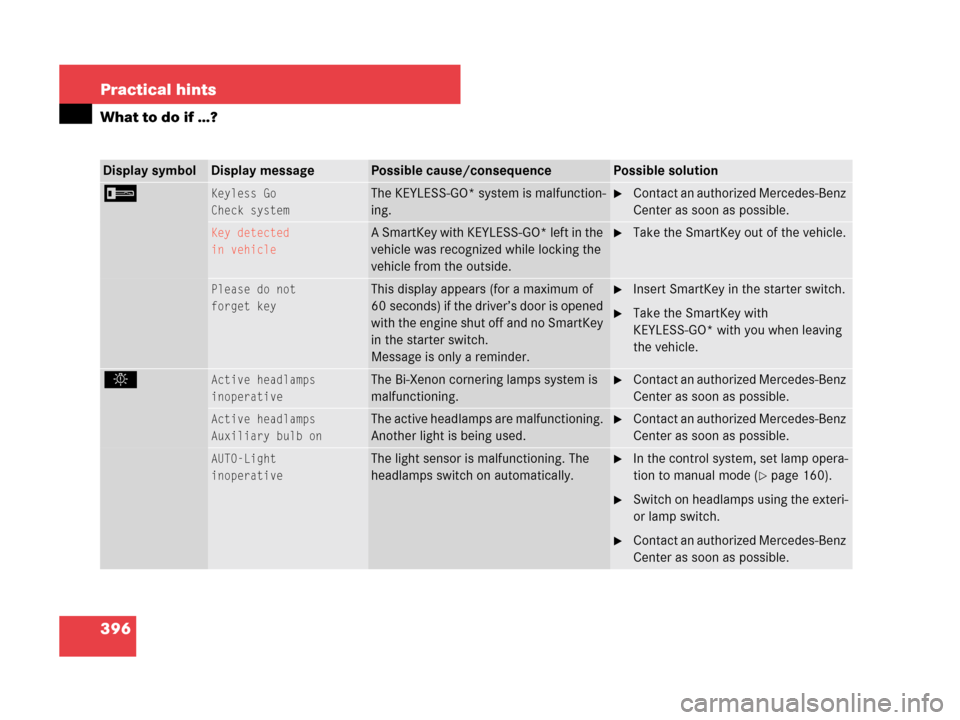
I Keyless Go
Check systemThe KEYLESS-GO* system is malfunction-
ing.�Contact an authorized Mercedes-Benz
Center as soon as possible.
Key detected
in vehicleA SmartKey with KEYLESS-GO* left in the
vehicle was recognized while locking the
vehicle from the outside.�Take the SmartKey out of the vehicle.
Please do not
forget keyThis display appears (for a maximum of
60 seconds) if the driver’s door is opened
with the engine shut off and no SmartKey
in the starter switch.
Message is only a reminder.�Insert SmartKey in the starter switch.
�Take the SmartKey with
KEYLESS-GO* with you when leaving
the vehicle.
. Active headlamps
inoperativeThe Bi-Xenon cornering lamps system is
malfunctioning.�Contact an authorized Mercedes-Benz
Center as soon as possible.
Active headlamps
Auxiliary bulb onThe active headlamps are malfunctioning.
Another light is being used.�Contact an authorized Mercedes-Benz
Center as soon as possible.
AUTO-Light
inoperativeThe light sensor is malfunctioning. The
headlamps switch on automatically.�In the control system, set lamp opera-
tion to manual mode (
�page 160).
�Switch on headlamps using the exteri-
or lamp switch.
�Contact an authorized Mercedes-Benz
Center as soon as possible.
Page 400 of 505

399 Practical hints
What to do if …?
Display symbolDisplay messagePossible cause/consequencePossible solution
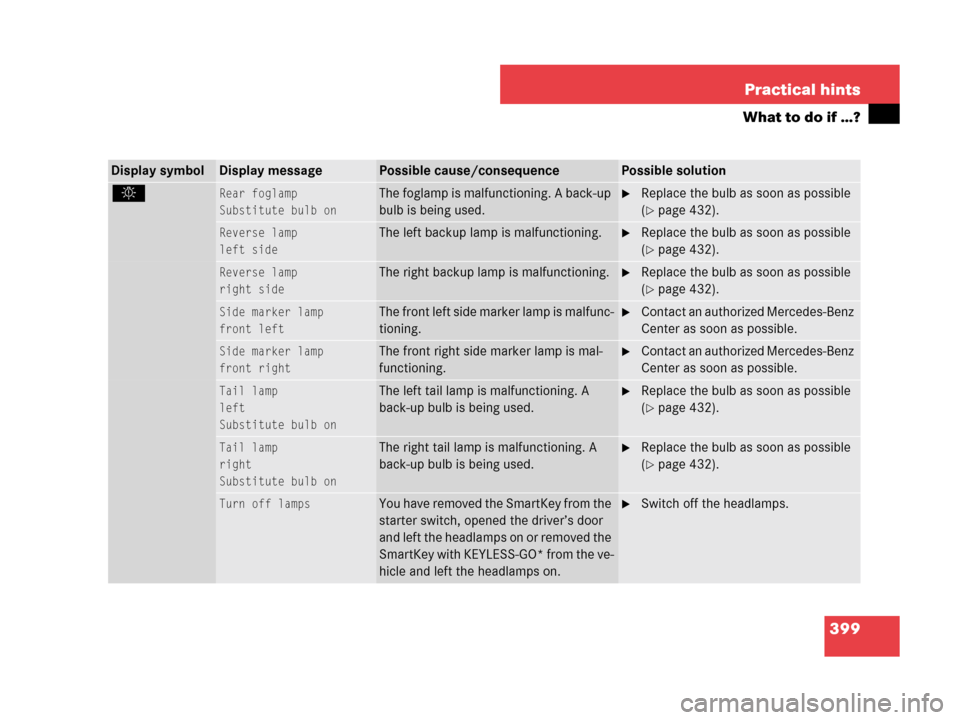
. Rear foglamp
Substitute bulb on
The foglamp is malfunctioning. A back-up
bulb is being used.�Replace the bulb as soon as possible
(
�page 432).
Reverse lamp
left sideThe left backup lamp is malfunctioning.�Replace the bulb as soon as possible
(
�page 432).
Reverse lamp
right sideThe right backup lamp is malfunctioning.�Replace the bulb as soon as possible
(
�page 432).
Side marker lamp
front leftThe front left side marker lamp is malfunc-
tioning.�Contact an authorized Mercedes-Benz
Center as soon as possible.
Side marker lamp
front rightThe front right side marker lamp is mal-
functioning.�Contact an authorized Mercedes-Benz
Center as soon as possible.
Tail lamp
left
Substitute bulb on
The left tail lamp is malfunctioning. A
back-up bulb is being used.�Replace the bulb as soon as possible
(
�page 432).
Tail lamp
right
Substitute bulb on
The right tail lamp is malfunctioning. A
back-up bulb is being used.�Replace the bulb as soon as possible
(
�page 432).
Turn off lampsYou have removed the SmartKey from the
starter switch, opened the driver’s door
and left the headlamps on or removed the
SmartKey with KEYLESS-GO* from the ve-
hicle and left the headlamps on.�Switch off the headlamps.
Page 411 of 505
410 Practical hints
Unlocking/locking in an emergency
Unlocking the vehicle
If you are unable to unlock the vehicle with
the SmartKey or KEYLESS-GO*, open the
driver’s door and the trunk using the
mechanical key.
1Mechanical key locking tab
2Mechanical key
�Move locking tab1 in direction of
arrow.
�Slide mechanical key2 out of the
housing.Unlocking the driver’s door
1Unlocking
�Insert the mechanical key into the
driver’s door lock until it stops.
�Turn the mechanical key counterclock-
wise to position1 until the locking
knob moves up.
The driver’s door is unlocked.
�Pull the door handle to open the
driver’s door.
iUnlocking and opening the driver’s door
and/or the trunk with the mechanical key will
trigger the anti-theft alarm system.
To cancel the alarm, do one of the following:
�Press button Œ or ‹on the
SmartKey.
�Insert the SmartKey in the starter switch.
Vehicles with KEYLESS-GO*:
�Pull the outside door handle.
�Press the KEYLESS-GO* start/stop button
(
�page 37).
Page 412 of 505

411 Practical hints
Unlocking/locking in an emergency
Unlocking the trunk
A minimum height clearance of 5.41 ft
(1.65 m) is required to open the trunk lid.
The trunk lid lock is located next to the
handle above the rear license plate recess.
1Unlocking in an emergency
2Handle
�Insert the mechanical key into the
trunk lid lock until it stops.
�Turn the mechanical key
counterclockwise to position1 and
hold it in this position.
�Pull the trunk lid handle2 and lift the
trunk lid.
The trunk opens.
�Turn the mechanical key back and
remove it from the trunk lid lock.
Locking the vehicle
If you cannot lock the vehicle with the
SmartKey or SmartKey with
KEYLESS-GO*, do the following:
�Close the passenger door and the
trunk.
�Press the central locking switch in the
center console (
�page 118).
�Check to see whether the locking knob
on the passenger door has moved
down.
�If necessary, push it down manually.
�Remove the mechanical key out of the
SmartKey (
�page 410).
�Check whether the trunk is locked.
�If necessary, lock the trunk with the
mechanical key (
�page 117).
Except for the driver’s door, the vehicle
should now be locked.
!The trunk lid swings open upwards
automatically. Always make sure there is suffi-
cient overhead clearance.
��
Page 420 of 505

419 Practical hints
Opening/closing in an emergency
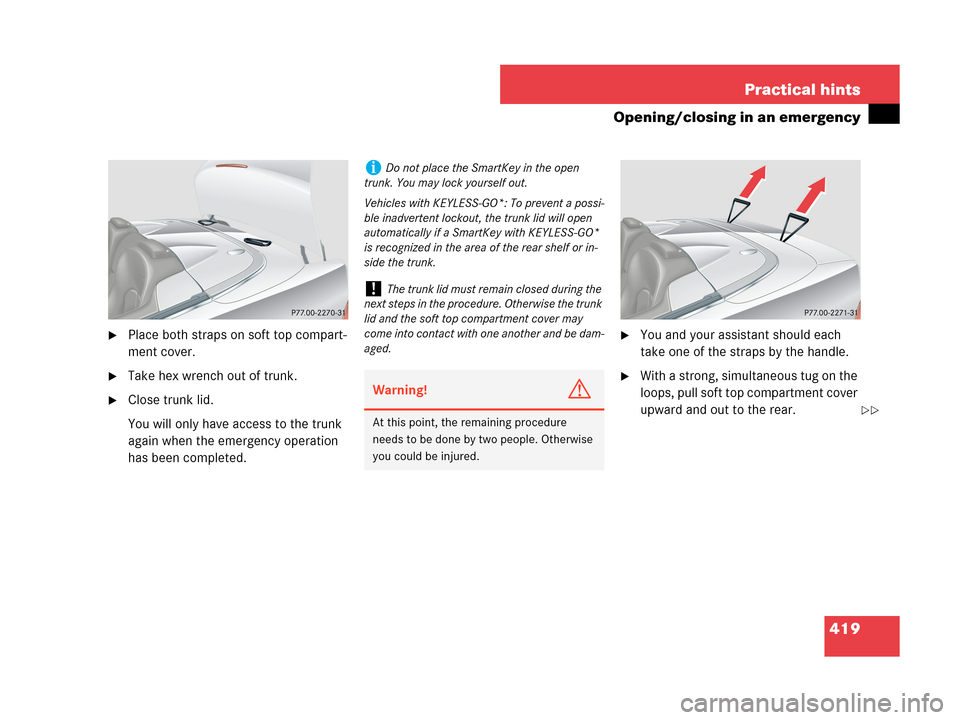
�Place both straps on soft top compart-
ment cover.
�Take hex wrench out of trunk.
�Close trunk lid.
You will only have access to the trunk
again when the emergency operation
has been completed.
�You and your assistant should each
take one of the straps by the handle.
�With a strong, simultaneous tug on the
loops, pull soft top compartment cover
upward and out to the rear.
iDo not place the SmartKey in the open
trunk. You may lock yourself out.
Vehicles with KEYLESS-GO*: To prevent a possi-
ble inadvertent lockout, the trunk lid will open
automatically if a SmartKey with KEYLESS-GO*
is recognized in the area of the rear shelf or in-
side the trunk.
!The trunk lid must remain closed during the
next steps in the procedure. Otherwise the trunk
lid and the soft top compartment cover may
come into contact with one another and be dam-
aged.
Warning!G
At this point, the remaining procedure
needs to be done by two people. Otherwise
you could be injured.��