Page 426 of 505
425 Practical hints
Replacing SmartKey batteries
�Replacing SmartKey batteries
If the batteries in the SmartKey or the
SmartKey with KEYLESS-GO* are dis-
charged, the vehicle can no longer be
locked or unlocked. It is recommended to
have the batteries replaced at an
authorized Mercedes-Benz Center.Batteries contain materials that can harm
the environment if disposed of improperly.
Recycling of batteries is the preferred
method of disposal. Many states require
sellers of batteries to accept old batteries
for recycling.
Warning!G
Keep the batteries out of reach of children.
If a battery is swallowed, seek medical help
immediately.
iWhen inserting the batteries, make sure
they are clean and free of lint.
iWhen changing batteries, always replace
both batteries.
The required replacement batteries are available
at any Mercedes-Benz Center.
Page 427 of 505
426 Practical hints
Replacing SmartKey batteries
SmartKey / SmartKey with
KEYLESS-GO*
Replacement batteries: Lithium, type
CR 2025 or equivalent.
�Remove the mechanical key from the
SmartKey or SmartKey with
KEYLESS-GO* (
�page 410).
1Mechanical key
2Battery compartment
�Insert mechanical key1 into the
opening.
�Press mechanical key1 in direction of
arrow.
The battery compartment2 is un-
latched.
�Pull battery compartment2 out of the
housing.
3Batteries
4Contact spring
�Remove the batteries3.
�Using a lint-free cloth, insert new
batteries3 under the contact
springs4 with the positive terminal
(+) side facing up.
�Return battery compartment2 into
housing until it locks into place.
�Slide mechanical key 1 back into the
SmartKey.
�Check the operation of the SmartKey.
Page 435 of 505

434 Practical hints
Replacing wiper blades
Removing and installing wiper blades
�Remove SmartKey from starter switch
(vehicles with KEYLESS-GO*: make
sure the vehicle's on board electronics
have status 0).
Removing wiper blades
1Unlocking
2Tab
�Pull the tab2 in the direction of
arrow1.
The wiper blade is unlocked.
�Lift up the wiper arm as far as you need
to remove the wiper blade.
�Carefully fold the wiper arm back to
rest on the windshield.
Warning!G
For safety reasons, switch off wipers and
remove SmartKey from starter switch
(vehicles with KEYLESS-GO*: make sure the
vehicle’s on-board electronics have
status0) before replacing a wiper blade.
Otherwise, the wiper motor could suddenly
turn on and cause injury.
Warning!G
Wiper blades are components that are sub-
ject to wear and tear. Change the wiper
blades twice a year, preferably in the spring
and fall. Otherwise the windows will not be
properly wiped. As a result, you may not be
able to observe surrounding traffic condi-
tions and could cause an accident.
!Never open the hood when the wiper arms
are folded forward.
For your convenience, we recommend that you
have this work carried out by an authorized
Mercedes-Benz Center.
!Do not pull on the wiper blade inserts. They
could tear.
!Hold on to the wiper arm. If released, the
force of the impact from the tensioning spring
could crack the windshield.
Page 437 of 505

436 Practical hints
Flat tire
The CLK 63 AMG is equipped with a
TIREFIT kit
Preparing the vehicle
�Park the vehicle in a safe distance from
moving traffic on a hard, flat surface
when possible.
�Turn on the hazard warning flashers
(
�page 133).
�Turn the steering wheel so that the
front wheels are in a straight ahead
position.
�Set the parking brake (�page 58).
�Move the gear selector lever toP.
Vehicles with SmartKey:
�Turn off the engine (�page 60).
�Remove the SmartKey from the starter
switch.Vehicles with SmartKey with
KEYLESS-GO*:
�Turn off the engine by pressing the
KEYLESS-GO* start/stop button on the
gear selector lever once (
�page 60).
�Open the driver’s door (this puts the ig-
nition in position0 (
�page 38), same
as with the SmartKey removed from
the starter switch). The driver’s door
then can be closed again.
�Have any passenger exit the vehicle at
a safe distance from the roadway.Sealing tires with TIREFIT
(CLK 63 AMG only)
Small tire punctures, particularly those in
the tread, can be sealed with TIREFIT.
TIREFIT can be used in ambient tempera-
tures down to -4°F (-20°C).
iOpen door only when conditions are safe to
do so.
Warning!G
Keep TIREFIT away from sparks, open flame
or heat source.
Do not smoke.
Page 439 of 505

438 Practical hints
Flat tire
�Screw the air pump’s air hose5 onto
flange6 of the TIREFIT container.
�Stick TIREFIT container1 upside
down into notch3 of the electric air
pump.
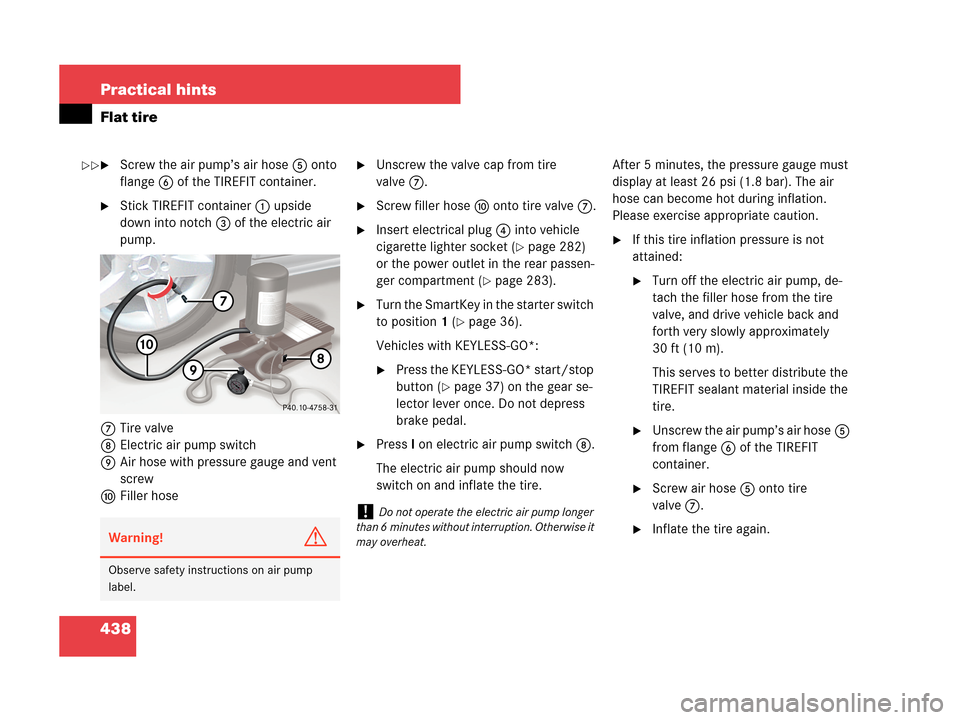
7Tire valve
8Electric air pump switch
9Air hose with pressure gauge and vent
screw
aFiller hose
�Unscrew the valve cap from tire
valve7.
�Screw filler hosea onto tire valve7.
�Insert electrical plug4 into vehicle
cigarette lighter socket (
�page 282)
or the power outlet in the rear passen-
ger compartment (
�page 283).
�Turn the SmartKey in the starter switch
to position1 (
�page 36).
Vehicles with KEYLESS-GO*:
�Press the KEYLESS-GO* start/stop
button (
�page 37) on the gear se-
lector lever once. Do not depress
brake pedal.
�PressI on electric air pump switch8.
The electric air pump should now
switch on and inflate the tire.After 5 minutes, the pressure gauge must
display at least 26 psi (1.8 bar). The air
hose can become hot during inflation.
Please exercise appropriate caution.
�If this tire inflation pressure is not
attained:
�Turn off the electric air pump, de-
tach the filler hose from the tire
valve, and drive vehicle back and
forth very slowly approximately
30 ft (10 m).
This serves to better distribute the
TIREFIT sealant material inside the
tire.
�Unscrew the air pump’s air hose5
from flange6 of the TIREFIT
container.
�Screw air hose5onto tire
valve7.
�Inflate the tire again.Warning!G
Observe safety instructions on air pump
label.
!Do not operate the electric air pump longer
than 6 minutes without interruption. Otherwise it
may overheat.
��
Page 440 of 505

439 Practical hints
Flat tire
�After attaining a tire inflation pressure
of 26 psi (1.8 bar), press0 on electric
air pump switch8.
The electric air pump should now be
switched off.
�Turn the SmartKey in the starter switch
to position0 (
�page 36).
Vehicles with KEYLESS-GO*:
�Press the KEYLESS-GO* start/stop
button (
�page 37) on the gear
selector lever twice. Do not depress
brake pedal.
�Detach the electric air pump.
The air hose may still be hot. Please
exercise appropriate caution.
�Place the electrical air pump back in
the trunk.
�Close the trunk lid.
�Drive away immediately.
The TIREFIT sealant will distribute itself
evenly inside the tire.
�After driving the vehicle for an initial
10 minutes, check the tire inflation
pressure using pressure gauge 9 on
the air pump.
Warning!G
If a tire inflation pressure of 26 psi (1.8 bar)
is not attained, tire is too severely damaged
for TIREFIT to provide a reliable tire repair.
In this case, TIREFIT cannot properly seal
the tire.
Do not drive the vehicle.
Contact the nearest Mercedes-Benz Center
or call Roadside Assistance.
Warning!G
Do not exceed vehicle speed of
50 mph (80 km / h). A TIREFIT repair is not
designed to operate at higher speeds.
The sticker supplied with the TIREFIT kit
must be attached on the instrument cluster
where it will be easily seen by the driver.
Vehicle handling characteristics may
change. Adapt your driving accordingly.
��
Page 449 of 505

448 Practical hints
Battery
2Negative terminal
3Positive terminal cover
Disconnecting the battery
�Apply the parking brake (�page 59).
�Make sure gear selector lever is set to
positionP (
�page 172).
�Turn off all electrical consumers.
�Remove SmartKey from starter switch.
Vehicles with KEYLESS-GO*:
�Press the start / stop button until
the engine shuts off.
�Open the driver’s door.
�Open the hood (�page 315).
�Remove the filter box (�page 447).
�Read and observe safety instructions
and precautions (
�page 447).
�Disconnect the battery negative lead
from negative terminal2.
�Remove cover3 from the positive ter-
minal.
�Disconnect the battery positive lead.
Removing the battery
�Remove the screw securing the
battery.
�Remove the battery support and
bracket.
�Pull out the ventilation hose from the
battery (depending on battery arrange-
ment in your vehicle model, the ventila-
tion hose is located either on the left or
right side of the battery).
�Take out the battery.
Warning!G
With a disconnected battery
�you will no longer be able to turn the
SmartKey in the starter switch and
pressing the KEYLESS-GO* start/stop
button on the gear selector lever will
have no effect
�the gear selector lever will remain
locked in positionP
!Always disconnect the battery in the order
described below. Otherwise the vehicle’s elec-
tronics can be damaged.
Page 450 of 505

449 Practical hints
Battery
Charging and reinstalling the battery
�Charge battery in accordance with the
instructions of the battery charger
manufacturer.
�Reinstall the charged battery. Follow
the previously described steps in
reverse order.
Reconnecting the battery
�Turn off all electrical consumers.
�Remove SmartKey from starter switch.
Vehicles with KEYLESS-GO*:
�Open the driver’s door.
�Connect the battery positive lead and
fasten its cover3 (
�page 448).
�Connect the battery negative lead2
(
�page 448).
�Reinstall the filter box (�page 447).Batteries contain materials that can harm
the environment if disposed of improperly.
Large 12-volt storage batteries contain
lead. Recycling of batteries is the preferred
method of disposal. Many states require
sellers of batteries to accept old batteries
for recycling.
Warning!G
Never charge a battery while still installed in
the vehicle unless the accessory battery
charge unit approved by Mercedes-Benz is
being used. Gases may escape during charg-
ing and cause explosions that may result in
paint damage, corrosion or personal injury.
An accessory battery charge unit specially
adapted for Mercedes-Benz vehicles and
tested and approved by Mercedes-Benz is
available, permitting the charging of the bat-
tery in its installed position. Contact an au-
thorized Mercedes-Benz Center for
information and availability. Charge battery
in accordance with the separate instruc-
tions for the accessory battery charger.
!The battery, its filler caps and the ventilation
hose must always be securely installed when the
vehicle is in operation.
!Always connect the battery in the order de-
scribed below. Otherwise the vehicle’s electron-
ics can be damaged.
!Never invert the terminal connections!
iThe following procedures must be carried
out following any interruption of battery power
(e.g. due to reconnecting):
�Set the clock (�page 158). Vehicles with
COMAND*: see COMAND operator’s manu-
al.
�Synchronize the side windows
(
�page 251).