Page 430 of 505

429 Practical hints
Replacing bulbs
Notes on bulb replacement
�Only use 12 volt bulbs of the same type
and with the specified watt rating.
�Switch lights off before changing a bulb
to prevent short circuits.
�Always use a clean lint-free cloth when
handling bulbs.
�Your hands should be dry and free of oil
and grease.
�If the newly installed bulb does not
come on, visit an authorized
Mercedes-Benz Center.
Have the LEDs and bulbs for the following
lamps replaced by an authorized
Mercedes-Benz Center.
�Additional turn signal lamps in the exte-
rior rear view mirrors
�High mounted brake lamp
�Bi-Xenon* lamps
�Front fog lamps
�Front side marker lamps
Warning!G
Keep bulbs out of reach of children.
Bulbs and bulb sockets can be very hot. Al-
low the lamp to cool down before changing
a bulb.
Halogen lamps contain pressurized gas. A
bulb can explode if you:
�touch or move it when hot
�drop the bulb
�scratch the bulb
Wear eye and hand protection.
Because of high voltage in Xenon lamps, it is
dangerous to replace the bulb or repair the
lamp and its components. We recommend
that you have such work done by a qualified
technician.
!Do not replace the LEDs yourself. You could
otherwise damage the LEDs or parts of the
vehicle. Only have the LEDs replaced by an
authorized Mercedes-Benz Center.
Page 439 of 505

438 Practical hints
Flat tire
�Screw the air pump’s air hose5 onto
flange6 of the TIREFIT container.
�Stick TIREFIT container1 upside
down into notch3 of the electric air
pump.
7Tire valve
8Electric air pump switch
9Air hose with pressure gauge and vent
screw
aFiller hose
�Unscrew the valve cap from tire
valve7.
�Screw filler hosea onto tire valve7.
�Insert electrical plug4 into vehicle
cigarette lighter socket (
�page 282)
or the power outlet in the rear passen-
ger compartment (
�page 283).
�Turn the SmartKey in the starter switch
to position1 (
�page 36).
Vehicles with KEYLESS-GO*:
�Press the KEYLESS-GO* start/stop
button (
�page 37) on the gear se-
lector lever once. Do not depress
brake pedal.
�PressI on electric air pump switch8.
The electric air pump should now
switch on and inflate the tire.After 5 minutes, the pressure gauge must
display at least 26 psi (1.8 bar). The air
hose can become hot during inflation.
Please exercise appropriate caution.
�If this tire inflation pressure is not
attained:
�Turn off the electric air pump, de-
tach the filler hose from the tire
valve, and drive vehicle back and
forth very slowly approximately
30 ft (10 m).
This serves to better distribute the
TIREFIT sealant material inside the
tire.
�Unscrew the air pump’s air hose5
from flange6 of the TIREFIT
container.
�Screw air hose5onto tire
valve7.
�Inflate the tire again.Warning!G
Observe safety instructions on air pump
label.
!Do not operate the electric air pump longer
than 6 minutes without interruption. Otherwise it
may overheat.
��
Page 445 of 505
�Clean contact surfaces of wheel and
wh")
444 Practical hints
Flat tire
Mounting the spare wheel
1Wheel bolt for light alloy rims
2Wheel bolt for Minispare wheel
(located in trunk with Minispare wheel)�Clean contact surfaces of wheel and
wheel hub.
1Alignment bolt
�Guide the spare wheel onto the align-
ment bolt and push it on.
�Insert wheel bolts and tighten them
slightly.!Wheel bolts2 must be used when mount-
ing the Minispare wheel. The use of any wheel
bolts other than wheel bolts2 for the Minispare
wheel will physically damage the vehicle’s
brakes.
!To avoid paint damage, place wheel flat
against hub and hold it there while installing first
wheel bolt.
Warning!G
Always replace wheel bolts that are dam-
aged or rusted.
Never apply oil or grease to wheel bolts.
Damaged wheel hub threads should be re-
paired immediately. Do not continue to drive
under these circumstances! Contact an au-
thorized Mercedes-Benz Center or call
Roadside Assistance.
Incorrect wheel bolts or improperly tight-
ened wheel bolts can cause the wheel to
come off. This could cause an accident.
Make sure to use the correct wheel bolts.
Page 446 of 505
445 Practical hints
Flat tire
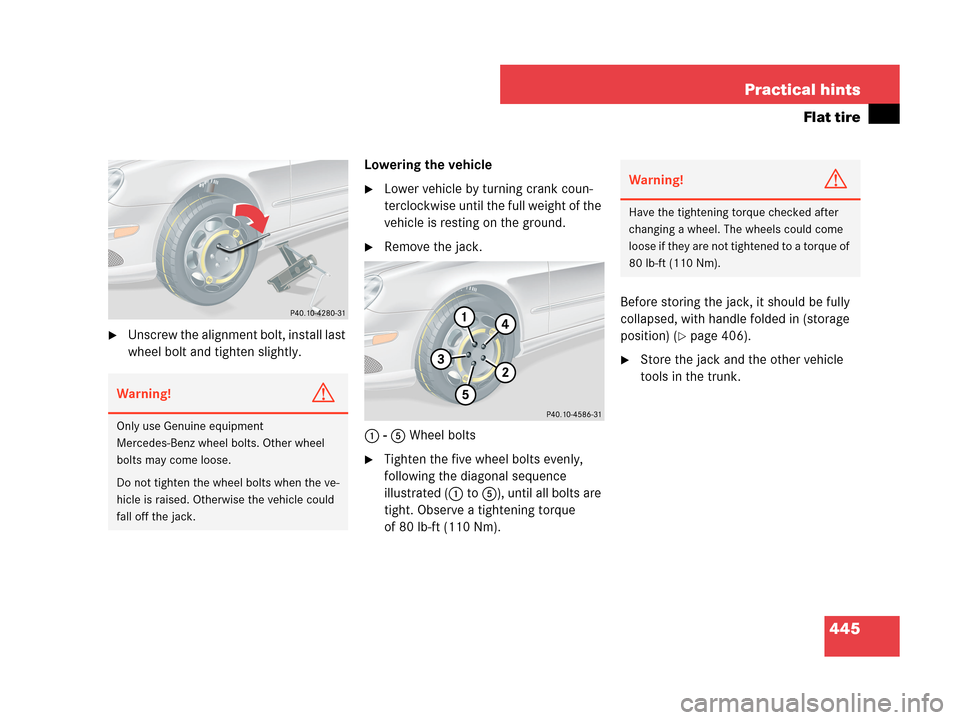
�Unscrew the alignment bolt, install last
wheel bolt and tighten slightly.Lowering the vehicle
�Lower vehicle by turning crank coun-
terclockwise until the full weight of the
vehicle is resting on the ground.
�Remove the jack.
1 - 5 Wheel bolts
�Tighten the five wheel bolts evenly,
following the diagonal sequence
illustrated (1 to 5), until all bolts are
tight. Observe a tightening torque
of 80 lb-ft (110 Nm).Before storing the jack, it should be fully
collapsed, with handle folded in (storage
position) (
�page 406).
�Store the jack and the other vehicle
tools in the trunk.
Warning!G
Only use Genuine equipment
Mercedes-Benz wheel bolts. Other wheel
bolts may come loose.
Do not tighten the wheel bolts when the ve-
hicle is raised. Otherwise the vehicle could
fall off the jack.
Warning!G
Have the tightening torque checked after
changing a wheel. The wheels could come
loose if they are not tightened to a torque of
80 lb-ft (110 Nm).
Page 476 of 505

475 Technical data
Fuels, coolants, lubricants, etc.
Brake fluid
During vehicle operation, the boiling point
of the brake fluid is continuously reduced
through the absorption of moisture from
the atmosphere.
Only brake fluid approved by
Mercedes-Benz is recommended. An
authorized Mercedes-Benz Center will
provide you with additional information.Premium unleaded gasoline
Warning!G
Under extremely strenuous operating condi-
tions, this moisture content can lead to the
formation of bubbles in the system, thus re-
ducing the system’s efficiency.
Therefore, the brake fluid must be replaced
regularly. Refer to your vehicle's Mainte-
nance Booklet for replacement interval.
Warning!G
Gasoline is highly flammable and poisonous.
It burns violently and can cause serious per-
sonal injury.
Never allow sparks, flame or smoking mate-
rials near gasoline!
Turn off the engine before refueling
Whenever you are around gasoline, avoid in-
haling fumes and skin or clothing contact,
extinguish all smoking materials.
Direct skin contact with fuels and the inha-
lation of fuel vapors can be damaging to
your health.
!To maintain the engine’s durability and per-
formance, premium unleaded gasoline must be
used. If premium unleaded is not available and
low octane fuel is used, follow these precau-
tions:
�Have the fuel tank only partially filled with
unleaded regular and fill up with premium
unleaded as soon as possible.
�Avoid full throttle driving and abrupt acceler-
ation.
�Do not exceed an engine speed of 3 000 rpm
if the vehicle is loaded with a light load such
as two persons and no luggage.
�Do not exceed 2/3 of maximum accelerator
pedal position if the vehicle is fully loaded or
operating in mountainous terrain.
Page 485 of 505

484 Index
Control system menus 142, 143
AMG 145
AUDIO 149
NAV* 151
Settings 153
Settings, Submenus 154
Standard display 145
Submenus 141
TEL* 167
Trip computer 165
Vehicle status message memory 152
Control system submenus 141, 143, 155
Convenience 164
Instrument cluster 156
Lighting 160
Time/Date 158
Vehicle 163Coolant 320, 477
Adding 320
Anticorrosion/antifreeze
mixing ratio and quantity 477
Capacities 472
Checking coolant level 320
Messages in display 390–392
Temperature 311
Temperature indicator 137
Warning lamp 371
Coolants 477
Corner-illuminating front fog lamps* 131
Replacing bulbs 428, 429
Cruise control 263
Canceling 265
Cruise control lever 263
Current speed 264
Fine adjustment 266
Higher speed 265
Last stored speed
(“Resume” function) 266
Slower speed 266
Cup holder 279
Curb weight 347D
Date 158
Date, Setting 159, 160
Daytime running lamp mode 128
Setting 160, 161
Deep water see Standing water
Defogging
Windshield 194, 204
Defrosting, Front 193, 204
Defrosting, Rear 187
Delayed shut-off
Exterior lamps 162
Interior lighting 163
Department of Transportation see DOT
Difficulties
With starting 52
Digital speedometer 145
Dimensions, Vehicle 471
Direction of rotation (tires) 326
Displays
Digital speedometer 145
Lap analysis 149
Maintenance service indicator 353
Messages in display 378
Multifunction display 139
Outside temperature 138
Page 489 of 505

488 Index
Gross Vehicle Weight see GVW
GVW 347
GVWR 348
H
Halogen headlamp see Headlamps
Hands-free microphone 31
Hard plastic trim items, cleaning 363
Hazard warning flasher 133
Head restraints 40, 119
Active head restraints 80
Front seat 119
Power seat, Adjusting 40
Rear seat 119
Rear seat, Lowering 120
Rear seat, Raising 120
Headlamp cleaning
system* 184, 322, 479
Headlamp delayed shut-off see
Delayed shut-off, Exterior lamps
Headlamps
Automatic headlamp mode 127
Bi-Xenon* 431
Cleaning lenses 361
Daytime running lamp mode 128
Halogen 430High beam see High beam flasher
High beam see High beam headlamps
Light sensor 396
Locator lighting 129
Low beam see Low beam headlamps
Manual headlamp mode 127
Messages in display 397–400
Night security illumination 129
Replacing bulbs 430, 432
Switch 54, 126
Headliner and shelf below rear window,
Cleaning and care of 363
Head-thorax air bag 70
Heated seats* 122
High beam flasher 54, 131
Replacing bulbs
(Bi-Xenon*) 428, 431
Replacing bulbs
(Halogen) 428, 430High beam headlamps 54, 131
Indicator lamp 27
Messages in display 397
Replacing bulbs
(Bi-Xenon*) 428, 429
Replacing bulbs
(Halogen) 428, 430
Replacing bulbs for high beam flasher
(Bi-Xenon*) 431
Switching on 54, 131
High mounted brake lamp 428
Hood 315
Horn 25
HVAC see Climate control system
Hydroplaning 306
Page 490 of 505
 462, 463
Ignition
with KEYLESS-GO* 38
with SmartKey 36
Immobilizer 95
Indicator lamps see
Lamps, indicator and warning
Infa")
489 Index
I
Identification labels 462
Identification number,
Vehicle (VIN) 462, 463
Ignition
with KEYLESS-GO* 38
with SmartKey 36
Immobilizer 95
Indicator lamps see
Lamps, indicator and warning
Infant and child restraint systems see
Children in the vehicle 82
Inflation pressure see
Tires, Inflation pressure
Inside door handle 32, 108
Instrument cluster 26, 136
Illumination brightness 136
Lamps in 366–375
Messages in display see
Multifunction display messages
Multifunction display 139
Instrument lighting see
Instrument cluster, Illumination
brightness
Instrument panel see Instrument cluster
Instruments and controls see CockpitInterior lighting 134
Delayed shut-off 163
Interior rear view mirror 45, 184
Antiglare position 184
Auto-dimming 185
Interior storage spaces see
Storage compartments
J
Jack 406
Jacking up the vehicle 441
Jump starting 450K
Key, Mechanical 410
Key, SmartKey 98
Batteries 107
Battery check lamp 100, 105
Changing batteries 426
Factory setting 100, 101
Ignition 36
Locking/unlocking 34, 62, 98
Locking/unlocking,
Global setting 100
Locking/unlocking,
Selective setting 100
Loss of 107
Message in display 395, 396
Opening and closing
the power windows 252
Opening and closing
the soft top 259
Positions in starter switch 36
Remote control 98
SmartKey with KEYLESS-GO* 101
Starting the engine 51
Steering wheel lock 36
Turning off the engine 60
Unlocking/opening trunk lid 101