Page 196 of 441

195 Controls in detail
Audio system
Manual tuning
�Select desired waveband.
�Press S or Tbutton for approx.
3 seconds.
�Press button repeatedly until desired
frequency has been reached.
Step-by-step station tuning takes place
in ascending or descending order. Each
time the button is pressed, the radio
tunes further by 0.2 MHz. During
manual tuning, the radio is muted.
Automatic seek tuning
�Select desired waveband.
�Press S or T button briefly.
The radio will tune to the next highest
or next lowest receivable frequency.Scan search
�Starting scan search
�Select desired waveband.
�Press SC soft key.
SC will appear in the display. The
radio briefly tunes in all receivable
stations on the waveband selected.
�Ending scan search
�Press SC soft key or S or T.The station last played will be
selected and
SC disappears from
the display.
Station memory
You can store ten AM and ten FM stations
in the memory.
�Storing stations
�Tune in desired station.
�Press and hold desired station
button1 to R until a brief
signal tone is heard.
The frequency is stored on the
selected station button.
�Calling up stations
�Press desired station button1
to R briefly.
iYou can only enter frequencies within the re-
spective waveband.
If a button is not pressed within 4 seconds, the
radio will return to the last station tuned.iIf no station is received after two
consecutive scans of the complete frequency
range, then the scan stops at the frequency from
which it began.
Page 198 of 441

197 Controls in detail
Audio system
Search
�Press S or T button to tune in
the next receivable weather band
station.
Scan search
�Starting scan search
�Press SC soft key.
SC will appear in the display. The
radio briefly tunes in all receivable
weather band stations.
�Ending scan search
�Press SC soft key or S or T.
The weather band station last
played will be selected and
SC
disappears from the display.Introduction to satellite radio*
(USA only)
SIRIUS satellite radio provides 100 chan-
nels of digital-quality radio, among others
music, sports, news, and entertainment,
free of commercials. SIRIUS satellite radio
uses a fleet of high-power satellites to
broadcast 24 hours per day, coast to
coast, in the contiguous U.S.
This diverse, satellite-delivered program-
ming is available for a monthly subscrip-
tion fee.
For more information and service
availability call the SIRIUS Service
Center (
�page 201), or contact
www.siriusradio.com.
iIf no weather band station is received after
three consecutive scans of the complete fre-
quency range, then the scan stops at the chan-
nel with which it began and
NO WB FOUND
appears in the display.
If this happens, switch back to standard radio
mode.
iAdditional satellite radio equipment and a
subscription to a satellite radio service provider
are required for the satellite radio operation de-
scribed here.
Contact an authorized Mercedes-Benz Center
for details and availability for your vehicle.
Note that categories and channels shown in illus-
trations are dependent on programming content
delivered by the service provider. Programming
content is subject to change. Therefore,
channels and categories shown in illustrations
and descriptions contained in this manual may
differ from the channels and categories
delivered by the service provider.
iSatellite radio service may be unavailable or
interrupted from time to time for a variety of rea-
sons, such as environmental or topographic con-
ditions and other things beyond the service
provider’s or our control. Service might also not
be available in certain places (e.g., in tunnels,
parking garages, or within or next to buildings) or
near other technologies.
Page 231 of 441

230 Controls in detail
Loading
Roof rack*
�Mount the roof rack only between the
fastening points (see arrows).
�Secure the roof rack according to
manufacturer’s instructions for
installation.
Ski sack* (Canada only)
1Handle
2Cover
3Armrest
Unfolding and loading
�Fold armrest3 down (arrow).
�Pull handle1 and swing cover2
down.
Warning!G
Only use roof racks approved by
Mercedes-Benz for your vehicle model to
avoid damage to the vehicle.
Follow the manufacturer’s installation in-
structions. Otherwise, an improperly at-
tached roof rack system or its load could
become detached from the vehicle.
Do not exceed the maximum roof load of
220 lbs (100 kg).
Take into consideration that when the roof
rack is loaded, the handling characteristics
are different from those when operating the
vehicles without the roof rack loaded.
!Load the roof rack in such a way that the ve-
hicle cannot be damaged while driving.
Make sure
�you can fully raise the tilt/sliding sunroof*.
�you can fully open the trunk.
!Do not sit on or lean your body weight
against the armrest when it is folded down, as
you could otherwise damage it.
Page 232 of 441
231 Controls in detail
Loading
4Hook and loop fastener
�Unfasten hook and loop fastener4.
�Pull ski sack into passenger compart-
ment and unfold.5Button
�Open trunk lid.
�Press button5.
The flap opens downward.
�From trunk, slide skis into ski sack.
Warning!G
The ski sack is designed for up to four pairs
of skis. Do not load the ski sack with other
objects.
Always fasten the ski sack securely. In an
accident, an unfastened ski sack can cause
injury to vehicle occupants.
��
Page 233 of 441
232 Controls in detail
Loading
6Strap
�Tighten strap6 by pulling at the loose
end (arrow) until the skis in the ski sack
are tightly secured.7Hook
8Eye
�Connect hook7 to eye8.
Tighten strap by pulling at the loose
end (arrow).Unloading and folding
�Loosen the straps.
�Disconnect hook7 from eye8.
�Unload skis.
�Close flap in trunk.
�Fold and flatten ski sack lengthwise.
�Place folded ski sack inside recess of
backrest.
�Fasten hook and loop fastener.
�Close ski sack compartment cover.
��
Page 234 of 441

233 Controls in detail
Loading
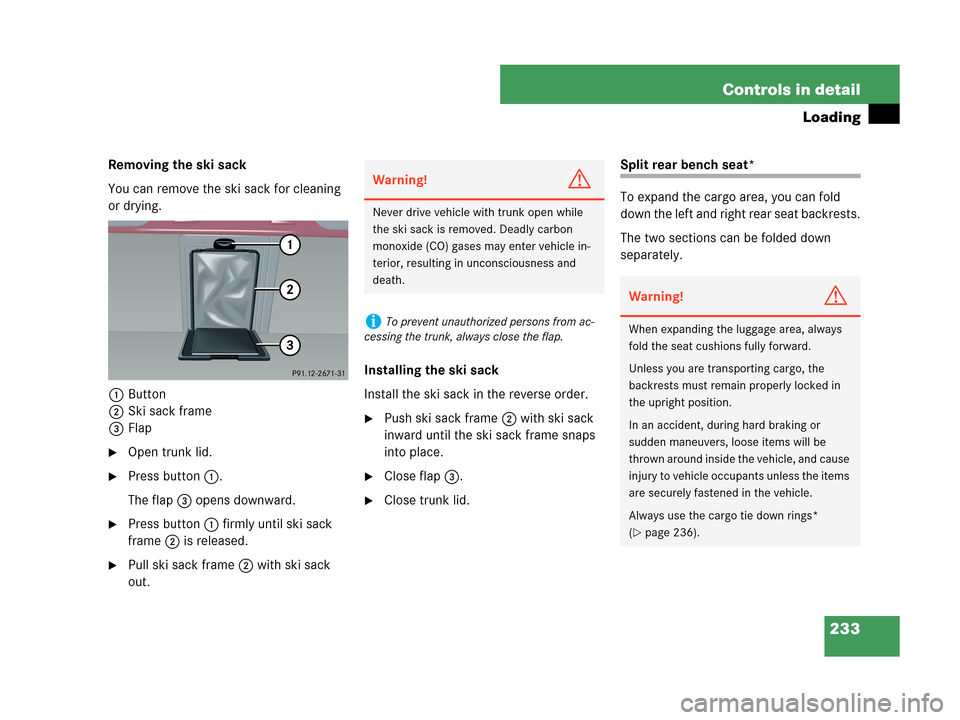
Removing the ski sack
You can remove the ski sack for cleaning
or drying.
1Button
2Ski sack frame
3Flap
�Open trunk lid.
�Press button1.
The flap3 opens downward.
�Press button1 firmly until ski sack
frame2 is released.
�Pull ski sack frame2 with ski sack
out.Installing the ski sack
Install the ski sack in the reverse order.
�Push ski sack frame2 with ski sack
inward until the ski sack frame snaps
into place.
�Close flap3.
�Close trunk lid.
Split rear bench seat*
To expand the cargo area, you can fold
down the left and right rear seat backrests.
The two sections can be folded down
separately.
Warning!G
Never drive vehicle with trunk open while
the ski sack is removed. Deadly carbon
monoxide (CO) gases may enter vehicle in-
terior, resulting in unconsciousness and
death.
iTo prevent unauthorized persons from ac-
cessing the trunk, always close the flap.
Warning!G
When expanding the luggage area, always
fold the seat cushions fully forward.
Unless you are transporting cargo, the
backrests must remain properly locked in
the upright position.
In an accident, during hard braking or
sudden maneuvers, loose items will be
thrown around inside the vehicle, and cause
injury to vehicle occupants unless the items
are securely fastened in the vehicle.
Always use the cargo tie down rings*
(
�page 236).
Page 236 of 441

235 Controls in detail
Loading
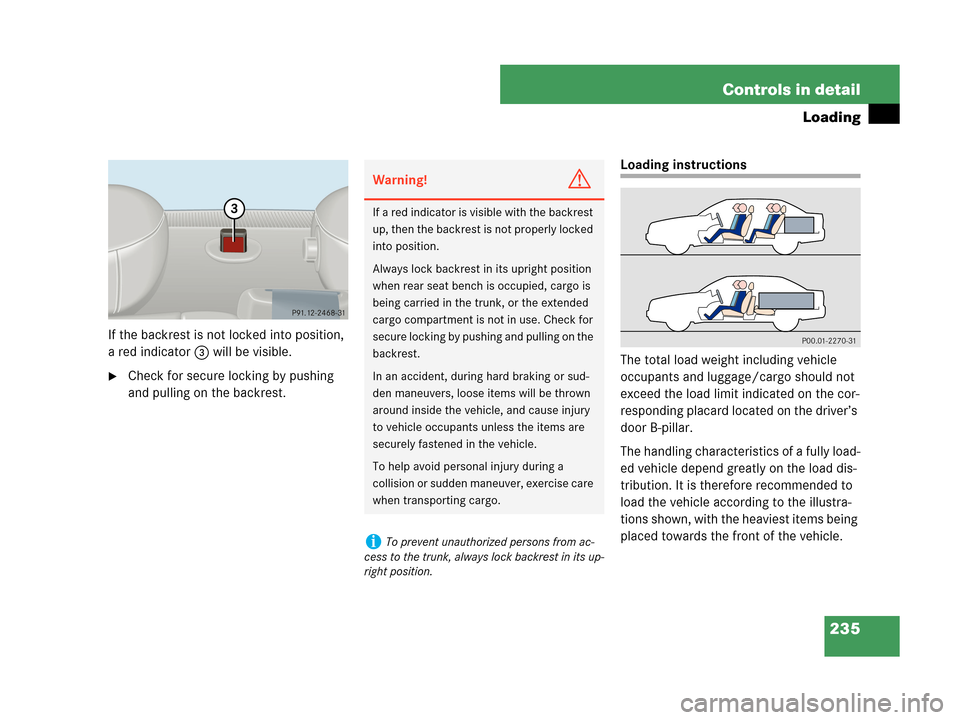
If the backrest is not locked into position,
a red indicator3 will be visible.
�Check for secure locking by pushing
and pulling on the backrest.
Loading instructions
The total load weight including vehicle
occupants and luggage/cargo should not
exceed the load limit indicated on the cor-
responding placard located on the driver’s
door B-pillar.
The handling characteristics of a fully load-
ed vehicle depend greatly on the load dis-
tribution. It is therefore recommended to
load the vehicle according to the illustra-
tions shown, with the heaviest items being
placed towards the front of the vehicle.
Warning!G
If a red indicator is visible with the backrest
up, then the backrest is not properly locked
into position.
Always lock backrest in its upright position
when rear seat bench is occupied, cargo is
being carried in the trunk, or the extended
cargo compartment is not in use. Check for
secure locking by pushing and pulling on the
backrest.
In an accident, during hard braking or sud-
den maneuvers, loose items will be thrown
around inside the vehicle, and cause injury
to vehicle occupants unless the items are
securely fastened in the vehicle.
To help avoid personal injury during a
collision or sudden maneuver, exercise care
when transporting cargo.
iTo prevent unauthorized persons from ac-
cess to the trunk, always lock backrest in its up-
right position.
Page 237 of 441

236 Controls in detail
Loading
Always place items being carried against
front or rear seat backrests, and fasten
them as securely as possible.
The heaviest portion of the cargo should al-
ways be kept as low as possible since it in-
fluences the handling characteristics of
the vehicle.Cargo tie-down rings*
The four cargo tie-down rings are located
in the trunk.
Cargo tie-down rings
�Carefully secure cargo by applying
even load on all rings with rope
sufficient strength to hold down the
cargo.
Always follow loading instructions
(
�page 235).
Warning!G
Always fasten items being carried as secure-
ly as possible using cargo tie-down rings and
fastening materials appropriate for the
weight and size of the load.
In an accident, during hard braking or sud-
den maneuvers, loose items will be thrown
around inside the vehicle and can cause in-
jury to vehicle occupants unless the items
are securely fastened in the vehicle.
To help avoid personal injury during a colli-
sion or sudden maneuver, exercise care
when transporting cargo.
Never drive vehicle with trunk open. Deadly
carbon monoxide (CO) gases may enter ve-
hicle interior resulting in unconsciousness
and death.
iThe trunk is the preferred place to carry ob-
jects.
The enlarged cargo area should only be used for
items which do not fit in the trunk alone.