Page 90 of 441

89 Safety and Security
Anti-theft systems
�Anti-theft systems
Immobilizer
The immobilizer prevents unauthorized
persons from starting your vehicle.
Activating
�Remove the SmartKey from the starter
switch.
Deactivating
�Switch on the ignition (�page 32).
Anti-theft alarm system*
Once the alarm system has been armed, a
visual and audible alarm is triggered when
someone opens
�a door
�the trunk
�the hood
The alarm will stay on even if the activating
element (e. g. a door) is immediately
closed.The alarm system will also be triggered
when
�opening the vehicle with the
mechanical key
�someone opens a door from the inside
�someone opens the trunk with the
emergency release button
iStarting the engine will also deactivate the
immobilizer.
In case the engine cannot be started (yet the ve-
hicle’s battery is charged), the system is not op-
erational. Contact an authorized Mercedes-Benz
Center or call 1-800-FOR-MERCedes (in the
USA), or 1-800-387-0100 (in Canada).
iIf the alarm stays on for more than
30 seconds, a call to the Response Center is ini-
tiated automatically by the Tele Aid system*
(
�page 247) provided Tele Aid service was
subscribed to and properly activated, and that
necessary cellular service and GPS coverage are
available.
Page 91 of 441

90 Safety and Security
Anti-theft systems
Arming the alarm system
The indicator lamp is in the center console.
1Indicator lamp�Lock the vehicle with the SmartKey.
The turn signal lamps flash three times
and an acoustic signal sounds three
times, to indicate that the alarm sys-
tem is armed.
Indicator lamp1 begins to flash after
approximately 30 seconds after arming
the alarm system.Disarming the alarm system
�Unlock the vehicle with the SmartKey.
The turn signal lamps flash once and an
acoustic signal sounds once, to
indicate that the alarm system is dis-
armed.
Canceling the alarm
To cancel the alarm:
�Press theŒ or‹ button on the
SmartKey.
or
�Insert the SmartKey in the starter
switch.
iIf the turn signal lamps do not flash three
times, one of the following elements may not be
properly closed:
�a door
�the trunk
Close the respective element and lock the vehi-
cle again.
iThe alarm system will rearm automatically
after approximately 40 seconds if neither a door
nor the trunk lid was opened.
Page 113 of 441

112 Controls in detail
Lighting
Locator lighting and night security
illumination
The locator lighting and the night security
illumination are described in the “Control
system” section, see “Setting locator light-
ing” (
�page 140) and “Setting night secu-
rity illumination” (
�page 141).
Fog lamps
Front fog lamps
�Switch on the low beam
headlampsB (
�page 109).
�Pull out the exterior lamp switch to first
stop.
The front fog lamps switch on.
The green indicator lamp‡ in the
exterior lamp switch comes on
(
�page 109).
�Push in the exterior lamp switch.
The front fog lamps switch off.
The green indicator lamp‡ in the
exterior lamp switch goes out.
Rear fog lamp (driver’s side only)
�Switch on the low beam
headlampsB (
�page 109).
�Pull out the exterior lamp switch to
second stop.
The front fog lamps and the rear fog
lamp switch on.
The yellow indicator lamp† in the
exterior lamp switch comes on
(
�page 109).
�Push in the exterior lamp switch to first
stop.
The rear fog lamp switches off.
The yellow indicator lamp† in the
exterior lamp switch goes out.
The front fog lamps remain lit.
Warning!G
In low ambient lighting or foggy conditions,
only switch from positionU toB with
the vehicle at a standstill in a safe location.
Switching fromU toB will briefly
switch off the headlamps. Doing so while
driving in low ambient lighting conditions
may result in an accident.
iFog lamps will operate with the parking
lamps and/or the low beam headlamps on. Fog
lamps should only be used in conjunction with
low beam headlamps. Consult your State or
Province Motor Vehicle Regulations regarding
permissible lamp operation.
iFog lamps cannot be switched on with the
exterior lamp switch in positionU. To switch
on the fog lamps, turn the exterior lamp switch to
positionB first.
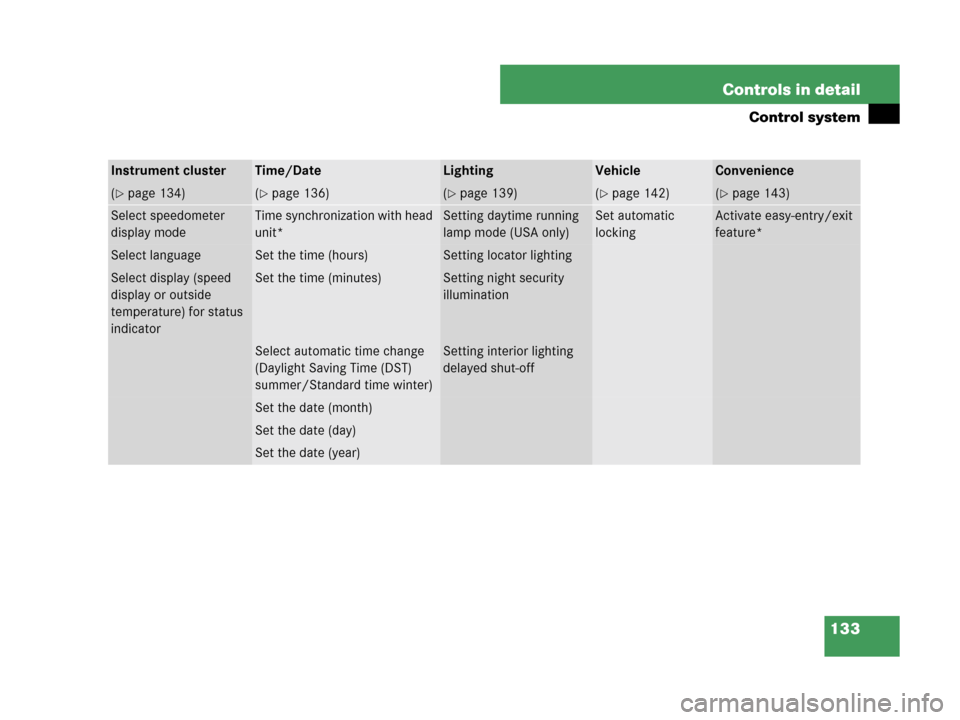
Page 134 of 441
133 Controls in detail
Control system
Instrument clusterTime/DateLightingVehicleConvenience
(�page 134)(�page 136)(�page 139)(�page 142)(�page 143)
Select speedometer
display modeTime synchronization with head
unit*Setting daytime running
lamp mode (USA only)Set automatic
lockingActivate easy-entry/exit
feature*
Select languageSet the time (hours)Setting locator lighting
Select display (speed
display or outside
temperature) for status
indicatorSet the time (minutes)Setting night security
illumination
Select automatic time change
(Daylight Saving Time (DST)
summer/Standard time winter)Setting interior lighting
delayed shut-off
Set the date (month)
Set the date (day)
Set the date (year)
Page 140 of 441

139 Controls in detail
Control system
�Move the selection marker with
buttonæ orç to the
Time/Date
submenu.
�Press buttonj ork repeatedly
until the message
Date Set year ap-
pears in the multifunction display.
The selection marker is on the year
setting.
�Press buttonæ orç to set the
year.Lighting submenu
Access the
Lighting submenu via the
Settings menu. Use the Lighting
submenu to change the lamp and lighting
settings on your vehicle.
The following functions are available:Setting daytime running lamp mode
(USA only)
�Move the selection marker with
buttonæ orç to the
Lighting
submenu.
�Press buttonj ork repeatedly
until the message
Headlamp mode ap-
pears in the multifunction display.
The selection marker is on the current
setting.
iVehicles with COMAND*:
For information on setting the date, refer to the
separate COMAND operating instructions.
FunctionPage
Setting daytime running lamp
mode (USA only)139
Setting locator lighting140
Setting night security
illumination141
Setting interior lighting delayed
shut-off142
iThis function is not available in countries
where the daytime running lamp mode is
mandatory and therefore in a constant mode.
��
Page 142 of 441

141 Controls in detail
Control system
�Turn the exterior lamp switch to
positionU when exiting the vehicle.
The locator lighting feature is
activated.
Setting night security illumination
(Headlamps delayed shut-off feature)
Use this function to set whether you would
like the exterior lamps to remain on for
15 seconds during darkness after exiting
the vehicle and closing all doors.
With the headlamps delayed shut-off
feature activated and the exterior lamp
switch in positionU before the engine
is turned off, the following lamps will
switch on when the engine is turned off:
�Parking lamps
�Tail lamps
�License plate lamps
�Side marker lamps
�Front fog lampsIf after turning off the engine you do not
open a door or do not close an opened
door, the lamps will automatically switch
off after 60 seconds.
�Move the selection marker with
buttonæ orç to the
Lighting
submenu.
�Press buttonj ork repeatedly
until the message
Headl. delayed
shut-off
appears in the multifunction
display.
The selection marker is on the current
setting.
�Press buttonæ orç to switch
the headlamps delayed shut-off feature
Onor Off.
�Turn the exterior lamp switch to
positionU before turning off the
engine.
The headlamps delayed shut-off
feature is activated.
You can temporarily deactivate the head-
lamp delayed shut-off feature:
�Before exiting the vehicle, turn the
SmartKey in the starter switch to
position0.
�Then turn it to position2 and back to
position0.
The headlamps delayed shut-off
feature is deactivated. It will reactivate
as soon as you reinsert the SmartKey in
the starter switch.
Page 154 of 441

153 Controls in detail
Automatic transmission*
Gear selector lever positions
The current gear selector lever position
appears in the multifunction display.
1Current gear selector lever position
Effect
ìPark position
Gear selector lever position
when the vehicle is parked. Place
gear selector lever in park
positionP only when vehicle is
stopped. The park position is not
intended to serve as a brake
when the vehicle is parked.
Effect
Rather, the driver should always
set the parking brake in addition
to placing the gear selector lever
in park positionP to secure the
vehicle.
The SmartKey can only be
removed from the starter switch
with the gear selector lever in
park positionP. With the
SmartKey removed, the gear
selector lever is locked in park
positionP.
If the vehicle’s electrical system
is malfunctioning, the gear
selector lever could remain
locked in park positionP
(
�page 363).
íReverse gear
Place gear selector lever in
positionR only when vehicle is
stopped.
Effect
ëNeutral
No power is transmitted from the
engine to the drive axle. When
the brakes are released, the
vehicle can be moved freely
(pushed or towed).
To avoid damage to the trans-
mission, never engage neutral
positionN while driving.
If the ESP
® is deactivated or
malfunctioning:
Move gear selector lever to neu-
tral positionN only if the vehicle
is in danger of skidding, e.g. on
icy roads.
êDrive
The transmission shifts
automatically. All forward gears
are available.
Page 155 of 441

154 Controls in detail
Automatic transmission*
!Coasting the vehicle, or driving for any other
reason with gear selector lever in neutral
positionN can result in transmission damage
that is not covered by the Mercedes-Benz
Limited Warranty.Warning!G
PositionP alone is not intended to or capa-
ble of preventing your vehicle from moving,
possibly hitting people or objects. Always
set the parking brake in addition to shifting
to park positionP (
�page 54).
When parked on an incline, turn the front
wheels towards the road curb.
Do not park this vehicle in areas where com-
bustible materials such as grass, hay or
leaves can come into contact with the hot
exhaust system, as these materials could be
ignited and cause a vehicle fire.
Warning!G
When leaving the vehicle, always remove the
SmartKey from the starter switch, take it
with you, and lock the vehicle. Do not leave
children unattended in the vehicle, or with
access to an unlocked vehicle. Children
could move the gear selector lever from
park positionP, which could result in an
accident and/or serious personal injury.
Getting out of your vehicle without taking
the above measurements to secure it is
dangerous.