Page 236 of 377
Where will I find...?
233First-aid kit
i Check the expiry dates of the first-aid kit
contents annually, and replace them if nec-
essary.
Saloon Depending on the vehicle's equipment, th
e
first-aid kit is located either in the boot in the
open storage compartment or behind the
cover on the left side .1
Rotary catch
2 Cove r
X To open: turn handle 1anti-clockwise.
X Fold down cover 2. Estat
e The first-aid kit is located in the luggage com-
partment behind the cover to the right in the
direction of travel.
1
Handl e
X To open: pull handle 1.
X Fold down cover . 1
First-aid kit
X Remove first-aid kit 1. Fire extinguisher*
i Have the fire extinguisher refilled after
each use and checked every one or two
years. Otherwise, it may fail in an emer -
gency.
Observe the legal requirements in all coun-
tries concerned. Practical advice
* optional
204_AKB; 2; 3, en-GB
mkalafa,
2007-06-26T23:11:51+02:00 - Seite 233
Page 237 of 377

Where will I find...?
234
The fire extinguisher is located underneath
the front of the driver's seat.
1
Tab
2 Fire extinguishe r
X Pull tab 1upwards.
X Remove fire extinguisher 2. Vehicle tool kit, TIREFIT kit, jack
,
spare wheel* and "Minispare" emer-
gency spare wheel*
The vehicle tool kit, TIREFIT kit etc. can be
found on the left of the stowage well under
the boot/luggage compartment floor.
X Saloon: open the stowage well under the
floor of the boot (Y page 184).
X Estate: open the stowage well under th e
floor of the luggage compartment
( Y page 184).
The vehicle tool kit contains :
R A towing ey e
R A wheel wrench
R A folding wheel chock
R Spare fuses
R A pair of glove s G
Risk of injury
The jack is designed only to raise and hol d
the vehicle for a short time while a whee l
is being changed.
If you are carrying out work on the vehicle,
you must use stands.
Make sure that the jack is placed on a firm ,
non-slip and level surface. Do not us e wooden blocks or similar objects as a jac
k
underlay. Otherwise the jack will not be
able to achieve its load-bearing capacit y
due to the restricted height.
Do not start the engine at any time while a
wheel is being changed.
Do not lie under the vehicle when it is bein g
supported by the jack. If you do not raise
the vehicle as described, it could slip off the
jack (e.g. if the engine is started or a door
or the boot lid is opened or closed) and you
could be seriously injured.
Do not lie under the vehicle when it is being
supported by the jack. If you do not raise
the vehicle as described, it could slip off the
jack (e.g. if the engine is started or a door
or the boot lid/tailgate is opened or closed)
and you could be seriously injured.
i When using the jack, you should also
observe the safety notes in the "Flat tyre"
section (Y page 313). Practical advice
* optional
204_AKB; 2; 3, en-GB
mkalafa,
2007-06-26T23:11:51+02:00 - Seite 234
Page 238 of 377
Where will I find...?
235
Vehicles with a TIREFIT kit
1
TIREFIT kit
2 Electric air pump
3 Towing eye
4 Folding wheel chock
5 Jack
Removing the jack
X Open Velcro fastener.
X Remove jack 5.
Vehicles with spare wheel/"Minispare "
emergency spare wheel* X
Saloon: lift up the floor of the boot
( Y page 184). X
Estate: lift up the floor of the luggage com -
partment (Y page 184). 1
Stowage well
X Remove stowage well 1. Removing the spare wheel/"Minispare"
emergency spare wheel
* 1
Vehicle tool kit tray
2 Stowage well
3 Spare wheel/"Minispare" emergency
spare wheel *
X Remove vehicle tool kit tray 1.
X Turn stowage well 2anti-clockwise and
remove it.
X Remove spare wheel/"Minispare" emer-
gency spare wheel* 3. Practical advice
* optional
204_AKB; 2; 3, en-GB
mkalafa,
2007-06-26T23:11:51+02:00 - Seite 235
Page 240 of 377

Display
messages 23
7 cator lamps, display messages or system
failures. The vehicle's handling character-
istics may be affected. Adjust your driving
style and speed accordingly .
Immediately consult a qualified specialist
workshop which has the necessary special-
ist knowledge and tools to carry out the
work required. Mercedes-Benz recom-
mends that you use a Mercedes-Benz
Service Centre for this purpose. In particu- lar, work relevant to safety or on safety-
related systems must be carried out at
a
qualified specialist workshop.
Before starting a journey, check that the
warning and indicator lamps are operatin g
correctly .
X Turn the key to position 2in the ignition
lock .
or X
Press the KEYLESS GO button* twice.
All warning and indicator lamps (except for
the main-beam indicator lamp and the turn
signal indicator lamps) light up and the
multi-function display is activated.
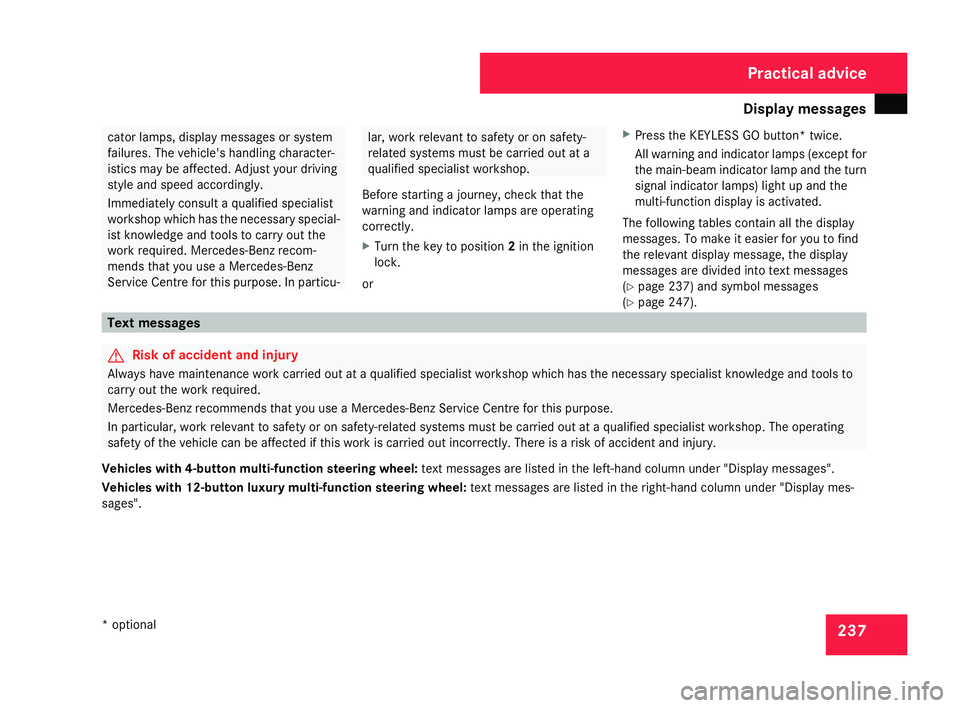
The following tables contain all the display
messages. To make it easier for you to find
the relevant display message, the display
messages are divided into text messages
( Y page 237) and symbol messages
( Y page 247). Text messages
G
Risk of accident and injury
Always have maintenance work carried out at a qualified specialist workshop which has the necessary specialist knowledge and tools to
carry out the work required .
Mercedes-Benz recommends that you use a Mercedes-Benz Service Centre for this purpose.
In particular, work relevant to safety or on safety-related systems must be carried out at a qualified specialist workshop. The operating
safety of the vehicle can be affected if this work is carried out incorrectly. There is a risk of accident and injury.
Vehicles with 4-button multi-function steering wheel: text messages are listed in the left-hand column under "Display messages".
Vehicles with 12-button luxury multi-function steering wheel: text messages are listed in the right-hand column under "Display mes-
sages". Practical advice
* optional
204_AKB; 2; 3, en-GB
mkalafa,
2007-06-26T23:11:51+02:00 - Seite 237
Page 245 of 377

Display
messages 24
2 Display messages Possible cause/consequence Possible solution
Check brake
fluid level
G
Risk of accident
There is insufficient brake fluid in the
brake fluid reservoir. In addition, the
3 warning lamp in the instrument clus-
ter lights up and a warning tone sounds. X
Pull over as soon as it is safe to do so.
X Do not continue driving under any circumstan-
ces .
X Consult the nearest qualified specialist work -
shop.
X Do not top up the brake fluid. This will not rec -
tify the malfunction. P
Shift to
P P
Shift to
P You have switched off the engine with the
KEYLESS GO* button and opened the driv-
er's door.
You have attempted to lock the vehicle. X
Move the selector lever to P.
The engine can be started again. To start
engine, shift
to either P or
N To start engine,
shift to either
P
or N You have attempted to start the engin
e
while the selector lever is not in position
P or N. X
Move the selector lever to Por N. Clean the fuel
filter X
Visit a qualified specialist workshop. Practical advice
* optional
204_AKB; 2; 3, en-GB
mkalafa,
2007-06-26T23:11:51+02:00 - Seite 242
Page 246 of 377

Display
messages 24
3 Display messages Possible cause/consequence Possible solution
Top up coolan
t The coolant level is too low. X
Top up the coolant, observing the warning
notes (Y page 209).
X Have the coolant system checked at a qualified
specialist workshop if the coolant needs top-
ping up more often than usual .Switch off
lights or
remove key The light switch has been set to the
*
position or the daytime driving lights
are switched on and you have not
removed the key. The parking lamps
remain switched on. In addition, a warning
tone sounds. X
Remove the key from the ignition lock.
or
X Set the light switch to the Mposition . Check tyres Tyre pressure
Check tyres The tyre pressure loss warning system has
detected a significant pressure loss.
A
warning tone also sounds. X
Stop the vehicle without making any sudden
steering or braking manoeuvres. Pay attention
to the traffic conditions as you do so.
X Check the tyres.
X Check the tyre pressure and correct it if nec-
essary (Y page 213).
X Repair or change the faulty wheel as necessar y
( Y page 313).
X Then restart the tyre pressure loss warning
system once the tyre pressure is correc t
( Y page 214). Practical advice
204_AKB; 2; 3, en-GB
mkalafa,
2007-06-26T23:11:51+02:00 - Seite 243 Z
Page 247 of 377

Display
messages 24
4 Display messages Possible cause/consequence Possible solution
Run Flat Indi-
cator inopera-
tiv
e Run Flat Indicator
inoperative The tyre pressure loss warning system is
deactivated due to a malfunction. X
Have the tyre pressure loss warning system
checked at a qualified specialist workshop .Check tyres
Restart system Check tyre pres-
sures then restart
Run Flat Indicator There was a tyre pressure warning mes-
sage. X
Make sure that the pressure is correct for all
tyres (Y page 213).
X Then restart the tyre pressure loss warning
system (Y page 214). Key not detec-
ted
The KEYLESS GO* key cannot be detected
while the engine is running because it is
either not in the vehicle or because ther
e
is strong radio interference. In addition, a
warning tone sounds.
Once the engine has been switched off ,
you will no longer be able to lock the vehi-
cle centrally or start the engine. X
Stop the vehicle as soon as the traffic condi -
tions permit.
X Locate the KEYLESS GO* key or operate the
vehicle using the key in the ignition lock. Key not detec-
ted
The KEYLESS GO* key cannot be detec-
ted. X
Change the location of the KEYLESS GO key*
within the vehicle .
X Operate the vehicle using the key in the ignition
lock if necessary. Key does not
belong to vehi-
cle You have put the wrong key in the ignition
lock. X
Use the correct key. Practical advice
* optional
204_AKB; 2; 3, en-GB
mkalafa,
2007-06-26T23:11:51+02:00 - Seite 244
Page 248 of 377

Display
messages 24
5 Display messages Possible cause/consequence Possible solution
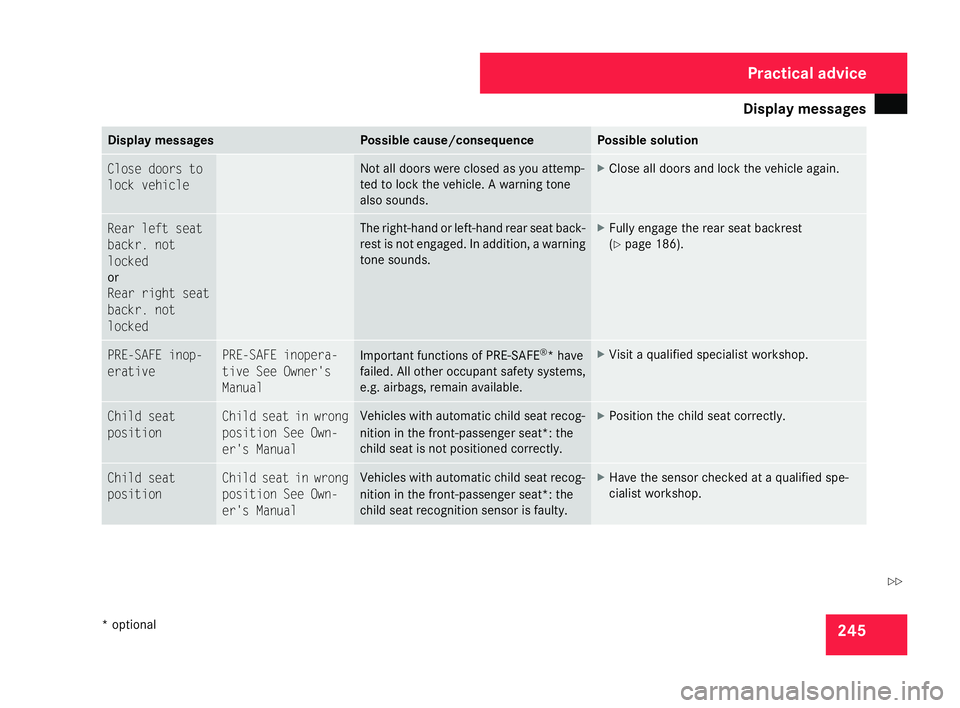
Close doors to
lock vehicl
e Not all doors were closed as you attemp-
ted to lock the vehicle. A warning tone
also sounds. X
Close all doors and lock the vehicle again .Rear left seat
backr. not
locked
or
Rear right seat
backr. not
locked The right-hand or left-hand rear seat back-
rest is not engaged. In addition, a warning
tone sounds. X
Fully engage the rear seat backrest
(Y page 186). PRE-SAFE inop-
erativ
e PRE-SAFE inopera-
tive See Owner's
Manual
Important functions of PRE-SAFE
®
* have
failed. All other occupant safety systems,
e.g. airbags, remain available. X
Visit a qualified specialist workshop. Child seat
position Child seat in wrong
position See Own-
er's Manual Vehicles with automatic child seat recog-
nition in the front-passenger seat*: the
child seat is not positioned correctly. X
Position the child seat correctly. Child seat
position Child seat in wrong
position See Own-
er's Manual Vehicles with automatic child seat recog-
nition in the front-passenger seat*: the
child seat recognition sensor is faulty. X
Have the sensor checked at a qualified spe -
cialist workshop. Practical advic
e
* optional
204_AKB; 2; 3, en-GB
mkalafa,
2007-06-26T23:11:51+02:00 - Seite 245 Z