2007 MERCEDES-BENZ C-CLASS ESTATE warning
[x] Cancel search: warningPage 143 of 377
On-board computer (vehicles with the luxury multi-function steering wheel*, 12 buttons)
140 Service menu
i Menu overview (Y page 132), using the
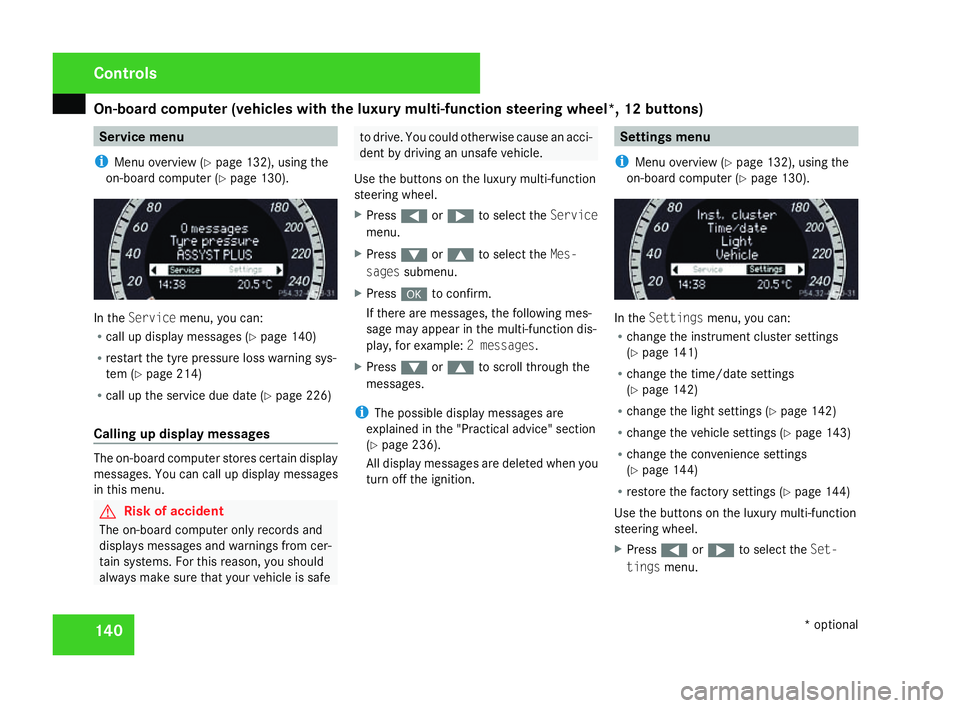
on-board computer (Y page 130). In the
Servic emenu, you can:
R call up display messages (Y page 140 )
R restart the tyre pressure loss warning sys-
tem (Y page 214 )
R call up the service due date (Y page 226 )
Calling up display messages The on-board computer stores certain display
messages. You can call up display messages
in this menu. G
Risk of accident
The on-board computer only records and
displays messages and warnings from cer-
tain systems. For this reason, you shoul d
always make sure that your vehicle is safe to drive. You could otherwise cause an acci-
dent by driving an unsafe vehicle .
Use the buttons on the luxury multi-function
steering wheel.
X Press (or& to select the Service
menu.
X Press %or$ to select the Mes-
sages submenu.
X Press #to confirm.
If there are messages, the following mes -
sage may appear in the multi-function dis-
play, for example: 2 messages.
X Press %or$ to scroll through the
messages.
i The possible display messages are
explained in the "Practical advice" section
( Y page 236).
All display messages are deleted when you
turn off the ignition. Settings menu
i Menu overview (Y page 132), using the
on-board computer (Y page 130). In the
Settings menu, you can:
R change the instrument cluster settings
(Y page 141 )
R change the time/date settings
(Y page 142 )
R change the light settings (Y page 142 )
R change the vehicle settings (Y page 143 )
R change the convenience settings
(Y page 144 )
R restore the factory settings (Y page 144 )
Use the buttons on the luxury multi-function
steering wheel.
X Press (or& to select the Set-
tings menu. Controls
* optional
204_AKB; 2; 3, en-GB
mkalafa,
2007-06-26T23:11:51+02:00 - Seite 140
Page 151 of 377
Driving sys
tems 14
8
Making adjustments in 1 km/h incre-
ments X
Briefly press the cruise control lever up to
pressure point 1for a higher speed or
down 4for a lower speed.
The last speed stored is increased or
reduced.
Making adjustments in 10 km/h incre-
ments X
Briefly press the cruise control lever up
beyond pressure point 1for a higher
speed or down 4for a lower speed.
The last speed stored is increased or
reduced.
Deactivating cruise control There are several ways to deactivate cruis
e
control :
X Briefly press the cruise control lever for-
wards 6.
or
X Brake .
or X
Briefly press the cruise control lever in the
direction of arrow 5.
Variable Speedtronic is selected. LIM indi-
cator lamp 2in the cruise control lever
lights up.
Cruise control is automatically deactivated if:
R you depress the parking brak e
R you are driving at less than 30 km/h
R ESP ®
(Y page 68) is intervening or if you
deactivate ESP ®
R with a vehicle with manual transmission ,
you change into neutral or if the clutch is
depressed for longer than 6 seconds
R you move the selector lever to Nin vehicles
with automatic transmission* while drivin g
If cruise control is deactivated, you will hear
a warning tone. You see the Cruise control
off message in the multi-function display for
approximately five seconds.
i The last speed stored is cleared when you
switch off the engine. Speedtronic*
Speedtronic brakes automatically so that you
do not exceed the set speed. On long and
steep downhill gradients, especially if the
vehicle is laden or towing a trailer, you must
shift to a lower gear in good time or select
shift range 1,2 or 3in vehicles with automatic
transmission*. In this way you will make use
of the braking effect of the engine, which
relieves the load on the brake system and
prevents the brakes from overheating and
wearing too quickly. If you need additional
braking, depress the brake pedal repeatedly
rather than continuously. G
Risk of accident
Never depress the brake pedal continu -
ously while the vehicle is in motion, e.g.
never cause the brakes to rub by applying
constant slight pedal pressure. This causes
the brake system to overheat, increases
the braking distance and can lead to the
brakes failing completely. G
Risk of accident
Do not change down for additional engine
braking on a slippery road surface. Thi s
could cause the drive wheels to lose thei r
grip and the vehicle could skid. Controls
* optional
204_AKB; 2; 3, en-GB
mkalafa,
2007-06-26T23:11:51+02:00 - Seite 148
Page 153 of 377
Driving sys
tems 15
0
Storing the current speed You can use the cruise control lever to restrict
the speed to any speed above 30 km/h whil e
the engine is running .
X Press the cruise control lever briefly to the
pressure point, either upwards 1or down-
wards 4.
The current speed is stored. For five sec-
onds, the multi-function display shows the
stored speed, e.g. Limit 100 km/h.
Vehicles with the 4-button multi-function
steering wheel: the stored speed is perma-
nently displayed in the status indicator, e.g.
LIM 100 km/h.
Vehicles with a 12-button luxury multi-
function steering wheel*: the segments
from the start of the scale up to the stored
speed light up in the speedometer.
Selecting the current or last stored
speed X
Pull the cruise control lever briefly towards
you 3. Making adjustments in 1 km/h incre-
ments X
Briefly press the cruise control lever up to
pressure point 1for a higher speed or
down 4for a lower speed.
or
X Keep the cruise control lever pressed to the
pressure point until the desired speed is
set. Press the cruise control lever up 1for
a higher speed or down 4for a lower
speed.
Making adjustments in 10 km/h incre-
ments X
Briefly press the cruise control lever
beyond pressure point 1for a higher
speed or down 4for a lower speed.
or
X Keep the cruise control lever pressed
beyond the pressure point until the desired
speed is set. Press the cruise control lever
up 1 for a higher speed or down 4for a
lower speed. Deactivating variable Speedtronic There are several ways to deactivate variable
Speedtronic
:
X Briefly press the cruise control lever for-
wards 6.
or
X Briefly press the cruise control lever in the
direction of arrow 5.
LIM indicator lamp 2in the cruise control
lever goes out. Variable Speedtronic is
deactivated.
Cruise control* is selected.
Variable Speedtronic is automatically deacti-
vated if you depress the accelerator pedal
beyond the pressure point (kickdown) and
your current speed does not differ by mor e
than 20 km/h from the stored speed. You will
hear a warning tone if this is the case. G
Risk of accident
It is not possible to deactivate variabl e
Speedtronic by braking.
i The last speed stored is cleared when you
switch off the engine. Controls
* optional
204_AKB; 2; 3, en-GB
mkalafa,
2007-06-26T23:11:51+02:00 - Seite 150
Page 157 of 377
Driving sys
tems 15
4
Front sensor
s Centr
e Approximately 100 cm
Corner
s Approximately 60 cm
Rear sensors
Centre Approximately 120 cm
Corner
s Approximately 80 cm
!
Pay particular attention to objects above
or below the sensors when parking, such
as flower pots or trailer towbars. Parktroni c
does not detect such objects when they are
in the immediate vicinity of the vehicle. You
could damage the vehicle or the objects.
Ultrasonic sources such as an automatic
car wash, a lorry's compressed-air brakes
or a pneumatic drill could cause Parktronic
to malfunction .
Minimum distanc eCentr
e Approximately 20 cm
Corner
s Approximately 15 cm If there is an obstacle within this range, al
l
warning displays light up and a tone sounds.
If the distance falls below the minimum clear -
ance, it may no longer be shown.
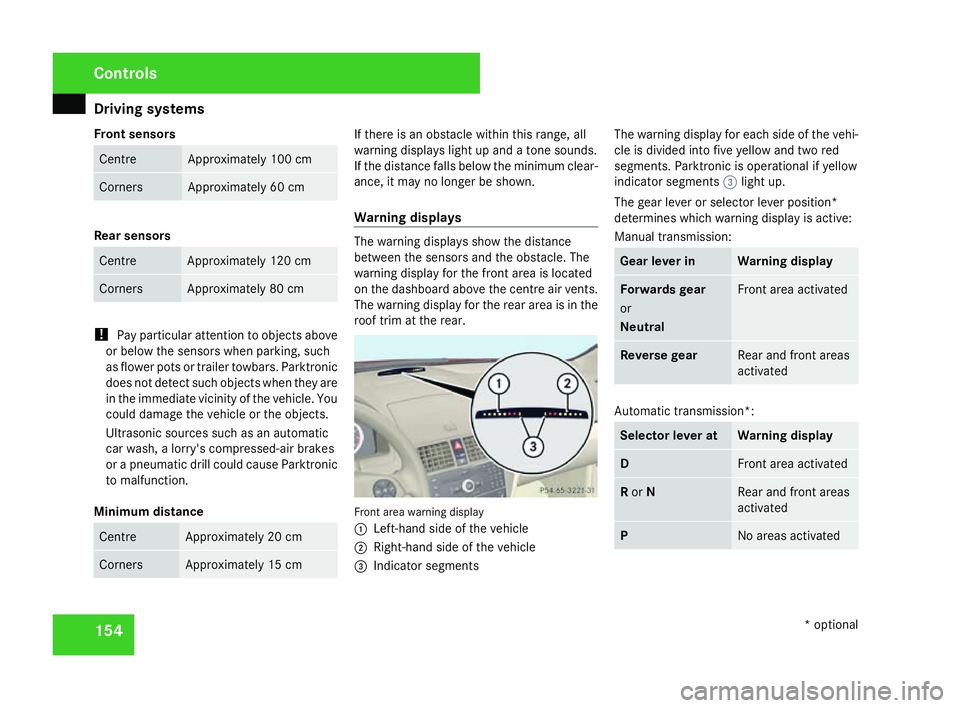
Warning displays The warning displays show the distanc
e
between the sensors and the obstacle. The
warning display for the front area is located
on the dashboard above the centre air vents.
The warning display for the rear area is in the
roof trim at the rear. Front area warning display
1
Left-hand side of the vehicle
2 Right-hand side of the vehicl e
3 Indicator segments The warning display for each side of the vehi-
cle is divided into five yellow and two red
segments. Parktronic is operational if yellow
indicator segments
3light up.
The gear lever or selector lever position*
determines which warning display is active:
Manual transmission : Gear lever in Warning display
Forwards gear
or
Neutral Front area activated
Reverse gear Rear and front areas
activated
Automatic transmission*:
Selector lever at Warning displa
y D Front area activate
d R
or N Rear and front area
s
activated P No areas activatedControls
* optional
204_AKB; 2; 3, en-GB
mkalafa,
2007-06-26T23:11:51+02:00 - Seite 154
Page 158 of 377
Driving sys
tems 15
5
One or more segments light up as the vehicle
approaches an obstacle, depending on the
vehicle's distance from the obstacle.
From the:
R sixth segment onwards, you will hear an
intermittent warning tone for approxi-
mately two seconds
R seventh segment onwards, you will hear a
warning tone for approximately two sec -
onds. You have reached the minimum dis-
tance.
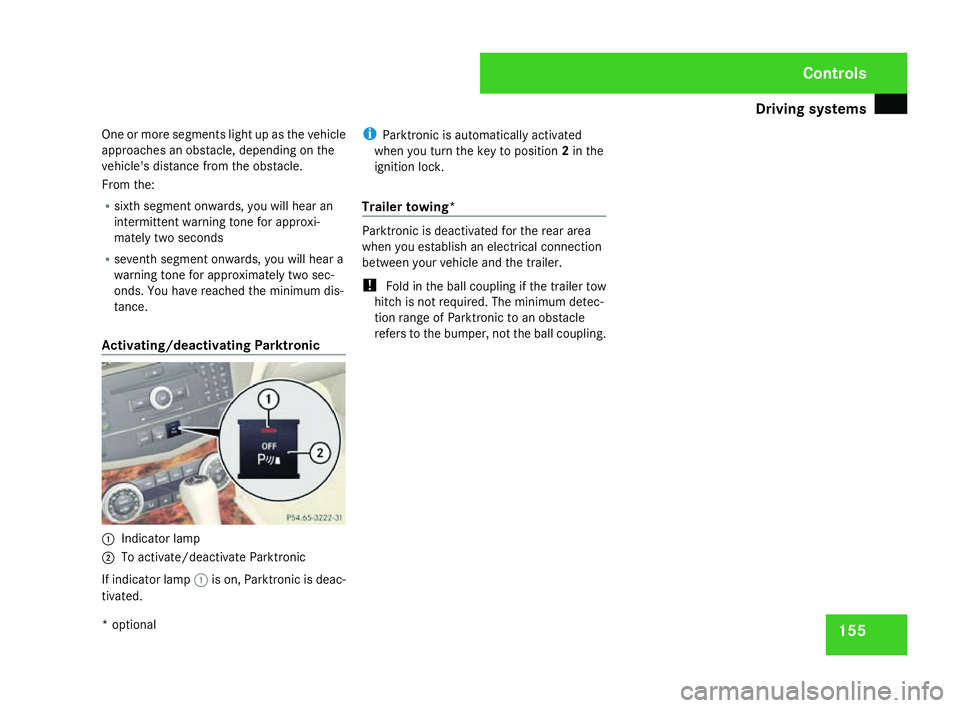
Activating/deactivating Parktronic 1
Indicator lamp
2 To activate/deactivate Parktronic
If indicator lamp 1is on, Parktronic is deac-
tivated. i
Parktronic is automatically activated
when you turn the key to position 2in the
ignition lock .
Trailer towing* Parktronic is deactivated for the rear area
when you establish an electrical connectio
n
between your vehicle and the trailer.
! Fold in the ball coupling if the trailer tow
hitch is not required. The minimum detec -
tion range of Parktronic to an obstacle
refers to the bumper, not the ball coupling . Cont
rols
* optional
204_AKB; 2; 3, en-GB
mkalafa,
2007-06-26T23:11:51+02:00 - Seite 155
Page 215 of 377
Tyres and wheels
21
2
cate that the wheels or tyres are damaged.
If you suspect that a tyre is defective,
reduce your speed and stop the vehicle as
soon as possible to check the wheels and
tyres for damage. Hidden tyre damag
e
could also be causing the unusual handling
characteristics. If you find no signs of dam-
age, have the wheels and tyres inspected
at a specialist workshop, for example at a
Mercedes-Benz Service Centre.
R When parking your vehicle, make sure that
the tyres do not get deformed by the kerb
or other obstacles. If it is necessary to drive
over kerbs, speed humps or similar, try to
do so slowly and at an obtuse angle. Oth-
erwise, the tyres, particularly the sidewalls,
could get damaged. Direction of rotation
Direction of rotation Tyres with a specified direction of rotation
have additional benefits, e.g. if there is a risk
of aquaplaning. You will only gain these ben-
efits if the correct direction of rotation is
observed.
An arrow on the sidewall of the tyre indicates
its correct direction of rotation.
i You may fit a spare tyre *against th e
direction of rotation. MOExtended run-flat system
*
The MOExtended run-flat system* allows you
to continue driving the vehicle even when one
or more tyres lose all air pressure.
The MOExtended run-flat system* may only
be used in combination with the tyre pressure
loss warning system and only on wheels spe-
cifically tested and approved by Mercedes-
Benz.
i Vehicles with MOExtended run-flat sys-
tem* are not equipped with the TIREFIT
kit*. 14 It is therefore recommended to additionally
equip your vehicle with the TIREFIT kit*
when fitting tyres that do not feature run-
flat properties, e.g. winter tyres.
i A TIREFIT kit* is available from any quali-
fied specialist workshop, e.g. a Mercedes-
Benz Service Centre.
You will find notes on driving with a flat tyr e
in the "Practical advice" section
( Y page 323). Tyre tread
G
Risk of accident
Bear in mind that:
R tyre grip decreases rapidly on wet roads
when the tread depth is less than 3 mm.
You should thus replace tyres that have
insufficient tread.
R winter tyres should be replaced when th e
tread depth is 4 mm or less because oth -
erwise they no longer provide adequate
grip.
R the tread on a tyre may not wear evenly .
You should thus regularly check the tread
14 Only for certain countries. Operation
* optional
204_AKB; 2; 3, en-GB
mkalafa,
2007-06-26T23:11:51+02:00 - Seite 212
Page 217 of 377
Tyres and wheels
21
4 Tyre pressure loss warning system
G
Risk of accident
The tyre pressure loss warning system*
does not warn you of an incorrectly set tyre
pressure. The table on the inside of the fue l
filler flap will help you decide whether the
tyre pressures should be corrected.
The tyre pressure loss warning system*
does not replace the need to regularly
check your vehicle's tyre pressures, since
an even loss of pressure on several tyres at
the same time cannot be detected by the
tyre pressure loss warning system*.
The tyre pressure loss warning system* is
not able to warn you of a sudden loss of
pressure, e.g. following penetration by a
foreign object.
In the event of a sudden loss of pressure,
bring the vehicle to a halt by braking care-
fully. Do not make any sudden steering
movements when doing so.
While the vehicle is in motion, the tyre pres-
sure loss warning system* monitors the set
tyre pressure using the rotational speed of
the wheels. This enables the system to detect
significant pressure loss in a tyre. If the spee d
of rotation of a wheel changes as a result of a loss of pressure, a corresponding warning
message will appear in the multi-function dis-
play.
The function of the tyre pressure loss warning
system* is limited or delayed if:
R
snow chains are fitted to your vehicle's
tyres
R road conditions are wintry
R you are driving on sand or grave l
R you adopt a very sporty driving style (cor -
nering at high speeds or driving with high
rates of acceleration)
R you are towing a very heavy or large trailer
R you are driving with a heavy load (in th e
vehicle or on the roof)
Restarting the tyre pressure loss warn-
ing system* Restart the tyre pressure loss warning sys-
tem* if you have
:
R changed the tyre pressure
R changed the wheels or tyre s
R fitted new wheels or tyres
X Before restarting, consult the table of tyre
pressures on the inside of the fuel filler fla pto ensure that the tyre pressure in all fou
r
tyres is set correctly for the operating con-
ditions concerned .
X Also observe the notes in the section on
tyre pressures (Y page 213). G
Risk of accident
The tyre pressure loss warning system* can
only give reliable warnings if you have set
the correct tyre pressure.
If an incorrect tyre pressure is set, thes e
incorrect values will be monitored.
A tyre with insufficient pressure results in
an instability of the vehicle when driving,
thus increasing the risk of an accident .
Configuring with the multi-function steer-
ing wheel
X Make sure that the key is in position 2in
the ignition lock .
X Press èto select Tyre pressure
menu: R.
X Press the íbutton.
The following appears in the multi-function
display: RFI active Reactivate: ROperation
* optional
204_AKB; 2; 3, en-GB
mkalafa,
2007-06-26T23:11:51+02:00 - Seite 214
Page 218 of 377
Tyres and wheels
21
5
X
Press the íbutton.
The following appears in the multi-function
display: Tyre press. OK?
Yes+ Cancel -
To confirm the restart of the tyre pressure
loss warning system:
X Press the +button.
The following appears in the multi-function
display: Run Flat Indicator restar -
ted.
After a teach-in period, the tyre pressure
loss warning system* will monitor the set
tyre pressures of all four tyres.
or
To cancel the restart of the tyre pressure
loss warning system:
X Press the -button.
The previous settings will not be changed.
Configuring with the luxury multi-func-
tion steering wheel*
X Make sure that the key is in position 2in
the ignition lock .
X Press (or& to select the Service
menu. X
Press $or% to select Tyre pres-
sur e.
X Press #.
The following appears in the multi-function
display: Run Flat Indicator active
Restart with OK
X Press #.
The following appears in the multi-function
display: Tyre press. now OK?
To confirm the restart of the tyre pressur e
loss warning system:
X Press $or% to select Yes.
X Press #.
The following appears in the multi-function
display: Run Flat Indicator restarted
After a teach-in period, the tyre pressure
loss warning system* will monitor the set
tyre pressures of all four tyres.
or
To cancel the restart of the tyre pressur e
loss warning system:
X Press $or% to select Cancel.
X Press #.
The previous settings will not be changed. Interchanging the wheels
G
Risk of accident
Interchange the front and rear wheels only
if they have the same dimensions, for exam-
ple size, offset, etc.
After every wheel interchange/change,
have the tightening torque checked at a
qualified specialist workshop that has the
necessary specialist knowledge and tools
to carry out the work required. Mercedes-
Benz recommends that you use a
Mercedes-Benz Service Centre for this pur-
pose. In particular, work relevant to safety
or on safety-related systems must be car-
ried out at a qualified specialist workshop.
The wheels could work loose if they are not
tightened to a tightening torque of
130 Nm.
For safety reasons, Mercedes-Benz recom -
mends that you only use wheel bolts of the
correct size which have been approved for
Mercedes-Benz vehicles.
The wheels may be interchanged every 5,000
km to 10,000 km depending on the degree of
tyre wear, provided that the vehicle has the
same size front and rear tyres. Do not reverse
the direction of tyre rotation. Operation
* optiona l
204_AKB; 2; 3, en-GB
mkalafa,
2007-06-26T23:11:51+02:00 - Seite 215 Z