2007 MERCEDES-BENZ C-CLASS ESTATE warning
[x] Cancel search: warningPage 296 of 377
Troubleshooting
29
3 Parktronic*
Problem Possible cause/consequence Suggested solutions
Only the red segments in the
Parktronic warning display are lit.
You also hear a warning tone for
approximately two seconds.
Parktronic is deactivated after
approximately 20 seconds and
the indicator lamp in the Park-
tronic button lights up. Parktronic has malfunctioned
and has switched itself off. X
If problems persist, have Parktronic checked at a qualified spe-
cialist workshop. Only the red segments in the
Parktronic warning display are lit.
Parktronic is deactivated after
approximately 20 seconds. The Parktronic sensors are dirty
or there is interference. X
Clean the Parktronic sensors (Y page 230).
X Switch the ignition back on. Only the red segments in the
Parktronic warning display are lit.
Parktronic is deactivated afte
r
approximately 20 seconds. The problem may be caused by an
external source of radio or ultra-
sound waves
. X
See if Parktronic functions in a different location. Practical advice
* optiona l
204_AKB; 2; 3, en-GB
mkalafa,
2007-06-26T23:11:51+02:00 - Seite 293
Page 316 of 377
Flat tyre
313Rear window wiper blade (Estate)
Removin g G
Risk of injury
The wiper arm could be set in motion and
injure you if the windscreen wipers are
switched on.
Remove the key from the ignition lock
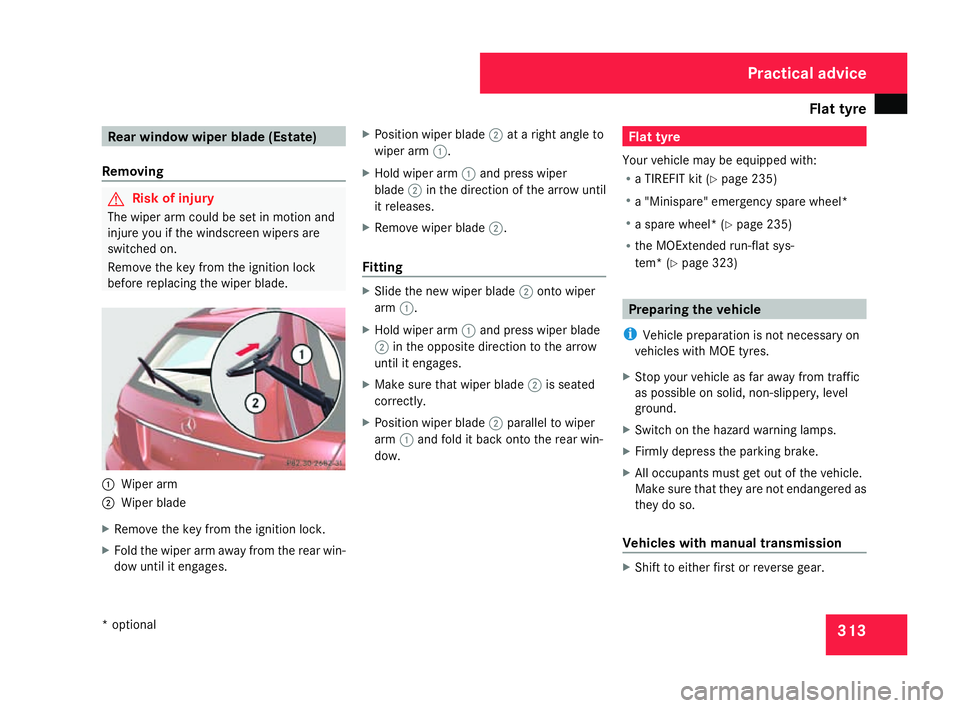
before replacing the wiper blade. 1
Wiper arm
2 Wiper blade
X Remove the key from the ignition lock.
X Fold the wiper arm away from the rear win-
dow until it engages . X
Position wiper blade 2at a right angle to
wiper arm 1.
X Hold wiper arm 1and press wiper
blade 2in the direction of the arrow until
it releases .
X Remove wiper blade 2.
Fitting X
Slide the new wiper blade 2onto wiper
arm 1.
X Hold wiper arm 1and press wiper blade
2 in the opposite direction to the arrow
until it engages.
X Make sure that wiper blade 2is seated
correctly.
X Position wiper blade 2parallel to wiper
arm 1and fold it back onto the rear win-
dow. Flat tyre
Your vehicle may be equipped with:
R a TIREFIT kit (Y page 235 )
R a "Minispare" emergency spare wheel*
R a spare wheel* (Y page 235 )
R the MOExtended run-flat sys-
tem* (Y page 323 ) Preparing the vehicle
i Vehicle preparation is not necessary on
vehicles with MOE tyres.
X Stop your vehicle as far away from traffic
as possible on solid, non-slippery, level
ground .
X Switch on the hazard warning lamps .
X Firmly depress the parking brake.
X All occupants must get out of the vehicle.
Make sure that they are not endangered as
they do so.
Vehicles with manual transmission X
Shift to either first or reverse gear. Practical advice
* optiona l
204_AKB; 2; 3, en-GB
mkalafa,
2007-06-26T23:11:51+02:00 - Seite 313
Page 317 of 377
Flat tyre
314
Vehicles with automatic transmission
*X
Move the selector lever to P.
For all vehicles X
Place the warning triangle (Y page 232) or
warning lamps at a suitable distance.
Observe legal requirements. G
Risk of injury
The jack is designed only to raise and hol d
the vehicle for a short time while a whee l
is being changed.
If you are carrying out work on the vehicle,
you must use stands.
Make sure that the jack is placed on a firm ,
non-slip and level surface. Do not us e
wooden blocks or similar objects as a jac k
underlay. Otherwise the jack will not be
able to achieve its load-bearing capacit y
due to the restricted height.
Do not start the engine at any time while a
wheel is being changed.
Do not lie under the vehicle when it is bein g
supported by the jack. If you do not raise
the vehicle as described, it could slip off the
jack (e.g. if the engine is started or a door or the boot lid/tailgate is opened or closed)
and you could be seriously injured. Using the TIREFIT kit
You can use the TIREFIT kit to seal small
punctures, particularly those in the tyre tread.
You can use TIREFIT in outdoor temperatures
down to -20 °C. G
Risk of accident
In the following situations, your safety is at
particular risk and TIREFIT is unable to pro -
vide breakdown assistance:
R if there are cuts or punctures in the tyre
greater than 4 mm
R if the wheel rim is damaged
R if you have driven at very low tyre pres-
sures or on a flat tyre
Do not drive any further. Consult a qualified
specialist workshop which has the neces-
sary specialist knowledge and tools to carr y
out the work required.
Mercedes-Benz recommends that you use
a Mercedes-Benz Service Centre for this
purpose. In particular, work relevant to
safety or on safety-related systems must be carried out at a qualified specialist work-
shop.
X Do not remove any foreign objects which
have penetrated the tyre, e.g. screws or
nails .
X Remove TIREFIT, the accompanying "max .
80 km/h“ and the electric air pump from
the stowage compartment in the boot floo r
(Saloon) or the luggage compartment floor
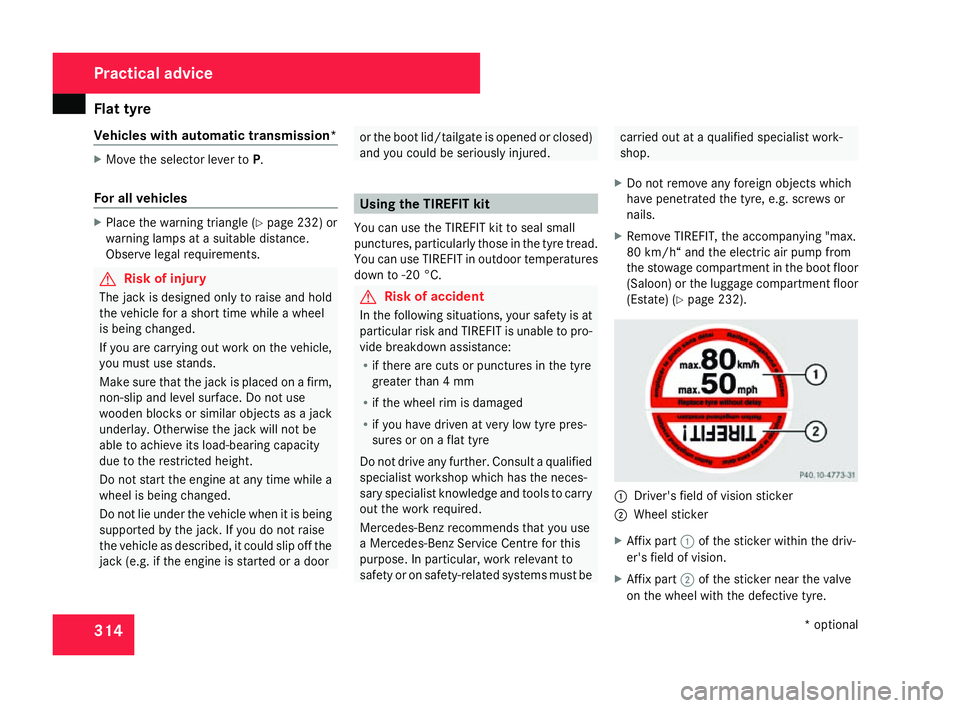
(Estate) (Y page 232). 1
Driver's field of vision sticker
2 Wheel sticker
X Affix part 1of the sticker within the driv-
er's field of vision.
X Affix part 2of the sticker near the valve
on the wheel with the defective tyre. Practical advice
* optional
204_AKB; 2; 3, en-GB
mkalafa,
2007-06-26T23:11:51+02:00 - Seite 314
Page 319 of 377
Flat tyre
316
X
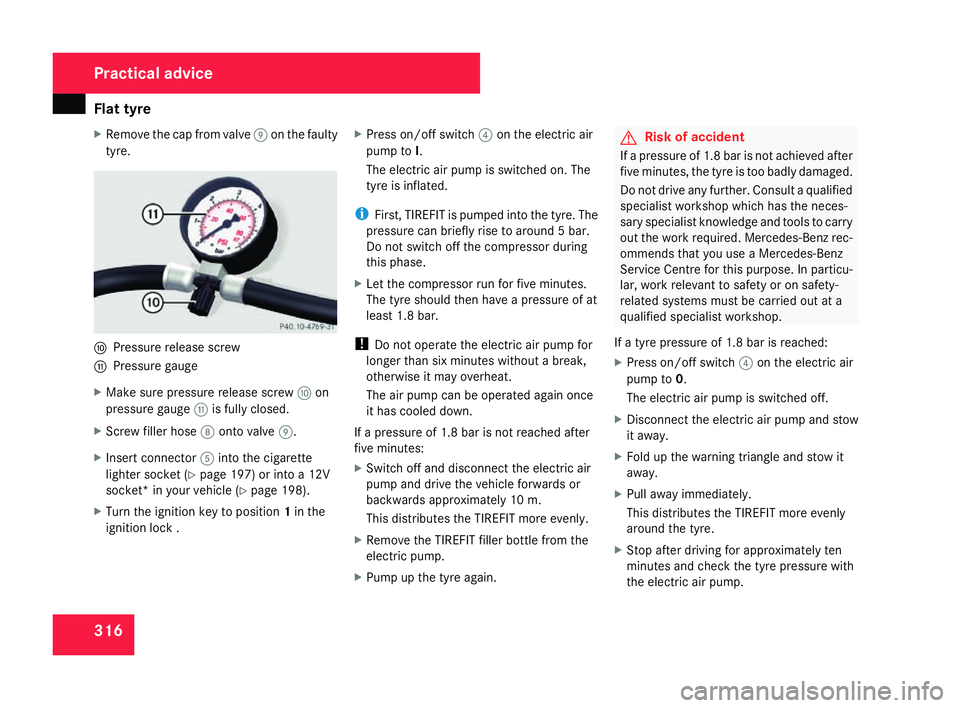
Remove the cap from valve 9on the faulty
tyre. a
Pressure release screw
b Pressure gauge
X Make sure pressure release screw aon
pressure gauge bis fully closed.
X Screw filler hose 8onto valve 9.
X Insert connector 5into the cigarett e
lighter socket (Y page 197) or into a 12V
socket* in your vehicle (Y page 198).
X Turn the ignition key to position 1in the
ignition lock . X
Press on/off switch 4on the electric air
pump to I.
The electric air pump is switched on. The
tyre is inflated.
i First, TIREFIT is pumped into the tyre. The
pressure can briefly rise to around 5 bar.
Do not switch off the compressor during
this phase.
X Let the compressor run for five minutes.
The tyre should then have a pressure of at
least 1.8 bar.
! Do not operate the electric air pump for
longer than six minutes without a break,
otherwise it may overheat.
The air pump can be operated again once
it has cooled down.
If a pressure of 1.8 bar is not reached after
five minutes:
X Switch off and disconnect the electric ai r
pump and drive the vehicle forwards or
backwards approximately 10 m.
This distributes the TIREFIT more evenly.
X Remove the TIREFIT filler bottle from th e
electric pump.
X Pump up the tyre again. G
Risk of accident
If a pressure of 1.8 bar is not achieved afte r
five minutes, the tyre is too badly damaged.
Do not drive any further. Consult a qualified
specialist workshop which has the neces-
sary specialist knowledge and tools to carry
out the work required. Mercedes-Benz rec-
ommends that you use a Mercedes-Benz
Service Centre for this purpose. In particu-
lar, work relevant to safety or on safety-
related systems must be carried out at a
qualified specialist workshop.
If a tyre pressure of 1.8 bar is reached:
X Press on/off switch 4on the electric air
pump to 0.
The electric air pump is switched off.
X Disconnect the electric air pump and stow
it away .
X Fold up the warning triangle and stow it
away .
X Pull away immediately.
This distributes the TIREFIT more evenly
around the tyre.
X Stop after driving for approximately ten
minutes and check the tyre pressure with
the electric air pump. Practical advice
204_AKB; 2; 3, en-G
B
mkalafa , 2007-06-26T23:11:51+02:00 - Seite 316
Page 321 of 377
Flat tyre
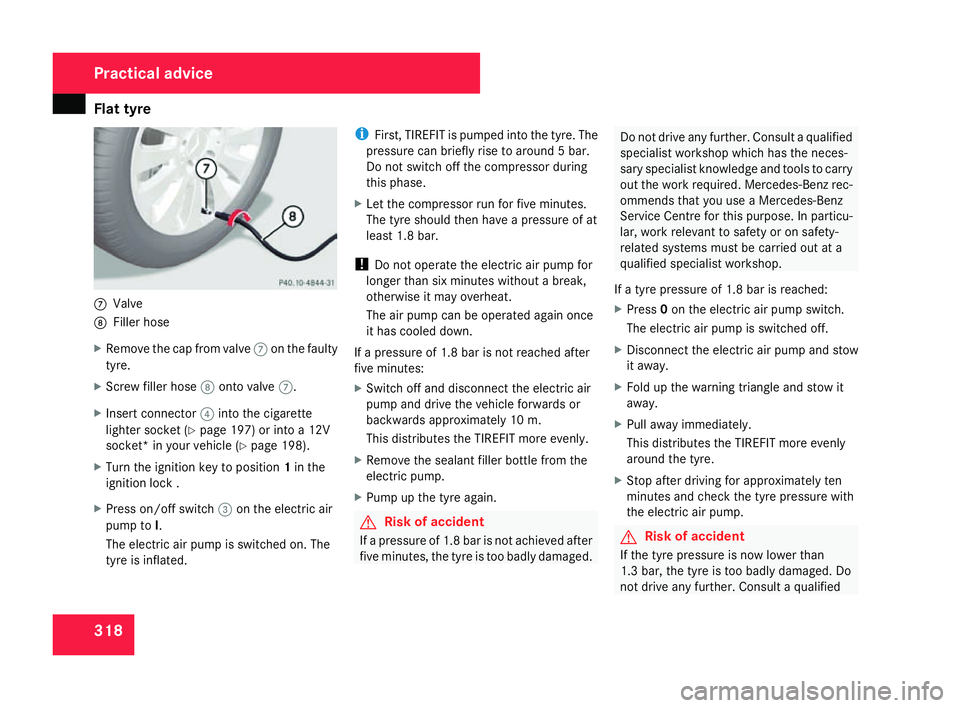
3187
Valve
8 Filler hos e
X Remove the cap from valve 7on the faulty
tyre.
X Screw filler hose 8onto valve 7.
X Insert connector 4into the cigarett e
lighter socket (Y page 197) or into a 12V
socket* in your vehicle (Y page 198).
X Turn the ignition key to position 1in the
ignition lock .
X Press on/off switch 3on the electric air
pump to I.
The electric air pump is switched on. The
tyre is inflated. i
First, TIREFIT is pumped into the tyre. The
pressure can briefly rise to around 5 bar.
Do not switch off the compressor during
this phase.
X Let the compressor run for five minutes.
The tyre should then have a pressure of at
least 1.8 bar.
! Do not operate the electric air pump for
longer than six minutes without a break,
otherwise it may overheat.
The air pump can be operated again once
it has cooled down.
If a pressure of 1.8 bar is not reached after
five minutes:
X Switch off and disconnect the electric ai r
pump and drive the vehicle forwards or
backwards approximately 10 m.
This distributes the TIREFIT more evenly.
X Remove the sealant filler bottle from th e
electric pump.
X Pump up the tyre again. G
Risk of accident
If a pressure of 1.8 bar is not achieved afte r
five minutes, the tyre is too badly damaged. Do not drive any further. Consult a qualified
specialist workshop which has the neces-
sary specialist knowledge and tools to carry
out the work required. Mercedes-Benz rec-
ommends that you use a Mercedes-Benz
Service Centre for this purpose. In particu-
lar, work relevant to safety or on safety-
related systems must be carried out at
a
qualified specialist workshop.
If a tyre pressure of 1.8 bar is reached:
X Press 0on the electric air pump switch.
The electric air pump is switched off.
X Disconnect the electric air pump and stow
it away .
X Fold up the warning triangle and stow it
away .
X Pull away immediately.
This distributes the TIREFIT more evenly
around the tyre.
X Stop after driving for approximately ten
minutes and check the tyre pressure with
the electric air pump. G
Risk of accident
If the tyre pressure is now lower than
1.3 bar, the tyre is too badly damaged. Do
not drive any further. Consult a qualified Practical advice
204_AKB; 2; 3, en-G
B
mkalafa , 2007-06-26T23:11:51+02:00 - Seite 318
Page 326 of 377
Flat tyre
323
X
Turn the jack back to its initial position and
store it and the rest of the vehicle tool kit
in the boot/luggage compartment.
Vehicles with the "Minispare" emergency
spare wheel*:
X Transport the faulty wheel in the boot/lug-
gage compartment.
or
X Depending on the size of the wheel, yo u
may also be able to secure the faulty whee l
in the spare wheel well. In this case, you
will have to remove the stowage well casin g
from the spare wheel well and stow it
securely in the boot/luggage compart-
ment. MOExtended run-flat system*
The MOExtended run-flat system* must only
be used in conjunction with the tyre pressure
loss warning system*.
! The maximum permissible distance which
can be driven in run-flat mode depends on
the load in the vehicle. It is 50 km if the
vehicle is partially laden and 30 km if fully
laden. The maximum permissible distance which
can be driven in run-flat mode is counted
from the moment the tyre pressure loss
warning appears in the multi-function dis-
play.
You must not exceed a maximum speed of
80 km/h.
i Vehicles featuring the MOExtended run-
flat system* are not equipped with the
TIREFIT kit*.
It is therefore recommended to additionally
equip your vehicle with the TIREFIT kit*
when fitting tyres that do not feature run-
flat properties, e.g. winter tyres.
i A TIREFIT kit* is available from any quali-
fied specialist workshop, e.g. a Mercedes-
Benz Service Centre. G
Risk of accident
The handling characteristics of your vehicl e
deteriorate in run-flat mode, for example:
R when cornering
R when braking
R when accelerating rapidly
Adapt your driving style accordingly and
avoid sudden changes in direction and sud- den acceleration, as well as driving over
obstacles (i.e. kerbs, potholes), and driving
off-road. This is particularly the case when
the vehicle is heavily laden .
The maximum permissible distance that
can be driven in run-flat mode depends to
a large extent on the loads placed on the
vehicle. It can be shorter due to high
speeds, a heavy load, sudden acceleration
and/or manoeuvring, the road surface con-
dition, outside temperature, etc., or further
if you drive carefully and conservatively.
Do not continue to drive in run-flat mode if:
R you hear banging noises
R the vehicle starts to shake
R you see smoke and smell rubber
R ESP ®
is intervening constantly
R there are tears in the sidewalls of the tyr e
After driving in run-flat mode, you must
have the rims checked for damage at a
qualified specialist workshop which has the
necessary specialist knowledge and tools
to carry out the work required. The faulty
tyre must be replaced in every case.
Mercedes-Benz recommends that you use
a Mercedes-Benz Service Centre for this Practical advice
* optional
204_AKB; 2; 3, en-GB
mkalafa,
2007-06-26T23:11:51+02:00 - Seite 323 Z
Page 356 of 377
Tyres and wheels
35
3 MOExtended tyres*
All models except the Estate:
C 350 / C 320 CDI / C 320 CDI 4MATI
C Estate: C 350 / C 320 CDI
/
C 320 CDI 4MATIC Front axl
e Summer tyres
27 225/45 R17 91W MOExtended 225/45 R17 91Y MOExtended
Alloy wheels 7.5J x 17 H2 ET 47 7.5J x 17 H2 ET 47
Rear axle
Summer tyres
27,28 245/40 R17 91W MOExtended 245/40 R17 91Y MOExtended
Wheels 8.5J x 17 H2 ET 58 8.5J x 17 H2 ET 58
Both axles
Winter tyres
27,29 225/45 R17 91H M+S MOExtended 225/45 R17 91H M+S MOExtended
Alloy wheels 7.5J x 17 H2 ET 47 7.5J x 17 H2 ET 47
27
Tyres with run-flat characteristics only with tyre pressure loss warning system or tyre pressure monitor* activated.
28 Snow chains not permitted.
29 Winter tyres for retrofitting. Only certain tyre brands are approved. Ask your Mercedes-Benz Service Centre for more information . Techni
cal data
* optiona l
204_AKB; 2; 3, en-GB
mkalafa,
2007-06-26T23:11:51+02:00 - Seite 353