2007 MERCEDES-BENZ C-CLASS ESTATE warning
[x] Cancel search: warningPage 58 of 377
Occupant safet
y 55
Child seat on the front-passenger seat
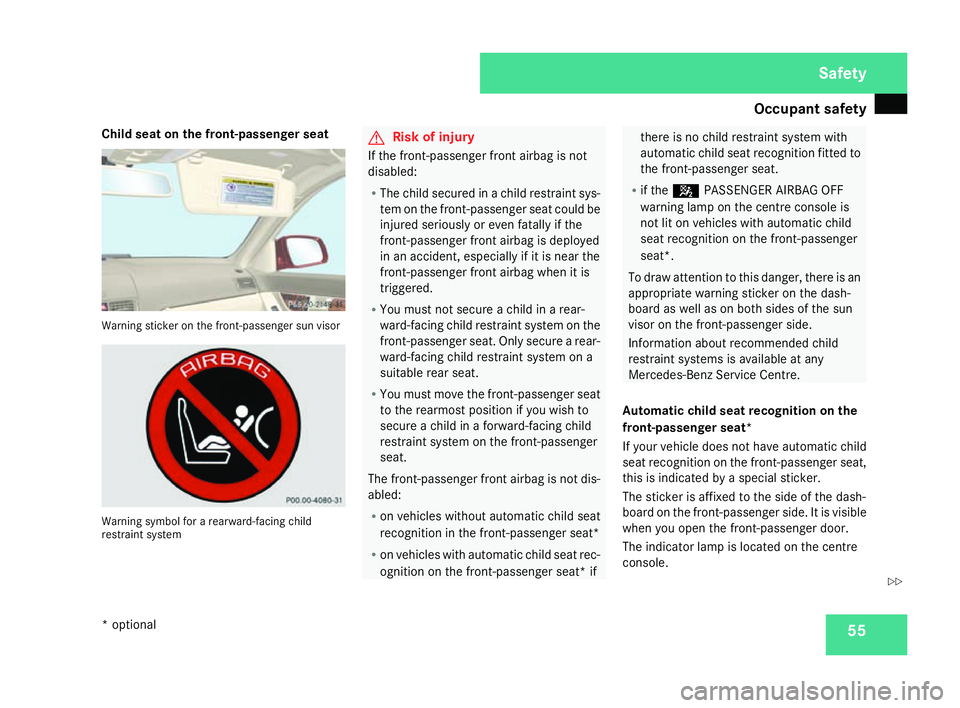
Warning sticker on the front-passenger sun visor
Warning symbol for a rearward-facing child
restraint system G
Risk of injury
If the front-passenger front airbag is not
disabled:
R The child secured in a child restraint sys-
tem on the front-passenger seat could be
injured seriously or even fatally if the
front-passenger front airbag is deployed
in an accident, especially if it is near the
front-passenger front airbag when it is
triggered.
R You must not secure a child in a rear-
ward-facing child restraint system on the
front-passenger seat. Only secure a rear-
ward-facing child restraint system on a
suitable rear seat.
R You must move the front-passenger seat
to the rearmost position if you wish to
secure a child in a forward-facing child
restraint system on the front-passenge r
seat.
The front-passenger front airbag is not dis-
abled:
R on vehicles without automatic child seat
recognition in the front-passenger seat*
R on vehicles with automatic child seat rec-
ognition on the front-passenger seat* if there is no child restraint system with
automatic child seat recognition fitted to
the front-passenger seat.
R if the 5 PASSENGER AIRBAG OFF
warning lamp on the centre console is
not lit on vehicles with automatic child
seat recognition on the front-passenger
seat*.
To draw attention to this danger, there is an
appropriate warning sticker on the dash-
board as well as on both sides of the sun
visor on the front-passenger side.
Information about recommended child
restraint systems is available at any
Mercedes-Benz Service Centre.
Automatic child seat recognition on the
front-passenger seat*
If your vehicle does not have automatic child
seat recognition on the front-passenger seat,
this is indicated by a special sticker.
The sticker is affixed to the side of the dash-
board on the front-passenger side. It is visible
when you open the front-passenger door.
The indicator lamp is located on the centre
console. Safety
* optional
204_AKB; 2; 3, en-GB
mkalafa,
2007-06-26T23:11:51+02:00 - Seite 55 Z
Page 59 of 377
Occupant safet
y561
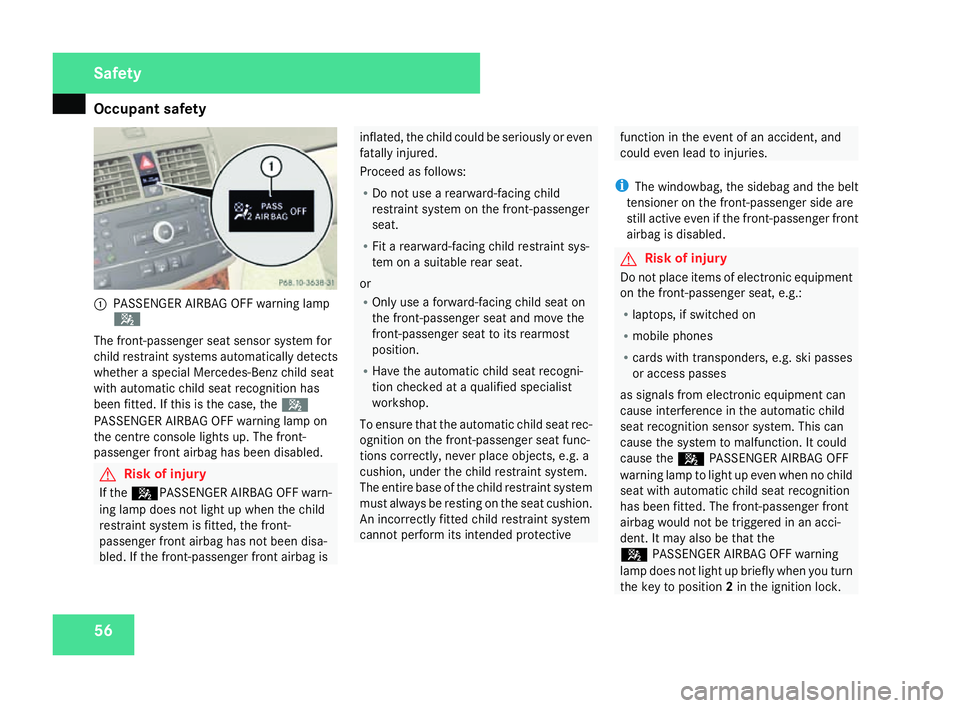
PASSENGER AIRBAG OFF warning lamp
5
The front-passenger seat sensor system for
child restraint systems automatically detect s
whether a special Mercedes-Benz child seat
with automatic child seat recognition has
been fitted. If this is the case, the 5
PASSENGER AIRBAG OFF warning lamp on
the centre console lights up. The front-
passenger front airbag has been disabled. G
Risk of injury
If the 5PASSENGER AIRBAG OFF warn-
ing lamp does not light up when the child
restraint system is fitted, the front-
passenger front airbag has not been disa-
bled. If the front-passenger front airbag is inflated, the child could be seriously or even
fatally injured.
Proceed as follows:
R
Do not use a rearward-facing child
restraint system on the front-passenge r
seat.
R Fit a rearward-facing child restraint sys-
tem on a suitable rear seat.
or
R Only use a forward-facing child seat on
the front-passenger seat and move the
front-passenger seat to its rearmost
position.
R Have the automatic child seat recogni-
tion checked at a qualified specialist
workshop .
To ensure that the automatic child seat rec-
ognition on the front-passenger seat func-
tions correctly, never place objects, e.g. a
cushion, under the child restraint system.
The entire base of the child restraint system
must always be resting on the seat cushion.
An incorrectly fitted child restraint system
cannot perform its intended protective function in the event of an accident, and
could even lead to injuries.
i The windowbag, the sidebag and the belt
tensioner on the front-passenger side are
still active even if the front-passenger front
airbag is disabled. G
Risk of injury
Do not place items of electronic equipment
on the front-passenger seat, e.g.:
R laptops, if switched on
R mobile phones
R cards with transponders, e.g. ski passe s
or access passes
as signals from electronic equipment can
cause interference in the automatic child
seat recognition sensor system. This can
cause the system to malfunction. It could
cause the 5PASSENGER AIRBAG OFF
warning lamp to light up even when no child
seat with automatic child seat recognition
has been fitted. The front-passenger front
airbag would not be triggered in an acci-
dent. It may also be that th e
5 PASSENGER AIRBAG OFF warning
lamp does not light up briefly when you turn
the key to position 2in the ignition lock .Safety
204_AKB; 2; 3, en-GB
mkalafa,
2007-06-26T23:11:51+02:00 - Seite 56
Page 71 of 377
Driving safety sys
tems68 G
Risk of accident
If ABS is faulty, the wheels could lock when
braking. This limits the steerability of the
vehicle when braking and the braking dis-
tance may increase.
If ABS is deactivated due to a malfunction,
then BAS and ESP are also deactivated. BAS (Brake Assist)
BAS operates in emergency braking situa-
tions. If you depress the brake pedal quickly,
BAS automatically boosts the braking force ,
thus shortening the stopping distance.
X Keep the brake pedal firmly depressed until
the emergency braking situation is over.
ABS prevents the wheels from locking.
The brakes will function as usual once you
release the brake pedal. BAS is deactivated. G
Risk of accident
If BAS has malfunctioned, the braking sys-
tem remains available with full brake boost-
ing effect. However, braking force is not
automatically increased in emergency
braking situations and the stopping dis-
tance may increase. Adaptive brake lamps
i Adaptive brake lamps are only available in
certain countries.
If you brake sharply from a speed of mor e
than 50 km/h or if braking is assisted by BAS,
the brake lamps flash rapidly. In this way,
traffic travelling behind you is warned in an
even more noticeable manner .
If you brake from a speed of more than
70 km/h and bring the vehicle to a halt, the
hazard warning lamps switch on automati-
cally once the vehicle is stationary and the
brake lamps light up constantly if you depres s
the brake pedal again. The hazard warning
lamps switch off automatically if you travel
faster than 10 km/h again. ES
P®
(Electronic Stability Program)
ES P®
monitors driving stability and traction,
i.e. power transmission between the tyres
and the road surface.
If ESP ®
detects that the vehicle is deviatin g
from the direction desired by the driver, one
or more wheels are braked to stabilise the
vehicle. The engine output is also modified, if
necessary, to keep the vehicle on the desired
course within the laws of physics. ESP assists
the driver when pulling away on wet or slip-
pery roads. ESP ®
can also stabilise the vehi-
cle during braking.
When ESP ®
intervenes, the vwarning
lamp flashes in the instrument cluster. G
Risk of accident
If the v warning lamp in the instrumen t
cluster flashes, proceed as follows:
R Do not deactivate ESP ®
under any cir -
cumstances .
R Only depress the accelerator pedal as far
as necessary when pulling away.
R Adapt your driving style to suit the pre -
vailing road and weather conditions.
The vehicle could otherwise go into a skid. Safety
204_AKB; 2; 3, en-GB
mkalafa,
2007-06-26T23:11:51+02:00 - Seite 68
Page 73 of 377
Anti-theft syste
ms70
i
If ESP ®
is deactivated and one or mor e
wheels start to spin, the vwarning lamp
in the instrument cluster flashes. ES P®
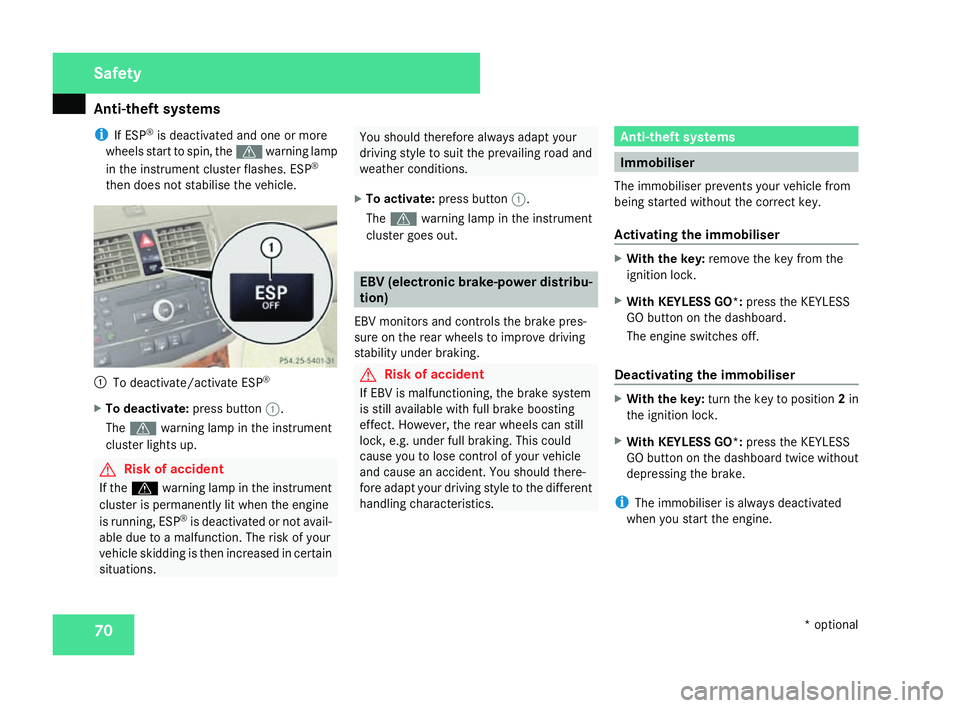
then does not stabilise the vehicle. 1
To deactivate/activate ESP ®
X To deactivate :press button 1.
The v warning lamp in the instrumen t
cluster lights up . G
Risk of accident
If the v warning lamp in the instrumen t
cluster is permanently lit when the engine
is running, ESP ®
is deactivated or not avail-
able due to a malfunction. The risk of your
vehicle skidding is then increased in certain
situations. You should therefore always adapt your
driving style to suit the prevailing road and
weather conditions.
X To activate :press button 1.
The v warning lamp in the instrumen t
cluster goes out. EBV (electronic brake-power distribu-
tion)
EBV monitors and controls the brake pres-
sure on the rear wheels to improve driving
stability under braking. G
Risk of accident
If EBV is malfunctioning, the brake system
is still available with full brake boosting
effect. However, the rear wheels can stil l
lock, e.g. under full braking. This could
cause you to lose control of your vehicle
and cause an accident. You should there-
fore adapt your driving style to the differen t
handling characteristics. Anti-theft systems
Immobiliser
The immobiliser prevents your vehicle from
being started without the correct key.
Activating the immobiliser X
With the key: remove the key from the
ignition lock.
X With KEYLESS GO*: press the KEYLESS
GO button on the dashboard.
The engine switches off.
Deactivating the immobiliser X
With the key: turn the key to position 2in
the ignition lock .
X With KEYLESS GO*: press the KEYLESS
GO button on the dashboard twice without
depressing the brake.
i The immobiliser is always deactivated
when you start the engine. Safety
* optional
204_AKB; 2; 3, en-GB
mkalafa,
2007-06-26T23:11:51+02:00 - Seite 70
Page 103 of 377
Seat belts
100
X
Click belt tongue 2into buckle3 .
X If necessary, adjust the belt to the appro-
priate height (Y page 100).
X If necessary, pull upwards on the shoulder
section of the belt to tighten the belt across
your body.
Routing the belt X
Press release button 4and guide belt
tongue 2back towards belt sash guide
1 . Belt warning for driver and fron
t
passenge r
The < seat belt warning lamp in the instru-
ment cluster reminds you that all occupants
should fasten their seat belts. The
or it may flash. Additionally there may be a
warning tone.
The < seat belt warning lamp goes out and
the warning tone ceases when the driver and
the front passenger have fastened their seat
belt.
For certain countries only: independent of
whether the driver or the front passenger are already secured, the
has been started. The
front passenger have fastened their seat belt.
i Further information about the
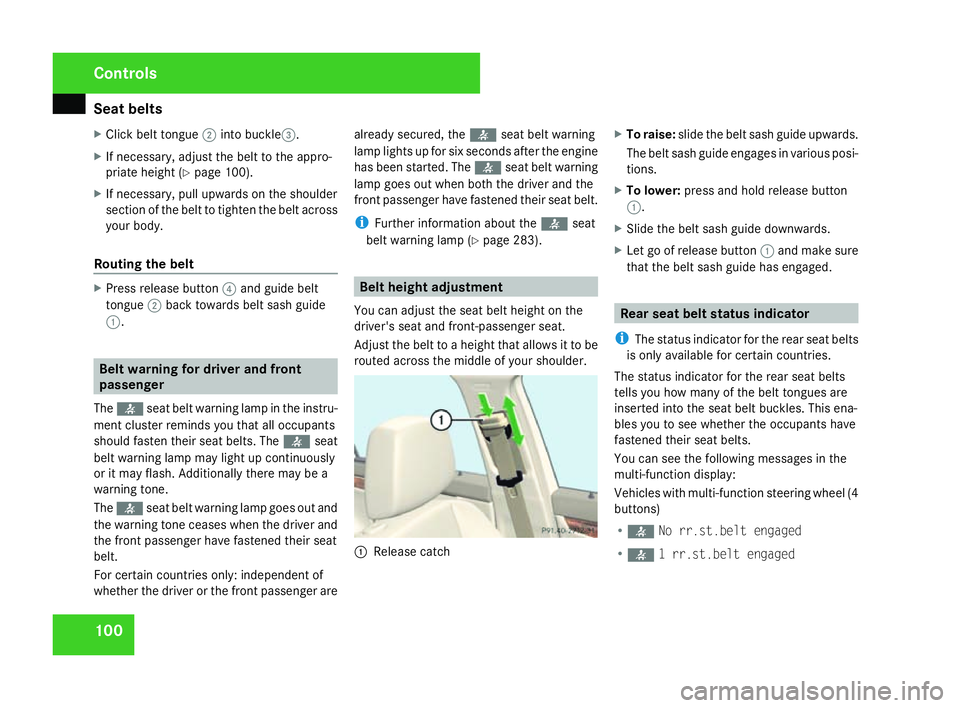
You can adjust the seat belt height on the
driver's seat and front-passenger seat.
Adjust the belt to a height that allows it to be
routed across the middle of your shoulder. 1
Release catch X
To raise: slide the belt sash guide upwards .
The belt sash guide engages in various posi-
tions.
X To lower: press and hold release button
1 .
X Slide the belt sash guide downwards .
X Let go of release button 1and make sure
that the belt sash guide has engaged . Rear seat belt status indicator
i The status indicator for the rear seat belts
is only available for certain countries.
The status indicator for the rear seat belts
tells you how many of the belt tongues are
inserted into the seat belt buckles. This ena-
bles you to see whether the occupants have
fastened their seat belts.
You can see the following messages in the
multi-function display :
Vehicles with multi-function steering wheel (4
buttons)
R < No rr.st.belt engaged
R < 1 rr.st.belt engaged Controls
204_AKB; 2; 3, en-GB
mkalafa,
2007-06-26T23:11:51+02:00 - Seite 100
Page 108 of 377
Light
s 105
Headlamp flasher
X
To switch on: briefly pull the combinatio n
switch in the direction of arrow 2. Hazard warning lamps
1
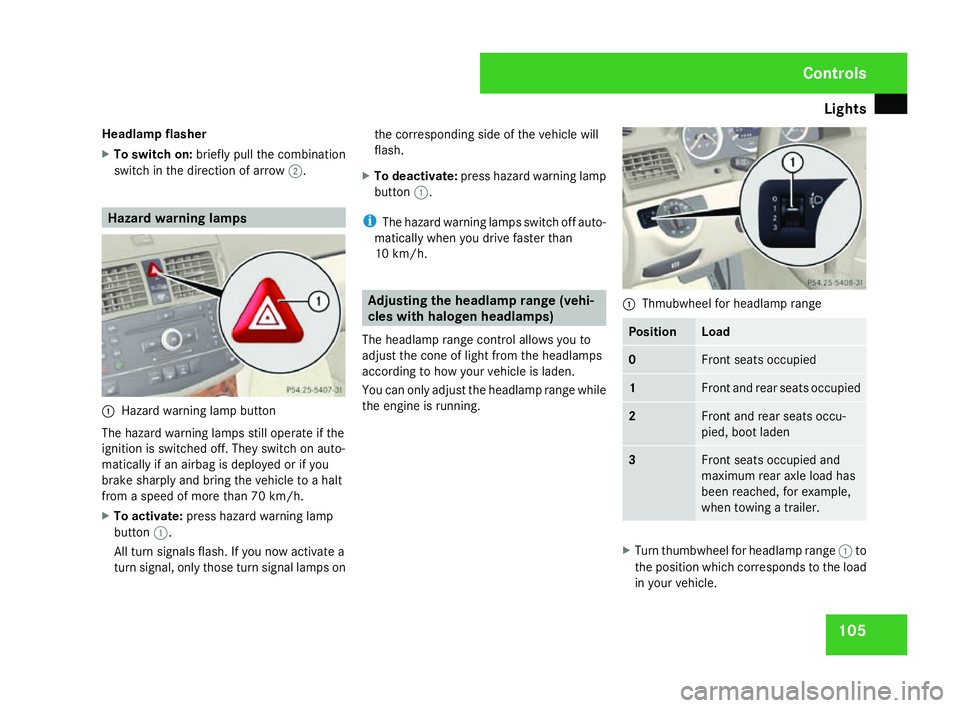
Hazard warning lamp button
The hazard warning lamps still operate if the
ignition is switched off. They switch on auto-
matically if an airbag is deployed or if yo u
brake sharply and bring the vehicle to a halt
from a speed of more than 70 km/h.
X To activate :press hazard warning lamp
button 1.
All turn signals flash. If you now activate a
turn signal, only those turn signal lamps on the corresponding side of the vehicle will
flash.
X To deactivate :press hazard warning lamp
button 1.
i The hazard warning lamps switch off auto-
matically when you drive faster than
10 km/h. Adjusting the headlamp range (vehi-
cles with halogen headlamps)
The headlamp range control allows you to
adjust the cone of light from the headlamps
according to how your vehicle is laden.
You can only adjust the headlamp range while
the engine is running. 1
Thmubwheel for headlamp range Position Load
0 Front seats occupied
1 Front and rear seats occupied
2 Front and rear seats occu
-
pied, boot laden 3 Front seats occupied and
maximum rear axle load ha s
been reached, for example,
when towing a trailer. X
Turn thumbwheel for headlamp range 1to
the position which corresponds to the load
in your vehicle. Controls
204_AKB; 2; 3, en-G
B
mkalafa , 2007-06-26T23:11:51+02:00 - Seite 105
Page 126 of 377

Instrument cluste
r 123Instrument cluster
You will find an illustration of the instrumen t
cluster in the "At a glance" section
( Y page 28). G
Risk of accident
No messages can be displayed if instru -
ment cluster and/or the multi-function dis-
play fail .
This means that you will not see information
about the driving situation, such as the
speed, outside temperature, warning/indi-
cator lamps, display messages or system
failures. The vehicle's handling character-
istics may be affected. Adjust your driving
style and speed accordingly.
Immediately consult a qualified specialist
workshop which has the necessary special-
ist knowledge and tools to carry out the
work required. Mercedes-Benz recom-
mends that you use a Mercedes-Benz
Service Centre for this purpose. In particu-
lar, work relevant to safety or on safety-
related systems must be carried out at a
qualified specialist workshop. Activating the multi-function displa
y
X Switch on the ignition.
The multi-function display is also activate d
when you switch on the lights or open th e
driver's door. Adjusting the instrument cluster
lighting
1
Brightness control
X Brighter or dimmer: turn clockwise or
anti-clockwise. Coolant temperature gaug
e
The coolant temperature gauge is in the
instrument cluster on the left-hand side. The
coolant temperature may rise to 120 †under
normal operating conditions and if the con-
centration of antifreeze/corrosion inhibitor is
correct. The coolant temperature may rise to
the top end of the scale at high outside tem-
peratures and on long uphill stretches. Resetting the trip meter
Vehicles with a 4-button multi-function
steering wheel: you can reset the trip meter
in the standard displa ymenu
( Y page 128).
Vehicles with a 12-button luxury multi-
function steering wheel* :you can find th e
"Reset values" function in the Tripmenu in
the on-board computer (Y page 135). Controls
* optional
204_AKB; 2; 3, en-GB
mkalafa,
2007-06-26T23:11:51+02:00 - Seite 123
Page 131 of 377
On-board computer (vehicles with multi-function steering wheel, 4 buttons)
128 Function
1 Standard display
(Y page 128 )
Shows the standard display or resets
the trip mete r 2 Trip computer
(Y page 128 )
Shows the trip computer from the
start of the journey or resets it 3 Rang
e 4 Digital speedomete
r5 Message memory
(Y page 128 ) 6 Service
(Y page 226 )
Calls up the service due dat e7 Tyre pressure loss warning sys
-
tem * 8 Time/date
(Y page 129 ) The number of menus shown depends on the
optional equipment in the vehicle.
Use the buttons on the multi-function steer-
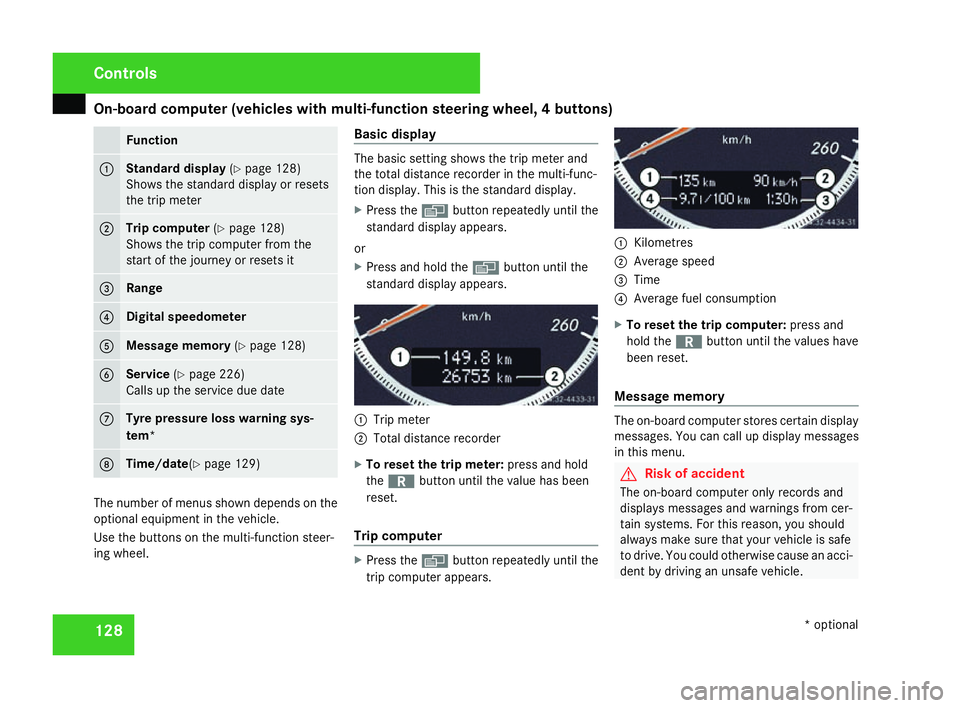
ing wheel. Basic display The basic setting shows the trip meter and
the total distance recorder in the multi-func-
tion display. This is the standard display .
X Press the èbutton repeatedly until the
standard display appears.
or
X Press and hold the èbutton until the
standard display appears. 1
Trip meter
2 Total distance recorder
X To reset the trip meter: press and hold
the í button until the value has been
reset .
Trip compute r X
Press the èbutton repeatedly until the
trip computer appears. 1
Kilometres
2 Average spee d
3 Time
4 Average fuel consumption
X To reset the trip computer: press and
hold the íbutton until the values have
been reset .
Message memory The on-board computer stores certain display
messages. You can call up display messages
in this menu. G
Risk of accident
The on-board computer only records and
displays messages and warnings from cer-
tain systems. For this reason, you shoul d
always make sure that your vehicle is safe
to drive. You could otherwise cause an acci-
dent by driving an unsafe vehicle .Cont
rols
* optional
204_AKB; 2; 3, en-GB
mkalafa,
2007-06-26T23:11:51+02:00 - Seite 128